
I just read this whole thread and it has been a really interesting build. Excellent work on the body.
I hope you can get the crank sensor and any other problems sorted out soon.
Project 240
-
youngmoney

- Posts: 377
- Joined: Thu Dec 03, 2009 8:58 am
- Car: 93 240sx SE
Re: Project 240
gnarly thread. before primering your car what grit of sand paper would you recommend to scuff the paint up? what about after its primered and your ready to paint? anyway if you put as much time/effort into other parts of you car its going to be bad a**. keep up the good work.
Re: Project 240
Car should be fixed by sometime early next week...although I don't want to wait that long lol. I also didn't realize how expensive those were to replace...Otto MCR wrote: I hope you can get the crank sensor and any other problems sorted out soon.
Well, I dunno if I would recommend something, but, I'll tell ya what I usually do...youngmoney wrote:gnarly thread. before primering your car what grit of sand paper would you recommend to scuff the paint up? what about after its primered and your ready to paint?
It kind of depends on what Im doing exactly but, in a nutshell i guess, whatever area Im about to prime, I sand it with 280 grit , then after it's primered, I sand the area with 320 (or 400) then wet 600.

Re: Project 240
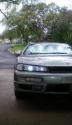
Really would like to see your body work in person sometime... looks to be quite the car as it sits now
-
youngmoney
- Posts: 377
- Joined: Thu Dec 03, 2009 8:58 am
- Car: 93 240sx SE
Re: Project 240
i was using 100 to scuff the paint eep. thanks!
Re: Project 240
LOL...
Well, even though you were using 100, just make sure you go over the area you used 100 on with a finer grit (I think 280 should be fine) to knock down those 100 grit scratches.
Sanding the paint with a grit that is that coarse (or agressive, however you look at it) and then priming over it won't exactly have the best results...those scratches willshow up in the primer pretty easily. Good luck though.
Other than that, Im still waiting for my car to be fixed...
Last edited by S13_love on Sun Jul 11, 2010 7:23 pm, edited 1 time in total.
Re: Project 240
Woohoo! 
I finally got my car back today, and no more start up issues! Anyways, I got the whole distributor replaced (except the cap and rotor), as well as the O2 sensor. Add that to the fuel pump that I bought...almost $500 just in parts was spent to get it running right again.
Now that im broke, I guess it's back to eating ramen noodles for the next few weeks.
Re: Project 240
I think it's time for another update of where things are at.
Not much else has happened except earlier this week, I managed to pick these up:

Remanufactured, fully loaded, etc. I'm pretty excited I got these.
The front rotors I ordered (stock z32 ones) won't be in until next Wednesday... but I did get new rear rotors (stock as well) today. Long story short, it was time for those to be replaced anyways.

Other than that, this summer, Im going to try to get the interior finished too. First off, Im trying to convert it to an all black interior (I really didn't like that brown colored interior anyways). Managed to pick up door panels for cheap, still trying to hunt down a good dash.

They're really dirty in that pic, but I already cleaned them up and they look a lot better.
Also, I was really bored today so I just went ahead and got the calipers ready for paint.


Then onto spraying the silver color as a basecoat.

I didn't want to paint these with them lying on the ground, so I hung them. Although I really couldn't find anything to really hang them from, so I just used a bunch of storage bins, an unused picnic table, and a ladder to hang them on LOL.
Not much else has happened except earlier this week, I managed to pick these up:
Remanufactured, fully loaded, etc. I'm pretty excited I got these.
The front rotors I ordered (stock z32 ones) won't be in until next Wednesday... but I did get new rear rotors (stock as well) today. Long story short, it was time for those to be replaced anyways.
Other than that, this summer, Im going to try to get the interior finished too. First off, Im trying to convert it to an all black interior (I really didn't like that brown colored interior anyways). Managed to pick up door panels for cheap, still trying to hunt down a good dash.
They're really dirty in that pic, but I already cleaned them up and they look a lot better.
Also, I was really bored today so I just went ahead and got the calipers ready for paint.
Then onto spraying the silver color as a basecoat.
I didn't want to paint these with them lying on the ground, so I hung them. Although I really couldn't find anything to really hang them from, so I just used a bunch of storage bins, an unused picnic table, and a ladder to hang them on LOL.
Re: Project 240
Calipers didn't turn out too bad, could have been better imo. Masking the Nissan lettering was a p.i.t.a.
Results...


I also forgot to mention that I ordered the conversion lines from PDM racing...and I have honestly no idea when those are coming in. I can't imagine it'll take too long though.
Results...
I also forgot to mention that I ordered the conversion lines from PDM racing...and I have honestly no idea when those are coming in. I can't imagine it'll take too long though.
Re: Project 240
Woohoo! Picked up the front rotors today!

Now, I am gonna get these redrilled for 4-lug but...

This rotor has those 2 little random holes there (not too sure why the other one doesn't have them )...is this gonna be a problem for when it gets redrilled? I honestly think it shouldn't really matter but I could be wrong.
The OEM Z32 1" BMC that I ordered earlier this week has yet to ship, I feel im gonna be waiting a while for that.
As for the conversion lines...according to the tracking thing, they were in a place called Burnaby (near Vancouver) on June 25th, but the tracking info hasn't been updated since then...so I don't know if they are still there or not. It kind of bugs me when something like this happens.
Now, I am gonna get these redrilled for 4-lug but...
This rotor has those 2 little random holes there (not too sure why the other one doesn't have them
The OEM Z32 1" BMC that I ordered earlier this week has yet to ship, I feel im gonna be waiting a while for that.
As for the conversion lines...according to the tracking thing, they were in a place called Burnaby (near Vancouver) on June 25th, but the tracking info hasn't been updated since then...so I don't know if they are still there or not. It kind of bugs me when something like this happens.
Last edited by S13_love on Thu Jul 01, 2010 9:53 pm, edited 1 time in total.
-
S14Kouki10
- Posts: 472
- Joined: Thu Feb 25, 2010 6:13 pm
- Car: 1997 240sx
- Location: TX
Re: Project 240
what paint did you use to paint to calipers?
Re: Project 240
The silver paint was the duplicolor caliper paint...but long story short, the only caliper paint I found available came in only red, blue, black, and silver color (literally checked every auto store here in town)...so then I just used a yellow colored engine enamel and then sprayed clear engine enamel on them (that's why they look so shiny).S14Kouki10 wrote:what paint did you use to paint to calipers?
They look nice now, but Im pretty confident once brake fluid touches that paint, it won't be good. So we'll see.
Re: Project 240
S13_love the two extra holes are screw holes to screw the rotors to the hubs. Not really needed because when you put your rims on they will hold them just the same. I didn't have an issue getting my 5 lug rotors re-drilled to four lug. Your project looks great keep the updates coming.
Re: Project 240

The bmc finally shipped out and that's really the only thing im waiting on at this point.
-
speedeast

- Posts: 1610
- Joined: Sat Aug 01, 2009 7:01 pm
- Car: 1990 240sx VH45 FB & 1993 300zx
- Location: Orlando, Fl
Re: Project 240
Sweet, how much did the brake lines put you back?
Re: Project 240
Those brake lines were $68 ...then + $14 for shipping.
Re: Project 240
Finally received the BMC today!


The center port was plugged, so I had to use a 5 mm hex key to remove it and to my surprise...

That flair fitting was already in there. HALLE-F***ING-LUJAH!! I lucked out there...so now I don't have to worry about destroying my old stock bmc to get that fitting.
In case I didn't mention this...I ordered this from mynismo.com for about $209 (then + s/h so it was more like $220). The part no. was 46010-45P20 (Nabco OEM Z32 1" BMC) .
Still need to find someplace/someone to re-drill the front rotors then im good to go, I should be expecting to do this brake swap by sometime next week.
Sidenote: Photobucket sucks.
The center port was plugged, so I had to use a 5 mm hex key to remove it and to my surprise...
That flair fitting was already in there. HALLE-F***ING-LUJAH!!
In case I didn't mention this...I ordered this from mynismo.com for about $209 (then + s/h so it was more like $220). The part no. was 46010-45P20 (Nabco OEM Z32 1" BMC) .
Still need to find someplace/someone to re-drill the front rotors then im good to go, I should be expecting to do this brake swap by sometime next week.
Sidenote: Photobucket sucks.
Re: Project 240
I thought I was gonna complete this swap by tomorrow....yeah that's not gonna happen.
I had a feeling that the machine shops here weren't gonna like the idea of getting the brake rotors re-drilled...and guess what? I was right!
I went to a few and they basically said no and the ones that were actually willing to do it wanted a lot of money. The only other machinst that I know of (willing to do this type of work for somewhat cheap I assumed) was currently "out" working on a project or something...so I was gonna have to wait, which I didn't want to.
I contemplated the idea of re-drilling them myself but decided just to save myself from all the hassle (and the potential of me f***ing up the rotors and having to get new ones) and returned all the ones I bought.
So I went to that 240sxmotoring site and ordered those cross-drilled/slotted ones for both the front and rears. Apparently the front z32 ones are already re-drilled for 4 lug so Im really happy about that, but once again, now Im just wating on the parts to arrive...kinda wished I made up my mind and got those in the first place.
Well, I guess you gotta pay to play.
-
speedeast
- Posts: 1610
- Joined: Sat Aug 01, 2009 7:01 pm
- Car: 1990 240sx VH45 FB & 1993 300zx
- Location: Orlando, Fl
Re: Project 240
Always gotta pay to play... I am glad to see some progress out your way. I have been in a different state as my car for 5 weeks now. 2 Weeks and Counting!! Oh, and nice BMC; glad that worked out for you!
Re: Project 240
Brake swap fail !!
Sort of...I'll get to that in a sec.
Well, first off, all of the rotors were delivered today.

I was pretty excited to get those on... I managed to get the rear rotors and new brake pads on without any problem. Then I went to work on the fronts and it went ok at first. One bolt on the driver side caliper was stuck, but managed to get it out.
I chose to keep the splash shields and used a grinder to get rid of that lip that was going to be in the way.

Not too bad, then I went ahead and hammered both shields back a little way.

Then after I got that out of the way, I tried to get the old brake lines off the car...this is where I hit a dead end. I honestly struggled for about an hour and a half to get those lines disconnected from the hard lines.
After enough struggling, it became pretty clear that I wasn't going to get this done tonight...and that I needed new brake hardlines for the front as well. Those brakes lines that are on there are definitely frozen/seized onto the hardline...I figured the easiest way at this point is just to order new hardlines and not have to deal with trying to get those off of there.
Oh, I managed to damage the rubber line or whatever it is on the driver side. While I was driving back home, the pedal felt more mushy than usual (I knew this wasn't good) and when I got back, I found brake fluid sprayed on the inside of the wheel. It wasn't a lot but it was noticeable.
Im just gonna play it safe for now and not drive the car until I get those new hardlines and the rest of this job finished.
Sidenote: Anti-seize is your friend...
Sort of...I'll get to that in a sec.
Well, first off, all of the rotors were delivered today.
I was pretty excited to get those on... I managed to get the rear rotors and new brake pads on without any problem. Then I went to work on the fronts and it went ok at first. One bolt on the driver side caliper was stuck, but managed to get it out.
I chose to keep the splash shields and used a grinder to get rid of that lip that was going to be in the way.
Not too bad, then I went ahead and hammered both shields back a little way.
Then after I got that out of the way, I tried to get the old brake lines off the car...this is where I hit a dead end. I honestly struggled for about an hour and a half to get those lines disconnected from the hard lines.
After enough struggling, it became pretty clear that I wasn't going to get this done tonight...and that I needed new brake hardlines for the front as well.
Oh, I managed to damage the rubber line or whatever it is on the driver side. While I was driving back home, the pedal felt more mushy than usual (I knew this wasn't good) and when I got back, I found brake fluid sprayed on the inside of the wheel. It wasn't a lot but it was noticeable.
Im just gonna play it safe for now and not drive the car until I get those new hardlines and the rest of this job finished.
Sidenote: Anti-seize is your friend...
-
speedeast
- Posts: 1610
- Joined: Sat Aug 01, 2009 7:01 pm
- Car: 1990 240sx VH45 FB & 1993 300zx
- Location: Orlando, Fl
Re: Project 240
Anti-seize rocks my socks. As for the hard lines, just go to your local auto parts store and buy lines. If you go to NAPA, I'm pretty sure you can take your BMC and brake lines and have them flared for you.
Re: Project 240
Yep, that's what I did this morning. Actually, I went to the dealership before going to Napa and found out that those brake hardlines were discontinued (no surprise).

Then I went to Napa and got the two lines I needed...If I did my measurements correctly, each of these will end up being short by just a few inches so i'll have to re-route them or something to make up for the length needed which shouldn't be that difficult...but seeing how things are going so far, it probably will.
Then I went to Napa and got the two lines I needed...If I did my measurements correctly, each of these will end up being short by just a few inches so i'll have to re-route them or something to make up for the length needed which shouldn't be that difficult...but seeing how things are going so far, it probably will.
Re: Project 240
Well, now I feel like an idiot. I found out that there's a tool called a flare nut spanner/wrench....which I need . If I had that to begin with, this would have been a whole lot easier.
A regular 10 mm wrench will round off the flare nuts.
With that being said, no progress was made tonight.
A regular 10 mm wrench will round off the flare nuts.
With that being said, no progress was made tonight.
Re: Project 240
Managed to get some stuff done today.
Even with that flare nut wrench, the flare nuts that connect to the soft brake lines still wouldn't budge (as I expected).
Removing old bmc.

Took off the nuts and let it drain for a while...kinda wish I had put that towel there earlier.
Brake fluid is corrosive...

Very corrosive...I can't believe I didn't notice it dripping on there. Although the paint there was already peeling before, the brake fluid that got on there finished the job alright. Oh, well...it'll evetually get taken care of hopefully by this winter/next spring. (trying to wipe the fluid off made it worse, the area that peeled was smaller before that...)

Driver side line cut.

I cut the hardline itself on the passenger side and it left a little mess...oops.

Some random pic I thought I'd throw in there.

New bmc on with the line for the rear on there. As for the new hardlines that I have, I still need to bend them. Tomorrow, Im gonna try to get ahold of a bender tool. Once that's done, I guess it's just a matter of re-assembling everything...and bleeding the brakes to get rid of all the air that's going to be there. Sooo looking forward to that.
Even with that flare nut wrench, the flare nuts that connect to the soft brake lines still wouldn't budge (as I expected).
Removing old bmc.
Took off the nuts and let it drain for a while...kinda wish I had put that towel there earlier.
Brake fluid is corrosive...
Very corrosive...I can't believe I didn't notice it dripping on there. Although the paint there was already peeling before, the brake fluid that got on there finished the job alright. Oh, well...it'll evetually get taken care of hopefully by this winter/next spring. (trying to wipe the fluid off made it worse, the area that peeled was smaller before that...)
Driver side line cut.
I cut the hardline itself on the passenger side and it left a little mess...oops.
Some random pic I thought I'd throw in there.
New bmc on with the line for the rear on there. As for the new hardlines that I have, I still need to bend them. Tomorrow, Im gonna try to get ahold of a bender tool. Once that's done, I guess it's just a matter of re-assembling everything...and bleeding the brakes to get rid of all the air that's going to be there. Sooo looking forward to that.
Re: Project 240
Oooohhhh god, where to start...
Started the install on the new brake hardlines, did the driver side first.


This was fairly easy to do...now as for the passenger side one, not so much.


Got the part that runs along the firewall to straighten out better after I took that pic

Well, I was glad to get that part out of the way...it was kind of nerve-racking to do. Reason for that is because the process went a little something like this:
Bend, test fit, bend, test fit, bend, test fit...oh that was easy, lets do the other side!
Bend, test fit, bend, test fit, bend, test fit, realize you f***ed up and have to straighten out half of the damn thing, bend some more, test fit, repeat process 3-7 more times.
And in this part of the post, I'll explain why I nearly went on a baby seal killing spree.
Who wants to guess which one is smaller?


So I go to install these calipers, one fit perfectly. Went to do the other one, and well, made that unpleasant discovery...honestly this is quite embarassing, I would normally check to make sure the parts are the right ones whenever I buy stuff...I don't know why I didn't do that for these.....the one time I don't do that, it comes back to bite me in the a**. Go figure.
I (hopefully ) will get the correct size caliper by Tuesday, (at the latest Wednesday) of next week.
...
*sigh*
Started the install on the new brake hardlines, did the driver side first.
This was fairly easy to do...now as for the passenger side one, not so much.
Got the part that runs along the firewall to straighten out better after I took that pic
Well, I was glad to get that part out of the way...it was kind of nerve-racking to do. Reason for that is because the process went a little something like this:
Bend, test fit, bend, test fit, bend, test fit...oh that was easy, lets do the other side!
Bend, test fit, bend, test fit, bend, test fit, realize you f***ed up and have to straighten out half of the damn thing, bend some more, test fit, repeat process 3-7 more times.
And in this part of the post, I'll explain why I nearly went on a baby seal killing spree.
Who wants to guess which one is smaller?
So I go to install these calipers, one fit perfectly. Went to do the other one, and well, made that unpleasant discovery...honestly this is quite embarassing, I would normally check to make sure the parts are the right ones whenever I buy stuff...I don't know why I didn't do that for these.....the one time I don't do that, it comes back to bite me in the a**. Go figure.
I (hopefully ) will get the correct size caliper by Tuesday, (at the latest Wednesday) of next week.
...
*sigh*
Re: Project 240
Kinda feels like im talking to myself here...lol.
Another little update...
I got the correct size caliper yesterday and had enough time to paint it this morning. After I got off work, I went ahead and finished installing the rest of the stuff.
All I gotta do now is bleed the system and pray there aren't any leaks.
I'll post more pics tomorrow.
Another little update...
I got the correct size caliper yesterday and had enough time to paint it this morning. After I got off work, I went ahead and finished installing the rest of the stuff.
All I gotta do now is bleed the system and pray there aren't any leaks.
I'll post more pics tomorrow.
-
speedeast
- Posts: 1610
- Joined: Sat Aug 01, 2009 7:01 pm
- Car: 1990 240sx VH45 FB & 1993 300zx
- Location: Orlando, Fl
Re: Project 240
Looks good man. I've been in the garage hardcore for the last few days and haven't really used the computer at all, so I haven't seen your updates. You're not talking to yourself. You're having the same problem as me. I update late at night and the only people that see it are the people that are on right after me. Throughout the day, my thread gets pushed back a few pages on the active search... Oh well. Keep up the good work and let us know how it's going.
Re: Project 240
Will do. 
This brake swap (if I had all the right parts) should have taken only 2 days at most...here I am almost going on 2 weeks.
This brake swap (if I had all the right parts) should have taken only 2 days at most...here I am almost going on 2 weeks.
-
speedeast
- Posts: 1610
- Joined: Sat Aug 01, 2009 7:01 pm
- Car: 1990 240sx VH45 FB & 1993 300zx
- Location: Orlando, Fl
Re: Project 240
Half of my little projects are the same way, but you will always need something you don't have, haha.
Re: Project 240
K, so I tried bleeding the brake system this morning (I had to do this myself, nobody was available to help me) and when I went to test drive it I immediately noticed that the pedal was mushy. When driving I barely had any stopping power. Im gonna assume that there is air in the lines still........that's what I hope at least. I can't imagine it being anything else other than that.