I finished with the switch sensor today.
Tools needed:Wire strippersPliers
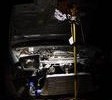
Earlier in this install I stopped with these four wires wondering where they go...finally found that out. The instructions say:GREY=to coolant temp positiveWHITE=to coolant temp negativeBLACK=manual turn on(wire up to any switch)BLACK=manual turn on(wire up to any switch)This is the harness/plugs for the coolant temp sensor. The big red plug goes to the coolant temperature sensor, the small black plug goes to the coolant temperature gauge sender and the large grey plug goes to the ECU.This is where you need to splice the fan controller into, the ECU plug.Get a razorblade or knife...cut the shrink wrap and pull it back to expose the wires that you need to splice into.You will use these taps to tap into the wires.There were three wires on mine...a white, red and black.Take the taps and place them on the red(positive) and black(negative) wires. You center them on the wire and close them down, use a pair of pliers to shut them down completely if you can't with your fingers.Complete.Now for the fan controller wires, take the grey and white and strip the ends.Place connectors on the ends and crimp to 16-14.The white wire gets plugged into the positive(red) and the grey wire gets plugged into the negative(black) and you are done. You'll need to cover the wires back up and shrink wrap but I'll wait till the swap to do that so that I can test the connections first. As far as the manual switch goes, I'm going to look into what needs to happen for that also.
THANKS TO FRSPORT FOR PROVIDING A INSTALL WITH PICTURES ON THIS CONTROLLERhttp://www.frsport.com/DIF-Dua....html
Modified by positron_ at 3:12 AM 8/15/2008
My S13 SR20DET Prep
-
positron1

- Posts: 3609
- Joined: Mon Mar 21, 2005 12:29 am
- Car: Project: 1993 Nissan 240SX Coupe SR
Daily: 2010 Honda Civic Coupe - Location: Starkville, MS.
Valve Cover
I got my stuff back from Bonehead Performance that I sent off to be powdercoated and I have to say that they did an excellent job.I sent them a new unpainted valve cover that I had powdercoated in anodized red...
and I sent some harness and radiator brackets.
I got some new hardware for the valvecover.Valve control part#: 11810-79E02The valve control goes here. It receives the hose from the fuel rail.Just place it.I messed up my deepwell 19mm socket so I just used a 19mm wrench.There are no torque specs for this in the FSM. The old valve control was turned in with just 4 threads showing so I did the same with this one.Valve cover gasket part#: 13270-52F00Spark plug gasket part#: 13271-52F00I realized that I did not have this gasket, I emailed a couple of places but haven't gotten any responses so can anyone tell me where I can get this gasket or should I re-use the old one if it's not in bad shape...something that I don't want to do.I placed the valve cover gasket on and worked it into place. From what I learned...I'll just need to put liquid gasket on the four half moon sections on the front and back of the block.
I cleaned up the oil around the edges on the block and removed old traces of liquid gasket.Question, what type of gasket should I use for the spark plug gaskets? I'm sitting on a tube of Ultra-black and the orange/red RTV and I've read about people using the Ultra-gray. Which one should I go with?
Modified by positron_ at 4:30 PM 8/19/2008
-
positron1
- Posts: 3609
- Joined: Mon Mar 21, 2005 12:29 am
- Car: Project: 1993 Nissan 240SX Coupe SR
Daily: 2010 Honda Civic Coupe - Location: Starkville, MS.
Rocker Arm Stopper Install
Little problem with this! I've got a question for those that have installed RAS on a S13 SR20DET. I installed mine to specifications but now my valve cover will not sit flush with the block like it did before. Now I know that the S14/S15 valve covers need to be modified, something has to be cut underneath for them to fit properly over the RAS but everyone says that this is not necessary with the S13 valve covers. Am I just thinking too much about this, will the tightening of the valve cover washers take care of this problem? I've actually been trying out some things on the old valve cover, I was hoping to have this figured out by the time I got my new valve cover back but so far no go. I did get it to sit quite a bit more flush to the block but there is still some space. It appears to be making contact where it would on the S14/S15 valve covers on the intake cams rear oil tube at the top, I trimmed this section. The next place it appears to be making contact is on the exhaust RAS, the sides are rubbing the valve cover where the two indentions are on the exhaust side near where the screws go. WTF!!!
-
positron1
- Posts: 3609
- Joined: Mon Mar 21, 2005 12:29 am
- Car: Project: 1993 Nissan 240SX Coupe SR
Daily: 2010 Honda Civic Coupe - Location: Starkville, MS.
Clutch...That Thing That Turns And Makes It Go!!!
This just in.
I narrowed my choices down to the big three, Exedy, ACT and Spec. There was a stage 2 ACT in the KA that I pulled so...go with what you know.Pressure plate part#N-015Disc part#:6P240F
Modified by positron_ at 2:33 PM 8/20/2008
I narrowed my choices down to the big three, Exedy, ACT and Spec. There was a stage 2 ACT in the KA that I pulled so...go with what you know.Pressure plate part#N-015Disc part#:6P240F
Modified by positron_ at 2:33 PM 8/20/2008
-
240sxHitman

- Posts: 918
- Joined: Sun May 30, 2004 3:11 pm
- Car: Boosted '91 240sx
- Contact:
-
I WE TODD ED
- Posts: 296
- Joined: Fri Jul 27, 2007 3:01 pm
- Car: '90 & '91 S13
Re:(positron_)
Just a little tip:Before you go to put the valve cover on, put a little liquid gasket on the valve cover gasket so it doesn't fall out of postition. This helped me a lot when i had to keep reinstalling my valve cover.
-
positron1
- Posts: 3609
- Joined: Mon Mar 21, 2005 12:29 am
- Car: Project: 1993 Nissan 240SX Coupe SR
Daily: 2010 Honda Civic Coupe - Location: Starkville, MS.
Re: Re:(positron_) (I WE TODD ED)
Thanks for the heads up!I WE TODD ED wrote:Just a little tip:Before you go to put the valve cover on, put a little liquid gasket on the valve cover gasket so it doesn't fall out of postition. This helped me a lot when i had to keep reinstalling my valve cover.
-
positron1
- Posts: 3609
- Joined: Mon Mar 21, 2005 12:29 am
- Car: Project: 1993 Nissan 240SX Coupe SR
Daily: 2010 Honda Civic Coupe - Location: Starkville, MS.
Turbo Continued....
Well, that missing hardware that was supposed to come with my turbo elbow never showed up so I just emailed the seller and said send me $15 and I'll buy the studs myself so I finally got a set.
Tools needed:Socket wrenchSocket extension12mm deepwell socket12mm wrenchThreadlocker
I already have gaskets and nuts so I only needed the studs anyway. Circuit sports studs thread size M8x???MM.OEM T25 Turbo. There are two studs already on the outlet so I need to place three for a total of five.Probably not going to help much but I put a little thread locker on the studs before seating them.Place them in the turbo and put a couple of washers on the stud...to keep the nut that you use to seat them from bottoming out and getting stuck on the stud...like this. I've seated plenty of studs so I should have known this, just impatient and not paying attention to what I was doing is all.Use a 12mm wrench to seat the studs.Seat all three studs into the turbo then move to the next step.T25 OEM metal outlet gasket part#: 14445-26E00.Take the gasket...place it on the turbo.Take your elbow...place it on the turbo.Put the nuts on. You can use M8x1,25 from the parts store. I had to use a wrench here because the O2 sensor port gets in the way of a socket wrench.Use a 12mm socket, tighten and torque to 16-23ft.lbs.Here is the O2 sensor port. As you know by now, the blacktop and redtop engines have two different O2 sensors. The blacktops have a "fat" sensor while the redtops have a "skinny" sensor.From what I've seen all the aftermarket elbows have a fat O2 sensor outlet so if you have a redtop, like me, then you will need a O2 sensor adapter to accomodate your "skinny" sensor.This is a O2 sensor adapter. It will screw into the "fat" O2 sensor bung and allow you to screw the "skinny" sensor into that.Place it in like so.Use a 22mm socket to tighten it, I don't have torque specs on this.You unscrew the port...this is my old O2 sensor but you get the idea what has to happen here.Once I get a new sensor then I'll be done with this side of the engine.
TO BE CONTINUED...
-
inkslingers13

- Posts: 1063
- Joined: Tue Dec 04, 2007 5:32 pm
- Car: 1985 Corolla Gt-S
Re: Clutch...That Thing That Turns And Makes It Go!!! (positron_)
aww man... unsprung clutch?
-
LayNLow240
- Posts: 1017
- Joined: Mon Oct 10, 2005 6:20 pm
- Car: 92 240 coupe
Re: (LayNLow240)
all of this is so clearly explained and easy to understand.
simply priceless
simply priceless
-
positron1
- Posts: 3609
- Joined: Mon Mar 21, 2005 12:29 am
- Car: Project: 1993 Nissan 240SX Coupe SR
Daily: 2010 Honda Civic Coupe - Location: Starkville, MS.
Re: Clutch...That Thing That Turns And Makes It Go!!! (inkslingers13)
I'm not real up to par on clutch info. I've had a couple of people comment that this is too much clutch for my setup. You guys think I should ditch this thing and maybe go with a stage 1?inkslingers13 wrote:aww man... unsprung clutch?
I checked and it was sitting at a 45 degree angle but I adjusted it so thanks for the headsup!LayNLow240 wrote:I cant remember from the post of your turbo oil line install, but do you have the drain facing straight down? If not I am pretty sure it needs to be facing down.Nice work so far, I went through all of the pages and everything looks great.
Kalypso123 wrote:all of this is so clearly explained and easy to understand. simply priceless.
-
inkslingers13
- Posts: 1063
- Joined: Tue Dec 04, 2007 5:32 pm
- Car: 1985 Corolla Gt-S
Re: Clutch...That Thing That Turns And Makes It Go!!! (positron_)
dude that clutch you have is WAY to much. get a nice stage 2. MAYBE 3. and make sure they are sprung. your clutch would tear your crank and transmission apart. it would be a ok clutch for a full drift car. take my word its way to much. unsprung is a bad idea, and so are ACT clutchs in my book. get a clutch masters, or a spec. cant go wrong with a spec.hope this helps! other then that your getting there!!!
-
homeslicej2

- Posts: 5446
- Joined: Mon Jan 15, 2007 5:46 pm
- Car: 1990 Nissan 240SX S13 SR'd hatch
Re: Clutch...That Thing That Turns And Makes It Go!!! (inkslingers13)
^You're one a hand full that I've heard say they didn't like/trust ACT. I've almost always heard very good things about them. I have/seen many more bad things about Spec, only good about clutch masters. Posi, I have a sprung 6-puck, and for a DD or weekend car, it gets old quick. I don't like it. If DD or weekend fun car is your goal, go with a full face. ACT, Spec and others make some that handle up to 360-380 lb ft and 400 bhp.
-
inkslingers13
- Posts: 1063
- Joined: Tue Dec 04, 2007 5:32 pm
- Car: 1985 Corolla Gt-S
Re: Clutch...That Thing That Turns And Makes It Go!!! (homeslicej2)
ive seen nothing but horrible $hit from act. but its all up to the buyer. end of story...homeslicej2 wrote:^You're one a hand full that I've heard say they didn't like/trust ACT. I've almost always heard very good things about them. I have/seen many more bad things about Spec, only good about clutch masters. Posi, I have a sprung 6-puck, and for a DD or weekend car, it gets old quick. I don't like it. If DD or weekend fun car is your goal, go with a full face. ACT, Spec and others make some that handle up to 360-380 lb ft and 400 bhp.

Re: Clutch...That Thing That Turns And Makes It Go!!! (inkslingers13)
I've used nothing but ACT on my 240 and had nothing short of perfection from all of them. There are defective units in every brand and maybe those are the ones you've encountered but ACT is one of the best. Period. On the flip I've seen crap from SPEC. FSUDrifter on this board had a nightmare experience with a SPEC clutch. I'm gonna go see if I can dig it up.
Edit: Here it is zer...age=1
Edit: Here it is zer...age=1
-
homeslicej2
- Posts: 5446
- Joined: Mon Jan 15, 2007 5:46 pm
- Car: 1990 Nissan 240SX S13 SR'd hatch
Re: Clutch...That Thing That Turns And Makes It Go!!! (inkslingers13)
huh...well, I guess I'll just go with an Exedy Stage 1 and if my power goals exceed it, I'll get the twin plate ( at cost).inkslingers13 wrote:
ive seen nothing but horrible $hit from act. but its all up to the buyer. end of story...
-
homeslicej2
- Posts: 5446
- Joined: Mon Jan 15, 2007 5:46 pm
- Car: 1990 Nissan 240SX S13 SR'd hatch
Re: Clutch...That Thing That Turns And Makes It Go!!! (redtop91)
Please do Ryon. I've heard many people sing the praises of ACT, but very few denounce it. I've heard/seen proof of more bad about Spec than I have of any clutch brand other than XTD. corvette owners will tell you about Spec. Double post ftw.redtop91 wrote:FSUDrifter on this board had a nightmare experience with a SPEC clutch. I'm gonna go see if I can dig it up.
Edit: Here it is zer...age=1
-
positron1
- Posts: 3609
- Joined: Mon Mar 21, 2005 12:29 am
- Car: Project: 1993 Nissan 240SX Coupe SR
Daily: 2010 Honda Civic Coupe - Location: Starkville, MS.
Re: Clutch...That Thing That Turns And Makes It Go!!! (homeslicej2)
Good info people, thanks and keep it coming. I'm gonna look for a different clutch.
Local CLUTCH SHOPS!
"Savannah Clutch" stage 4 clutch disc on this SR20
Support Local business!
Support Local business!
-
inkslingers13
- Posts: 1063
- Joined: Tue Dec 04, 2007 5:32 pm
- Car: 1985 Corolla Gt-S
Re: Clutch...That Thing That Turns And Makes It Go!!! (positron_)
go with a clutch masters stage 3. straight up.positron_ wrote:Good info people, thanks and keep it coming. I'm gonna look for a different clutch.
-
positron1
- Posts: 3609
- Joined: Mon Mar 21, 2005 12:29 am
- Car: Project: 1993 Nissan 240SX Coupe SR
Daily: 2010 Honda Civic Coupe - Location: Starkville, MS.
Re: (Kalypso123)
I've been informed that I should remove the turbo outlet until the engine is installed in the car because it will hit the steering column. Is this so?
-
positron1
- Posts: 3609
- Joined: Mon Mar 21, 2005 12:29 am
- Car: Project: 1993 Nissan 240SX Coupe SR
Daily: 2010 Honda Civic Coupe - Location: Starkville, MS.
Flywheel
I decided to replace the stock flywheel with a aftermarket unit.
ACT Streetlite Flywheel part#:600225. I was going to get another brand but read that the chromoly forged one piece design was better and would not separate...porbably because it's one piece huh! OEM vs. aftermarket flywheel. The OEM flywheel weighs in at 22lbs. and the Streetlite flywheel is 14lbs.
ACT Streetlite Flywheel part#:600225. I was going to get another brand but read that the chromoly forged one piece design was better and would not separate...porbably because it's one piece huh! OEM vs. aftermarket flywheel. The OEM flywheel weighs in at 22lbs. and the Streetlite flywheel is 14lbs.
-
supreamS14

- Posts: 1046
- Joined: Thu Jan 04, 2007 11:13 am
- Car: 96 240sx S13-blacktop Sr20deT
Re: (positron_)
Yes, Its a P.I.T.A! Nice flywheel! Exedy supplies most oem's. They even supply ACT their clutch disks.positron_ wrote:I've been informed that I should remove the turbo outlet until the engine is installed in the car because it will hit the steering column. Is this so?
Re: (positron_)
dont believe the hype,positron_ wrote:I've been informed that I should remove the turbo outlet until the engine is installed in the car because it will hit the steering column. Is this so?
I left mine on while sliding the motor in. I did tap the steering column once, but I just pushed my arm against it while lowering the motor in slowly.
you wont have much trouble I did it in the first shot.
-
duffman1278
- Posts: 6816
- Joined: Sun Apr 01, 2007 3:09 pm
- Car: 89 240sx Hatch, the wildcats!
-
positron1
- Posts: 3609
- Joined: Mon Mar 21, 2005 12:29 am
- Car: Project: 1993 Nissan 240SX Coupe SR
Daily: 2010 Honda Civic Coupe - Location: Starkville, MS.
Fan Controller Continued...
I got some wire so I started on the fan wiring finally.
Tools needed:Wire cutters14 gauge wireButt connectors
I had to decide wether to wire the fan motors for high power or low power and I opted for low power because of people saying that the fan motors burn out prematurely on high power.-------------------------------------------------------------------------------+12v blue, (-12v black & -12v green) == low speed
+12v yellow, (-12v black & -12v green) == high speed
(+12v blue & +12v yellow), (-12v black & -12v green) == fans don't spin at all!--------------------------------------------------------------------------------Low Speed: blue connects to +12v source, black and green connect to ground.
High speed: yellow connects to +12v source, black and green connect to ground.--------------------------------------------------------------------------------These elec fans have 4 wires EACH.
2 go to 12V 2 go to GROUND
Low speed requires ONE 12V lead and ONE ground lead...
High Speed requires BOTH 12V active and BOTH Grounds active.
On my 240 and 200sx have the same color's on the fans and the FSM's state the same pattern.
BLUE & GREEN are the two 12V sourcesYELLOW & BLACK are the GROUND sources.
BLUE 12V & YELLOW Ground will give LOW speedBLUE 12V & BLACK Ground will also give LOW speedGREEN 12V & YELLOW Ground will also give LOW speedGREEN 12V & BLACK Ground will also give LOW speed
BLUE 12V & GREEN 12V with YELLOW ground & BLACK ground will give HIGH speed....---------------------------------------------------------------------Using the provided diagram, it easily explains that there are four wires on each fan motor.
BLUE-12V powerGREEN-12v powerBLACK-GROUNDYELLOW-GROUND
So if I were wiring them for high power I would use all four wires but since I'm going with low power...I'll only use two. One wire for power and one for ground. There didn't seem to be a question as to which set I used so I chose the blue power and the black ground. The green power and the yellow ground will just be bypassed.14 gauge wire. It seems to be the same gauge as the wire that was provided with the fan controller unit.Butt connectors. You'll need these to wire the fan motors.Bird's nest!Fan motors.
These are the two plugs that will need to be rewired.I took a pair of wire cutters and cut the plugs off.Like so.I took a razorblade and cut some of the protective sheath back for some extra work space and bent the other wires out of the way since I'll only be needing the blue and the black. Speaking of those other wires, since I won't be using them should I tape or solder them off anyway? There will be no power running through them as far as I know.Use the wire cutters to strip the end of the wires.I started with the power wire first, take a butt connector(16-14) and place the wire in.Crimp it to 16-14.Repeat for the ground wire...as well as the other fan motor.I'm not certain how much wire I'm going to need to run for this setup so I just cut about a foot and a half, which is probably way too much, but I can always trim it down after the install. You'll need to cut four wires, two for the power and two for the grounds.I took the first wire, stripped the end...and inserted it into the butt connector. Crimp to 16-14. Repeat for the other butt connector.Take the white wire coming from the FAN1 outlet on the fan controller, strip the other end of the EXTRA wire...insert and crimp to 16-14. Repeat this for the FAN2 white power wire and the other EXTRA wire as well.These are the three ring terminals provided for ground that came with the fan controller unit.The grounds will be wired up like so.Take one of the EXTRA ground wires, strip it, place the ring terminal on and crimp to 16-14.Repeat for the other fan motors EXTRA ground wire. These will go in a ground spot in the engine bay.While I was at it, I used the last provided yellow ring terminal for the fan controller unit's power source. Strip, insert and crimp to 16-14. This will be connected directly to the battery and will power the actual DIF fan controller unit which will in turn provide power to the individual fan motors from there...correct?
When I get my battery cables back, I'll post up a test to see if these fans work with this setup.
TO BE CONTINUED...
Modified by positron_ at 7:08 PM 9/3/2008
Modified by positron_ at 7:21 PM 9/3/2008
Re: Fan Controller Continued... (positron_)
damn well done i must say. If you change ur mind on clutches lemme know I got a spec stage 2 sprung disc that is brand new in the box.
Re: (positron_)
you got the circuit sports turbo lines right?
-
positron1
- Posts: 3609
- Joined: Mon Mar 21, 2005 12:29 am
- Car: Project: 1993 Nissan 240SX Coupe SR
Daily: 2010 Honda Civic Coupe - Location: Starkville, MS.
Re: (Kalypso123)
Yes.