^Thanks!
Anybody not too far wanna help me find a s13 sending unit? I need one by the end of the week.
Zach's S13 Build Thread!! LOTS OF PICS! VH45 SWAP!
-
speedeast

- Posts: 1610
- Joined: Sat Aug 01, 2009 7:01 pm
- Car: 1990 240sx VH45 FB & 1993 300zx
- Location: Orlando, Fl
Re: Zach's S13 Build Thread!! LOTS OF PICS! VH45 SWAP!
I just wanted to throw this in here, very sad.

-
ag240

- Posts: 767
- Joined: Wed Apr 02, 2008 12:33 pm
- Car: 1993 Hatch, 1989 Hatch SE, 2010 Fronty SE
- Contact:
Re: Zach's S13 Build Thread!! LOTS OF PICS! VH45 SWAP!
Subscribed. Inspiring.
-
DRFTBLD
- Posts: 311
- Joined: Fri Jun 12, 2009 7:54 am
- Car: 89 S13 VH45DETT
05 Ford F-150 Drift Support
91 S13 Tester
08 Ford Focus - Location: Green Bay, WI
- Contact:
Re: Zach's S13 Build Thread!! LOTS OF PICS! VH45 SWAP!
speedeast wrote:I just wanted to throw this in here, very sad.
Hopefully no one was inside but it's always sad to see an S Chassis go!
-
speedeast
- Posts: 1610
- Joined: Sat Aug 01, 2009 7:01 pm
- Car: 1990 240sx VH45 FB & 1993 300zx
- Location: Orlando, Fl
Re: Zach's S13 Build Thread!! LOTS OF PICS! VH45 SWAP!
Just bought a fan controller, some cushioned metal clasps, some fuel line, and a heater hose hard line. This b**** is starting this weekend. Y'all keep your eyes open for some video to pop up on here. Thanks for tuning in.
-
HeadAblaze

- Posts: 36
- Joined: Mon Oct 18, 2010 6:28 am
- Car: Now: 1971 Datsun 510 w/ ka24e
Sold: Red 1990 240sx hatch - Location: Tucson, AZ
Re: Zach's S13 Build Thread!! LOTS OF PICS! VH45 SWAP!
Nice work! And thank you for keeping me busy at work on Monday, haha. I might actually get a spare shell and do this swap, but I just wont rebuild.
-
speedeast
- Posts: 1610
- Joined: Sat Aug 01, 2009 7:01 pm
- Car: 1990 240sx VH45 FB & 1993 300zx
- Location: Orlando, Fl
Re: Zach's S13 Build Thread!! LOTS OF PICS! VH45 SWAP!
No prob, homie.
Stainless conversion brake lines came in today!

I will be in the garage for a huge portion of the day tying up loose ends and trying to get prepared for this weekend's start attempt.
Stainless conversion brake lines came in today!
I will be in the garage for a huge portion of the day tying up loose ends and trying to get prepared for this weekend's start attempt.
-
PyR0NiAk

- Posts: 3851
- Joined: Sun Mar 01, 2009 4:29 pm
- Car: S13 SR W/ T2 GT3071R .86AR, JWT S4 Cams, 810cc Injectors,Z32 MAF, JWT tuned ECU 87mm 9:1 Compression CP pistons, Manley Rods
- Location: Ohio
- Contact:
Re: Zach's S13 Build Thread!! LOTS OF PICS! VH45 SWAP!
Good luck. :1
-
speedeast
- Posts: 1610
- Joined: Sat Aug 01, 2009 7:01 pm
- Car: 1990 240sx VH45 FB & 1993 300zx
- Location: Orlando, Fl
Re: Zach's S13 Build Thread!! LOTS OF PICS! VH45 SWAP!
And he RETURNS! Thanks bro.
Re: Zach's S13 Build Thread!! LOTS OF PICS! VH45 SWAP!
Figured I would peep out your build thread... DAMN! you are going all out!! I'm sure you are more than capable of figuring out those wires. That's simple compared to what you've done so far... and I've only got through the first page. I'll read the rest at work (about the only time I have time for stuff like this, LOL) Excellent job so far and THANK YOU for your services for our country.
-
HeadAblaze
- Posts: 36
- Joined: Mon Oct 18, 2010 6:28 am
- Car: Now: 1971 Datsun 510 w/ ka24e
Sold: Red 1990 240sx hatch - Location: Tucson, AZ
Re: Zach's S13 Build Thread!! LOTS OF PICS! VH45 SWAP!
Ha, probably dumb quesion, but I am new to cars (used to be a bike person) butwhat is the sending unit? I have a ka24de motor that's disassembled so I might have one.speedeast wrote:^Thanks!
Anybody not too far wanna help me find a s13 sending unit? I need one by the end of the week.
-
speedeast
- Posts: 1610
- Joined: Sat Aug 01, 2009 7:01 pm
- Car: 1990 240sx VH45 FB & 1993 300zx
- Location: Orlando, Fl
Re: Zach's S13 Build Thread!! LOTS OF PICS! VH45 SWAP!
It's the cradle that holds the fuel pump in the fuel tank. I found one though. Thanks anyways.
-
speedeast
- Posts: 1610
- Joined: Sat Aug 01, 2009 7:01 pm
- Car: 1990 240sx VH45 FB & 1993 300zx
- Location: Orlando, Fl
Re: Zach's S13 Build Thread!! LOTS OF PICS! VH45 SWAP!
Update!
A lot has been accomplished since the last update, and a lot will be accomplished before the next. The goal to crank her up tomorrow still stands. Here goes...
We'll start with the fan controller. I acquired one from the local speed shop, AA Speed & Custom. They have a real nice outfit and the prices are decent; although, there in stock merchandise is geared toward American muscle cars. Anyway, I got the Flex-A-Lite fan controller, and it is temperature adjustable. It's the kind that you push through the fins at the radiator inlet.


Next up are the heater hoses. I never had the one heater line that reaches all the way to the thermostat housing, so when I finally got one, I had already installed a bunch of s*** around it. So, taking that into consideration and the fact that the bend at the firewall would be brutal, I went ahead and cut the pipe down to where it was a little under two inches long and installed it like that. That way the heater hose has a longer distance to distribute the 90 degree curve to the firewall and it works out much better. When it finally gets to the firewall, it still has to bend brutally to hook to the heater core. I went digging around at the parts store until I found an elbow that would help me out. The elbow worked great, the only problem is that the parts store only had one. So, I have to find another one today sometime so I can finish the heater lines. On the other heater line, I used one of those stainless coils that are supposed to keep it from bending. It seems to be working real good right now, though.


My friend, Santi, came by to help me out for a few hours. In that time, he installed my fuel hard lines for me and a few other things. We used the rubber insulated clasps to hold them in place. The lines are 3/8" aluminum feed and return. Then I cut up some 5/16" rubber fuel line and began installing and decorating with band clamps. I also created a custom fuel filter bracket because the oem I had was covered in yellow paint and bad memories, so I just said f*** it.


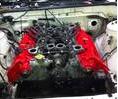
Next up, the electrical stuff that I got accomplished; although, there are still plenty of hours worth of it left to go. I took lots of notes: 1, I like to be organized so I can minimize mistakes; 2, I plan on doing a complete write-up on the elctrical changes required to VH --> S13 swap. I turned one of my pick tools into my new "connector removal tool." I can now pull all of the wires effortlessly out of the connectors for whatever reason I want I suppose. I removed the interior EFI connector from the KA... that was just a few seconds before I realized the VH connector is identical, oh well. I also pulled the 2 connectors off of the KA harness that connected to the "Engine Room Harness" with as much wire as I could manage. i plan to use these to create a bridge from the VH harness to the KA "Engine Room Harness." I finished sprucing up the injector harness. I also made note of the part number for the coil pack harness, just in case. I noticed that the letter/numbers were wearing away. I also installed the starter. The power wire from the starter will connect to the terminal shown in the last picture below.


There will be more!
A lot has been accomplished since the last update, and a lot will be accomplished before the next. The goal to crank her up tomorrow still stands. Here goes...
We'll start with the fan controller. I acquired one from the local speed shop, AA Speed & Custom. They have a real nice outfit and the prices are decent; although, there in stock merchandise is geared toward American muscle cars. Anyway, I got the Flex-A-Lite fan controller, and it is temperature adjustable. It's the kind that you push through the fins at the radiator inlet.
Next up are the heater hoses. I never had the one heater line that reaches all the way to the thermostat housing, so when I finally got one, I had already installed a bunch of s*** around it. So, taking that into consideration and the fact that the bend at the firewall would be brutal, I went ahead and cut the pipe down to where it was a little under two inches long and installed it like that. That way the heater hose has a longer distance to distribute the 90 degree curve to the firewall and it works out much better. When it finally gets to the firewall, it still has to bend brutally to hook to the heater core. I went digging around at the parts store until I found an elbow that would help me out. The elbow worked great, the only problem is that the parts store only had one. So, I have to find another one today sometime so I can finish the heater lines. On the other heater line, I used one of those stainless coils that are supposed to keep it from bending. It seems to be working real good right now, though.
My friend, Santi, came by to help me out for a few hours. In that time, he installed my fuel hard lines for me and a few other things. We used the rubber insulated clasps to hold them in place. The lines are 3/8" aluminum feed and return. Then I cut up some 5/16" rubber fuel line and began installing and decorating with band clamps. I also created a custom fuel filter bracket because the oem I had was covered in yellow paint and bad memories, so I just said f*** it.
Next up, the electrical stuff that I got accomplished; although, there are still plenty of hours worth of it left to go. I took lots of notes: 1, I like to be organized so I can minimize mistakes; 2, I plan on doing a complete write-up on the elctrical changes required to VH --> S13 swap. I turned one of my pick tools into my new "connector removal tool." I can now pull all of the wires effortlessly out of the connectors for whatever reason I want I suppose. I removed the interior EFI connector from the KA... that was just a few seconds before I realized the VH connector is identical, oh well. I also pulled the 2 connectors off of the KA harness that connected to the "Engine Room Harness" with as much wire as I could manage. i plan to use these to create a bridge from the VH harness to the KA "Engine Room Harness." I finished sprucing up the injector harness. I also made note of the part number for the coil pack harness, just in case. I noticed that the letter/numbers were wearing away. I also installed the starter. The power wire from the starter will connect to the terminal shown in the last picture below.
There will be more!
-
PyR0NiAk
- Posts: 3851
- Joined: Sun Mar 01, 2009 4:29 pm
- Car: S13 SR W/ T2 GT3071R .86AR, JWT S4 Cams, 810cc Injectors,Z32 MAF, JWT tuned ECU 87mm 9:1 Compression CP pistons, Manley Rods
- Location: Ohio
- Contact:
Re: Zach's S13 Build Thread!! LOTS OF PICS! VH45 SWAP!
Good progress Zach. Just remember slow is smooth and smooth is fast.
-
speedeast
- Posts: 1610
- Joined: Sat Aug 01, 2009 7:01 pm
- Car: 1990 240sx VH45 FB & 1993 300zx
- Location: Orlando, Fl
Re: Zach's S13 Build Thread!! LOTS OF PICS! VH45 SWAP!
Words to live by.
Re: Zach's S13 Build Thread!! LOTS OF PICS! VH45 SWAP!
This is one interesting build, Read all 11 pages and was just fascinated with all your work. Keep it up dude 
Btw I just painted my car the Porsche Midnight Blue Metallic and it came out beautifully.. Love the color and didnt regret it at all. Just incase you interested the code is 39c. I will post up a pic in a second.
This is the color i went with on my s14


This is another color i was considering, I think it would look beautifull on my car which is an s14.

Btw I just painted my car the Porsche Midnight Blue Metallic and it came out beautifully.. Love the color and didnt regret it at all. Just incase you interested the code is 39c. I will post up a pic in a second.
This is the color i went with on my s14
This is another color i was considering, I think it would look beautifull on my car which is an s14.
-
PyR0NiAk
- Posts: 3851
- Joined: Sun Mar 01, 2009 4:29 pm
- Car: S13 SR W/ T2 GT3071R .86AR, JWT S4 Cams, 810cc Injectors,Z32 MAF, JWT tuned ECU 87mm 9:1 Compression CP pistons, Manley Rods
- Location: Ohio
- Contact:
Re: Zach's S13 Build Thread!! LOTS OF PICS! VH45 SWAP!
39c240sx, thread jack much?
Re: Zach's S13 Build Thread!! LOTS OF PICS! VH45 SWAP!
how is it thread jack? he was debating a dark color to paint his car. I showed up 2 colors...PyR0NiAk wrote:39c240sx, thread jack much?
He is asking us what do we think.. My post up above is what i think would look good on a 240sx..speedeast wrote:I suppose I need to start looking for a place to work on her at.
I am questioning the paint options. I haven't yet 100% decided on a color. I was stuck on Gloss Black for a long time, but the closer I get to painting it, the more I am still up in the air.
What do you guys think? Interior will remain black regardless. I don't want anything too flashy. I like darker colors. The two tone: color bottom, black top is also on the shelf...
Please share.
He was interested in the Lapis Blue Metallic from the porsche so i figured he would like the Midnight Blue Metallic. So i posted the Paint Code for it..Again i thought i was helping, If you think its thread jacking then im sorry.39c240sx wrote:This is one interesting build, Read all 11 pages and was just fascinated with all your work. Keep it up dude
Btw I just painted my car the Porsche Midnight Blue Metallic and it came out beautifully.. Love the color and didnt regret it at all. Just incase you interested the code is 39c. I will post up a pic in a second.
-
speedeast
- Posts: 1610
- Joined: Sat Aug 01, 2009 7:01 pm
- Car: 1990 240sx VH45 FB & 1993 300zx
- Location: Orlando, Fl
Re: Zach's S13 Build Thread!! LOTS OF PICS! VH45 SWAP!
It's cool. I like both of the colors, but I've already made a decision. I'm going with the Mazda Lapis Blue Metallic.

As for forward progress on the car and getting it to start... Today was a fail of epic proportions. I was hung over; little things kept frustrating me all day; and some important tools were misplaced. All was expected, but I was hoping to get further.
All electrical has been resolved; write-up coming soon. Vacuum lines and coolants lines all resolved as well. Power steering pump is almost fully mocked up. Fuel tank I purchased was cleaned, and will soon be installed. I have acquired the sending unit, and it is VERY clean! I already have 4 gallons of unleaded 93 ready to go in. I knocked a bunch of other tasks off my to-do list, but didn't quite reach the ultimate goal. There are still a couple of issues. Brake booster clearance worries me. I think there is 2-3mm clearance between the valve cover and the brake booster. Fortunately, I don't need brakes to hear her run. In the morning, I have to make a run to the parts store and get a couple things. I should have another nice update at some point tomorrow. Thanks for all the support guys.
-
SX APPEAL

- Posts: 1345
- Joined: Tue Oct 05, 2004 10:26 am
- Car: 06 G35 Coupe 6MT
95 Maxima SE 5MT - Location: Springfield, MO
Re: Zach's S13 Build Thread!! LOTS OF PICS! VH45 SWAP!
Just read your whole build, excellent work man! Wish I had half the fabrication ability you do. Can't wait to see it when its done.
btw thanks for sharing the info about the chassis saver paint earlier in the thread, just picked up a quart today. Gonna do my subframe/rear suspension components and hopefully the engine bay this weekend.
btw thanks for sharing the info about the chassis saver paint earlier in the thread, just picked up a quart today. Gonna do my subframe/rear suspension components and hopefully the engine bay this weekend.
-
speedeast
- Posts: 1610
- Joined: Sat Aug 01, 2009 7:01 pm
- Car: 1990 240sx VH45 FB & 1993 300zx
- Location: Orlando, Fl
Re: Zach's S13 Build Thread!! LOTS OF PICS! VH45 SWAP!
Just a heads up for you. In my engine bay, the chassis saver served as a primer. I would also recommend chassis saver directly on the metal. If you want to paint it after that you can.
-
PyR0NiAk
- Posts: 3851
- Joined: Sun Mar 01, 2009 4:29 pm
- Car: S13 SR W/ T2 GT3071R .86AR, JWT S4 Cams, 810cc Injectors,Z32 MAF, JWT tuned ECU 87mm 9:1 Compression CP pistons, Manley Rods
- Location: Ohio
- Contact:
Re: Zach's S13 Build Thread!! LOTS OF PICS! VH45 SWAP!
39c240sx, I called it a threadjack because of the fact you continually talked about your S14. Saying things such as "I think it would look beautiful on my car, which is an S14." Either way, it's over and done with.
Zach, if I ever get a free weekend after I get back to NC, I still plan on trying to come up and help you. And what's wrong with 2-3mms? You put a V8 in a car designed for a 4 cylinder. Things are suppose to be tight.
Zach, if I ever get a free weekend after I get back to NC, I still plan on trying to come up and help you. And what's wrong with 2-3mms? You put a V8 in a car designed for a 4 cylinder. Things are suppose to be tight.
Re: Zach's S13 Build Thread!! LOTS OF PICS! VH45 SWAP!
That blue does look good as heck... Btw.speedeast wrote:It's cool. I like both of the colors, but I've already made a decision. I'm going with the Mazda Lapis Blue Metallic.
As for forward progress on the car and getting it to start... Today was a fail of epic proportions. I was hung over; little things kept frustrating me all day; and some important tools were misplaced. All was expected, but I was hoping to get further.
All electrical has been resolved; write-up coming soon. Vacuum lines and coolants lines all resolved as well. Power steering pump is almost fully mocked up. Fuel tank I purchased was cleaned, and will soon be installed. I have acquired the sending unit, and it is VERY clean! I already have 4 gallons of unleaded 93 ready to go in. I knocked a bunch of other tasks off my to-do list, but didn't quite reach the ultimate goal. There are still a couple of issues. Brake booster clearance worries me. I think there is 2-3mm clearance between the valve cover and the brake booster. Fortunately, I don't need brakes to hear her run. In the morning, I have to make a run to the parts store and get a couple things. I should have another nice update at some point tomorrow. Thanks for all the support guys.
Im just giving him an idea on how the color looks on a s14, Not every color looks good on a specific car.PyR0NiAk wrote:39c240sx, I called it a threadjack because of the fact you continually talked about your S14. Saying things such as "I think it would look beautiful on my car, which is an S14." Either way, it's over and done with.
Zach, if I ever get a free weekend after I get back to NC, I still plan on trying to come up and help you. And what's wrong with 2-3mms? You put a V8 in a car designed for a 4 cylinder. Things are suppose to be tight.
-
SX APPEAL
- Posts: 1345
- Joined: Tue Oct 05, 2004 10:26 am
- Car: 06 G35 Coupe 6MT
95 Maxima SE 5MT - Location: Springfield, MO
Re: Zach's S13 Build Thread!! LOTS OF PICS! VH45 SWAP!
no worries man, I'm not really making it pretty, just liked the idea of a rust and chemical proof coating that I could brush onspeedeast wrote:Just a heads up for you. In my engine bay, the chassis saver served as a primer. I would also recommend chassis saver directly on the metal. If you want to paint it after that you can.
-
speedeast
- Posts: 1610
- Joined: Sat Aug 01, 2009 7:01 pm
- Car: 1990 240sx VH45 FB & 1993 300zx
- Location: Orlando, Fl
Re: Zach's S13 Build Thread!! LOTS OF PICS! VH45 SWAP!
I understand, but when chassis saver or anything like it is exposed to UV light (sunlight) it gradually fades to a flat dark dark gray. It will always retain it's rust preventative value, but it fades.SX APPEAL wrote:no worries man, I'm not really making it pretty, just liked the idea of a rust and chemical proof coating that I could brush on
That's the color that's on my Mazda 6 now, love it!39c240sx wrote:That blue does look good as heck... Btw.
Check, and check. Well, the 2-3mm concerned me because though my mounts are very stiff, they are not solid. I don't want the engine movement affecting my brake system.PyR0NiAk wrote:Zach, if I ever get a free weekend after I get back to NC, I still plan on trying to come up and help you. And what's wrong with 2-3mms? You put a V8 in a car designed for a 4 cylinder. Things are suppose to be tight.

Re: Zach's S13 Build Thread!! LOTS OF PICS! VH45 SWAP!
Definately looking forward to this. This is the only part of the swap I'm unsure of.speedeast wrote:All electrical has been resolved; write-up coming soon.
Really enjoying your build, It's given me alot of good ideas.
-
speedeast
- Posts: 1610
- Joined: Sat Aug 01, 2009 7:01 pm
- Car: 1990 240sx VH45 FB & 1993 300zx
- Location: Orlando, Fl
Re: Zach's S13 Build Thread!! LOTS OF PICS! VH45 SWAP!
On some of my more "creative" projects... consult with me before you duplicate just in case new information has arisen or I developed a better way, or found issues. Thanks for all of the praise and support; it helps keep me going. I mentioned that the wiring was resolved, and in patching things together I came up with some more questions that I've been looking into; therefore, the wiring isn't completely done, but a write-up is definitely coming. I plan to not only show what I did, but why I did it that way so everybody understands where I'm coming from.
Re: Zach's S13 Build Thread!! LOTS OF PICS! VH45 SWAP!
Sounds good. I have amassed everything I need to do this, just waiting to start this in January when my S13 will be officially retired. In the meantime, I have the engine apart for freshening up & powder coating.
Can't wait till' you get her started!
Can't wait till' you get her started!
-
speedeast
- Posts: 1610
- Joined: Sat Aug 01, 2009 7:01 pm
- Car: 1990 240sx VH45 FB & 1993 300zx
- Location: Orlando, Fl
Re: Zach's S13 Build Thread!! LOTS OF PICS! VH45 SWAP!
They officially retire them in January? I kind of figured they retired them on the anniversary of the manufacture date. Oh well. Mine is officially 21 years old, but that's still not old enough here in Prince William County, Virginia. Joy!
I hope to get her started real soon. I had a friend in town to help this weekend, but things weren't right so we never got it going. I have since then been taking my time a bit, but I've been learning a lot about what I'm doing rather than just doing what others tell me to do. This will make for quite a write-up.
I hope to get her started real soon. I had a friend in town to help this weekend, but things weren't right so we never got it going. I have since then been taking my time a bit, but I've been learning a lot about what I'm doing rather than just doing what others tell me to do. This will make for quite a write-up.
-
speedeast
- Posts: 1610
- Joined: Sat Aug 01, 2009 7:01 pm
- Car: 1990 240sx VH45 FB & 1993 300zx
- Location: Orlando, Fl
Re: Zach's S13 Build Thread!! LOTS OF PICS! VH45 SWAP!
Tonight I will catch this thread up to speed with what's been going on. Not yet running, but made a lot of progress.