Gino's 300zx build
Re: (Gino)
blasphemy!Gino wrote:lol amen! didn't even think to add those two in haha, not to mention the piping will be a lot more simple than OEM piping also...man, I might even be able to see the ground through the engine bay!
-
Pieceofsand

- Posts: 1895
- Joined: Thu Dec 25, 2008 8:07 pm
- Car: 91 300zx Twin Turbo
Re: (Pieceofsand)
either nitrous or methanol/water injection.Pieceofsand wrote:those two red lines that splits and goes to the intercooler, what are they?
-
Gino
- Posts: 242
- Joined: Mon Oct 18, 2004 3:12 pm
- Car: 1990 300zxTT stage 5+++
- Location: Hanover, PA
- Contact:
Satge 1 of engine bay:
drilled/tapped for the EGT probes:
Finished full plenum/TB's:
re-clocked turbo's for SS oil feed clearance and fully assembled front of motor:
Ash duel fuel pump controller:
Also have a Z1 oil return kit on the way.Next up is making the wastegate actuator brackets. The ATI pulley isn't going back on until the motor is in the car, it is a VERY tight fit (supposed to be) and I have no way of keeping the crank from turning to put it on (don't want to use air on it). Once the wastegate actuator brackets are done I will be hooking up the coolant lines (which I am re-doing with SS not nylon braided for heat reasons as we talked about before lol). I will probably be doing the subframe this weekend, so i will also run the fuel lines when that it out (easier access to the tank for routing the lines up there).
Also figured out my set of wheels for the R compounds...Cobra R wheels: 17x9 +24 17x10.5 +27those will be painted flat black with gold spokes and R888's all the way around 245/45/17 front and 275/40/17 rear.
-
Gino
- Posts: 242
- Joined: Mon Oct 18, 2004 3:12 pm
- Car: 1990 300zxTT stage 5+++
- Location: Hanover, PA
- Contact:
engine bay stage 2:
I'm not done sanding/shaping, I had to put a second layer of filler on most parts for the imperfections that didn't come out of the first layer. Will be done later today after I get back from class lol. Still trying to decide which holes on the drivers side I want to fill, some will be used. Also the battery tray is coming out and that all will be sprayed as well. As will the random brackets that won't be used anymore (i.e. hood button bracket, remote bleeder for the clutch, and that half tab by the shock that you see on the passengers side
I'm not done sanding/shaping, I had to put a second layer of filler on most parts for the imperfections that didn't come out of the first layer. Will be done later today after I get back from class lol. Still trying to decide which holes on the drivers side I want to fill, some will be used. Also the battery tray is coming out and that all will be sprayed as well. As will the random brackets that won't be used anymore (i.e. hood button bracket, remote bleeder for the clutch, and that half tab by the shock that you see on the passengers side
-
NolimitZ32

- Posts: 7042
- Joined: Fri Jun 27, 2008 9:07 am
- Car: 91 AG2 2+0 TTMT swap/E39 BMW 540i6/E53 4.6is Dinan S3
- Location: Houston, TX
Re: (Gino)
Damn gino what the hell do you do for money this isht is ridiculous, not to mention you got skills man. props on the shaving and general cosmetic work.
Re: (NolimitZ32)
I just went through the whole thread and it looks completely sick. Kinda makes me wish I stayed VG. What suspension setup do you have? Insane build! Good luck with it
-
pintovit

- Posts: 342
- Joined: Fri Jan 04, 2008 2:23 pm
- Car: 1993 300zx TT 2+2
- Location: Porto, Portugal
Re: (2JZ32)
2JZ32 wrote:I just went through the whole thread and it looks completely sick. Kinda makes me wish I stayed VG. Insane build! Good luck with it
Different ways... But you should have...
Crazy work Gino... I'm loving it.
-
Gino
- Posts: 242
- Joined: Mon Oct 18, 2004 3:12 pm
- Car: 1990 300zxTT stage 5+++
- Location: Hanover, PA
- Contact:
Re: (2JZ32)
haha thanks man, 2jz is a good motor to, just blasphemous! lol. They're SPL coilovers with all the adjustable bits.2JZ32 wrote:I just went through the whole thread and it looks completely sick. Kinda makes me wish I stayed VG. What suspension setup do you have? Insane build! Good luck with it
haha thanks man! I sell my body for monies!NolimitZ32 wrote:Damn gino what the hell do you do for money this isht is ridiculous, not to mention you got skills man. props on the shaving and general cosmetic work.
respraying it all bro, no shortcuts lol.tg wrote:You going to respray the engine bay or just touch it up?
also my clutch remote bleeder delete (the engine bay line):
to finish the engine bay I just need to drill out the spot welds on the HICAS bracket, fill those holes, fill the one hole right next to it, then drill out the hood button bracket and fill. Then finish sanding it all down and PAINT!
I'm to damn tired to do any more work on it today haha and my fingers hurt to much
Just for me, smash the f*ck out of that battery tray with a 10lb sledge once its out and take a pic for me. f***ing thing is the only rusted piece on my car.
That engine bay is going to look SICK. You gonna keep it red or go black?
edit: found somebody else wth the gold/black scheme, but I prefer the more subtle approach.. the entire timing belt cover is a bit much.
That engine bay is going to look SICK. You gonna keep it red or go black?
edit: found somebody else wth the gold/black scheme, but I prefer the more subtle approach.. the entire timing belt cover is a bit much.
-
Gino
- Posts: 242
- Joined: Mon Oct 18, 2004 3:12 pm
- Car: 1990 300zxTT stage 5+++
- Location: Hanover, PA
- Contact:
Re: (tg)
lol I'll smash it more than once for ya bro!tg wrote:Just for me, smash the f*ck out of that battery tray with a 10lb sledge once its out and take a pic for me. f***ing thing is the only rusted piece on my car.
That engine bay is going to look SICK. You gonna keep it red or go black?
edit: found somebody else wth the gold/black scheme, but I prefer the more subtle approach.. the entire timing belt cover is a bit much.
Keeping the engine bay CRP, I feel like on a red car having a black bay looks unfinished. And yea I know that car lol. I to think the TB covers are a bit much, but other than that it's pretty. Can't wait to actually see mine with everything in it haha with how much s*** i've removed :x
-
DCaff300ZX

- Posts: 4202
- Joined: Sun Jun 14, 2009 8:18 am
- Car: .
1993 CRP TT- Modified - Location: Tacoma, Washington
Re: (Gino)
If you're staying with the cherry red color I think that the gold would look good but you'd have to go with more gold highlights elsewhere like the balance tube and maybe more, which could maybe be too much.Red on the other hand will work with the rest of the car and not seem like so much...although honestly I think either way would be sweet with your beast.Go, Gino!!
Modified by DCaff300ZX at 8:35 PM 4/9/2010
Modified by DCaff300ZX at 8:35 PM 4/9/2010
Re: (DCaff300ZX)
I respectfully disagree, too much gold and its going to be too much and it'll look gaudy.DCaff300ZX wrote:If you're staying with the cherry red color I think that the gold would look good but you'd have to go with more gold highlights elsewhere like the balance tube and maybe more, which could maybe be too much.Red on the other hand will work with the rest of the car and not seem like so much...although honestly I think either way would be sweet with your beast.Go, Gino!!
Modified by DCaff300ZX at 8:35 PM 4/9/2010
watch out with the black engine bay knocking... milo might be lurking ;D
-
DCaff300ZX
- Posts: 4202
- Joined: Sun Jun 14, 2009 8:18 am
- Car: .
1993 CRP TT- Modified - Location: Tacoma, Washington
Re: (tg)
Yeah, I agree that too much gold would not be good and that perhaps just red is best.
Re: (Gino)
I agree 100%, you have to have some shinny stuff under the hoodGino wrote:Keeping the engine bay CRP, I feel like on a red car having a black bay looks unfinished. And yea I know that car lol. I to think the TB covers are a bit much, but other than that it's pretty. Can't wait to actually see mine with everything in it haha with how much s*** i've removed :x
Your car is going to be sick when it's all back together. Good luck with the build!
-
KevinZtwin

- Posts: 114
- Joined: Mon May 26, 2008 10:31 pm
- Car: 1990 300zx Twin Turbo
Re: (Pieceofsand)
There is one white line, that splits into two red lines. Those red lines lead to the intake pipe on each side.Pieceofsand wrote:those two red lines that splits and goes to the intercooler, what are they?
The white hose is coming from the Methanol pump, and the pump connects to the water/meth tank which is visible right between the two intake filters.
It is definitely a Meth injection kit.

Re: Gino's 300zx build
Can you show where you put the fuel filters? i just wanna see it visually how you did that, the car is coming along great looks like you might have your bay done clean before me.
Re: Gino's 300zx build
omg i HAVE to buy my Z32 soooon.
I want to get started so bad. Gino, your build is sick.
Subscribed!
I want to get started so bad. Gino, your build is sick.
Subscribed!
Re: Gino's 300zx build
Hopefully we'll get some updates this weekend 
Re: Gino's 300zx build
cford1080 wrote:omg i HAVE to buy my Z32 soooon.
I want to get started so bad. Gino, your build is sick.
Subscribed!
Same here dude. Cant wait to buy one
-
Gino
- Posts: 242
- Joined: Mon Oct 18, 2004 3:12 pm
- Car: 1990 300zxTT stage 5+++
- Location: Hanover, PA
- Contact:
Re: Gino's 300zx build
sorry for the late updates, I just now reset my stuff for here since the changes:
updates:
subframe is just about finished, just need to replace the ball joints for the rear tie rods

the solid aluminum bushings in. removing the OEM bushings was a total PITA

that's what I had to cut out of each bushing cup...not to mention removing the bushing itself (hole saw drill bits + lots of prying and burning)..fun times!

both widebands mounted

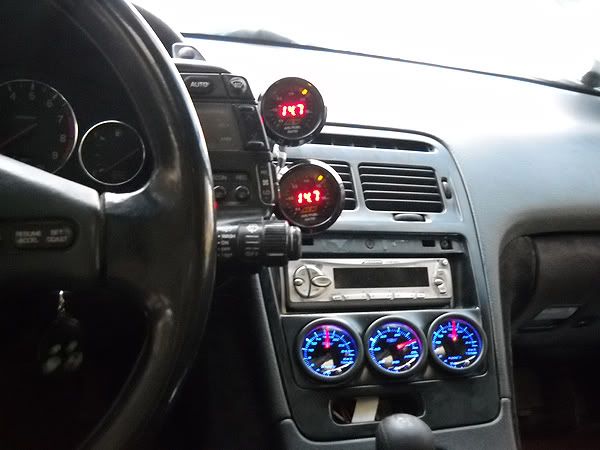
all gauges mounted and wired up! (no battery lol just connected one of those jumper packs to the cables since I haven't run the new ones to the hatch for the battery yet). The orientation is:
A/C pod: TOP= DS wideband. BOTTOM= PS wideband
DIN panel: L-R: DS EGT, Oil pressure, PS EGT
and of course the boost gauge stays on the A pillar. I cut the dual pod down to a single and mounted it a little lower on the pillar. The turbo timer will be relocated to the OEM clock mounting point (the hole in the center din panel section) and painted black. As well as getting a new head unit (which will also be black. this one is old and silver doesn't match anymore lol).
and one of the more important things, finally made the wastegate actuator brackets lol:


and ontop of that, got BASF single stage AH3 paint for the bay
Still need to do the fuel tank work, which I have planned for tomorrow- which shouldn't be to bad, the worst part will be trying to put 15 gallons back into the tank lol. I'll have to siphon it from the drum (55 gallon drum cut in half) into 5 gallon gas cans, then into the car. So: that's it for now!
updates:
subframe is just about finished, just need to replace the ball joints for the rear tie rods
the solid aluminum bushings in. removing the OEM bushings was a total PITA
that's what I had to cut out of each bushing cup...not to mention removing the bushing itself (hole saw drill bits + lots of prying and burning)..fun times!
both widebands mounted
all gauges mounted and wired up! (no battery lol just connected one of those jumper packs to the cables since I haven't run the new ones to the hatch for the battery yet). The orientation is:
A/C pod: TOP= DS wideband. BOTTOM= PS wideband
DIN panel: L-R: DS EGT, Oil pressure, PS EGT
and of course the boost gauge stays on the A pillar. I cut the dual pod down to a single and mounted it a little lower on the pillar. The turbo timer will be relocated to the OEM clock mounting point (the hole in the center din panel section) and painted black. As well as getting a new head unit (which will also be black. this one is old and silver doesn't match anymore lol).
and one of the more important things, finally made the wastegate actuator brackets lol:
and ontop of that, got BASF single stage AH3 paint for the bay
Still need to do the fuel tank work, which I have planned for tomorrow- which shouldn't be to bad, the worst part will be trying to put 15 gallons back into the tank lol. I'll have to siphon it from the drum (55 gallon drum cut in half) into 5 gallon gas cans, then into the car. So: that's it for now!
-
bartZ32tt
- Posts: 850
- Joined: Mon Mar 09, 2009 8:12 pm
- Car: 1990 300zx twin turbo, 1996 7.3 powerstroke
- Location: Des Moines, IA
Re: Gino's 300zx build
You're almost there! That actuator bracket looks like it was a b*tch to do...dremel?
Unrelated to your last post, I was curious what MAF(s) youre planning on running? 800+hp is beyond the z32 MAF's threshold if I'm not mistaken..
Unrelated to your last post, I was curious what MAF(s) youre planning on running? 800+hp is beyond the z32 MAF's threshold if I'm not mistaken..

Re: Gino's 300zx build
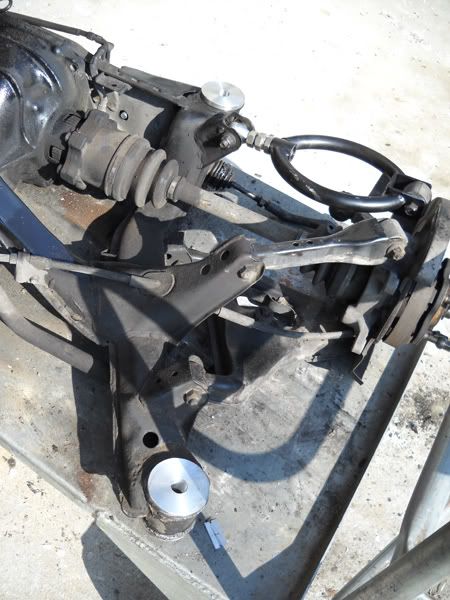
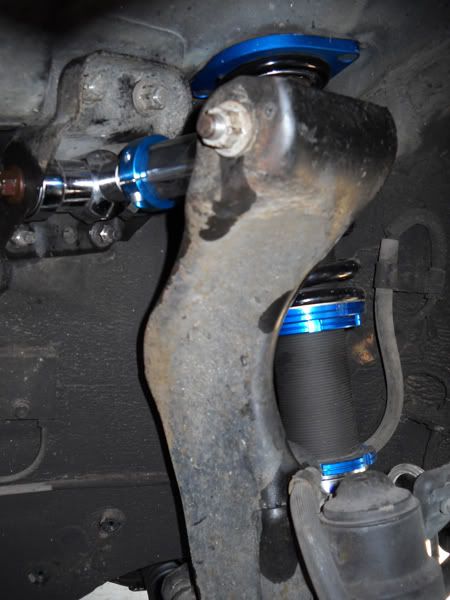
that engine is sexy nice progress hey do you have pics of the front camber kit installed with the tension rods maybe it will motivate me to install mine lol thx
-
Gino
- Posts: 242
- Joined: Mon Oct 18, 2004 3:12 pm
- Car: 1990 300zxTT stage 5+++
- Location: Hanover, PA
- Contact:
Re: Gino's 300zx build
lol I actually did them at work. A dremel would have been easier, I was using a 3" cut off wheel (and drill and bench grinder) and just welding it all together to the stock bracket- so it's a little rough, but at the end of the day it works just as well as anything else (and not like you see it anyways). As for the second question, no MAF. I am running the haltech with a 5 bar map sensorbartZ32 wrote:You're almost there! That actuator bracket looks like it was a b*tch to do...dremel?
Unrelated to your last post, I was curious what MAF(s) youre planning on running? 800+hp is beyond the z32 MAF's threshold if I'm not mistaken..
Thanks man, i thought I put pics up on the previous page but maybe not. so here ya go:sodtoast wrote:that engine is sexy nice progress hey do you have pics of the front camber kit installed with the tension rods maybe it will motivate me to install mine lol thx

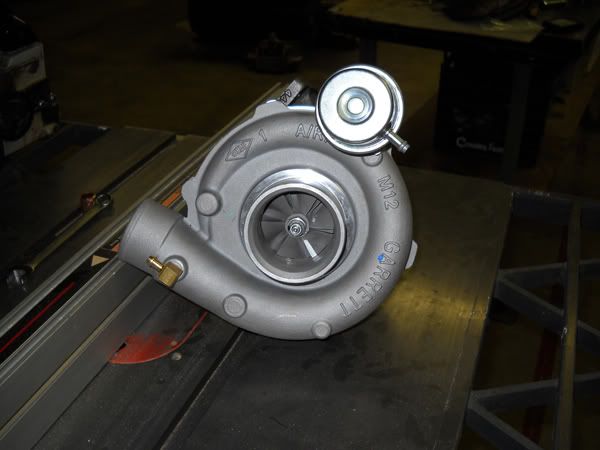
as for new progress, the subframe is back in. Got the fuel lines run from the tank (the hanger is still not in because I'm waiting for one fuel pump strainer assembly (the little bag filter). To run the lines I had to drop the fuel tank and remove the bracket that holds the hardlines on the side of the tank. As for the subframe, it has the solid bushings, and new ball joints (for the hicas tie rod ends). Now that the subframe is back in I can drag the car around to spray the engine bay! Then put the motor in and all thats really left is IC/intake piping and the tune (plus the brakes which are on the way). Also received my AMS 3" downpipes, and the test pipes are on a 2 week backorder, should be here in about 2 weeks though! So here are the pics:

The motor with turbos/wastegate actuators.

rear subframe back together and back in


-8AN nylon braided lines and the two inline 40 micron summit filters

downpipes!
that's it for now, should be coming together nicely once the bay is painted. Need to get the hardener and mix it up then just get time to spray it.