Thanks to doc, rjdmmfl1, I was able to get this project underway and it was a pretty straight forward wiring. Toughest part for me was to find a way to route a wire from the engine compartment to the driver's panel.
Unlike the coupes, which has a perfect 1 ft foglight housing for the placement of the LEDs, the sedan didnt have this luxury so the LEDs are placed medial to the fog lights.
Quick pix to test wiring.
Night pix will follow soon.
Audi White LED Daytime Running Lights - Sedan Version
Re: Audi White LED Daytime Running Lights - Sedan Version (ursus)
cant wait to see them man....looks great
Re: Audi White LED Daytime Running Lights - Sedan Version (rjdmmfl1)
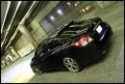
Night Pix, like doc said, they look absolutely sexy in person. I tried to adjust different modes in taking these pictures, but just as i thought, none of them do any justice.
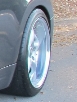
With foglights ON
With foglights OFF
LED alone + Blue LED rocker switch
With foglights ON
With foglights OFF
LED alone + Blue LED rocker switch
-
Mayorprime
- Posts: 20
- Joined: Fri Feb 29, 2008 6:17 am
- Car: 2008 Nissan Altima Sedan
Re: Audi White LED Daytime Running Lights - Sedan Version (ursus)
Where Can I get these lights??
Re: Audi White LED Daytime Running Lights - Sedan Version (Mayorprime)
oznium.com then go to flexible LED and then it's called "THIN LED Strips"
Re: Audi White LED Daytime Running Lights - Sedan Version (ursus)
Alrity, so here’s the how to, pretty straight forward, toughest part was getting the wire from the engine compartment to the driver’s panel.
Preping of car: I will skip the details in some of the easier steps, such as -take off the front grill – all plastic clips, then pull straight out-take off the plastic piece underneath the steering wheel – first remove the side over by prowing it open, then remove the one screw in the bottom left hand side, then pull off. (sorry if I m being unclear, this part is pretty straight forward)-Jack the car up and take off the front left wheel-Remove the rear half of the plastic trim in the wheel well – all plastic clips + 3 screws around the side rockers.-Finally you will need to cut a tiny hole from the drivers side, it’s located all the way above and to the left of the clutch/brake pads. (see picture)-Go to the wheel well and use a blunt pointy tool and stab it until you reach the hole you cut in the driver’s legroom (see picture)You are now done preping the car
Preping the LEDs: -You will receive two LEDs with these 4 prong connector and to home-use adapters but you will need to cut the wires (see picture) in order to extend them; to extend them, I soldered the wires together and shrink wrapped them in the rubber heat shrink or you can use electrical tape.-Extend both LED strips, one ~6ft (passenger side), one ~ 3ft (drivers side).Whole schemeSwitch: you can buy many different types, I chose the rocker LED.There should be 3 prongs in the back of the switch, follow instruction as to which prong goes to which source.-Connect both + ends from LED together and GND ends together. The + end will be extended again to reach the switch, and the GND wires can be grounded at any bolt on the chassis, I chose the one holding the headlight housing. (see picture)-Cut a 6ft wire for the battery switch. Cut the wire near the battery end and insert a fuse holder, and insert a 10A fuse in it. Looks like this, I believe this is the mini one, I got the regular one, shouldn’t make a difference though.Connecting to battery-Cut a 1 ft wire for the switch ground wire. Choose any bolt in that area to be grounded. See pic
Start installing!-Follow the schematic drawing and route every wire accordingly, it should be simple if you did you preping first. Remember, always plan ahead. -Test out the lighting before you put everything in place, check if you wired everything correctly, if the led doesn’t light up, flip it since it has polarity.-Switch: depending where you want to have ur switch, simply drill a hole big enough to fit the switch snug, the location is up to you. I chose the factory buttons above the trunk release see pictures I posted earlier.-Zip tie everything neatly!! You wont regret this, make sure everything is out of harms way (ie, make sure the wires are not against some parts that will heat up and melt your wires).-Tape up the LED connecting parts, although the website says the thin-led-strips are waterproof, just as a percaution measure, tape everything tight.
Last pic to share~A while back I did a dark slate overlaying on my grill and lower grill, here’s the LED covered in the same overlay.Enjoy and best of luck.
Re: Audi White LED Daytime Running Lights - Sedan Version (ursus)
great tutorial!!! go ask for a nice custom tag now!

Re: Audi White LED Daytime Running Lights - Sedan Version (ursus)
VERY FREAKING NICEEEEE.....
That is exactly where I thought about putting these led strips on the sedan, but weren't sure how it would come out. The only thing I'm worrying is how are these led strips will withstand in the Chicago winter time????
That is exactly where I thought about putting these led strips on the sedan, but weren't sure how it would come out. The only thing I'm worrying is how are these led strips will withstand in the Chicago winter time????
-
rjdmmfl1

- Posts: 5111
- Joined: Tue Sep 25, 2007 8:52 pm
- Car: 2008 Altima Coupe, Radiant Silver, 3.5SE, Premium Package, VDC
Re: Audi White LED Daytime Running Lights - Sedan Version (ursus)
Nice tutorial Ursus... are you in SOCAL, or are you in Phoenix?
Re: Audi White LED Daytime Running Lights - Sedan Version (rjdmmfl1)
Sup doc, I'm currently in LA (socal), but I go down to SD quite often (i went to ucsd, and my gf still lives there). I'm only in phoenix during school year.
-
cartersaltima
- Posts: 205
- Joined: Wed Nov 28, 2007 7:45 am
- Car: 2007 altima sedan
Re: Audi White LED Daytime Running Lights - Sedan Version (ursus)
Looks really good. Provides a good option for 2.5ers who dont have Fgos
-
edonissan13
- Posts: 184
- Joined: Wed Dec 12, 2007 11:00 pm
- Car: Nissan altima 2.5s
Re: Audi White LED Daytime Running Lights - Sedan Version (cartersaltima)
Im so down to get this
im just not so down for all the hasle doing it myself
im just not so down for all the hasle doing it myself
-
Importroller

- Posts: 1135
- Joined: Sat Oct 26, 2002 10:12 am
- Car: G35 and 07 Altima 3.5 6spd
- Location: san diego
- Contact:
Re: Audi White LED Daytime Running Lights - Sedan Version (edonissan13)
alan,
i've been trying to find these on line, and cant seem to find where to get them at. where did you find them?
i've been trying to find these on line, and cant seem to find where to get them at. where did you find them?
-
Importroller
- Posts: 1135
- Joined: Sat Oct 26, 2002 10:12 am
- Car: G35 and 07 Altima 3.5 6spd
- Location: san diego
- Contact:
Re: Audi White LED Daytime Running Lights - Sedan Version (Importroller)
....
Double post. My bad
Double post. My bad
They're from http://www.oznium.com
-
Importroller
- Posts: 1135
- Joined: Sat Oct 26, 2002 10:12 am
- Car: G35 and 07 Altima 3.5 6spd
- Location: san diego
- Contact:
Re: (Jose3.5)
thanks
Re: (Importroller)
yup, they are called "thin Led strips @ $19 each.
-
Importroller
- Posts: 1135
- Joined: Sat Oct 26, 2002 10:12 am
- Car: G35 and 07 Altima 3.5 6spd
- Location: san diego
- Contact:
Re: (ursus)
ordered 2' for $34
-
SniperJoe

- Posts: 301
- Joined: Mon Mar 24, 2008 1:11 pm
- Car: 2008 Nissan Altima Coupe 3.5 SE CVT, Premium, Tech, VDC.
Re: Audi White LED Daytime Running Lights - Sedan Version (ursus)
Very nice job ... Looks Sharp!
Re: (Importroller)
Oooh?? good deal! post pix when ur done man.Importroller wrote:ordered 2' for $34
-
Importroller
- Posts: 1135
- Joined: Sat Oct 26, 2002 10:12 am
- Car: G35 and 07 Altima 3.5 6spd
- Location: san diego
- Contact:
Re: Audi White LED Daytime Running Lights - Sedan Version (ursus)
i must have ordered the wrong set. Mine didnt come with any kind of connector. Its being a real pain to solder
-
ADKSaad1387
- Posts: 363
- Joined: Mon Nov 19, 2007 5:37 am
- Car: 2012 Infiniti G37X
2007 Nissan Altima 2.5S Majestic Blue
Re: Audi White LED Daytime Running Lights - Sedan Version (Importroller)
i REALLY like it, but i dont know about dealing with all that wiring and stuff. Dont know if i have the patience.
-
Importroller
- Posts: 1135
- Joined: Sat Oct 26, 2002 10:12 am
- Car: G35 and 07 Altima 3.5 6spd
- Location: san diego
- Contact:
Re: Audi White LED Daytime Running Lights - Sedan Version (ADKSaad1387)
wiring wasnt difficult. I have mine set to come on when the car is on. DRL!
-
ADKSaad1387
- Posts: 363
- Joined: Mon Nov 19, 2007 5:37 am
- Car: 2012 Infiniti G37X
2007 Nissan Altima 2.5S Majestic Blue
Re: Audi White LED Daytime Running Lights - Sedan Version (Importroller)
are you gonna write a tutorial on how to make it DRL? That sounds like it would be easier than a separate switch. oh and what color is that white or the blue?
-
Importroller
- Posts: 1135
- Joined: Sat Oct 26, 2002 10:12 am
- Car: G35 and 07 Altima 3.5 6spd
- Location: san diego
- Contact:
Re: Audi White LED Daytime Running Lights - Sedan Version (ADKSaad1387)
thats the white.
the tutorial is the same as ursus, except I connected the main power wire to a fuse under the hood. you can attach it to the fuse for the anything that comes on automatically when the car is on. I used the fuel pump fuse. the DRL fuse that is under the hood stayed on even when the car was off, so i tried a different fuse
Modified by Importroller at 1:03 AM 7/27/2008
Re: Audi White LED Daytime Running Lights - Sedan Version (Importroller)
Woohoo, that looks awesome man, enjoy the stares you'll get on the street!!
-
Nissan 4 LIFE
- Posts: 147
- Joined: Sun Jun 24, 2007 1:07 am
- Car: 2007 Nissan Altima 2.5 SL CVT Sedan Radiant Silver
- Contact:
Re: Audi White LED Daytime Running Lights - Sedan Version (alphapig)
That's not bad at all Alan & Shawn...I may have to figure out a way to Integrate that into the AIT Racing bodykit. My PIAA's may be up for sale real soon lol.