2001 Pathfinder 4x4 Restoration

A forum for the legendary Nissan Pathfinder and Infiniti QX4.
Kev90
Posts: 62
Joined: Wed Feb 15, 2017 5:20 pm
Car: 2001 Pathfinder SE 4x4

Post

Hey Guys, first post.

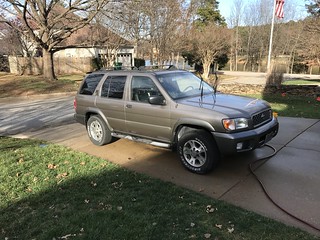
Just purchased a 169k 2001 Pathfinder SE 4x4 Gold with Black Leather Seats last week. PO had the car since new and became a seldom used 3rd vehicle. Vehicle lived its life in South Carolina and is pretty rust free body and paint is in pretty decent condition and has a sweet overhead lcd screen with VHS tape player OOOHHH. Work is going to be done at my brothers garage. :) Goal is a reliable daily driver with a little offroad attitude. No off-roading plans...yet, and just want to knock out everything now that might fail in next 40-50k miles that I can do at one time at my brothers place.

Image

I love the forum! It has been a huge help already. Please take a look at my plan of attack and let me know if there is anything else i should consider or provide any words of wisdom from all you pathfinder experts. Plan is to keep this thread updated as i go.

Happy Reading!! -Kev

Issues:
-Suspension Shot
-Steering Shot, fluid pours out of rack
-Vibration going down highway, starts at about 50mph
-Tear on side of driver side and passenger seats in the vinyl portion by the electronic switches, leather is hard as cardboard on front seats
-Center Console Armrest is junk
-Rear View Mirror is junk
-P1110 code "Intake Valve Timing Control Bank", i believe mine is due to oil sludge
-tires worn out and dry rotted
-Rear Main seal leaking bad
-Oil Cooler Leaking
-Valve Covers Leaking
-Exhaust is nearly rusted through with one previous patch
-Anything underneath that was black for suspension stuff has a light haze of rust, body is rust free
-Step Bar is rusted from underneath
-AC doesn't work, recent records show has a leak
-headlights are hazy
-passenger side fog light has a small crack
-license plate bulb is out
-tachometer and temp dash light is out
-defrost button bulb is out
-Bose Cd player doesn't work, tape and radio work
-floor mats look terrible
-rear luggage carpet is in poor shape

Recent work performed by PO:
-New Alternator and belts 1 year ago
-New AC Compressor 2 years ago
-Front and Rear Brakes done ~25k ago
-some point in the past, Super Heavy Duty Transmission Cooler Installed, this thing is half the size of the radiator

Plan:
-Oil Change, with some transmission fluid to clean out some of the sludge, hopefully fix the P1110 code
-transmission fluid change - purchased
-Transfer Case Fluid Change - purchased
-Diff Fluid Change - purchased
-Brake Fluid Flush- purchased
-NGK Spark Plugs (considering doing coils, but they are pricy and currently they are fine)- purchased
-Coolant Flush- purchased
-All New Coolant Hoses- purchased
-New Radiator - ( while i am this far, it was cheap for a brand new Denso) The OEM radiator is really thin... - purchased
-New Thermostat (while i am there)- purchased
-New Water Pump (while i am there)- purchased
-New Rebuild Steering Rack (must do)- purchased
-Rebuilt CV Axles (while i am there) - purchased Detroit Axle
-Rebuild Driveshafts with new U Joints and Balanced Shafts - Rebuilt Carolina Driveline, Spartanburg, SC (awesome stuff)
-KYB Shocks/Struts- purchased
-2" spacer lift- purchased
-245/75-16 Cooper AT tires
-Front Moog Suspension Components, Lower Control Arms, Tie Rod Ends, Lower Ball Joints,
-Rear Moog Lower and Upper Control Arms- purchased
-Front Sway Bar links and bushings- purchased
-Key Fob - bought 2
-Used Armrest - ebay
-Used Rear View Mirror ebay
-Valve Cover Gasket and do Powervalves - purchased
-Seafoam treatment - purchased, done 2/9/17
-New Headlights - purchased
-Front Wheel Bearings- purchased
-Front Brake Pads, Akebono OEM, (Disc are in good shape)- purchased
-Remove Step Bar - done 2/19/17
-Air Filter- purchased
-Cabin Filter- purchased
-Fuel Filter- purchased
-Fuel Injector Cleaner, multiple treatments, 1st treatment 2/15/17
-AC Hoses, and replace all O rings, do dye test and see where it leaks after that. - purchased
-Duplicolor touch up paint - purchased
-OEM Nissan Floormats - purchased
-Would like to find a used black leather driver seat in good shape
-replace bulbs with leds

Work Completed:
-Seafoam Treatment from the spray can into the throttle body and fuel injection cleaner 2/9/17
-Put down first coat of Rejuvinator Oil from Leatherique, this stuff is awesome 2/9/17
-Washed her down head to toe 2/10/17
-Cleaned all the carpets, threw away the floor mats 2/11/17
-Installed led license plate lights, with SS screws 2/11/17
-Purchased some ratchet straps 2/11/17
-laid down a haze of penetrating oil on all the suspension nuts/bolts 2/11/17
-Cleaned off the Leatherque Rejuvinator Oi with the Prestine Clean, Leather is 10 times better. Rear seats are just like new soft seats, fronts are way better but need a couple more applications to be perfect 2/11/17
-Removed front driveshaft, u joints were shot, nuts where on there tight!! 2/12/17
brother tried to remove rear driveshaft, nuts/bolts were on super tight, brother cut open his pinky and needed 3 stitches, Major Ouch 2/12/17
-Removed Rear Driveshaft, took my bro an hour with torch and penetrating oil, with a busted up pinky 2/13/17
-Another Coat of Leatherique Rejuvinator Oil 2/13/17
-Valentines Day = no work
-Driveshafts rebuilt at Carolina Driveline in Spartanburg, SC, dang their shop is sweet 2/15/17
FYI rockauto has wrong part number for rear driveshafts. they list an outside locking u joint (Moog/National 269), but pathfinder requires inner locking u joint. Rear Part number = Neapco 1-0029, Front = Moog/National 446 These guys know their stuff

Big plans this weekend, Dad, bro and I are knocking a bunch out now that all my parts are here. let me know what else i should do!!
Last edited by Kev90 on Wed Feb 15, 2017 7:54 pm, edited 3 times in total.


Kev90
Posts: 62
Joined: Wed Feb 15, 2017 5:20 pm
Car: 2001 Pathfinder SE 4x4

Post

New Parts!!
Image

New Headlights from RockAuto
Image

Driveshafts Removed! The U Joints are not smooth and floopy, they are really notchy and take some effort to rotate them.
Image

P1110 Code, I believe it is due to sludge build up from poor oil change intervals. I have put a half quart of transmission fluid to try and clean it up
Image

Huge transmission Cooler, I was glad to see this
Image

Blown Steering Rack Boot, and fluid everywhere. Really tough to steer when going slow
Image

Leatherique on the seats, next day was going to be 75 degrees and sunny. It is best to let it sit a day in the sun for the leather to soak up the Rejuvinator Oil. Bags help warm it up.
Image

Missing Sway Bar Bushing, and typical level of rust on the suspension components
Image

Rear Main Seal Leak after 12 hours
Image

Brian VT
Posts: 32
Joined: Tue Sep 27, 2016 10:07 am
Car: 2000 Pathfinder bought at 110k miles 9/26/16

Post

Timing belt.

Kev90
Posts: 62
Joined: Wed Feb 15, 2017 5:20 pm
Car: 2001 Pathfinder SE 4x4

Post

BrianVT- I thought the 3.5 has a timing chain?

I also checked the oil pressure due to the P1110 engine code. I took off the oil pressure idiot switch on the oil cooler and piped in a Harbour Freight Oil Pressure Gage. At start up I got 80psi of oil. Per the Nissan manual brand new at 2000rpm and once the motor is all warmed up you should get 43psi of oil pressure. I am getting 38-39psi. Not bad for a 169k motor with an obvious sludge issue. I am getting right at 18 to 20psi at idle. Don't know what oil weight is in there as the PO just did an oil change before selling it. Plan is to run 10w40 from here on out to make sure I save the bearings and keep the oil pressure up where it should be since i have some wear. I will do another oil pressure check after I change the oil to 10w40.

barnaclebob
Posts: 249
Joined: Tue Feb 10, 2015 2:55 pm
Car: 2001 Pathfinder LE
2011 Altima SR

Post

If you get the inclination to make new seats I can send you the patterns from my own upholstering experience. Its not as hard as it seems.

User avatar
atraudes
Posts: 1106
Joined: Thu Jan 10, 2013 7:46 pm
Car: 2001.5 Infiniti QX4 4WD
Location: Sammamish, WA

Post

It does have a timing chain. No timing belt change needed. It sounds like you did this already, but confirm your strut towers aren't rusted through. It's one of the few things that will singlehandedly send your car to the wrecker.

A couple of thoughts:

- When you are ready to tackle the valve covers, check out my post here on what else you'll want to get. Hopefully you got OEM gaskets; I wasn't impressed with the Fel-Pros I bought. This is also a good read. I pulled the baffles out of mine and cleaned out the gunk that was built up behind them as well.
- Idle air control valve (IACV): do this ASAP. If it idles properly it's not dead yet, but it will be eventually, likely sooner than later. When it does it will fry your ECU and you'll have to get it repaired. Not the end of the world but it's a few hundred dollars and a few days of downtime.
- The next time you pull the intake runners, put threadlocker on the power valves. A number of folks have had the screws back off over time and get ingested by the engine. Not necessarily fatal, but something to avoid if you can!
- I hate to recommend not replacing it, but the water pump is probably unnecessary. It's chain driven and behind the timing chain cover so it's a pain to access and replace, and I haven't read any stories of them failing here. On the other hand, just like everything else it has a limited lifespan. Up to you I guess ;)
- When you have the rear main seal replaced: if they/you remove the engine (or move it around significantly), consider replacing the gaskets where the water pipe connects to the backside of the heads if it's accessible. It's not terribly common for them to leak, but it's expensive/difficult to do if they give up the ghost.

Good on you for tackling so much up front!

User avatar
atraudes
Posts: 1106
Joined: Thu Jan 10, 2013 7:46 pm
Car: 2001.5 Infiniti QX4 4WD
Location: Sammamish, WA

Post

Oh, and PCV valve. Call a dealership and give them your VIN; you might have the screw-in or push-in type. Or just buy both and return the one you don't use ;) If you have the push-in type, plan on replacing the rubber grommet it pushes into and the hose that attaches to it; both were pretty shredded for me.

Kev90
Posts: 62
Joined: Wed Feb 15, 2017 5:20 pm
Car: 2001 Pathfinder SE 4x4

Post

@Atraudes: Thank you for the info. Strut Towers are in great shape, zero rust. dang I already purchased the Fel Pro and they arrived last night, planning on doing it on Saturday. If they end up not doing well, I will just run to the Nissan dealer. I will look into the idle air control valve and add that to the list. I am planning to do the threadlocker when I do the valve covers, as the intake manifold needs to come off and I got all the seals. Do you have a photo of the what the backside head waterpipe looks like, do you think rtv sealant will be an alternative?

For the PCV Valve are you recommending replacing the valve or just the grommet and hose?

Huge Thanks!!!

Update:
Let the truck run in the garage for 2 hours with 5 oz of Seafoam (1oz per quart) in the oil to try and clean up the sludge and oil passages. My oil pressure went up to 42psi at 2000rpm once the oil was all warmed up!! Must have had some sludge blockage. I also put another coat of Leatherique on the front seats, and had the heat on high with the butt warmers on to promote the leather absorbing the product.

@ barnaclebob From this photo you can see the condition of the driver seat, the vinyl on the side is torn. Do you think it is possible to just fix the vinyl, as the leather is getting better from the Leatherique.

Image

Image

Image

barnaclebob
Posts: 249
Joined: Tue Feb 10, 2015 2:55 pm
Car: 2001 Pathfinder LE
2011 Altima SR

Post

I would think it would be a fairly simple job to replace just that section of the seat if you have a sewing machine and practice a little bit with it. You might be able to get away without a walking foot on the sewing machine so maybe test it out with some scrap material before committing. The ease of the job mainly depends on if you would get frustrated learning how to use a sewing machine assuming you don't know already but I didn't have trouble with it. Or if you know someone who sews they probably wouldn't have much issue with this. I could probably do the repair in a day but I know the steps, maybe double that estimate for learning time.

Here is what I would do if you want to fix it:

Remove the seat bolts, then unplug the battery, then unhook the electrical connectors in that order so that you don't get an airbag light when you hook it back up.

Take the bottom seat cover off, you'll have to cut some hog rings and will need hog ring pliers to get it back together.

Cut the stitching of the damaged piece, make sure there is enough material in one form or another to attach the new piece to. You may need to cut the second row of stitching on the leather and I don't know of a good way to get it back. Or you could sew further up onto the leather but again would loose the look of the double stitched seam. Save the plastic clips

Sew the new piece and plastic clips on.

Reassemble in reverse order.

I can also just send you the template for that section since it looks too damaged to get a good pattern off of. You might be able to get it from pinning some paper to the passenger seat though, I don't know how that will work with the curve of the seat.

Here is the thread on my seats if you want to see what you might be getting into:

reupholstering-seats-in-cowhide-t603274.html

User avatar
atraudes
Posts: 1106
Joined: Thu Jan 10, 2013 7:46 pm
Car: 2001.5 Infiniti QX4 4WD
Location: Sammamish, WA

Post

The reason I liked the OEM valve cover gaskets vs. Fel-Pro were that they had little tabs built in that kept the gasket held in place so you could flip the cover over without the gaskets falling out. The Fel-Pros were also made out of a stiff licorice-like rubber and had joints I didn't trust (on the right):

Image

Fel-Pro is generally a great brand so maybe they work great; I just really didn't want to have to do the job over again :chuckle:

For the coolant pipe, I'd just stick with the standard paper gaskets. I don't think RTV will last any longer and the paper gaskets are pretty foolproof to install, especially given the location. Here's the best I could do for a picture:

Image

For the PCV valve, I was thinking replace all three. The valve is a super cheap part and it's kind of buried so I just replace it whenever I'm in there. The gasket had disintegrated the first time I got in there so the valve was just sort of flopping around and the hose was rock hard and split at the end when I put the new valve in.

You got it, let us know how it goes! I love reading these kinds of threads.

Kev90
Posts: 62
Joined: Wed Feb 15, 2017 5:20 pm
Car: 2001 Pathfinder SE 4x4

Post

@barnaclebob I tried to send you a PM but, it won't let me. I guess I don't have enough posts yet.

barnaclebob
Posts: 249
Joined: Tue Feb 10, 2015 2:55 pm
Car: 2001 Pathfinder LE
2011 Altima SR

Post

Kev90 wrote:@barnaclebob I tried to send you a PM but, it won't let me. I guess I don't have enough posts yet.
I sent you one, maybe it will let you reply.

Kev90
Posts: 62
Joined: Wed Feb 15, 2017 5:20 pm
Car: 2001 Pathfinder SE 4x4

Post

barnaclebob wrote:
Kev90 wrote:@barnaclebob I tried to send you a PM but, it won't let me. I guess I don't have enough posts yet.
I sent you one, maybe it will let you reply.
I got your PM, but I found I need to post more before I can reply.

Kev90
Posts: 62
Joined: Wed Feb 15, 2017 5:20 pm
Car: 2001 Pathfinder SE 4x4

Post

Went to the junkyard and picked up a good condition passenger seat, passenger side OEM fog light, some OEM rubber floor mats and trunk mat, and trunk carpet. I was thinking I might try to use the butt portion on the driver side and patch the hole where the electronic switches come through, at least i have 3 front seats to work with now :)

Set of Gunmetal Grey 2004 LE wheels
Image

Some OEM Floor Mats and Trunk Mat
Image
Image

Used Black Leather Passenger Seat
Image

User avatar
rgk
Posts: 588
Joined: Tue Dec 23, 2014 4:48 am
Car: 02 Pathfinder LE 3.5 auto 4x4
Location: Indiana Dunes National Park

Post

Don't bother replacing the complete IACV; just replace its rubber gasket. When it fails, coolant is introduced into the IACV, which is what shorts it out, which is what shorts out the ECU.

Kev90
Posts: 62
Joined: Wed Feb 15, 2017 5:20 pm
Car: 2001 Pathfinder SE 4x4

Post

Dad, bro and me did a bunch of destruction yesterday. Removed the transmission and transfer case, removed power steering. And removed half the front suspension. Had to remove the rear portion of the exhaust to get the transmission/transfer case out which requires lowering the spare tire. While lowering the spare tire the chain broke and dropped the spare tire. Good thing that didn't happen driving down the road.

Kev90
Posts: 62
Joined: Wed Feb 15, 2017 5:20 pm
Car: 2001 Pathfinder SE 4x4

Post

Some pictures from the weekend. Got the rest of the front suspension out of the car on sunday. I have a bad steering u joint that goes into the steering rack. Got to figure out what to do as the driveshaft place says they can't fix it. I posted another thread about the u joint.

transmission and Transfer Case:
Image

Old Suspension:
Image

Front Suspension Removed:
Image

Part of the steering U Joint that is shot
Image

hapathy
Posts: 8
Joined: Sun Feb 26, 2017 2:57 pm
Car: Just bought a nice oldie, 2001 Pathfinder SE

Post

Hello Kev90;
You will have a gem when you are finished. I just bought a tired old 2001 Pathfinder SE and love it.
I do want to put on an external transmission cooler separated from the radiator on mine. It sounds like yours is large and I was wondering if it is separated (independent) from the radiator?
Also I would like to know the make and model or at least the measured size, length and width, if it is accessable.
I want to get the most out of this tired old girl without any transmission problems. :^).
Best regards, Irv

Kev90
Posts: 62
Joined: Wed Feb 15, 2017 5:20 pm
Car: 2001 Pathfinder SE 4x4

Post

hapathy wrote:Hello Kev90;
You will have a gem when you are finished. I just bought a tired old 2001 Pathfinder SE and love it.
I do want to put on an external transmission cooler separated from the radiator on mine. It sounds like yours is large and I was wondering if it is separated (independent) from the radiator?
Also I would like to know the make and model or at least the measured size, length and width, if it is accessable.
I want to get the most out of this tired old girl without any transmission problems. :^).
Best regards, Irv

My transmission is only piped up to the aftermarket transmission cooler. The lines are there for the radiator transmission cooler but not hooked up. The aftermarket transmission cooler is 22.5" wide x7.5" tall x 1" thick. You can't go much thicker as a beam gets in the way. You can mount one that is wider (up to ~25") and taller (up to ~12"-14") if you wanted. My transmission cooler has the lines coming from the bottom. I have no idea what brand the cooler is and couldn't find any markings on it.

User avatar
atraudes
Posts: 1106
Joined: Thu Jan 10, 2013 7:46 pm
Car: 2001.5 Infiniti QX4 4WD
Location: Sammamish, WA

Post

If you're looking for a good transmission cooler, B&M is an excellent choice. I personally run a 70264 and an older member here ran the 70268.

Regarding whether to plumb inline with the existing radiator or not: it's generally recommended to unless you suspect your radiator is on its last legs because the heat from the coolant will warm the transmission fluid quicker after a cold start.

Kev90
Posts: 62
Joined: Wed Feb 15, 2017 5:20 pm
Car: 2001 Pathfinder SE 4x4

Post

Got a bunch more stuff done this weekend. Put in a FelPro Rear Main Seal which required dropping the oil pan, and since the front diff had some surface rust, took it out and cleaned it up. Went ahead and used degreaser, rust converter and sprayed some VHT Epoxy Paint = good as new! I also got a Felpro Front and Rear Oil Pan Gasket, the originals were hard as a rock. Majority of the oil pan just uses RTV sealant. It was a pain in the butt to clean up and to ensure the 2 oil cooler o rings stayed in place, as I couldn't completely drop the entire pan without removing the engine cross member. Got the transmission and transfer case back in. Built up the front KYB Struts, had to get new KYB boots as well and installed the strut spacer. Strut boots were a pain in the butt. Replaced the center console armrest with a great condition used one and replaced the rear view mirror.

On another note, the oil pan had a ton of sludge, about an inch thick of goo on the bottom of the small oil pan. I am sure the seafoam in the oil did a bunch of cleaning as the oil was super dark when it was drained. The oil pickup tube also had a bunch of solidified oil blocking the strainer.

Front of the truck with no headlights -> new ones coming soon. Good photo showing the transmission cooler
Image

transmission Cooler photos
Image
Image

Freshly Painted Front Diff!
Image

Assembled Front Strut with SF Creation 2" Spacer
Image

Rear Main Seal Leak Stain, looks like might have been the rear rubber oil pan gasket. Both replaced so should be good now.
Image

Clogged up Pickup Tube
Image
Image

Slug in the oil pan, Photo doesn't do a great job showing the gunk. There was a ton of caked on oil which was a pain to clean.
Image

Gunk after pouring out the oil pan
Image

hapathy
Posts: 8
Joined: Sun Feb 26, 2017 2:57 pm
Car: Just bought a nice oldie, 2001 Pathfinder SE

Post

Re transmission cooler. Thanks to all for good info and Pics. Nissan service dept. also said the rad-transmission cross contamination was not an issue on the 2001 Pathy. Also that the transmission shifts smoother once warm and should be heated by the rad? I still will put a cooler on as I will be light towing. May still separate as I don't want bad transmission issues. Yesterday the Nissan dlr. put both new front seat belts and retractors in. (Lifetime Warranty if they don't retract). Kev90, you will have a Gem. Great site Love my Pathy.

QCtech
Posts: 102
Joined: Wed Mar 22, 2017 9:43 pm
Car: 2003 Pathfinder LE

Post

atraudes wrote:If you're looking for a good transmission cooler, B&M is an excellent choice. I personally run a 70264 and an older member here ran the 70268.

Regarding whether to plumb inline with the existing radiator or not: it's generally recommended to unless you suspect your radiator is on its last legs because the heat from the coolant will warm the transmission fluid quicker after a cold start.
I been considering this, but one of the things that have killed a lot of transmissions on all brands , is when that inner tube inside the water radiator leaks and then you get water in your transmission. By my experience, when you turn on your car and it is cold, the radiator coolant will take about the same time or even more than your transmission fluid in heating up. The engine heat have to transfer to the coolant and it takes sometimes several minutes. Even in my 8 cylinder Silverado it takes a while. In my Corolla it takes forever. The transmission fluid is instantly in contact with the friction plates, so my guess is that it will actually warm faster than the coolant liquid. Also, if I am putting an external transmission cooler is to have the liquid at a lower temperature all the time. Why then would I want to expose the transmission fluid to over 100 degrees of hot water in the water radiator?? The #1 killer in Honda Odyssey and other cars transmissions have been excessive heat under normal operating conditions. I dont really think that we need to pass our transmission liquid thru ANY line going into the water radiator. Now, consider that most of the brands and models that have had this problem of water contamination, have been just outside the warranty period for the transmission, while most people are still paying their loans over the vehicle. It is a great designed tool for the companies to make money on a transmission repair at the dealer that goes from 2500 to 5000 dollars, but not so good for the rest of us.When I put my external transmission cooler, I will put a separate temp gauge to measure this.

hapathy
Posts: 8
Joined: Sun Feb 26, 2017 2:57 pm
Car: Just bought a nice oldie, 2001 Pathfinder SE

Post

RE SEPARATED transmission COOLING Thanks to QCtech and atraudes. It is a tricky subject and argument. Automakers never want to admit fault if it costs them a great recall or warranty expense, and thus a HUGE sales embarrassment.
Evidently they do not even today recognize this common transmission failure as THEIR design issue?
We do know that any appreciable amount of rad cooling fluid will KILL this AT.
Thus I will separate my transmission oil cooling from my older radiator, flush & replace all transmission oil. May also add an inline filter, to grab any chips? :^) Not a chance of getting rad water in there then.
I will likely do this over the next few weeks and will report back. I would also like to monitor the transmission oil temp. to see if it's operation changes with temp.
If it shifts rough (slams) or flairs (slides) into gears Then I may have to rethink. :^(
Thanks all, luck 2 Kev90, a big project.

hapathy
Posts: 8
Joined: Sun Feb 26, 2017 2:57 pm
Car: Just bought a nice oldie, 2001 Pathfinder SE

Post

Hi Kev90 & forum. Great info & pics. Kev, Thanks.
This forum is good info <<<BUTT this nico page constantly wants to reload and is hard to post to and follow. Very time consuming. (I use my iPhone 99% of the time at a good wireless location).>>>
MY 2001 UPDATE FYI. $
UPDATE Bought & installed NICE new good $ (U-HAUL = CURT) Pathy 98-2004 #78141 class 3 trailer hitch & (it allows for full size under stowed tire) & I wired it yesterday. U-H out of p&p harness, so Used W-Mart plug & play Pathy trailer Harness (= CURT 55361) sale ~ $18, OnLine order & store PU.
Me = Duh.
(***I need a lesson on how to find items and the service methods in the nicoclub 2001 downloaded service manuals, like rear panel, tail light assy. removals etc.***).
PS. I bought a pair of NEW beautiful OEM style tail lights, e-Bay $67.50. transmission oil cooler next.
happy pathying.

hapathy
Posts: 8
Joined: Sun Feb 26, 2017 2:57 pm
Car: Just bought a nice oldie, 2001 Pathfinder SE

Post


Kev90
Posts: 62
Joined: Wed Feb 15, 2017 5:20 pm
Car: 2001 Pathfinder SE 4x4

Post

@hapathy Sorry for the long load times. I believe it is due to all the photos. I currently have them hosted by Flickr, I can change how I did them to something else if someone has a good recommendation. Also good luck on your 01

Sorry for the delay in posts. Me and my brother have both got a terrible bug/flu and knock both out. My brother, dad, and I also had a string of bad luck with our cars that needed to be repaired first. Brother's Mustang Coil pack went out, Explorer 2V v8 blew 2 spark plugs out and stripped the threads, dad Hemi Durango exhaust manifold studs broke, Prelude front brake caliper leaked, and my accord needed new tie rod ends, tires and pads.

However back to action and got a bunch done this weekend. Finished mounting up the transmission, had to drill/grind out the exhaust flange studs as they broke when removing the rear section of exhaust. I had to remove it in order to drop the transmission/transfer case assembly. Took me 5 hours to grind them down and perfect my drilling technique. The drill kept wanting to walk on me and drill out the softer metal in the flange vs the old stud. I had to use a brand new 3/16" drill bit and worked my way up the pack of drills until I got to a 3/8" drill. On the driver side the gas tank is in the way and limited the length of drill bit, so I cut off the shank of the drill bits to finish up the driver side. I also bought and installed the 5 oil cooler coolant lines as mine were expanding due to being covered in oil from the leaking oil cooler and valve covers. I could only find the Nissan branded hoses and 2 go underneath the oil pan, 1 of them is the small coolant line on the thermostat, and last 2 are on the passenger side from the oil cooler to the long steel coolant manifold on the passenger side. The last two where a pain in the butt. I installed a new oil cooler gasket and cleaned all the sludge out of the oil cooler as best as I could with clean transmission fluid and an old toothbrush.

I removed all the coolant lines from the truck as they were all original. The passenger side steel coolant pipe is a pain. Took way longer than planned. anyways... I removed the front plates on the timing cover to swap out the water pump as I was already this far and it is cheap. My covers were loaded with sludge. The PO did not do oil changes like he should have. I had 1/8" to 1/4" of sludge on the plate and at the bottom of it almost a 1/2". I used clean transmission fluid and cleaned up the plates and the areas I could get to inside the motor. I was careful scooping it out so it didn't drop into the engine. I took my $30 amazon usb borescope and looked inside the motor and the rest looked pretty clean considering the sludge I had. I will be running a 1/2" quart of transmission fluid in my next few oil changes and do a seafoam treatment in the oil right after I dump the oil. I am going to do a couple 1000 mile oil changes to hopefully clean up the motor.

I also got a sweet deal on some Cooper Discovery At3 tires 265/70-17 off Discount Tire Direct on ebay. They had a $100 instant coupon and a $70 mail in rebate. Also found out I had 3 huge cracks in my fan. I couldn't find an aftermarket fan, so I ended up ordering an oem Nissan fan and a new clutch.


New tires: bigger than the originals :)
Image

Crack in fan
Image
Image

Sludge on the timing cover plates
Image

Sludge on the Water Pump
Image

Kev90
Posts: 62
Joined: Wed Feb 15, 2017 5:20 pm
Car: 2001 Pathfinder SE 4x4

Post

Couldn't find the edit button for my post... anyways here are some more photos:

Freshly painted Front Diff mounted after I hooked up the oil cooler lines:
Image

Exhaust bolted back up after drilling out broken studs.
Image

New thermostat, the wiggle pin wasn't at the top so I had to rotate the thermostat inside the new housing. Small coolant line on the botom of the housing goes to the oil cooler. This hose is only available from Nissan.
Image

Kev90
Posts: 62
Joined: Wed Feb 15, 2017 5:20 pm
Car: 2001 Pathfinder SE 4x4

Post

Hey so thought you guys might find this funny...

Brother lives in Greenville, SC. Ordered some OEM Nissan parts from NissanPartsDeal.com which came from Northern Georgia close to Atlanta (about 2 hours away), on the package for the part they show they came from the Nissan Dealer's Part Distribution Wearhouse for the Carolinas/Georgia/Virginia/TN which is located a whole 5 miles from my brothers house. The parts took 4 days + weekend to arrive as they went from the wearhouse in Greenville to the dealer in Georgia and back to my brothers house in Greenville. Next order tried to contact the local dealer which is about 5 min from the wearhouse and stated the parts were out of stock and would take a few days, not to mention they were about double the price and they are not allowed to budge on price to match or come close to the online prices from other dealers. It would be sweet if you could walk up to the wearhouse and pick up parts.

PathyPop
Posts: 111
Joined: Sun Mar 05, 2017 11:14 am
Car: 2003 Nissan Pathfinder LE 4x4

Post

Kev90 - continue to keep us updated, useful stuff. You've done ten times more work in just about a month than I can even think about. I just replaced a steering bellow (one side only) this weekend and that took me two hours. When I look at that sludge, it makes me think I could have some of that. I may take off one of the covers to see what it looks like inside, or buy a cheep scope.

On the stock radiator with built in transmission cooler, that scares me. I had that happen to my Saab at 70k miles, costing $3k. I googled the problem for Nissan and it seems to be a major issue with the 2005+ generation. Still, with the VQ35 having 120k miles and wanting to keep the stock set up, I'm thinking it might be good to just replace the radiator. They are only ~$100 for after market.


Return to “Nissan Pathfinder Forum / Infiniti QX4 Forum”