2001 Pathfinder 4x4 Restoration
Re: 2001 Pathfinder 4x4 Restoration
I just went thru all this to change the rear main seal. Followed the manual and dropped everything, the whole exhaust, ( previous owner welded the rear flange so I had to cut the exhaust to remove and then reweld), the front diff,( you need to, if you want to get to the starter),both shafts, and all of the front suspension. Fabricated a support on top of the engine to hold it while the front crossmember comes down(to remove the oil pan). In the process I cleaned everything and changed the oil cooler o-rings. Surprisingly , my engine had almost no sludge inside and it is 270K. I dont know if you know, but the torque converter bolts can not be reused. They elongate with use and have to be replaced with new ones of they will come out and cause trouble. I started taking pics and videos at the beggining, but I was doing all this alone so I got tired of having to clean my hands and everything to shot back the pics so I never fully documented it. Maybe I will post some later, but now I am chasing residual small problems that it already had. Your pics are very good. Thanks for sharing.
Re: 2001 Pathfinder 4x4 Restoration
Thanks everyone for your support and encouragement!!
I pulled the front seats out, boy are they easy on this vehicle, just four easily accessible bolts holding the seat to the car as long as you position the seat in the middle. I followed barnaclebobs recommendations for removing the lower cushion and cover and took it to an upholstery shop who is going to sew in new pieces on the side where the buttons come through. (Sorry barnaclebob, I didn't feel quite comfortable with doing this part myself.) I am going to swap the cushion pads from the passenger side to the driver side as it will have had less wear and tear. I have a low mileage awesome condition used seat for the passenger side. I cleaned up the carpet under the seats and found $1.45 in mostly pennies
Extra money

Underside of the Driver Seat. There are 4 bolts at each corner of the seat which holds the seat pan to the frame. Also will need to move a bunch of the wires out of the way.

Current Condition of the Driver Side Seat

I pulled the front seats out, boy are they easy on this vehicle, just four easily accessible bolts holding the seat to the car as long as you position the seat in the middle. I followed barnaclebobs recommendations for removing the lower cushion and cover and took it to an upholstery shop who is going to sew in new pieces on the side where the buttons come through. (Sorry barnaclebob, I didn't feel quite comfortable with doing this part myself.) I am going to swap the cushion pads from the passenger side to the driver side as it will have had less wear and tear. I have a low mileage awesome condition used seat for the passenger side. I cleaned up the carpet under the seats and found $1.45 in mostly pennies
Extra money
Underside of the Driver Seat. There are 4 bolts at each corner of the seat which holds the seat pan to the frame. Also will need to move a bunch of the wires out of the way.
Current Condition of the Driver Side Seat
Re: 2001 Pathfinder 4x4 Restoration
Removed the upper and lower intake manifold last night. My powervalve screws were all nice and tight. Prior to working on the car I ran a treatment of seafoam in the spray can through the throttle body. In the photos you can see where the seafoam cleaned the center section of the intake manifold and center runners and the sides still have about a 1/16" of gunk on them. I am going to remove the next portion of the intake manifold to get to the lower set of powervalves. Looks like the intake manifold is 4 pieces, upper and lower plenums, and then upper and lower portion bolted to the block. Plan for the top end of the motor is as follows:
-New Valve Cover Gaskets, as the current ones are leaking
-All new gaskets for everything that is taken apart
-New Spark Plugs
-Clean up both of the Timing Solenoids Valves, and remove the covers below them. I have a check engine light for this. Probably full of sludge
-New PCV valve, grommet, and hose (hose cracked when trying to remove it) This is circled in Blue in the photo
-New Idle air control valve gasket
-New OEM Nissan coolant hoses going to the throttle body
-New Coolant hose that goes from rear coolant pipe to the center of the vee to what appears to be a second thermostat which is located in the vee. This is -underneath the 3rd portion of the manifold which has the fuel injectors. (Circled in Red on the photo)
-New OEM Nissan crankcase ventilation hoses as the original are extra crispy and cracked (Circled in Green, bottom two circles is just one hose that goes between each valve cover)
-Clean up any sludge and gunk
Lower Intake with the Upper Intake Manifold Removed, you can see the Powervalves and the clean portion in the center from the Seafoam and the remaining gunk.

Underside of the Upper Intake Manifold

Lower Intake Manifold Plenum removed. This is the 3rd and 4th piece of the intake manifold. The 3rd pieces has the lower powervalves. Blue= PCV, Red = location of Coolant hose and 2nd thermostat, Green = more crank ventilation hoses.

Removing the Lower Intake Manifold

-New Valve Cover Gaskets, as the current ones are leaking
-All new gaskets for everything that is taken apart
-New Spark Plugs
-Clean up both of the Timing Solenoids Valves, and remove the covers below them. I have a check engine light for this. Probably full of sludge
-New PCV valve, grommet, and hose (hose cracked when trying to remove it) This is circled in Blue in the photo
-New Idle air control valve gasket
-New OEM Nissan coolant hoses going to the throttle body
-New Coolant hose that goes from rear coolant pipe to the center of the vee to what appears to be a second thermostat which is located in the vee. This is -underneath the 3rd portion of the manifold which has the fuel injectors. (Circled in Red on the photo)
-New OEM Nissan crankcase ventilation hoses as the original are extra crispy and cracked (Circled in Green, bottom two circles is just one hose that goes between each valve cover)
-Clean up any sludge and gunk
Lower Intake with the Upper Intake Manifold Removed, you can see the Powervalves and the clean portion in the center from the Seafoam and the remaining gunk.
Underside of the Upper Intake Manifold
Lower Intake Manifold Plenum removed. This is the 3rd and 4th piece of the intake manifold. The 3rd pieces has the lower powervalves. Blue= PCV, Red = location of Coolant hose and 2nd thermostat, Green = more crank ventilation hoses.
Removing the Lower Intake Manifold
Re: 2001 Pathfinder 4x4 Restoration
Got off the lowest portion of the intake manifold that has the fuel injectors and the second set of power valves and one of the valve covers off last night. Just as I expected caked with sludge.
Center of the Vee, with the top 3 portion of the intake manifold removed. Note the coolant hose, 2nd thermostat, and a knock sensor.

Valve Cover Removed, Sludge all around, This will be fun to scoop up and clean

Underside of the Valve Cover
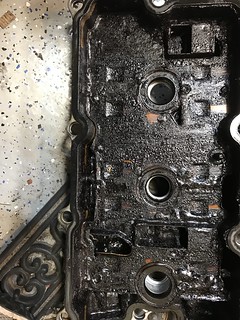
The Timing Solenoid Valve (this is the part giving me my check engine light) you can see sludge inside the oil holes, hopefully cleaning this up with transmission fluid will fix it. this is mounted right next to the valve cover toward the front of the engine. The Solenoid Valves are circled in blue


Center of the Vee, with the top 3 portion of the intake manifold removed. Note the coolant hose, 2nd thermostat, and a knock sensor.
Valve Cover Removed, Sludge all around, This will be fun to scoop up and clean
Underside of the Valve Cover
The Timing Solenoid Valve (this is the part giving me my check engine light) you can see sludge inside the oil holes, hopefully cleaning this up with transmission fluid will fix it. this is mounted right next to the valve cover toward the front of the engine. The Solenoid Valves are circled in blue
Re: 2001 Pathfinder 4x4 Restoration
Cleaning Sludge sucks!!!! Has taken days to clean up all the sludge in the valve covers, heads, timing cover area, and intake manifold. PCV valve failed in the open position and engine was vacuuming out oil into the intake manifold. I am replacing all the PCV hoses, Coolant hoses, and vaccum hoses around the intake manifold as they are all in rough shape.
While Cleaning decided to lay a nice coat of Red on the Valve Covers.

Sludge behind the Front Cam Cover. I cleaned all this up as this is what the cam position sensor is reading and possible cause of my Check Engine light.

While Cleaning decided to lay a nice coat of Red on the Valve Covers.
Sludge behind the Front Cam Cover. I cleaned all this up as this is what the cam position sensor is reading and possible cause of my Check Engine light.
Re: 2001 Pathfinder 4x4 Restoration
So I attempted to put the lower portion of the intake manifold on the truck but the knock sensor plug is broken. The wires came out and the plug is crumbly, needs to be replaced. I read about the 350z and G35 they commonly get a knock sensor check engine code but it is typically the harness/plug have gone bad and not the knock sensor. Knock sensors for the VQ are much more expensive then the VG motors. I looked high and low and couldn't find a replacement plug, as it is just a hair different then every similar plug on the car. Z1 Motorsports makes a replacement harness for the VQ35DE on the 350z and G35 and I have purchased one for $35 plus shipping https://www.z1motorsports.com/oxygen-an ... -5833.html Hopefully this will do the trick.
Re: 2001 Pathfinder 4x4 Restoration
Great guys. Long post 11 times crashed too much work to participate. Luck to all. Hapathy.
Re: 2001 Pathfinder 4x4 Restoration
@hapathy Sorry about it crashing. I guess I have really fast internet as I haven't had an issue on my phone or computers.
Re: 2001 Pathfinder 4x4 Restoration
Sorry about not positing for a while, been a bit busy, but have gotten a lot done on the truck.
Got the front suspension/rear suspension, steering rack, and the engine compartment all back together. Literally tons of new parts everywhere.
Painted Valve covers:

Engine all put back together, can't see much of the painted valve covers I went ahead and put in all new vaccum lines, as two of them had holes rubbed into them for the intake manifold power valves.

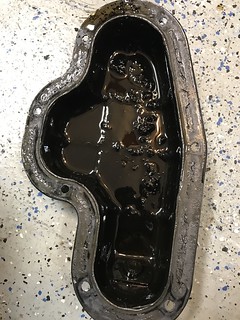
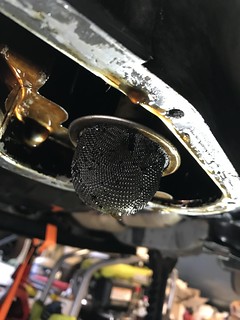
I fired up the motor for about an hour, added coolant and bleed the air out, recharged the AC (all new ac hoses, o rings, condenser, and drier), and put power steering fluid in and bleed the air out by turning the wheels side to side. Oil pressure looked good while running. I dumped the oil and tons of old crap/sludge bits came out with it. Photo shows the pickup tube mostly clogged up and lots of sludge at the bottom of the mini oil pan.


I had a new piece of vinyl stitched in by my local upholstery shop. It is the side piece by the electric switches and the side portion near your butt. They did an amazing job!!


Swapped out the rear control arms with some Moog ones, the bushing were completely shot on the passenger side. New rear shocks, and the SFcreation 2" lift spacer. Rear control arms are easier to install using a ratchet strap so you can put the bolts back in. The rear brakes are pretty new so left them alone. Don't really like the rusty color on the drums...
 [/url]
While putting the front suspension back together found a hole in the front brake caliper dust cover and they were a bit crumbly so got some rebuilt brake calipers and put a coat of Dupli-color silver brake caliper paint. The rebuild calipers always end up rusting and look like crap after 6 months. I used dupli-color paint and grease remover to get them degreased, masked up some spots and then put 3 coats of paint on them. The brake lines looked crummy and are cheap so swapped those out as well.

Just a few days away from driving it on the road for the first time in 2 months!!
Got the front suspension/rear suspension, steering rack, and the engine compartment all back together. Literally tons of new parts everywhere.
Painted Valve covers:
Engine all put back together, can't see much of the painted valve covers
I fired up the motor for about an hour, added coolant and bleed the air out, recharged the AC (all new ac hoses, o rings, condenser, and drier), and put power steering fluid in and bleed the air out by turning the wheels side to side. Oil pressure looked good while running. I dumped the oil and tons of old crap/sludge bits came out with it. Photo shows the pickup tube mostly clogged up and lots of sludge at the bottom of the mini oil pan.
I had a new piece of vinyl stitched in by my local upholstery shop. It is the side piece by the electric switches and the side portion near your butt. They did an amazing job!!
Swapped out the rear control arms with some Moog ones, the bushing were completely shot on the passenger side. New rear shocks, and the SFcreation 2" lift spacer. Rear control arms are easier to install using a ratchet strap so you can put the bolts back in. The rear brakes are pretty new so left them alone. Don't really like the rusty color on the drums...
[/url]While putting the front suspension back together found a hole in the front brake caliper dust cover and they were a bit crumbly so got some rebuilt brake calipers and put a coat of Dupli-color silver brake caliper paint. The rebuild calipers always end up rusting and look like crap after 6 months. I used dupli-color paint and grease remover to get them degreased, masked up some spots and then put 3 coats of paint on them. The brake lines looked crummy and are cheap so swapped those out as well.
Just a few days away from driving it on the road for the first time in 2 months!!
-
atraudes
- Posts: 1106
- Joined: Thu Jan 10, 2013 7:46 pm
- Car: 2001.5 Infiniti QX4 4WD
- Location: Sammamish, WA
Re: 2001 Pathfinder 4x4 Restoration
For the drum brakes, I recently found some folks getting them cleaned up by soaking them in rust remover. It leaves you with a nice paintable surface. I'll be doing mine this weekend if the weather is nice enough for painting.
http://www.9thgencivic.com/forum/mainte ... 821?page=1
http://www.9thgencivic.com/forum/mainte ... 821?page=1
Re: 2001 Pathfinder 4x4 Restoration
@atraudes thanks for the recommendation, that looks pretty easy and then I can put a layer of black paint so they fade behind the wheels and are not noticeable.
Did a bunch of work this weekend and she runs now and drives (still need an alignment). I am having a P0505 check engine light for the idle air control valve now. I replaced the gasket for this and cleaned it all up as it was quite dirty when I had the intake manifold off. When you start it up and it is cold you have to get it some gas to get it started and then it idles rough and at 500rpm, if you give it a tad of gas and idle at 750 it runs great. I purchased a new idle air control valve and hope that will fix it. I am getting a vibration at 50mph-60mph. I did a rough alignment of the toe with a tape measure and eyeballed the camber with a level. The tires are also off a junkyard truck and might need balancing. Hopefully after the Nissan dealer does the alignment and I mount the new 265/65-17 Coopers that will go away. The steering also feels like I have no power steering sometimes driving around slow in a parking lot, other times it feels great. I have a new steering rack and flushed the lines but have the original pump. After reading the bobistheoilguy.com forums on the VQ plan is to run synthetic only and a fram ultra from here on out. My reading is the motors tend to run hotter than many others breaking down the oil and synthetic does a better job cleaning. Since all my seals are brand new, I shouldn't have to worry about the synthetic leaking either.
This is the oil pan and pickup tube after oil change #3
Seat in the truck, had to reset the airbag light with closing the driver door switch 10 times

Pathy out to dinner...

Did a bunch of work this weekend and she runs now and drives (still need an alignment). I am having a P0505 check engine light for the idle air control valve now. I replaced the gasket for this and cleaned it all up as it was quite dirty when I had the intake manifold off. When you start it up and it is cold you have to get it some gas to get it started and then it idles rough and at 500rpm, if you give it a tad of gas and idle at 750 it runs great. I purchased a new idle air control valve and hope that will fix it. I am getting a vibration at 50mph-60mph. I did a rough alignment of the toe with a tape measure and eyeballed the camber with a level. The tires are also off a junkyard truck and might need balancing. Hopefully after the Nissan dealer does the alignment and I mount the new 265/65-17 Coopers that will go away. The steering also feels like I have no power steering sometimes driving around slow in a parking lot, other times it feels great. I have a new steering rack and flushed the lines but have the original pump. After reading the bobistheoilguy.com forums on the VQ plan is to run synthetic only and a fram ultra from here on out. My reading is the motors tend to run hotter than many others breaking down the oil and synthetic does a better job cleaning. Since all my seals are brand new, I shouldn't have to worry about the synthetic leaking either.
This is the oil pan and pickup tube after oil change #3
Seat in the truck, had to reset the airbag light with closing the driver door switch 10 times
Pathy out to dinner...
Re: 2001 Pathfinder 4x4 Restoration
Lookin' good. BTW, you figured out how much you've spent so far on all those repairs?
Re: 2001 Pathfinder 4x4 Restoration
I have an excel file with every penny I have spent, minus some shop supplies like paper towels, brake cleaner, etc. I will do a post with everything I have done, but right now it is about $2.5k plus $500 for tires. $100 items add up quick, but it has an entirely new suspension, all gaskets replaced, all wear items replaced, interior brought back to nearly new condition, new looking wheels, no leaks, and painted every item I took off the car.
Found out I didn't have the idle air control valve plugged in all the way, silly me. Idles great now. Dropping it off today at the Nissan dealer to perform alignment and there are 3 open recalls (strut housing, fuel filler pipe, and headlights/sidelights). My struts housing have zero rust so not worried about them scrapping it but it is good to get a once over on everything.
I just need to get this pesky blinking Airbag light off. I did the procedure to turn the key to the on position without starting and then within 10sec press the driver door button 10 times but it didn't work. I took out the front seats which typically sets off this light as it has airbags and confirmed they are all wired up. Any help is greatly appreciated...
Next project for the Pathy... get rid of the Bose system
Re: 2001 Pathfinder 4x4 Restoration
Mounted up the new tires 265/65-17 Cooper A/T3 and a lot of the vibration went away. Found out my new u joints in my front driveshaft had about .020" of play and you could move it easily move it around. The driveshaft felt like you were getting a butt message and was worst at 48-52mph. Took out the front driveshaft and it drives very smooth. Finally figured out how to reset the airbag light. The youtube video and other posts in the forum on the method to reset it by pressing in the door switch 10 times didn't work. I ended up following the method in the Service Manual section RS and put it into self-diagnosis mode and by the blinks it gave me told me it had an issue but the issue is now fixed ( I ran the motor in the garage while the seats were removed, so the seat airbags were disconnected). I followed the Diagnostic Procedure as laid out on page 49 in the RS Section of the Service Manual:
Inspecting SRS malfunctioning parts by using “AIR BAG”
warning lamp — Diagnosis mode
NOTE:
SRS will not enter Diagnosis mode if no malfunction is
detected in User mode.
1. Turn ignition switch “ON”.
2. After “AIR BAG” warning lamp lights for 7 seconds, turn ignition
switch “OFF” within 1 second.
3. Wait more than 3 seconds.
4. Repeat steps 1 to 3 three times.
5. Turn ignition switch “ON”.
SRS is now in Diagnosis mode.
6. “AIR BAG” warning lamp operates in Diagnosis mode as follows:
After going into this mode the airbag light blinks will tell you the issue. You will need to use the manual to determine the code. I received 2 sec of the light off followed by 3 sec of the light on. This states that the code is still in memory but has not be erased following the repair (I plugged the seats back in). All you have to do next is turn the key to the off position and my light turned off.
New Tires mounted: 265-65-17 Cooper Discovery AT3 with a SFcreation.com 2" spacer lift


Can just bairly fit my finger between tire and KYB strut:

Took the truck into the dealer for an Alignment and perform the 3 recalls on the truck. The headlight and gas tank filler were all good so they didn't do anything. For the Strut Housing Recall I have zero rust but they stated they ordered some bracket and installed it. However I can't find anything of which they added in there...
Alignment Before: I used a tape measure to do a rough toe alignment and eyeballed the camber for the new camber bolts. Even though the caster is not adjustable I wish the Nissan dealer at least measured it.

After

Doing the audio install this weekend and wiring up an oil pressure gage.
Inspecting SRS malfunctioning parts by using “AIR BAG”
warning lamp — Diagnosis mode
NOTE:
SRS will not enter Diagnosis mode if no malfunction is
detected in User mode.
1. Turn ignition switch “ON”.
2. After “AIR BAG” warning lamp lights for 7 seconds, turn ignition
switch “OFF” within 1 second.
3. Wait more than 3 seconds.
4. Repeat steps 1 to 3 three times.
5. Turn ignition switch “ON”.
SRS is now in Diagnosis mode.
6. “AIR BAG” warning lamp operates in Diagnosis mode as follows:
After going into this mode the airbag light blinks will tell you the issue. You will need to use the manual to determine the code. I received 2 sec of the light off followed by 3 sec of the light on. This states that the code is still in memory but has not be erased following the repair (I plugged the seats back in). All you have to do next is turn the key to the off position and my light turned off.
New Tires mounted: 265-65-17 Cooper Discovery AT3 with a SFcreation.com 2" spacer lift
Can just bairly fit my finger between tire and KYB strut:
Took the truck into the dealer for an Alignment and perform the 3 recalls on the truck. The headlight and gas tank filler were all good so they didn't do anything. For the Strut Housing Recall I have zero rust but they stated they ordered some bracket and installed it. However I can't find anything of which they added in there...
Alignment Before: I used a tape measure to do a rough toe alignment and eyeballed the camber for the new camber bolts. Even though the caster is not adjustable I wish the Nissan dealer at least measured it.
After
Doing the audio install this weekend and wiring up an oil pressure gage.
-
fleurys
- Posts: 324
- Joined: Fri Apr 16, 2010 10:00 pm
- Car: 2001 Pathfinder , Locked and loaded !
- Contact:
Re: 2001 Pathfinder 4x4 Restoration
Your path is looking very good Mr ! :-)
-
Buzzman
- Posts: 2079
- Joined: Fri Feb 02, 2007 2:35 pm
- Car: 2016 Lexus RX 350
2023 Kia Stinger Elite V6 AWD.
Re: 2001 Pathfinder 4x4 Restoration
I've just been going through the thread and seeing/reading everything you've done. Huge effort and tons of work.
Not something I could or would have taken on.
My reason for posting is regarding all the sludge you have found on the internals of that engine. That alone would have stopped me from going further.
There's only one way an engine gets that sludgy: The previous owner didn't do any oil changes.
I'm anal when it comes to doing my oil changes, and after 15 years of ownership and regular oil and filter changes (synthetic), my engine is sludge free.
Hopefully after you've done all that work, that the engine will be clean and clear of all that crap.
Keep your fingers crossed that all the oil passages are clean and clear.
Cheers.
-
fleurys
- Posts: 324
- Joined: Fri Apr 16, 2010 10:00 pm
- Car: 2001 Pathfinder , Locked and loaded !
- Contact:
Re: 2001 Pathfinder 4x4 Restoration
If you have a high resolution picture of the one we see your path from the side with your new tires, I would love to run in on my web site with your approval... Send it to [email protected]
Cheers.
S.
Cheers.
S.
Re: 2001 Pathfinder 4x4 Restoration
Following. Great job on the restoration. My 01 QX4 drivers seat has a big rip down the middle, after seeing how good yours came out I want to get mine fixed.
Keep us posted on the progression.
Keep us posted on the progression.
Re: 2001 Pathfinder 4x4 Restoration
Got the Front Driveshaft repaired. Was a little frustrating but the Moog U joints were loose and had .020" play, don't know how that happened. Driveshaft place replaced them with Spicer Greasable U Joints and found the driveshaft has .055" of runout in it. They repaired it and the Driveline is now nice and smooth, except right at 50mph there is just a hint of vibration, but it is a 99% improvement. I have read in the forums that many people have issues at 48-52mph, my only thought is there is some natural frequency when it is turning at that speed. One individual had a custom shaft installed and fixed his issue.
I wanted to paint the UHaul Trailer hitch as the paint was flaking off. Found out that it only had 6 of the 8 bolts installed, and all 6 of them were loose. The top two on the passenger side were only barely threaded in and the installer must have broken the welds on of the threaded nuts inside the frame and just gave up. Had to cut off the top two and I will be putting a bolt all the way through the frame rail when reinstalling. The 2 missing ones show no signs they were ever installed. Not too happy with this UHaul install job and glad I didn't pull a trailer yet. Warning: Check your trailer hitch bolts!!
Installed the new Pioneer radio and Polk DB speakers. Tried installing an amp but on the first brand I tried I had two bad ones that caused hissing with the replacement one being 10x worse, and then tried a different brand and it was causing the driver side front woofer to thump. So it is currently hooked up to the internal radio amp.

Installed an Electronic Oil Pressure Gage. The sludge issues was a big concern so wanted to be able to monitor. This pathfinder has the manual shift transfer case but has a center dash from an LE electronic 4wd. I believe Nissan did it so it could have the auxiliary switch which is for using the VHS player. Purchased a used 4wd switch and gutted it out with a dremel and used some Krylon Fusion Plastic Paint. Turned out really well and the gage is a close match to the oem gages.

I wanted to paint the UHaul Trailer hitch as the paint was flaking off. Found out that it only had 6 of the 8 bolts installed, and all 6 of them were loose. The top two on the passenger side were only barely threaded in and the installer must have broken the welds on of the threaded nuts inside the frame and just gave up. Had to cut off the top two and I will be putting a bolt all the way through the frame rail when reinstalling. The 2 missing ones show no signs they were ever installed. Not too happy with this UHaul install job and glad I didn't pull a trailer yet. Warning: Check your trailer hitch bolts!!
Installed the new Pioneer radio and Polk DB speakers. Tried installing an amp but on the first brand I tried I had two bad ones that caused hissing with the replacement one being 10x worse, and then tried a different brand and it was causing the driver side front woofer to thump. So it is currently hooked up to the internal radio amp.
Installed an Electronic Oil Pressure Gage. The sludge issues was a big concern so wanted to be able to monitor. This pathfinder has the manual shift transfer case but has a center dash from an LE electronic 4wd. I believe Nissan did it so it could have the auxiliary switch which is for using the VHS player. Purchased a used 4wd switch and gutted it out with a dremel and used some Krylon Fusion Plastic Paint. Turned out really well and the gage is a close match to the oem gages.
Re: 2001 Pathfinder 4x4 Restoration
Been a while since my last post. I have driven over 2500 miles since owning it (lots of weekend travel). Changed the oil after 2200 miles (oil change #5) and dropped the mini oil pan and had zero sludge and no buildup on the oil pickup tube. Woop Woop!!!! Put in Mobil 1 10W-40 high mileage and a Fram Ultra filter. Plan on checking the oil again in ~3K miles. My O2 sensor on the passenger side rear failed, and ended up being the wire cracked and broke, wires were pretty crispy. My idle air control valve is acting up again, at idle sometimes it vibrates quite a bit. Also the idle air control valve freaks out and you can hear it activating when the engine is in the ON position and not running. Going to replace it with a new one.
Finally on the 4th try got the 4 channel amp working. Purchased a Clarion and both of those hissed really bad (2nd one was 10x worse), then purchased a Rockford Fosgate that was DOA, and finally the 2nd Rockford worked great. Amp was a small 75 watt RMS per channel and was able to mount it underneath the radio in the vertical position. I kept second guessing my wiring job.
I removed the front mud flaps and moved the inner liner in front of the front tire about 1" closer to the front. The front tire would grab the plastic liner and rubbed (sounded like a loud snap) sounded worse then it actually was. With the bigger tires the rear mud flap looks really funny. I removed the rear mud flap and didn't like the look, then I cut off the rear mudflap from the molding and I don't like that either. Thinking about mounting up a flexible rubber mudflap that doesn't protrude too much.
Oil pressure gage works well, but is tougher to see while driving. Wish there was an easy way to mount one near the gage cluster.
Been getting 16-17 mpg on the highway on I95 from SC to Virginia. Average speed is 65-75mph, and up to 80mph at some spots. Trying to drive "normal", not drafting every tractor trailer and not being the fastest guy in the left lane. I know it has slightly larger tires and a lift so will probably get a bit less than stock, but is this typical of what other get?
-
atraudes
- Posts: 1106
- Joined: Thu Jan 10, 2013 7:46 pm
- Car: 2001.5 Infiniti QX4 4WD
- Location: Sammamish, WA
Re: 2001 Pathfinder 4x4 Restoration
I was scraping 20mpg on my road trip two years ago. That was all highway driving, but we had a bike rack on the back and was loaded down with quite a bit of stuff in the back. No lift or bigger tires for me. I wasn't drafting and kept it around 80mph the whole time.
I get around 15.5mpg around town. Like you, I don't take it especially easy on the gas but I'm not the fastest one out there either.
I get around 15.5mpg around town. Like you, I don't take it especially easy on the gas but I'm not the fastest one out there either.
Re: 2001 Pathfinder 4x4 Restoration
Kev - great work. Question, on your Cooper AT3's with the SFC 2" lift, is everything else stock and they fit? I think they are 31" and I've read that 30.5" is the max that will clear the stock strut without spacers. I see you have kyb struts, so maybe those have more clearance?
Re: 2001 Pathfinder 4x4 Restoration
The tires are exactly 30.61" and there are KYB struts. FYI the stock struts are KYB as well, they have both a Nissan and KYB logo stamped on them. Other then the lift and tires the rest of the truck is stock and no wheel spacers. I did have to remove a little bit from the front bumper and move the front inner fender so the front tire didn't rub at full lock and articulating at same time.
Re: 2001 Pathfinder 4x4 Restoration
Thanks. We ended up with "Pathfinder" 245/70/17, Direct Tire's house brand (relabeled Hankook Dynapros). So these are just a little taller than stock measuring at 30.4". The driver's side still rubs the plastic slightly only while turning and backing up, but we're going to do the 2" spacer lift and that should take care of it.
Re: 2001 Pathfinder 4x4 Restoration
I know it has been a while but knocked out a few things this past weekend and have put about 3000 miles since my last post over a month ago.
I POR 15 the Uhaul trailer hitch and painted it with a top coat. Reinstalled the hitch, the original install was missing 2 bolts, 2 had broken the welded nuts, and 3 were finger loose, and the last one was tight. Replaced the fuel filter and did an oil change with Mobil 1 10W-40 and Fram Ultra Filter. I checked the mini oil pan and looked very clean, so I think most of the sludge is out of the system.
My 2 year old (per the previous owners records) alternator failed. I replaced it with a rebuild one from Advance Auto. The Nissan design for the mounting nut on the end of the long bolt is terrible. This is a two person job and had to use my extension magnet to hold it into position.
Installed a new OEM idle air control valve which fixed my too low rpm idle issue. I also relocated my giant transmission cooler inbetween the radiator and A/C condenser. There was about 1.25" between them. Relocating the transmission cooler allowed me to install two 10" electric pusher fans directly to the condenser. The fans are wired up so they come on whenever the compressor clutch is engaged. This has made a huge difference in the A/C in idle and low speed driving on 90 degree plus days. I am thinking about wiring it up to a switch on the dash so they only run when I want the extra cooling. The fans utilize 15 amps. When everything is on (radio, fans, headlights, etc.) I have measured that I have a surplus of 10amps at idle to charge the battery. Used my fancy new clamp style multimeter to measure. If I wire it to a switch I can turn off the fans if I want the battery to charge faster.
Re: 2001 Pathfinder 4x4 Restoration
So another month and ~1.5k miles has lead to one more item to fix. The Power Steering Pump finally let go. I always thought the steering was heavy and finally the pump seal went. Spraying power steering fluid everywhere. The fluid was coming out where the shaft enters the box. I am glad it wasn't the pressure hose, as they are insanely expensive ~$200 and are not stocked anywhere. I even called the Nissan dealer and they didn't have one in stock and the $360 price shocked the parts guy. Anyways, was able to get a new pump from Advance Auto. The pump even had the pulley mounted on it.
Swapping out the pump was pretty easy, just needed to remove the battery and the belt. Two bolts hold the pump on the engine, then had to swap over a bracket to the pump. The only difficult part was lining up the pump onto the bottom mount. It is nearly a press fit to get it on there and then a pain to line up the holes to get the bolt through. The pump came with a new O-ring and 2 copper crush washers for the hoses.
Huge difference in steering now that I have a working pump. I can almost steer with one finger.
Re: 2001 Pathfinder 4x4 Restoration
So big news, got a new job and I am moving from Columbia, SC to right outside Las Vegas.
Packed up everything I could fit into a Uhaul and driving 2,600 miles to my new town.
Pathy towing a fully loaded UHaul. We are only 800 miles in, but its doing great!

Packed up everything I could fit into a Uhaul and driving 2,600 miles to my new town.
Pathy towing a fully loaded UHaul. We are only 800 miles in, but its doing great!
-
nicoguidera
- Posts: 3
- Joined: Mon Nov 20, 2017 11:28 pm
- Car: 2004 Nissan Pathfinder LE Platinum 4x4
Re: 2001 Pathfinder 4x4 Restoration
Thanks for the lessons, Kev, that was a great read...good luck, hope your job and Pathy are working out well in Las Vegas!
Nico
Nico
Re: 2001 Pathfinder 4x4 Restoration
Thanks nicoguidera Doing great in LV.
Took the Pathy to the Red Rock Canyon


Took the Pathy to the Red Rock Canyon
-
fleurys
- Posts: 324
- Joined: Fri Apr 16, 2010 10:00 pm
- Car: 2001 Pathfinder , Locked and loaded !
- Contact:
Re: 2001 Pathfinder 4x4 Restoration
Please send me these pictures in hi res ([email protected]).. I would love to use them on my website (with your permission).
Steve.
Steve.