Jareds RB20 S13 project
-
s13drifter88
- Posts: 1111
- Joined: Wed Jun 23, 2010 7:40 am
- Car: 93 S13 Coupe CA18DET (Money pit)
1996 D21 Hardbody (Work truck/daily)
!993 Del Sol (Daily)
1987 Pontiac GTA (Drag project, other money pit)
1989 SOHC S13 Buzz Car - Location: Huntsville, AL
Re: Jareds RB20 S13 project
no prob man. im sure hes got what u need and if not he can have it in quick
Re: Jareds RB20 S13 project
where abouts is he located?
Re: Jareds RB20 S13 project
pulled the pass. side suspension apart today. also thought i'd show you guys why im looking for axles lol. apparently the guy who had the car before teh guy i bought it off, when he crashed it he hit the side so hard he pushed the spider assembly on the inner cv into the plug seal putting a hole in it:


-
s13drifter88
- Posts: 1111
- Joined: Wed Jun 23, 2010 7:40 am
- Car: 93 S13 Coupe CA18DET (Money pit)
1996 D21 Hardbody (Work truck/daily)
!993 Del Sol (Daily)
1987 Pontiac GTA (Drag project, other money pit)
1989 SOHC S13 Buzz Car - Location: Huntsville, AL
Re: Jareds RB20 S13 project
located here in alabama
Re: Jareds RB20 S13 project
updates!
so after i got all the rear taken apart, i decided it was time to pull the subframe/diff. diff needed to get welded, and i wanted to pull the subframe...well just cuz. anyways that turned into a nightmare. the front passenger side bushing on the subframe was seized to the stud that comes down from the unibody. after a lot of propane torching and prying i got the subframe out, leaving the bushing behind. at this point i decided to get solid aluminum bushings for the rear (no still havent got them, but will be ordered shortly-ish).
some before pics of the subframe and diff:


after pics will be up when its all ready to go back in. i've got some plans.
anyways, this is the bushing that was such a PITA:

at that point i had already burned/scraped/peeled all the rubber off in hopes that the propane torch could help me pull it off. no luck, so i went and purchased a MAPP gas torch, hammer, and chisel. after much grinding, torching, chiseling, hammering, cursing etc. (we all know how it is working on old cars) this is the result:


i will be sanding down the rust, re-threading all the studs, and buying new nuts for the rear subframe, all in hopes that i will never have this issue again. some never seize will also be applied to the bolts, again for preventative measures.
second update, got my self some new used axles with the one broken seal that the last axle had i just went and picked up a set locally for $80

not bad if i say so myself.
also got my front hubs in and installed (cuz installing them is so hard lol)

theyre the ichiba front hubs. probably the easiest way to swap to 5 lug in the front
also, with the hubs in, and my front suspension put together, i borrowed a wheel from a friend just to "test fit" and see where the suspension was sitting. i didnt have lugs and the wheel was rubbing the coil spring, so i didnt set the car down, but all up in the air it sits pretty "low". theres maybe 3.5-4 inches between the fender well arch and the top of the tire:

shes gonna be loowwwwwww when i get to set it down i'll be picking up some spacers (probably 10mm or so) when i get my wheels to help clear the coils and push the wheels out a bit to fill up the fenders. in the future i'll have my work wheels and they should fill the fenders without any spacers
annnnddd last but not least, for the ebrake, theres this piece:

does anyone know how to disconnect the two ebrake lines from it? i've tried, and if it really is only a matter of rotating the cable and pushing it out, then i need to man up and do it. if not, any pointers are appreciated
so after i got all the rear taken apart, i decided it was time to pull the subframe/diff. diff needed to get welded, and i wanted to pull the subframe...well just cuz. anyways that turned into a nightmare. the front passenger side bushing on the subframe was seized to the stud that comes down from the unibody. after a lot of propane torching and prying i got the subframe out, leaving the bushing behind. at this point i decided to get solid aluminum bushings for the rear (no still havent got them, but will be ordered shortly-ish).
some before pics of the subframe and diff:
after pics will be up when its all ready to go back in. i've got some plans.
anyways, this is the bushing that was such a PITA:
at that point i had already burned/scraped/peeled all the rubber off in hopes that the propane torch could help me pull it off. no luck, so i went and purchased a MAPP gas torch, hammer, and chisel. after much grinding, torching, chiseling, hammering, cursing etc. (we all know how it is working on old cars) this is the result:
i will be sanding down the rust, re-threading all the studs, and buying new nuts for the rear subframe, all in hopes that i will never have this issue again. some never seize will also be applied to the bolts, again for preventative measures.
second update, got my self some new used axles
not bad if i say so myself.
also got my front hubs in and installed (cuz installing them is so hard lol)
theyre the ichiba front hubs. probably the easiest way to swap to 5 lug in the front
also, with the hubs in, and my front suspension put together, i borrowed a wheel from a friend just to "test fit" and see where the suspension was sitting. i didnt have lugs and the wheel was rubbing the coil spring, so i didnt set the car down, but all up in the air it sits pretty "low". theres maybe 3.5-4 inches between the fender well arch and the top of the tire:
shes gonna be loowwwwwww when i get to set it down
annnnddd last but not least, for the ebrake, theres this piece:
does anyone know how to disconnect the two ebrake lines from it? i've tried, and if it really is only a matter of rotating the cable and pushing it out, then i need to man up and do it. if not, any pointers are appreciated
Re: Jareds RB20 S13 project
update time! i've been pretty busy lately:
first off, got my new subframe. wont be needing to get solid bushings or anything, as the rubber ones on it are in perfect condition:
old:

and the thrashed mount and broken weld (at the top)

and the new one, soon to get bushings and a coat of paint to help clean it up:

also got a LOT of work done on putting the car back together. got the brake booster cleaned up, painted gloss black (cant have a rusty booster in my engine bay) and put back in, as well as the throttle cable. bay is dirty for now and i will take more pics in the sun when its clean:

and last but not least, i put the interior together! got the dash bar, steering column and all the pedals (picked up a 5spd brake pedal instead of cutting the auto) put in, as well as got the interior undercoated. looks DAMN good if i say so myself:


i also picked up a minty black dash with the brake pedal but no pics yet. still have to spray the upper half of the inside of the car, but thats just goin flat black like the firewall. i saw no need to undercoat it as i figure, what wear will the roof see? lol
first off, got my new subframe. wont be needing to get solid bushings or anything, as the rubber ones on it are in perfect condition:
old:
and the thrashed mount and broken weld (at the top)
and the new one, soon to get bushings and a coat of paint to help clean it up:
also got a LOT of work done on putting the car back together. got the brake booster cleaned up, painted gloss black (cant have a rusty booster in my engine bay) and put back in, as well as the throttle cable. bay is dirty for now and i will take more pics in the sun when its clean:
and last but not least, i put the interior together! got the dash bar, steering column and all the pedals (picked up a 5spd brake pedal instead of cutting the auto) put in, as well as got the interior undercoated. looks DAMN good if i say so myself:
i also picked up a minty black dash with the brake pedal but no pics yet. still have to spray the upper half of the inside of the car, but thats just goin flat black like the firewall. i saw no need to undercoat it as i figure, what wear will the roof see? lol
Re: Jareds RB20 S13 project
whew! got the interior done and got the subframe cleaned up and reinstalled. just gotta undercoat more of the underbody now...dunno how much im gonna do but im thinking the wheel wells and gas tank are a must:


with how good the subframe looks in contrast im debating not undercoating anything else...but knowing me and how much i like things to look good, i probably will. more work to be done tomorrow as its another day off work. 3 days off in a row, its been nice
with how good the subframe looks in contrast im debating not undercoating anything else...but knowing me and how much i like things to look good, i probably will. more work to be done tomorrow as its another day off work. 3 days off in a row, its been nice
Re: Jareds RB20 S13 project
and more updates still! went to the shop today and took care of my welded diff. cleaned it up all perfect and put the cover back on. no pics (it looks like a diff...) yet but soon, i have some plans with it.
also got to play with the rear gtst skyline knuckles. got all the bushings replaced. turns out theres only 3 apparently? anyways, just used a balljoint press and the bushings popped right out. the balljoint from the hicas was a major PITA, had to heat up the part of the knuckle surrounding it then just used an aire hammer and smashed it out. also, putting the urethane bushings in wasnt easy. had to put them in by hand as i couldnt make them line up properly with a press. anyways, some pics!

and the new, cleaned, gtst rotors that i got with the 5 lug rears. turns out the rear brakes on the skyline when it was crashed were brand new, just a little bit of surface rust which i buffed off:

also bought: sentra balljoints for the rlca, front rotors (on the way), front pads will be soon, and i cleaned up the rear calipers/pads and theyre ready to install. more updates as i go! just need to buy more undercoat....
also got to play with the rear gtst skyline knuckles. got all the bushings replaced. turns out theres only 3 apparently? anyways, just used a balljoint press and the bushings popped right out. the balljoint from the hicas was a major PITA, had to heat up the part of the knuckle surrounding it then just used an aire hammer and smashed it out. also, putting the urethane bushings in wasnt easy. had to put them in by hand as i couldnt make them line up properly with a press. anyways, some pics!
and the new, cleaned, gtst rotors that i got with the 5 lug rears. turns out the rear brakes on the skyline when it was crashed were brand new, just a little bit of surface rust which i buffed off:
also bought: sentra balljoints for the rlca, front rotors (on the way), front pads will be soon, and i cleaned up the rear calipers/pads and theyre ready to install. more updates as i go! just need to buy more undercoat....
-
TurboSauce

- Posts: 6702
- Joined: Thu May 21, 2009 2:12 pm
- Car: 2006 G35 coupe, 2018 Mazda CX-9
- Location: Orlando
Re: Jareds RB20 S13 project
Nice work man. Can't wait to see the end product, I bet it would be awesome.
.
.
.
.
.
.
.
.
.
just don't crash it....
.
.
.
.
.
.
.
.
.
just don't crash it....
Re: Jareds RB20 S13 project
haha. i'll try not to crash it of course...but at the same time its being built as a drift car, so if it does happen, i'll just build another one.
-
s13drifter88
- Posts: 1111
- Joined: Wed Jun 23, 2010 7:40 am
- Car: 93 S13 Coupe CA18DET (Money pit)
1996 D21 Hardbody (Work truck/daily)
!993 Del Sol (Daily)
1987 Pontiac GTA (Drag project, other money pit)
1989 SOHC S13 Buzz Car - Location: Huntsville, AL
Re: Jareds RB20 S13 project
Nice work man. It looks good. I gotta clean the WHOLE underside of my 240. My power steering and rear main seal were leaking so now my underside is a solid oil/gunk/sludge coating. Since Ive had my CA out Ive been working on it a little here and there between class at night and work in the day.
Re: Jareds RB20 S13 project
ya man, a wire brush is your friend, trust me. i hate oil leak messes...my entire front was covered
-
Hijacker

- Posts: 14373
- Joined: Wed Aug 13, 2003 4:57 am
- Car: '92 240sx Convertible
'94 F-150 - Location: Fredericksburg, VA
Re: Jareds RB20 S13 project
I know I'm a little late on commenting on this, but mine were pretty much seized into the bracket as well. I had to cut the e-brake cables going to the calipers, but I was swapping in Z32 cables for my Z rears. I did end up ordering a new front cable from Nissan. I tried burning the old cables out of the bracket, and that didn't work. The only thing I didn't try was to drill them out.JaredP wrote:does anyone know how to disconnect the two ebrake lines from it? i've tried, and if it really is only a matter of rotating the cable and pushing it out, then i need to man up and do it. if not, any pointers are appreciated
-
s13drifter88
- Posts: 1111
- Joined: Wed Jun 23, 2010 7:40 am
- Car: 93 S13 Coupe CA18DET (Money pit)
1996 D21 Hardbody (Work truck/daily)
!993 Del Sol (Daily)
1987 Pontiac GTA (Drag project, other money pit)
1989 SOHC S13 Buzz Car - Location: Huntsville, AL
Re: Jareds RB20 S13 project
So far y best friend(s) is a 72inch stiff bristle pole brush, a gallon of purple power my pressure washer lol. 2500psi with purple power is a force to reckon with lol
-
supersayianjim
- Posts: 308
- Joined: Wed Nov 26, 2008 6:02 am
- Car: 89 240sx(s13)
Re: Jareds RB20 S13 project
kwel jared. i just put in my rear toe urethane bushling as you said the other 2 were super f*** hard to get to. so i just left the stock ones in. why didn't you get a lsd??
Re: Jareds RB20 S13 project
ya all the bushings weren't really easy, but i got them. as for the lsd, welded was cheaper and i've driven a car or two with a welded and i like it. i've never really driven a car with an lsd but for how predictable the welded diff is i dont think i'll have any issues.supersayianjim wrote:kwel jared. i just put in my rear toe urethane bushling as you said the other 2 were super f**king hard to get to. so i just left the stock ones in. why didn't you get a lsd??
i got them out today. i basically just used channel lock pliers and needle nose and pryed them out. worked like a charm!Hijacker wrote:I know I'm a little late on commenting on this, but mine were pretty much seized into the bracket as well. I had to cut the e-brake cables going to the calipers, but I was swapping in Z32 cables for my Z rears. I did end up ordering a new front cable from Nissan. I tried burning the old cables out of the bracket, and that didn't work. The only thing I didn't try was to drill them out.JaredP wrote:does anyone know how to disconnect the two ebrake lines from it? i've tried, and if it really is only a matter of rotating the cable and pushing it out, then i need to man up and do it. if not, any pointers are appreciated
and more updates!!
i got the rear suspension started, just gotta do the bushings and ball joints in the rlca, and then i can put the wheels on! also, put the seat rails on the seat and got it put in the car. it wont be staying in the car for long i just wanted to sit in it and let me say its everything i dreamed of and more. tomorrow i'll be doin the lca's and (hopefully) putting some wheels on the car and maybe getting it set down and getting the height set to where i want it. stance rear coils have one collar removed and are as low as they can be so we'll see what kind of height that is. i also put the front brakes on (old pads and rotors though) so that i can put some wheels on the front. i get new rotors tomorrow but they wont go on until the car is ready to roll. anyways, on to a few pics!


the green tape on the coil is so that the ruca doesnt mark the coils. as much as i dont really care if they get scratched up, id rather it happen while i was driving
and the seat:


if you enlarge the pics you can kinda see my new, gold drift knob. got that the other day for cheap so i just threw it on
Re: Jareds RB20 S13 project
alright, some more small stuff today, nothing huge. its getting colder and its no fun working on cars when you cant feel your extremities. anyways, got the rear lca installed and the balljoint on the knuckle tightened up, and then i was able to borrow some wheels from a friend to "test fit". theyre subaru sti wheels, so the offset is +53, but the wheel doesnt clear the hub. i tried measuring the hub, its roughly 19mm from the back of the hub where the lugs seat to the centre part that sticks out, making the wheel have an effective offset in the +34 range. all in all, im happy with how close to "flush" the wheel sits at such a high offset and VERY happy with how low the vehicle will sit when i set it down. a nice pic to show what i mean:

that pic is without any weight on the vehicle, so expect another 1-1.5 inches "lower" after compression.
also, cleaned up the diff and painted it. just went aluminum silver which i think looks dope, and will look sick under the car:

you wont see it much, but thats ok. everything will be undercoated, so it will really stand out when its up in the air
that pic is without any weight on the vehicle, so expect another 1-1.5 inches "lower" after compression.
also, cleaned up the diff and painted it. just went aluminum silver which i think looks dope, and will look sick under the car:
you wont see it much, but thats ok. everything will be undercoated, so it will really stand out when its up in the air
Re: Jareds RB20 S13 project
well...i was about [] <<<that close to buying works today. sucks cuz i have too much other s*** i need to pay off first, and i would've got a killer deal  oh well, what can you do.
in other news, got my tie rods in. got the tein hardened ones with the spacer for more angle, and let me tell ya, its quite a bit more steering angle. probably another 10 degrees at least but im just speculating really. all i know is the tires move quite a bit. installation was as easy as installation can go for tie rods. olds out, new ones in, new boots. simple as that. few pics though, cuz i like pics:

mm tein, kinda choked i never got stickers though...

old vs new...the new ones are so much beefier/better quality

the teins use that spacer on the inner tie rod for MOAR angle, instead of using the stock locking tab thing. a little loctite and tighten 'er good, no more worries
i also decided to put the collar i removed from the rear coils, back in. as much as i want to be "omg slammed" practicality comes first, and ideally, im trying to copy the stance i've seen on another s13 online. so i borrowed some rotas from a buddy, 18x9.5 rota p45's, +20 offset, and put them on the car to test:

front end looks like its gonna have a bit more space between the tire and fender, but i think i've read that thats normal on these cars, as the rear fender arch sits "lower."

this pic was obviously taken straight on from the rear. unweighted, this is how much a 9.5" wide, +20 wheel sticks out of the stock fender. im goin with 30mm rear overs, so i think with a +12 offset (which is the lowest the works i was looking at are), i might need at most, a 15mm spacer or so. i dont care about "hellaflush" i just like a nice stance, and as long as the wheels arent crazy sunk, im happy.
and last but not least, i picked up an oil and power steering setup from the same friend who lent me the wheels. he just sold his s13 so i grabbed some of the parts off it, got skyline front brake lines as well. i'll probably upgrade to stainless but for now, brake lines are brake lines:

all in all pretty good condition stuff, gotta find a way to mount it all along with the intercooler and rad, but i'll figure it out.
in other news, got my tie rods in. got the tein hardened ones with the spacer for more angle, and let me tell ya, its quite a bit more steering angle. probably another 10 degrees at least but im just speculating really. all i know is the tires move quite a bit. installation was as easy as installation can go for tie rods. olds out, new ones in, new boots. simple as that. few pics though, cuz i like pics:
mm tein, kinda choked i never got stickers though...
old vs new...the new ones are so much beefier/better quality
the teins use that spacer on the inner tie rod for MOAR angle, instead of using the stock locking tab thing. a little loctite and tighten 'er good, no more worries
i also decided to put the collar i removed from the rear coils, back in. as much as i want to be "omg slammed" practicality comes first, and ideally, im trying to copy the stance i've seen on another s13 online. so i borrowed some rotas from a buddy, 18x9.5 rota p45's, +20 offset, and put them on the car to test:
front end looks like its gonna have a bit more space between the tire and fender, but i think i've read that thats normal on these cars, as the rear fender arch sits "lower."
this pic was obviously taken straight on from the rear. unweighted, this is how much a 9.5" wide, +20 wheel sticks out of the stock fender. im goin with 30mm rear overs, so i think with a +12 offset (which is the lowest the works i was looking at are), i might need at most, a 15mm spacer or so. i dont care about "hellaflush" i just like a nice stance, and as long as the wheels arent crazy sunk, im happy.
and last but not least, i picked up an oil and power steering setup from the same friend who lent me the wheels. he just sold his s13 so i grabbed some of the parts off it, got skyline front brake lines as well. i'll probably upgrade to stainless but for now, brake lines are brake lines:
all in all pretty good condition stuff, gotta find a way to mount it all along with the intercooler and rad, but i'll figure it out.
Re: Jareds RB20 S13 project
thanks man, got tuesday off so if im not busy helpin out a friend with his new rhd FD i'll be hopefully installing my oil/ps coolers, maybe foolin with the suspension, and above all IM LOOKING FOR WHEELS! IF ANYONE HAS ANY LOW OFFSET 17/18's LET ME KNOW  lol, sorry for caps, i just need my own wheels, and i need dope ones.
-
s13drifter88
- Posts: 1111
- Joined: Wed Jun 23, 2010 7:40 am
- Car: 93 S13 Coupe CA18DET (Money pit)
1996 D21 Hardbody (Work truck/daily)
!993 Del Sol (Daily)
1987 Pontiac GTA (Drag project, other money pit)
1989 SOHC S13 Buzz Car - Location: Huntsville, AL
Re: Jareds RB20 S13 project
id try to mount those coolers in the fenders as best as u can. i helped a friend with his rb20. it kept overheating and me and him moved the coolers to the fenders and that fixed the overheating issue. my guess is it was just to much radiating heat and to much blockage in front of the radiator. the radiator was a mishimoto 3"
Re: Jareds RB20 S13 project
i have an fmic, so i'll have to try to make the coolers clear the piping, but i might just put them in front or something, or i might hang them essentiall off the ends of the crash bar...we'll see. i'll see where i can mount them up tomorrow depending on weather
-
s13drifter88
- Posts: 1111
- Joined: Wed Jun 23, 2010 7:40 am
- Car: 93 S13 Coupe CA18DET (Money pit)
1996 D21 Hardbody (Work truck/daily)
!993 Del Sol (Daily)
1987 Pontiac GTA (Drag project, other money pit)
1989 SOHC S13 Buzz Car - Location: Huntsville, AL
Re: Jareds RB20 S13 project
well hoefully your weather is better there than it was here today. we had multiple tornados all around campus today and i drove right next to a funnel on my way back from lunch. slightly un-nerving
Re: Jareds RB20 S13 project
nope..today sucked, cold as all hell (but also, it was above freezing. i just hate cold). i did manage to pick up a full set, front and rear, of braided brake lines, now just trying to figure out how to install them onto the calipers. theyre "female" on both ends, yet so is the caliper body, so i need something to go in between, any ideas? also, found myself some wheels i'll hopefully be picking up
-
s13drifter88
- Posts: 1111
- Joined: Wed Jun 23, 2010 7:40 am
- Car: 93 S13 Coupe CA18DET (Money pit)
1996 D21 Hardbody (Work truck/daily)
!993 Del Sol (Daily)
1987 Pontiac GTA (Drag project, other money pit)
1989 SOHC S13 Buzz Car - Location: Huntsville, AL
Re: Jareds RB20 S13 project
banjo fitting
Re: Jareds RB20 S13 project
wont work...needs a male 45* flare fitting on both ends. im just gonna make a really small hardline to fit in there. dunno how big, but we'll see what happens
Re: Jareds RB20 S13 project
ok so, i got the fmic all mounted up last weekend. made some tabs for it out of some 1/8" thick steel and mounted it where the horns mount up. i think the hardest part of it all really was "measuring" and cutting, as i dont have a lot of tools at home all i had was a tape measure and grinder lol. but, either way it worked out pretty well id say.
some pics:

mounting tabs i made. you can see what i mean when i said i just made them a bit wider to accomodate for the difference in widths. the mounts for the intercooler arent as far apart as the bolts that hold the horns on so i made up the extra inch and a half with the mounts. bent using a torch, vice grips, and a bench vice lol

dashbar removed, and IC mounted
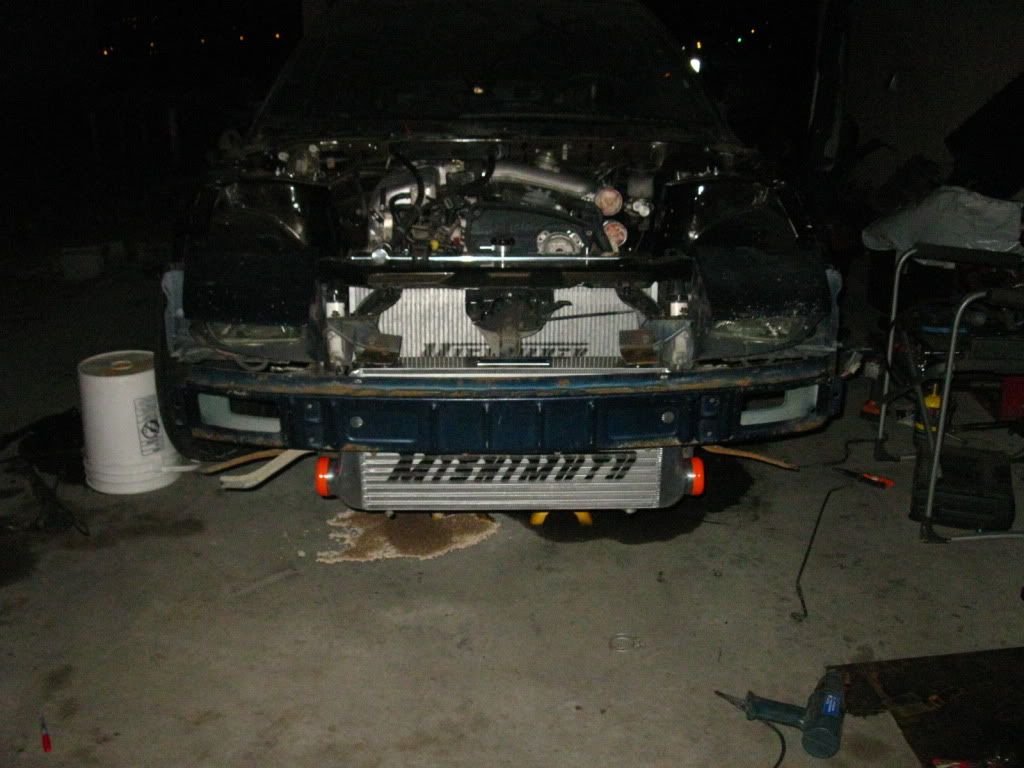
crash bar back on. had to trim/cut/grind away quite a bit of the crash bar to make it fit and clear the intercooler

you can see how much i had to take off the crash bar for it all to work

in this last pic, you can see how the mounting tabs stick out almost to the lip in the crash bar. im actually thinking about welding it all together, so that the crash bar still has a bit of rigidity to it, even though its been cut. also, the intercooler will be that much more sturdy. after it is all welded up, it will be ground smooth, cleaned up, and undercoated so as to help preserve the life of it.
i also found a set of absolutely DOPE wheels today, but the company only makes them in 19" plus sizes called vellano wheels, check them out!
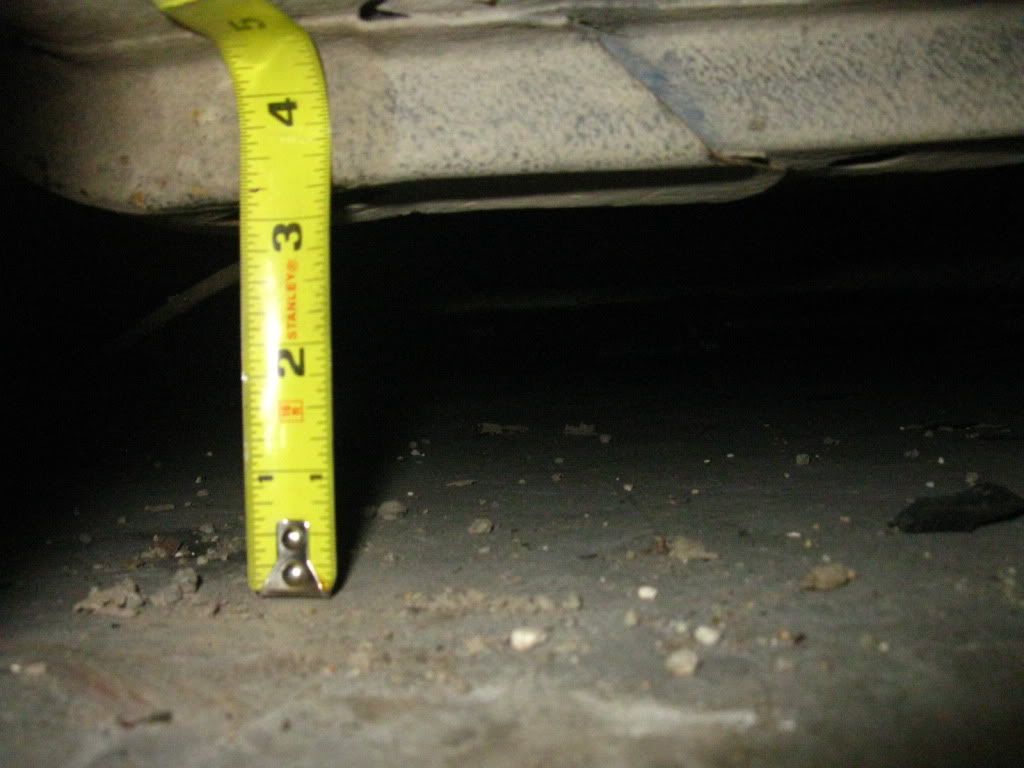
also, bought a set of wheels. some 17x9 impul r5's. consequently, i torqued all the balljoints and set the car down. well..lets just say shes low! so low in fact, that as i was lowering the front, the intercooler took a hit. minor to say the least, im not worried, but either way, thats how low!
fmic damage:

side shot:

this pic really doesnt do it justice. its a lot lower than it looks in the pic...and i think the angle/black lip on the wheels had something to do with that
frame to ground measurement. lol at ground clearance:
hellaflush rears:

also, decided on a for sure color for the wheels: white centers, with polished lip, and gold bolts. as always, comments welcome
some pics:
mounting tabs i made. you can see what i mean when i said i just made them a bit wider to accomodate for the difference in widths. the mounts for the intercooler arent as far apart as the bolts that hold the horns on so i made up the extra inch and a half with the mounts. bent using a torch, vice grips, and a bench vice lol
dashbar removed, and IC mounted
crash bar back on. had to trim/cut/grind away quite a bit of the crash bar to make it fit and clear the intercooler
you can see how much i had to take off the crash bar for it all to work
in this last pic, you can see how the mounting tabs stick out almost to the lip in the crash bar. im actually thinking about welding it all together, so that the crash bar still has a bit of rigidity to it, even though its been cut. also, the intercooler will be that much more sturdy. after it is all welded up, it will be ground smooth, cleaned up, and undercoated so as to help preserve the life of it.
i also found a set of absolutely DOPE wheels today, but the company only makes them in 19" plus sizes
also, bought a set of wheels. some 17x9 impul r5's. consequently, i torqued all the balljoints and set the car down. well..lets just say shes low! so low in fact, that as i was lowering the front, the intercooler took a hit. minor to say the least, im not worried, but either way, thats how low!
fmic damage:
side shot:
this pic really doesnt do it justice. its a lot lower than it looks in the pic...and i think the angle/black lip on the wheels had something to do with that
frame to ground measurement. lol at ground clearance:
hellaflush rears:
also, decided on a for sure color for the wheels: white centers, with polished lip, and gold bolts. as always, comments welcome
-
supersayianjim
- Posts: 308
- Joined: Wed Nov 26, 2008 6:02 am
- Car: 89 240sx(s13)
Re: Jareds RB20 S13 project
okay jared. you need to watch the clearance of that intercooler. i have to re-do mine next week and try to pick it up more. iam going to put the mounting tabs at the top of the bumper support. i see you have some damage already(i know the feeling). if you ever go silvia front end then you will have to redo your whole intercooler setup because the headlight brackets get in the way..
and i know you have a pig nose but here is a good location to put your oil coller(scroll down).
http://www.240sxforums.com/forums/rb-en ... -rb-3.html
or worst case secenerao we might have to get smaller units alltogether. i will let you klnow how it goes. also i obtained a road sign so iam going to make a difussor while iam at it.
Re: Jareds RB20 S13 project
thanks jim, i know its a little low, i really wasnt expecting it honestly, as i can still adjust the front coils another inch and a half or so. im going to be putting the front bumper on today, not all the way but just to put it on to see where i can expect some air flow, if i move the ic up any more im afraid that i will have so little air flow with the crash bar there too and the bumper blocking it that it would be doing almost nothing. i dont plan on goin silvia front so the horn mounts are not a concern, and with the back end down as well i have 8 inches or so to the bottom of the ic. i think my shocks would bottom out before it hits. i'll look more into that spot for my oil cooler and maybe mount the ps cooler i have beside it, otherwise im thinking of mounting them in the fender wells like a stock side mount intercooler. stay tuned!
Re: Jareds RB20 S13 project
just a couple quick pics taken in the day time:
first shows off the height better:

its actually going to stay that height i think. im going to even out the rear, camber the wheels in a little bit more and lower the front to match the back.
and now the front:
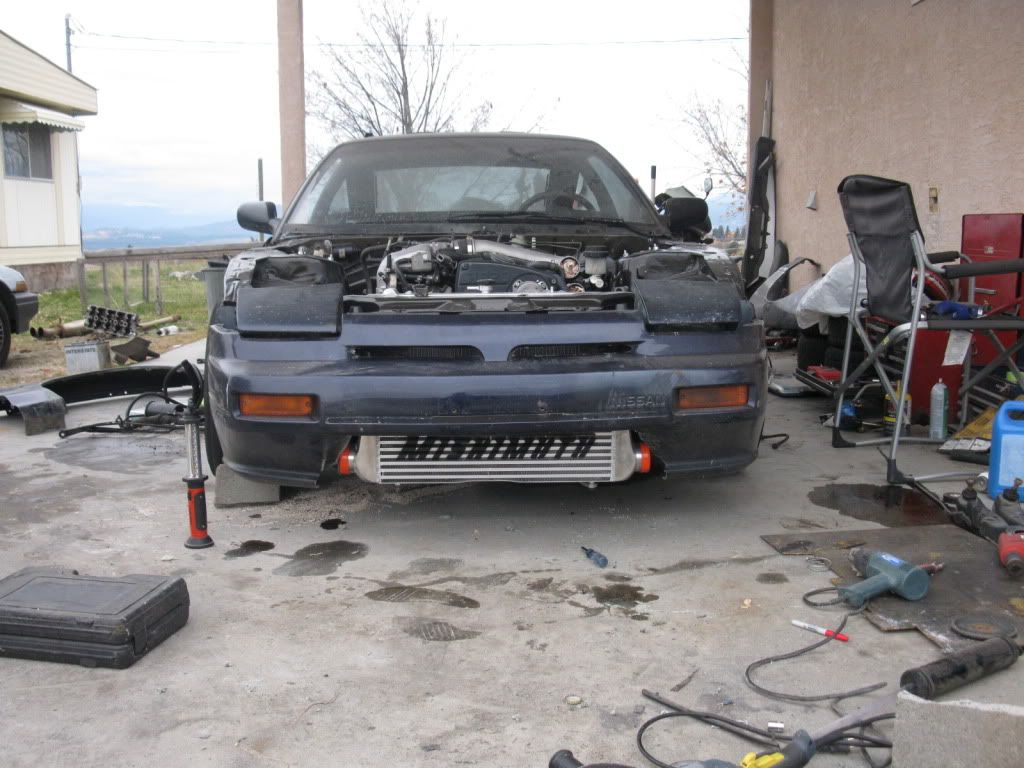
pignose fronts, and fmic's dont really mix well. had to "modify" the front bumper a little bit to get everything to fit well. its a little uneven but i'll fix that in the future. also, thanks to jim, i checked out the rad support for mounting my coolers, hence the grill being cut out. with the grill out, i can get some extra air flow into that area. the only thing i need to think of is in the future when i get my new front bumper, theres no grill area, its all solid, so i'll have to move my coolers if i hope to get any air flow into that area, and i would lower them but that would just further block the radiator. who knows, i'll figure it out later
first shows off the height better:
its actually going to stay that height i think. im going to even out the rear, camber the wheels in a little bit more and lower the front to match the back.
and now the front:
pignose fronts, and fmic's dont really mix well. had to "modify" the front bumper a little bit to get everything to fit well. its a little uneven but i'll fix that in the future. also, thanks to jim, i checked out the rad support for mounting my coolers, hence the grill being cut out. with the grill out, i can get some extra air flow into that area. the only thing i need to think of is in the future when i get my new front bumper, theres no grill area, its all solid, so i'll have to move my coolers if i hope to get any air flow into that area, and i would lower them but that would just further block the radiator. who knows, i'll figure it out later