They're just stupid creatures lol. If it wasn't dark I probably would have been able to slow down to parking lot speeds, but as it was I was braking just hard enough to not lock up. I've seen deer before, but this is the only time I've had any kind of encounter with them running out.mechanicalmoron wrote:That sucks, but could have been a lot worse. I did nearly the same thing once. My parents quarterpanel still doesn't look quite right.
Being farther over from a deer sometimes seems to make them want to lunge... I think they're trying to second guess you, like you're trying to feint and then go over and eat them, so they go for where you are, like deer reverse psychology. And then sometimes they don't even care you're there. Very fickle, unpredictable, and thus dangerous.
I slow down to parking lot speeds when I see deer, no matter how the people behind me hate it or honk or tail me. Had too many close calls, and my one actual strike. And yes, just think how it would have gone if you hit him head on.... would have totally ruined the car, and maybe ruined you as well. And it could have shot a deer through the windshield into your face.
And remember, if you see deer, you probably don't even see half of them.... where there's one, there's a ton.
Hoffman5982's Super Awesome Driveway Swap- Finally Running
-
Hoffman5982
- Posts: 1805
- Joined: Sat Sep 29, 2007 7:20 pm
- Car: '95 sr20det 240sx
Re: Hoffman5982's Super Awesome Driveway Swap- Finally Runni
-
Hoffman5982
- Posts: 1805
- Joined: Sat Sep 29, 2007 7:20 pm
- Car: '95 sr20det 240sx
Re: Hoffman5982's Super Awesome Driveway Swap- Finally Runni
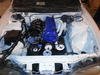
So I didn't get as many pictures throughout the process as I would have liked due to the time crunch, but I did get a few.
First, let me show you the whole point to all of this:

Look odd? Here we see the old boot on the left and a new one on the right:

Pretty sketchy. Only one was this bad, although a few others were starting to shred.
The original plan was to be finished by yesterday afternoon. It's never that simple. While I was sanding the letters down I didn't realize that I wasn't perfectly flat with the block and went through the paint, so I had to start over on the half. The color I chose is a medium-deep goldish. It's one of the VHT engine enamels.


After thoughts: I'm happy with the color, although I'm already debating sending them off to be powder coated once the s13 is running. With that said, f*** painting. This is the second time I've painted these, and the second time around was more complicated due to having to strip the old paint. Paint chips easily around edges. It's also easy to have runs resulting in 30 minutes of sanding and repainting. I'm definitely having them sandblasted and powdercoated from now on. The money is worth the hassle.
Also, f*** the retainer clips. The front calipers don't really have a lip for them, they just kinda clamp around the sides. So while you're trying to set them in place around it the side will pop up.The first 2 took forever, but after that I got the hang of it. Overall, it's a very simple procedure to rebuild these things, and it's definitely worth the piece of mind.
First, let me show you the whole point to all of this:
Look odd? Here we see the old boot on the left and a new one on the right:
Pretty sketchy. Only one was this bad, although a few others were starting to shred.
The original plan was to be finished by yesterday afternoon. It's never that simple. While I was sanding the letters down I didn't realize that I wasn't perfectly flat with the block and went through the paint, so I had to start over on the half. The color I chose is a medium-deep goldish. It's one of the VHT engine enamels.
After thoughts: I'm happy with the color, although I'm already debating sending them off to be powder coated once the s13 is running. With that said, f*** painting. This is the second time I've painted these, and the second time around was more complicated due to having to strip the old paint. Paint chips easily around edges. It's also easy to have runs resulting in 30 minutes of sanding and repainting. I'm definitely having them sandblasted and powdercoated from now on. The money is worth the hassle.
Also, f*** the retainer clips. The front calipers don't really have a lip for them, they just kinda clamp around the sides. So while you're trying to set them in place around it the side will pop up.The first 2 took forever, but after that I got the hang of it. Overall, it's a very simple procedure to rebuild these things, and it's definitely worth the piece of mind.
-
mechanicalmoron
- Posts: 790
- Joined: Fri Apr 29, 2011 1:04 am
Re: Hoffman5982's Super Awesome Driveway Swap- Finally Runni
That's somewhere on my list.
I figure when I've drained through another reservoir of brake fluid, and the light starts comming on again, I'll do it. I have one that apparently dribbles.
Your boot pictures make me worry about mine, although I don't remember it looking off, when I wiped all the muddy fluid off the outside.
But why not just paint over the old paint, so long as it would be smooth? It's not like twice as much paint will cause catastrophic brake failure.
-
Hoffman5982
- Posts: 1805
- Joined: Sat Sep 29, 2007 7:20 pm
- Car: '95 sr20det 240sx
Re: Hoffman5982's Super Awesome Driveway Swap- Finally Runni
There were quite a few chips that accumulated over the past ~3 years. Stripping the pain was a pain in the a** but it was worth it for the final product. Just like painting your car, would you just paint over the old paint?mechanicalmoron wrote:
But why not just paint over the old paint, so long as it would be smooth? It's not like twice as much paint will cause catastrophic brake failure.
I definitely see your point though. It would have no ill effect doing it either way.
Re: Hoffman5982's Super Awesome Driveway Swap- Finally Runni
God, stripping paint off is such a pain in the a**.
I guess we're brake twins!


I used VHT caliper gold though. It's a bit lighter than yours I think.
I guess we're brake twins!
I used VHT caliper gold though. It's a bit lighter than yours I think.
-
mechanicalmoron
- Posts: 790
- Joined: Fri Apr 29, 2011 1:04 am
Re: Hoffman5982's Super Awesome Driveway Swap- Finally Runni
....I've seldom heard of anyone NOT painting over the existing paintHoffman5982 wrote:There were quite a few chips that accumulated over the past ~3 years. Stripping the pain was a pain in the a** but it was worth it for the final product. Just like painting your car, would you just paint over the old paint?mechanicalmoron wrote:
But why not just paint over the old paint, so long as it would be smooth? It's not like twice as much paint will cause catastrophic brake failure.
I definitely see your point though. It would have no ill effect doing it either way.
As for brakes, whatever you do beats the hell out of whoever (I'd like to think not the nico member I got them from) painted calipers (or something) right next to my coilovers, and in doing so, misted the black coils with tan
Anyway, your new paint does look great, good color to go with the red, and in a subtle place where it won't be overpowering or obnoxious.
-
Hoffman5982
- Posts: 1805
- Joined: Sat Sep 29, 2007 7:20 pm
- Car: '95 sr20det 240sx
Re: Hoffman5982's Super Awesome Driveway Swap- Finally Runni
Lol, we may in fact be twins. The color I used was VHT Gold Flake I believeRazi wrote:God, stripping paint off is such a pain in the a**.
I guess we're brake twins!
I used VHT caliper gold though. It's a bit lighter than yours I think.
-
Hoffman5982
- Posts: 1805
- Joined: Sat Sep 29, 2007 7:20 pm
- Car: '95 sr20det 240sx
Re: Hoffman5982's Super Awesome Driveway Swap- Finally Runni
Hey guys, mini update time.
Tires are scheduled to be here Friday, so it's looking like monday will be the earliest I can have the new wheels on the shoes.
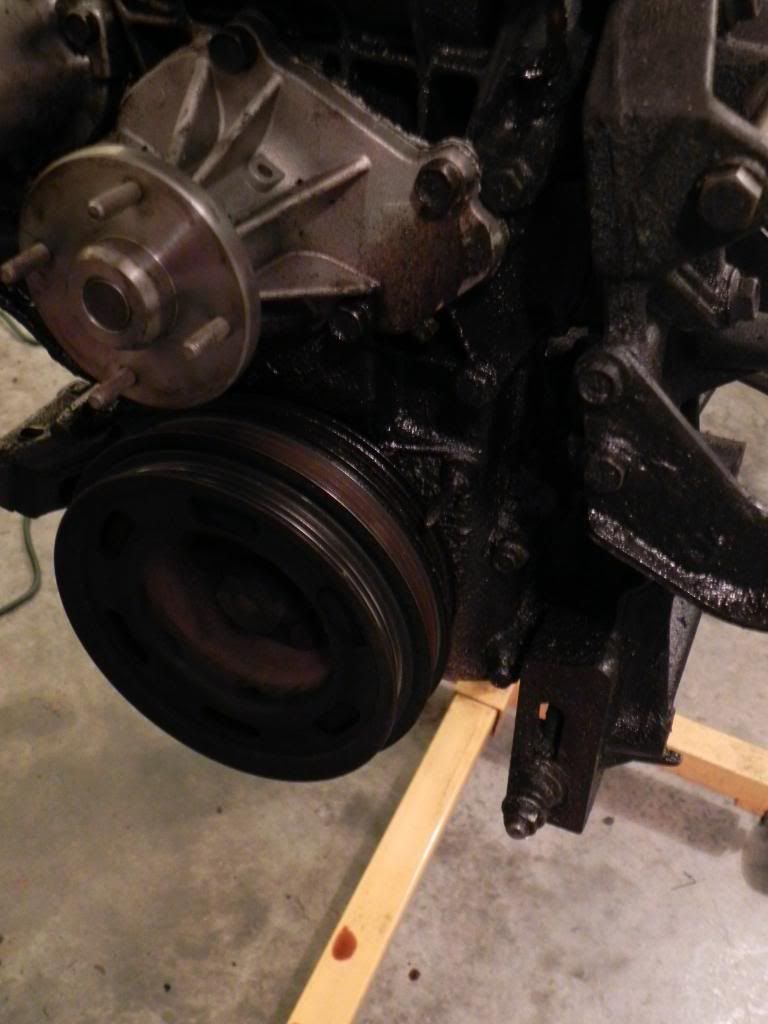
So after installing the oil filter relocation I realized I need to do something with my fuel lines and fuel filter. They were all up in the way of the relocation lines. I had been wanting to move them around for quite some time so it wasn't a big deal.
Here's what I was dealing with. You can see the hose I had cut and slipped around the lines to prevent being rubbed through:


I decided to eliminate the second hardline section that curves under the throttle body(apparently I forgot to take a picture) and in turn ran them up under the intake manifold:

In order to put the fuel filter behind the manifold and not kink the hose, I had to route the feed line up between runner 3 & 4:

Progress:

And the final product:


In all, I only need 4' of fuel line. I didn't get any pictures from under the car. I cut the hard line so that it was no longer extending up into the bay, and I then bent it over to meet the fuel lines. I still need to make shorter relocation lines, which I plan to do on my next oil change.
I also installed a new(used) IACV. It has gotten to the point where it almost always idles at 1500, and sometimes at 2200. We'll see if that solves the issue.
I also picked up a new passenger mirror.

The new one was pearl white, so it will need to be painted. I did manage to JBWeld 3 of the 4 broken studs back into the old shell, so for the time being my car looks somewhat normal again. I'd leave it since it feels solid with only 3 of the studs, but there's a nice crack and a few chunks of missing paint, but for now it will do. I also picked up a new clock spring which fixed my cruise control and horn, which I found out was also not working.
In other news, if you can't tell by the lack of pictures, I never picked up that redtop motorset. I may still do so in the future, but for now I decided that building a new motor wasn't a task I wanted to take on at the moment. I'm going to look at a KA motorset in the next few days. According to the seller it runs fine but needs a few external seals, so we will see. It sucks how hard KA's are to come by around here.
Tires are scheduled to be here Friday, so it's looking like monday will be the earliest I can have the new wheels on the shoes.
So after installing the oil filter relocation I realized I need to do something with my fuel lines and fuel filter. They were all up in the way of the relocation lines. I had been wanting to move them around for quite some time so it wasn't a big deal.
Here's what I was dealing with. You can see the hose I had cut and slipped around the lines to prevent being rubbed through:
I decided to eliminate the second hardline section that curves under the throttle body(apparently I forgot to take a picture) and in turn ran them up under the intake manifold:
In order to put the fuel filter behind the manifold and not kink the hose, I had to route the feed line up between runner 3 & 4:
Progress:
And the final product:
In all, I only need 4' of fuel line. I didn't get any pictures from under the car. I cut the hard line so that it was no longer extending up into the bay, and I then bent it over to meet the fuel lines. I still need to make shorter relocation lines, which I plan to do on my next oil change.
I also installed a new(used) IACV. It has gotten to the point where it almost always idles at 1500, and sometimes at 2200. We'll see if that solves the issue.
I also picked up a new passenger mirror.
The new one was pearl white, so it will need to be painted. I did manage to JBWeld 3 of the 4 broken studs back into the old shell, so for the time being my car looks somewhat normal again. I'd leave it since it feels solid with only 3 of the studs, but there's a nice crack and a few chunks of missing paint, but for now it will do. I also picked up a new clock spring which fixed my cruise control and horn, which I found out was also not working.
In other news, if you can't tell by the lack of pictures, I never picked up that redtop motorset. I may still do so in the future, but for now I decided that building a new motor wasn't a task I wanted to take on at the moment. I'm going to look at a KA motorset in the next few days. According to the seller it runs fine but needs a few external seals, so we will see. It sucks how hard KA's are to come by around here.
Last edited by Hoffman5982 on Wed Jan 30, 2013 9:12 pm, edited 1 time in total.
-
Ben_3minute_Smyth
- Posts: 18
- Joined: Tue Jan 22, 2013 2:24 am
- Car: '95 240sx-SOLD
- Location: Eskilstuna, Sweden
Re: Hoffman5982's Super Awesome Driveway Swap- Finally Runni
Just sat here and read this entire thread and I gotta say, from start to well... now, LEGIT build man. I wish my s14 was this nice when I had it. Really clean.  I'm sure you have been offered many condolences on your luck with the SR, but here's mine as well. Keep up the great work.
-
Hoffman5982
- Posts: 1805
- Joined: Sat Sep 29, 2007 7:20 pm
- Car: '95 sr20det 240sx
Re: Hoffman5982's Super Awesome Driveway Swap- Finally Runni
Hrmmmm...

Last edited by Hoffman5982 on Wed Jan 30, 2013 9:11 pm, edited 1 time in total.
-
Hoffman5982
- Posts: 1805
- Joined: Sat Sep 29, 2007 7:20 pm
- Car: '95 sr20det 240sx
Re: Hoffman5982's Super Awesome Driveway Swap- Finally Runni
Correct!
I had a hell of a time putting these things on. Passenger front rubbed against the spring, but not the drivers side!
Ensuing cheap parts rant..
I had a hell of a time putting these things on. Passenger front rubbed against the spring, but not the drivers side!
Ensuing cheap parts rant..
-
pepesilvia

- Posts: 584
- Joined: Tue Feb 21, 2012 8:15 pm
- Car: 96 S14
- Location: New Jersey :(
Re: Hoffman5982's Super Awesome Driveway Swap
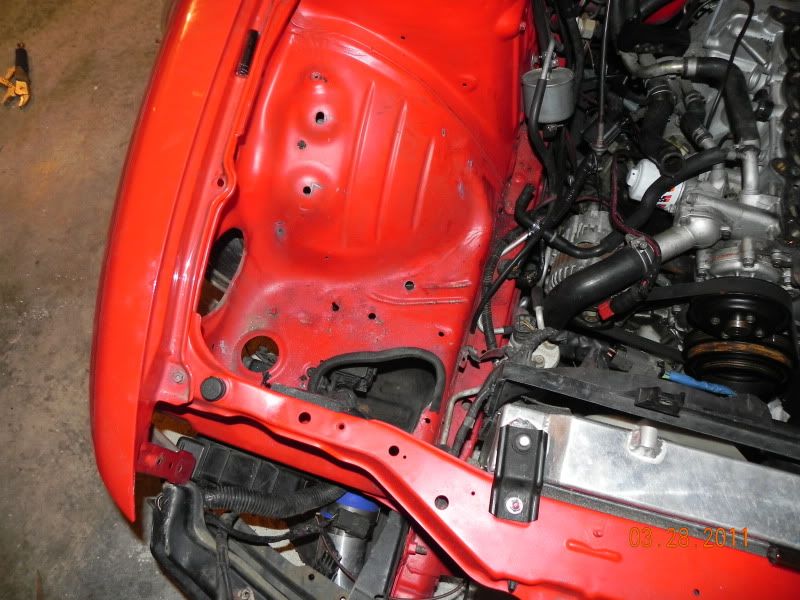
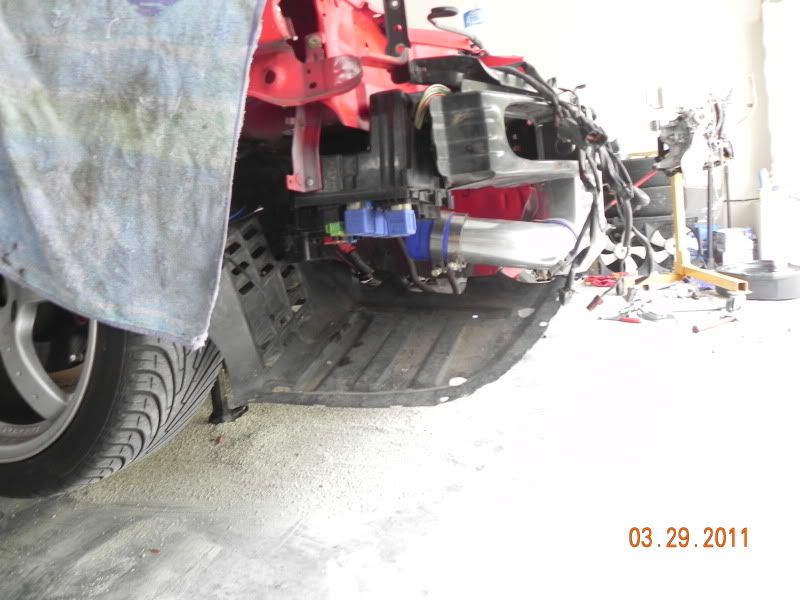
i gotta quick question about this ^^^ when its wet outside, do yur relays ever flood? like do they ever get filled with water and go haywire? because i relocated my fuse box down there too like last month and now my relays keep getting wet and keep leaving things on like my foglights and my radiator fan etc. hahahaha i tried covering the fusebox with stuff but somehow everything keeps getting wet... i even drilled holes in the bottom for water to pour out of so it dosent get filled with water....Hoffman5982 wrote: After that was done, I had nothing to do. After looking around I decided that my bay was a little crowded, so I started relocating my fuse box down into the fender/front bumper area. Wasn't hard at all. I routed the harness through my oversized cold pipe hole(the initial hole that I cut was a good 7 inches from where it needed to be) and all I had to extend was the 2 plugs that connect to the lower harness. Since I mounted the box upside down, I drilled some holes in the lid


and btw i like yur new wheel fitment
-
Hoffman5982
- Posts: 1805
- Joined: Sat Sep 29, 2007 7:20 pm
- Car: '95 sr20det 240sx
Re: Hoffman5982's Super Awesome Driveway Swap- Finally Runni
I've never had issued with it being there. I have plenty of holes drilled so any water just spills out. I've driven through hurricane weather as well it was fine. It definitely gets wet inside but doesn't flood.
-
Hoffman5982
- Posts: 1805
- Joined: Sat Sep 29, 2007 7:20 pm
- Car: '95 sr20det 240sx
Re: Hoffman5982's Super Awesome Driveway Swap- Finally Runni
I really need to stop relying on borrowing my parents camera and just invest in one. I have nothing but cell phone pics for the next few days. Deal with it.
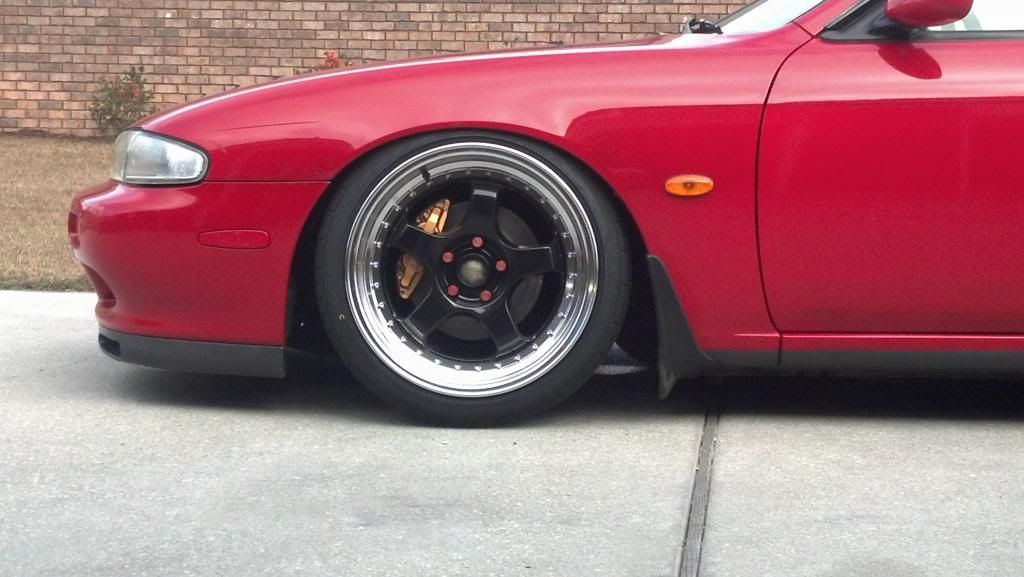
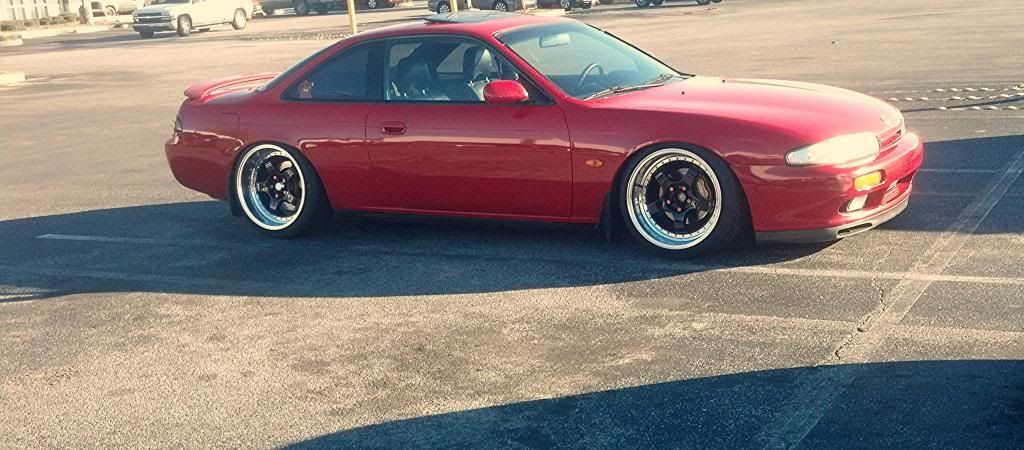
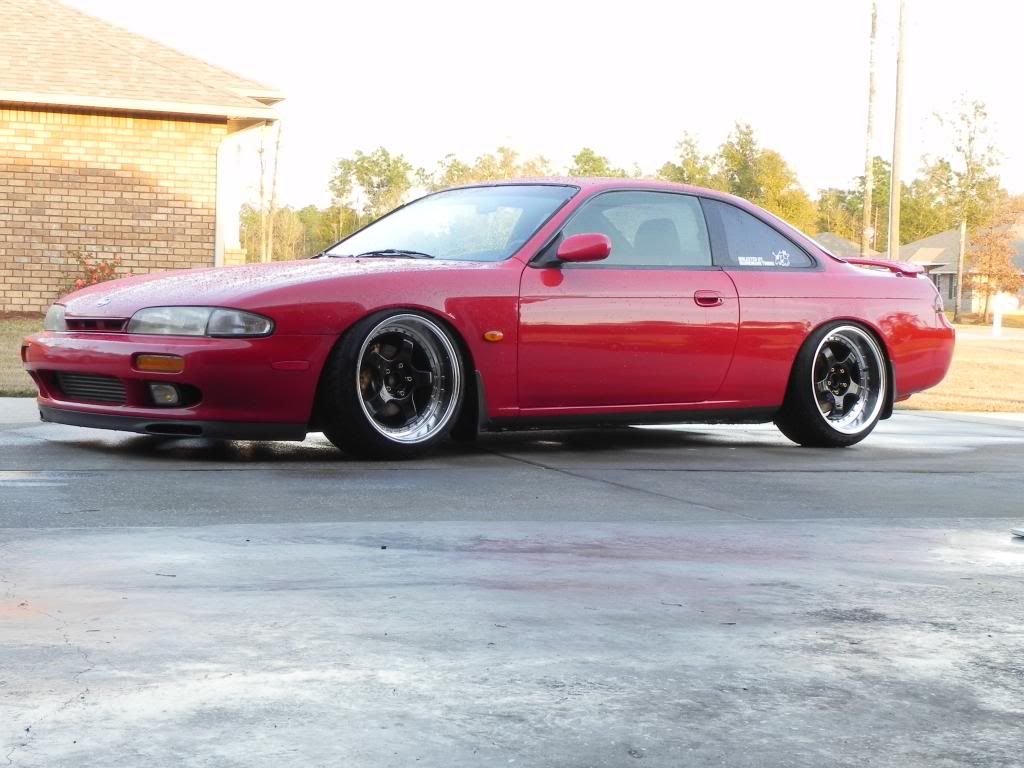
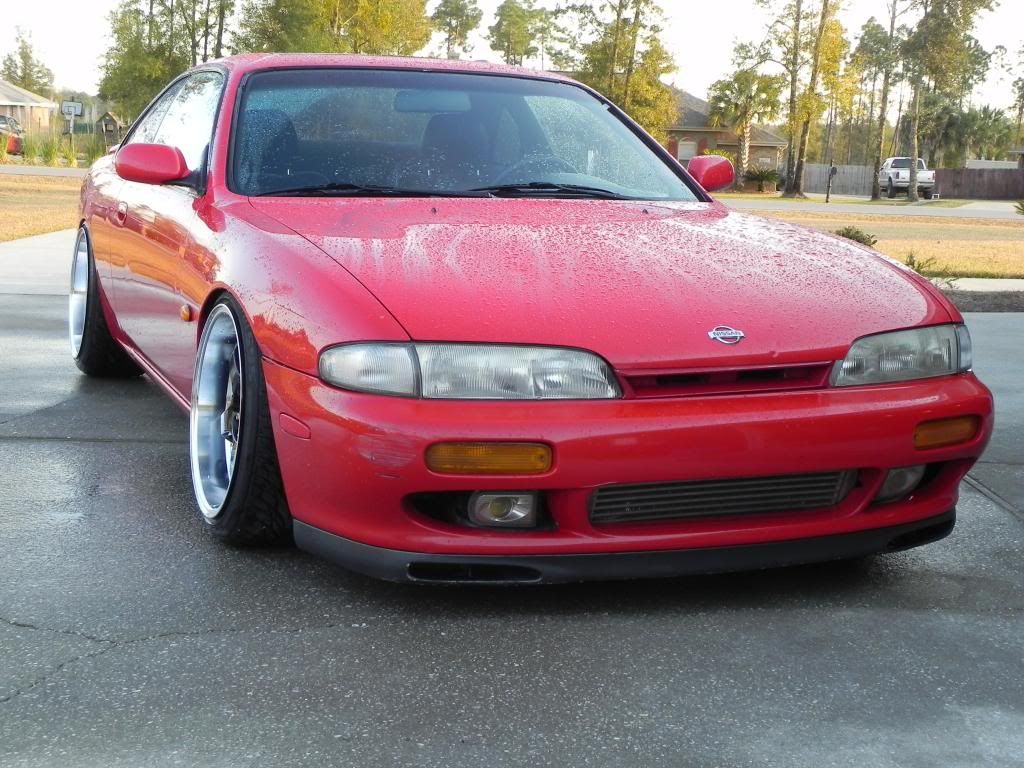
So my tires obviously came in and I had them mounted


And here is where the car is sitting:
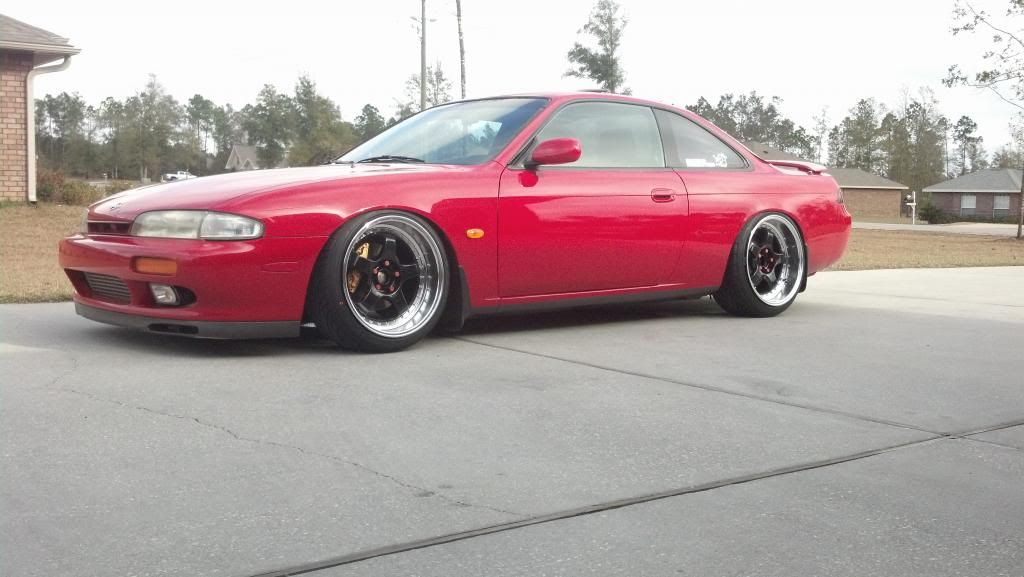
Front:
Rear:

I am maxing my camber all around. Apparently these sh**y lug nuts weren't threaded all the way inside, so I had to keep the spacers in the rear to be able to bolt them in. In order to fit that, I had to max the sh**y Godspeed RUCA's out. One side took over an hour to do because the RUCA was siezed. Only two years old, and I've kept them lubricated, and that thing was siezed. I'll be ordering the rest of the SPL arms as soon as I possibly can.
I am ordering Powered By Max lug nuts this week so that I can get rid of the spacers in the rear.
So now lets discuss the problems I have faced:
On the way to the tire shop one of my exhaust hangers decided to shear off, leaving a hole. A very annoying hole. Gotta get that fixed tomorrow.
On the way home last night, during the first drive with the wheels, there was a VERY loud squeal coming from the front passenger side. I made it home and got the wheel off to reveal that the rim was against the coilover spring. But only on that side. I'm going to look more into it tonight, but I picked up some 5mm spacers from work to solve the issue for now so that Im not rolling around on a single stock se wheel.
Other than that, I amazingly rub very little. Im pulling the fender tonight to re-raise the harness/ hood latch cable, but I'm very happy with where it is sitting. Once I can pull some camber out in the rear and get a proper alignment it should be perfectly fine. Stay tuned for some actual decent photos.
So my tires obviously came in and I had them mounted
And here is where the car is sitting:
Front:
Rear:
I am maxing my camber all around. Apparently these sh**y lug nuts weren't threaded all the way inside, so I had to keep the spacers in the rear to be able to bolt them in. In order to fit that, I had to max the sh**y Godspeed RUCA's out. One side took over an hour to do because the RUCA was siezed. Only two years old, and I've kept them lubricated, and that thing was siezed. I'll be ordering the rest of the SPL arms as soon as I possibly can.
I am ordering Powered By Max lug nuts this week so that I can get rid of the spacers in the rear.
So now lets discuss the problems I have faced:
On the way to the tire shop one of my exhaust hangers decided to shear off, leaving a hole. A very annoying hole. Gotta get that fixed tomorrow.
On the way home last night, during the first drive with the wheels, there was a VERY loud squeal coming from the front passenger side. I made it home and got the wheel off to reveal that the rim was against the coilover spring. But only on that side. I'm going to look more into it tonight, but I picked up some 5mm spacers from work to solve the issue for now so that Im not rolling around on a single stock se wheel.
Other than that, I amazingly rub very little. Im pulling the fender tonight to re-raise the harness/ hood latch cable, but I'm very happy with where it is sitting. Once I can pull some camber out in the rear and get a proper alignment it should be perfectly fine. Stay tuned for some actual decent photos.
-
pepesilvia
- Posts: 584
- Joined: Tue Feb 21, 2012 8:15 pm
- Car: 96 S14
- Location: New Jersey :(
-
nevertheless

- Posts: 1378
- Joined: Tue Jan 22, 2008 11:12 am
- Car: 1993 240sx hatch
1995 Nissan D21 - Location: Omaha, Nebraska
- Contact:
Re: Hoffman5982's Super Awesome Driveway Swap- Finally Runni
Looks hawt. Clean and simple. 
-
Hoffman5982
- Posts: 1805
- Joined: Sat Sep 29, 2007 7:20 pm
- Car: '95 sr20det 240sx
Re: Hoffman5982's Super Awesome Driveway Swap- Finally Runni
Well it looks like I'm picking up a KA on tuesday. It's missing the intake and exhaust mani's and the distributer. Luckily a friend has all of it minus the distributer as well as an SR transmission(KA was an auto). So I'll need to source a bellhousing, clutch, and flywheel and I'll be set. Getting the motor for $60 doll hairs. It looks like I'll be able to get this car running for under a grand!
So night before last I put in some work on the donk. I pulled the fender because I knew I needed to re-do my harness raise. I was starting to rub it with the Z wheels, so there was no way I wasn't going to hit with these new wheels.
Here's a super sh**y picture of what it was like before:

From there I pulled it all away, reloomed most of the harness as it was peeling in places, and started cutting.

It's no super pretty but it works very well.

Pay attention to the hood latch cable. This was the absolutely only way I could run it and still have length to get to the latch. Even then it was very tight. Does anyone know of another cable that can be used that is 5-10" longer? That would help tremendously.
So now I have no worries about rubbing the harness itself. Unfortunately the same can't be said about where it comes out of the firewall. Even with that "strap" holding the harness as far back as I could get it, my tire still catches it. I need to either make a full plate so that at the very least the edge won't tank out chunks of my tire or try to relocate it somehow. I'll deal with it in the coming week I guess.
I also grabbed some 5mm spacers and threw them on the front, which solved the wheel-on-coilover problem. Now I need to remove the rears and get an alignment. I should also have some actual pictures taken this week!
So night before last I put in some work on the donk. I pulled the fender because I knew I needed to re-do my harness raise. I was starting to rub it with the Z wheels, so there was no way I wasn't going to hit with these new wheels.
Here's a super sh**y picture of what it was like before:
From there I pulled it all away, reloomed most of the harness as it was peeling in places, and started cutting.
It's no super pretty but it works very well.
Pay attention to the hood latch cable. This was the absolutely only way I could run it and still have length to get to the latch. Even then it was very tight. Does anyone know of another cable that can be used that is 5-10" longer? That would help tremendously.
So now I have no worries about rubbing the harness itself. Unfortunately the same can't be said about where it comes out of the firewall. Even with that "strap" holding the harness as far back as I could get it, my tire still catches it. I need to either make a full plate so that at the very least the edge won't tank out chunks of my tire or try to relocate it somehow. I'll deal with it in the coming week I guess.
I also grabbed some 5mm spacers and threw them on the front, which solved the wheel-on-coilover problem. Now I need to remove the rears and get an alignment. I should also have some actual pictures taken this week!
-
vas13hatch
- Posts: 87
- Joined: Sun Dec 30, 2012 12:20 pm
- Car: 91 s13 Hatch
- Location: butttthole VA
Re: Hoffman5982's Super Awesome Driveway Swap- Finally Runni
Damn that car looks great, perfect stance. Is there any way to notch the firewall to raise the harness up at all, I dunno just an idea. anyway nice work
-
Hoffman5982
- Posts: 1805
- Joined: Sat Sep 29, 2007 7:20 pm
- Car: '95 sr20det 240sx
Re: Hoffman5982's Super Awesome Driveway Swap- Finally Runni
Thanks man! That's what I'm thinking about doing. I'll get under the dash first and make sure there's nothing vital in the way when I got to cut.
-
kouki munster

- Posts: 2195
- Joined: Wed Nov 09, 2005 6:13 pm
- Car: 97 base 240
- Location: Anderson, SC
Re: Hoffman5982's Super Awesome Driveway Swap- Finally Runni

I had to cut the harness and splice in about an extra foot so that it would work, but it was totaly worth the massive time and effort, as there is no way that the tire will ever hit the harness now. It also freed up a little extra room to get the hood latch cable further out of the way.
-
Silvia_Ks_90

- Posts: 58
- Joined: Sun Apr 18, 2010 10:24 am
- Car: 1990 Silvia K's w/2JZ
2007 Subaru Legacy Spec. B Stage 2 - Location: Calgary, AB
Re: Hoffman5982's Super Awesome Driveway Swap- Finally Runni
Looks good man, relocating the harness is a bit of extra work but hella cleaner, it looks like the 14's have a bit more space to play with than the S13 Silvia fenders so count yourself lucky 
-
Hoffman5982
- Posts: 1805
- Joined: Sat Sep 29, 2007 7:20 pm
- Car: '95 sr20det 240sx
Re: Hoffman5982's Super Awesome Driveway Swap- Finally Runni
I have an idea on what I will be doing to solve the harness issue. Unfortunately I won't be able to put any work in until Friday due to work.
Update! Tonight I picked that motor up. A little info on it: It has 13x,xxx miles. It's an auto motor out of a 91.
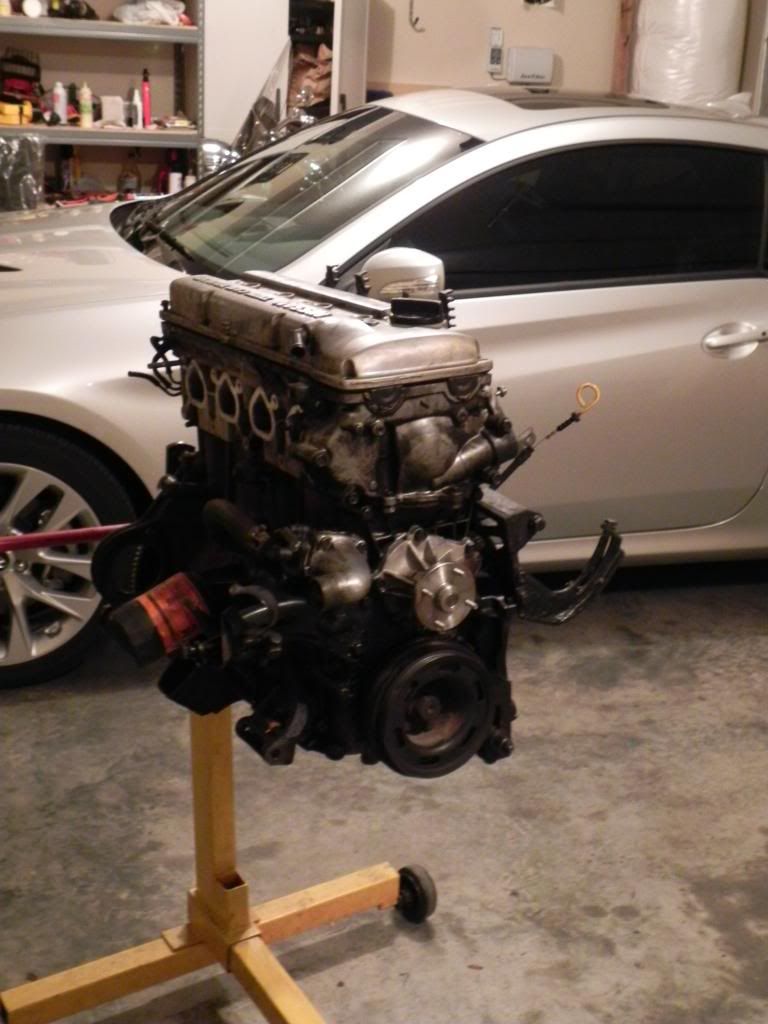
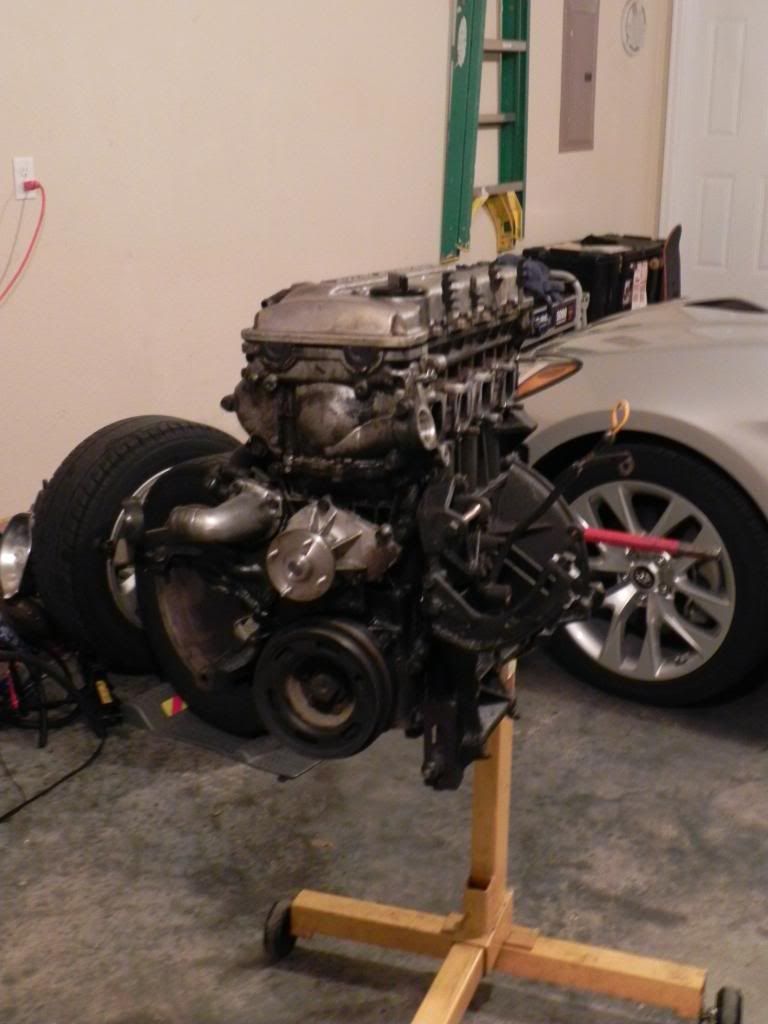
So I popped the valve cover off and everything looks pretty good. The green is oil dye according to the seller. I guess we'll see. Yes, there is a lot of grime.


I then popped the spark plugs out and took a peek down into the cylinders and they all look great. No heavy carbon or anything.

I went ahead and picked up a few gaskets today. So far I have front and rear main seals, oil pan gasket, intake manifold gaskets, and the exhaust manifold gasket.

I'm pretty excited to start this mini build. I have a line on most of the missing parts so it should fall together fairly quick. This is my first time digging into a KA, so everything is new to me again. Always fun.
Now, in s14 news: Not much has happened. I am filling in the hours for a manager that quit so I've been working nonstop. I did take the spacers out of the rear. I wasn't able to pull much camber out but I can at least carry somewhat heavy items in the car(tried to buy a floor jack, fenders were sitting on the tires). the rear kind of looks awkward to me. There's a bit of positive rake, maybe too much. I'm thinking of pulling my fenders tad and going another 1/4" lower in the rear. We'll see. Anyways, these purty things came in!


These are super nice. I think it's really going to make the wheels pop.
As I said before, I've been working like crazy, which means a good pay check. Thanks to my sh***y seized RUCA I'm planning on finally purchasing the SPL RUCA's here in the next week or so. I also have something pretty schweet in the works for the s13, other than the motor. Stay tuned...
Update! Tonight I picked that motor up. A little info on it: It has 13x,xxx miles. It's an auto motor out of a 91.
So I popped the valve cover off and everything looks pretty good. The green is oil dye according to the seller. I guess we'll see. Yes, there is a lot of grime.
I then popped the spark plugs out and took a peek down into the cylinders and they all look great. No heavy carbon or anything.
I went ahead and picked up a few gaskets today. So far I have front and rear main seals, oil pan gasket, intake manifold gaskets, and the exhaust manifold gasket.
I'm pretty excited to start this mini build. I have a line on most of the missing parts so it should fall together fairly quick. This is my first time digging into a KA, so everything is new to me again. Always fun.
Now, in s14 news: Not much has happened. I am filling in the hours for a manager that quit so I've been working nonstop. I did take the spacers out of the rear. I wasn't able to pull much camber out but I can at least carry somewhat heavy items in the car(tried to buy a floor jack, fenders were sitting on the tires). the rear kind of looks awkward to me. There's a bit of positive rake, maybe too much. I'm thinking of pulling my fenders tad and going another 1/4" lower in the rear. We'll see. Anyways, these purty things came in!
These are super nice. I think it's really going to make the wheels pop.
As I said before, I've been working like crazy, which means a good pay check. Thanks to my sh***y seized RUCA I'm planning on finally purchasing the SPL RUCA's here in the next week or so. I also have something pretty schweet in the works for the s13, other than the motor. Stay tuned...
-
Hoffman5982
- Posts: 1805
- Joined: Sat Sep 29, 2007 7:20 pm
- Car: '95 sr20det 240sx
Re: Hoffman5982's Super Awesome Driveway Swap- Finally Runni
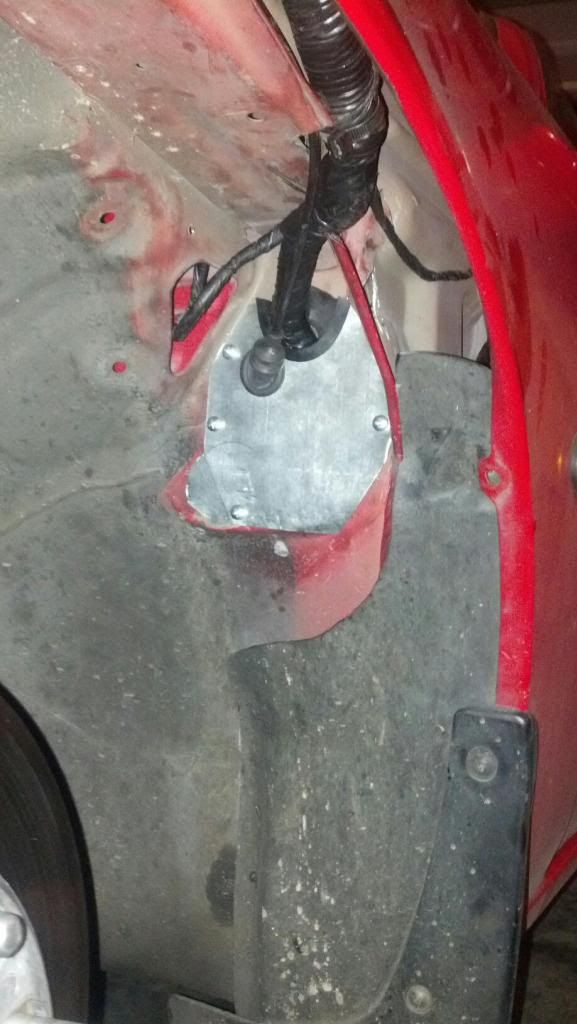
You guys may remember my little "strap" I made out of sheet metal to hold the chassis harness as far into the firewall as I could. It worked great with the old wheels and ride height, but this new setup has been hitting it, ripping off small chunks of my new tire. I couldn't turn further than a quarter turn, if that, to the left. To fix this, I simply removed the grommet and cut an inch and a half upwards, covering it with a plate. I also moved the hood latch cable up which gave me just enough slack to re-route it alongside the harness.
After that I threw on the new PBM lug nuts and gave this thing a bath. I'm very pleased with how the lug nuts look.


They are a little more gold in person. The pics make them look really light.


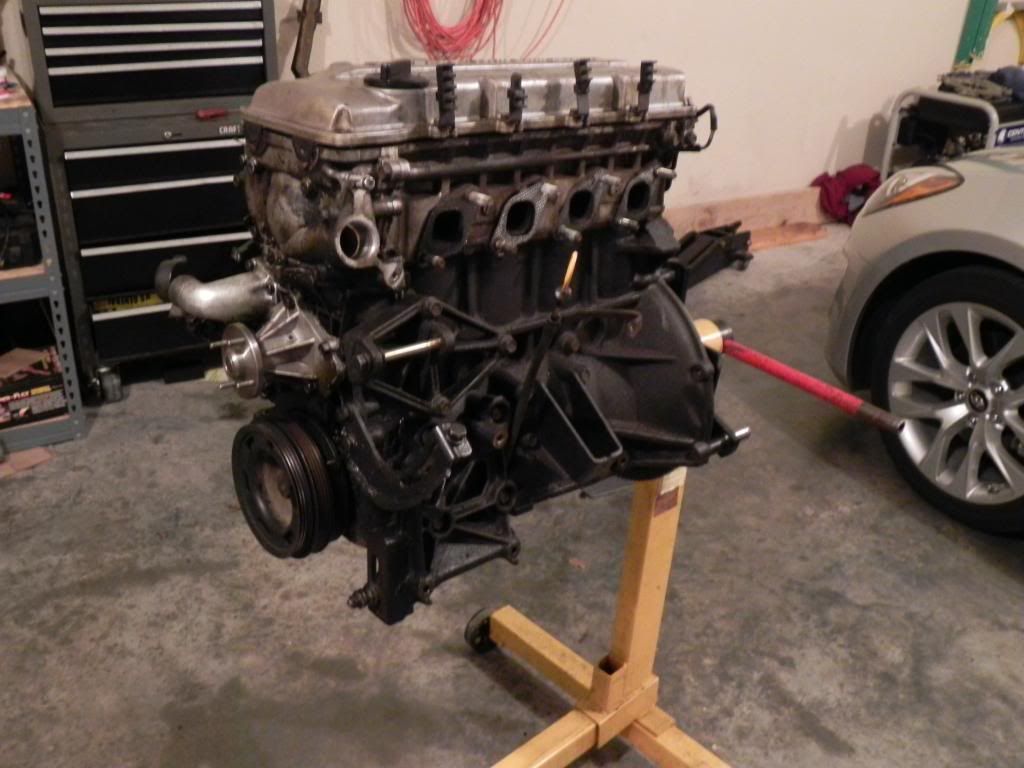
Work has been non stop so I haven't been able to go shoot pictures or anything. I removed the front cover and all brackets from the KA and have them soaking in a tub. I picked up a harness and sometime this week I'm going to cut the battery section out of a junker to graft into mine. There's a chance I'll be picking up another motorset with a spun bearing, this time complete, for 50 bucks. We'll see though.
After that I threw on the new PBM lug nuts and gave this thing a bath. I'm very pleased with how the lug nuts look.
They are a little more gold in person. The pics make them look really light.
Work has been non stop so I haven't been able to go shoot pictures or anything. I removed the front cover and all brackets from the KA and have them soaking in a tub. I picked up a harness and sometime this week I'm going to cut the battery section out of a junker to graft into mine. There's a chance I'll be picking up another motorset with a spun bearing, this time complete, for 50 bucks. We'll see though.
-
Hoffman5982
- Posts: 1805
- Joined: Sat Sep 29, 2007 7:20 pm
- Car: '95 sr20det 240sx
Re: Hoffman5982's Super Awesome Driveway Swap- Finally Runni
These came in the mail. Just trying to keep it real..

-
Lonismos14

- Posts: 1351
- Joined: Fri Sep 18, 2009 5:35 am
- Car: 1995 Nissan 240sx, 1999 Chevy Hoe, 1996 Saturn Sl2
Re: Hoffman5982's Super Awesome Driveway Swap- Finally Runni
What's going on hoff? Where do you work at again? I'm really digging the s14. It has came a very long way!! 
-
Hoffman5982
- Posts: 1805
- Joined: Sat Sep 29, 2007 7:20 pm
- Car: '95 sr20det 240sx
Re: Hoffman5982's Super Awesome Driveway Swap- Finally Runni
Hey stranger! I'm working at Oreillys now. You still have your s14?
Well I almost blew my motor. I put the actuator on and went for a drive. Car boosted to 17psi when I let off. Probably would have kept going. The rod, at its longest setting, doesn't even reach the flapper. I can pull it to but when I put an air compressor on it it barely opens. It seems I either got the wrong kit or this thing is faulty. Either way, I'm probably going to try and get my money back
Well I almost blew my motor. I put the actuator on and went for a drive. Car boosted to 17psi when I let off. Probably would have kept going. The rod, at its longest setting, doesn't even reach the flapper. I can pull it to but when I put an air compressor on it it barely opens. It seems I either got the wrong kit or this thing is faulty. Either way, I'm probably going to try and get my money back
-
Lonismos14
- Posts: 1351
- Joined: Fri Sep 18, 2009 5:35 am
- Car: 1995 Nissan 240sx, 1999 Chevy Hoe, 1996 Saturn Sl2
Re: Hoffman5982's Super Awesome Driveway Swap- Finally Runni
Naw I sold that car, long story but you live and learn. I now have an s13 I'm in the middle of an lsx turbo swap!!! I'm about to get my thread back up. And that's cool your working at Oreilly. If you go on team net and type store 1456 that's where I'm at.
-
Jmoore124
- Posts: 278
- Joined: Wed Dec 12, 2012 4:22 pm
- Car: 1995 240sx Ka-t
2003 Saab Linear turbo conv
(Sold) 1989 S13 red top
Re: Hoffman5982's Super Awesome Driveway Swap- Finally Runni
So what is the plan with the climate control? My s14 looks nothing like that.
-
Hoffman5982
- Posts: 1805
- Joined: Sat Sep 29, 2007 7:20 pm
- Car: '95 sr20det 240sx
Re: Hoffman5982's Super Awesome Driveway Swap- Finally Runni
I gotta collect all the sensors to put it in. Same deal as the s14 though, it's not going in unless it's 100% working. I paid 20 bucks for the unit so I figured why not