Oh, I did not know that about the S14SR.Hoffman5982 wrote:It's the recirculation tube for the BOV. Stock BOV is located over near the fise box I believe. Mine comes off that pipe on the cold pipe and is next to the radiator. I'll be getting it welded on the hot pipe finally soon, and the recirc tube will be gone. Kinda sad though, I kinda like it. I might keep it and cap it off. I'm weird.
Hoffman5982's Super Awesome Driveway Swap- Finally Running
-
homeslicej2

- Posts: 5446
- Joined: Mon Jan 15, 2007 5:46 pm
- Car: 1990 Nissan 240SX S13 SR'd hatch
Re: Hoffman5982's Super Awesome Driveway Swap- Finally Runni
-
Hoffman5982
- Posts: 1805
- Joined: Sat Sep 29, 2007 7:20 pm
- Car: '95 sr20det 240sx
Re: Hoffman5982's Super Awesome Driveway Swap- Finally Runni
Hey everyone, just thought I'd check in. Just rolled over 3k miles after taking the car on a 5 hour trip(each way) to visit a good friend. This was the longest trip I have taken the car on since I bought it on 09 and the car did extremely well. It stormed really hard on the trip up and I forgot how sketchy the car can be in the rain. On the other hand, I averaged 30-32mpg!
I told you in my last post that I was going to be making a purchase soon, and I did. I have mentioned before how much the brake lines disgust me. I've hated them since I fu**ed them up while painting the bay. I came across Suspicious garage about a year and a half ago and was immediately interested in their brake and clutch line relocation. The only place that carries them now is AceUpMotorsports, or at least that is all I could find. They didn't have the SG clutch line listed so I went with the ISIS auto to manual line. The day after I ordered they emailed me and said they had thrown the SG clutch line in so it'd match, which was super awesome. I'm gonna get these installed this week and will try to get a good write up for the install. I may also be nice and finally post the write up for the DCC as well. We'll see.

I told you in my last post that I was going to be making a purchase soon, and I did. I have mentioned before how much the brake lines disgust me. I've hated them since I fu**ed them up while painting the bay. I came across Suspicious garage about a year and a half ago and was immediately interested in their brake and clutch line relocation. The only place that carries them now is AceUpMotorsports, or at least that is all I could find. They didn't have the SG clutch line listed so I went with the ISIS auto to manual line. The day after I ordered they emailed me and said they had thrown the SG clutch line in so it'd match, which was super awesome. I'm gonna get these installed this week and will try to get a good write up for the install. I may also be nice and finally post the write up for the DCC as well. We'll see.
-
S13AL

- Posts: 444
- Joined: Sun May 03, 2009 4:31 pm
- Car: 1991 240sx hatch with blacktop s13 sr20det, HKS Hipermax III suspension, HKS Sport exhaust, Blitz downpipe, S15 Sylvia HLSD, 300zx/J30 5 lug and brakes, and mesh wheels
- Location: Kirkland, Wa
Re: Hoffman5982's Super Awesome Driveway Swap- Finally Runni
Congratulations on getting everything running reliably. I bet it took a lot of work and patience. Also, 30mpg sounds very nice. Kudos.
-
Hoffman5982
- Posts: 1805
- Joined: Sat Sep 29, 2007 7:20 pm
- Car: '95 sr20det 240sx
Re: Hoffman5982's Super Awesome Driveway Swap- Finally Runni
Thanks man, it's been a trip for sure. But I'm here now so all I can do is enjoy it.S13AL wrote:Congratulations on getting everything running reliably. I bet it took a lot of work and patience. Also, 30mpg sounds very nice. Kudos.
Today I went back to that dirt covered lot just to screw around and took a quick video. Nothing special, but I had fun. Now I get to clean up my mess tomorrow.
[youtube]http://www.youtube.com/watch?v=DtRIv9iAe3g[/youtube]
-
Hoffman5982
- Posts: 1805
- Joined: Sat Sep 29, 2007 7:20 pm
- Car: '95 sr20det 240sx
Re: Hoffman5982's Super Awesome Driveway Swap- Finally Runni
Hey guys, I got some work done this week.
I had a little mishap. The plug on the boost controller that goes to the solenoid had a wire rip out, and it won't stay back in. While driving I could instantly tell when it overboosted to 13lbs. Until I can find a replacement I decided, for sh**s and giggles to hook up the factory boost solenoid. It barely boosts to 6lbs now. I didn't realize how much 2psi makes.
The more important update is that today I took the time to install the Suspicious Garage relocation lines. It was very straightforward. I'll start with some pics that I took today.


Now some of the brake lines. Before:

After!:

Now I need to tuck the cluster fu** behind the head that was hidden by the ugliness of the hard
lines

As you can see, there's a huge difference in the overall appearance!
Now, before I start with the brief how-to, I'd like to say that after installing and bleeding the brakes, the lines feel great. A lot of people think that there will be more flex with these lines and a softer pedal feel, but this isn't true. The pedal actually feels a little stiffer now, and the clutch feels great as well. I'm very satisfied.
I didn't get a lot of pictures, but the install is very simple, just a little time consuming.
The biggest thing, and it might only be for those using the 300zx BMC, you will need an extra crush washer for each banjo bolt as the they bottom out before being completely tight without them. I found some at Autozone that were actually the exact same size as the ones included with the kit. 4 will be needed:


If you buy both the brake and clutch lines, you'll have 4 total line. Obviously.
The shortest goes directly down to the front drivers caliper. It's actually a little longer than needed(all the lines were), but this won't cause a problem. It's the back port, closest to the booster:


The remaining are around the same length. 2 are almost the exact same, and the 3rd is a few inches longer. This is the clutch line.
The next line, the middle port, goes to the front passenger caliper. Either of the 2 lines that are about the same length can be used. I'd have more pictures but I'm a worthless whorebag
Same as the front drivers caliper, there's a good bit of extra length here. I didn't want to take the chance of it touching anything it shouldn't, so unbolted the bracket and turned it to holed it against the fender well safely:

The last of the brake lines is the front port, farthest from the booster. This is the rear brakes. It goes to the box located near the clutch dampener thing. I WILL get a pic of this tomorrow, just bare with me here.
Last, of course, is the clutch line. It goes to the clutch. Directly to the slave cylinder.
Now, all three of the lines(front passenger and rear caliper, and clutch line) go straight down, curving towards the front of the car right over the cross member. They are then routed along the cross member between the oil pan. There are plenty of holes for zip ties here to neatly and safely route it:

The clutch line had the least amount of slack, but was perfectly fine. Now have fun bleeding everything
A few more pics, courtesy of my buddy Matt:


I am very happy with this purchase. It's the first decent purchase that wasn't going towards fixing the motor. Feels good man. I also want to thank AceUpMotorsports for hooking me up. Take care guys.
I had a little mishap. The plug on the boost controller that goes to the solenoid had a wire rip out, and it won't stay back in. While driving I could instantly tell when it overboosted to 13lbs. Until I can find a replacement I decided, for sh**s and giggles to hook up the factory boost solenoid. It barely boosts to 6lbs now. I didn't realize how much 2psi makes.
The more important update is that today I took the time to install the Suspicious Garage relocation lines. It was very straightforward. I'll start with some pics that I took today.
Now some of the brake lines. Before:
After!:
Now I need to tuck the cluster fu** behind the head that was hidden by the ugliness of the hard
lines
As you can see, there's a huge difference in the overall appearance!
Now, before I start with the brief how-to, I'd like to say that after installing and bleeding the brakes, the lines feel great. A lot of people think that there will be more flex with these lines and a softer pedal feel, but this isn't true. The pedal actually feels a little stiffer now, and the clutch feels great as well. I'm very satisfied.
I didn't get a lot of pictures, but the install is very simple, just a little time consuming.
The biggest thing, and it might only be for those using the 300zx BMC, you will need an extra crush washer for each banjo bolt as the they bottom out before being completely tight without them. I found some at Autozone that were actually the exact same size as the ones included with the kit. 4 will be needed:
If you buy both the brake and clutch lines, you'll have 4 total line. Obviously.
The shortest goes directly down to the front drivers caliper. It's actually a little longer than needed(all the lines were), but this won't cause a problem. It's the back port, closest to the booster:
The remaining are around the same length. 2 are almost the exact same, and the 3rd is a few inches longer. This is the clutch line.
The next line, the middle port, goes to the front passenger caliper. Either of the 2 lines that are about the same length can be used. I'd have more pictures but I'm a worthless whorebag
Same as the front drivers caliper, there's a good bit of extra length here. I didn't want to take the chance of it touching anything it shouldn't, so unbolted the bracket and turned it to holed it against the fender well safely:
The last of the brake lines is the front port, farthest from the booster. This is the rear brakes. It goes to the box located near the clutch dampener thing. I WILL get a pic of this tomorrow, just bare with me here.
Last, of course, is the clutch line. It goes to the clutch. Directly to the slave cylinder.
Now, all three of the lines(front passenger and rear caliper, and clutch line) go straight down, curving towards the front of the car right over the cross member. They are then routed along the cross member between the oil pan. There are plenty of holes for zip ties here to neatly and safely route it:
The clutch line had the least amount of slack, but was perfectly fine. Now have fun bleeding everything
A few more pics, courtesy of my buddy Matt:
I am very happy with this purchase. It's the first decent purchase that wasn't going towards fixing the motor. Feels good man. I also want to thank AceUpMotorsports for hooking me up. Take care guys.
-
Hoffman5982
- Posts: 1805
- Joined: Sat Sep 29, 2007 7:20 pm
- Car: '95 sr20det 240sx
Re: Hoffman5982's Super Awesome Driveway Swap- Finally Runni
So my boost controller took a dump on me. The backlight comes on but nothing else. The screen is just blank. Maybe Enjuku will send me a new one. Otherwise, I'm gonna have to add that to the list of sh**I need to buy.
I finally got around to lowering the front of my car today. I dropped it about an inch. I still have about another 2-3 inches left on the coilover but it's scrubbing the fender trim pieces at full lock, so I'll need to cut it down here soon. I'm much happier with the look though. The slight reverse rake was killing me.

Haven't really worked on the s13 at all. My buddy decided to buy an s14 to daily and I've been helping with that. I did, however, complete the initiation into missileage for the s13. Had a little mishap where I came in way too hot, and when i went to connect a drift the car went completely straight into a barbed wire fence. Apparently I haven't gotten over my fetish for those. The damage isn't too bad. Passenger fender is bad but we have a spare. Didn't get any pics because we were too busy fixing the fence. It was fun though.
I finally got around to lowering the front of my car today. I dropped it about an inch. I still have about another 2-3 inches left on the coilover but it's scrubbing the fender trim pieces at full lock, so I'll need to cut it down here soon. I'm much happier with the look though. The slight reverse rake was killing me.
Haven't really worked on the s13 at all. My buddy decided to buy an s14 to daily and I've been helping with that. I did, however, complete the initiation into missileage for the s13. Had a little mishap where I came in way too hot, and when i went to connect a drift the car went completely straight into a barbed wire fence. Apparently I haven't gotten over my fetish for those. The damage isn't too bad. Passenger fender is bad but we have a spare. Didn't get any pics because we were too busy fixing the fence. It was fun though.
-
Hoffman5982
- Posts: 1805
- Joined: Sat Sep 29, 2007 7:20 pm
- Car: '95 sr20det 240sx
Re: Hoffman5982's Super Awesome Driveway Swap- Finally Runni
Oh, hey guys...
-
nevertheless

- Posts: 1378
- Joined: Tue Jan 22, 2008 11:12 am
- Car: 1993 240sx hatch
1995 Nissan D21 - Location: Omaha, Nebraska
- Contact:
Re: Hoffman5982's Super Awesome Driveway Swap- Finally Runni
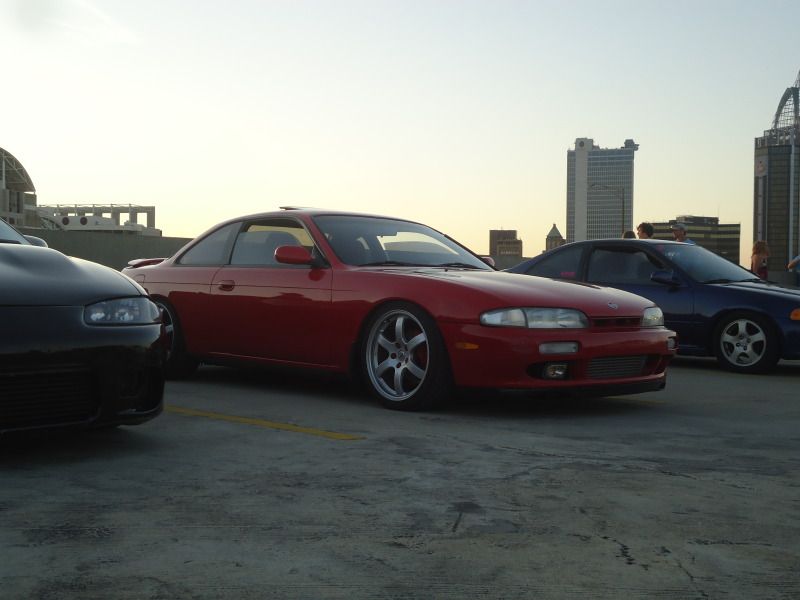
Clean zenki you have there. Hope you don't go Kouki.
-
Hoffman5982
- Posts: 1805
- Joined: Sat Sep 29, 2007 7:20 pm
- Car: '95 sr20det 240sx
Re: Hoffman5982's Super Awesome Driveway Swap- Finally Runni
No, as long as I own it, it will stay zenki.nevertheless wrote:Clean zenki you have there. Hope you don't go Kouki.
Update
Well I think I have enough material to justify an update.
Last time I posted I had just lowered my car. About a week later I picked up some OEM mud flaps. They weren't in the greatest shape but you can only see the flaws up close. I wasn't digging the almost-white faded state they were in so I hit them with some Duplicolor trim paint. I was a little wary since the mud flaps are a rubbery-plastic, but I haven't had any paint. Sh**y cell phone pic will have to suffice.

Before I installed them, there were a few other things I decided to tackle that I've been meaning to do for a while. First thing was to get the fubar'd lip off and do something about it. The fiberglass from the last repair job didn't stick so I used Gorilla glue to fix it. It's ugly, but it's in one piece until I buy a new one. While I was at it I ripped the front bumper off. The original intent was to install a new bumper retainer, but I also made new brackets for the intercooler that lowered it enough to fit the factory fog lights. I rocked this look for a week as I refused to run no lip with the ic hanging down below it.

And the fresh retainer to have proper fitment and the oem grille bracket:

Now, with the mud flaps on, I wasn't happy with the wheel fitment up front. The rear was fine with the spacers, but the mud flaps really made the front wheels look a tad sunken in, so I remedied that with some 8mm slip on spacers, same as the rear, and extended studs.

I finally got it all back on and had the car detailed. While I was at it, I repainted most of the bay as there were a lot of scratches
All of this was done in preparation for a big car show in Mobile, AL. I got some good shots of the car along the way.


After that was over, I received an unexpected tax return from the half a year I worked last year, so I ordered some parts. First thing, which I have yet to receive, was some Stance Toe Rods. I've been meaning to order theses for forever now. I'm still rocking the Godspeed RUCA's, but I'll be replacing them with Stance arms soon enough.
Next, I've been wanting to go with the Euro 200sx look, most notably the amber turn signals and side repeaters. I could never find any amber paint, so I went with the next best thing. Amber tint. I think they came out great, and if I decide I hate them I can peal it right off.
Before:

After:


Also, my dog had puppies, if you couldn't tell.
I haven't gotten a good picture of them installed, so that'll have to wait. I also haven't been able to find oem side repeaters but I found some universal ones that are very close. I'm going to search a little longer before I jump the gun and paint over the USDM side marker and cut holes in my fenders.
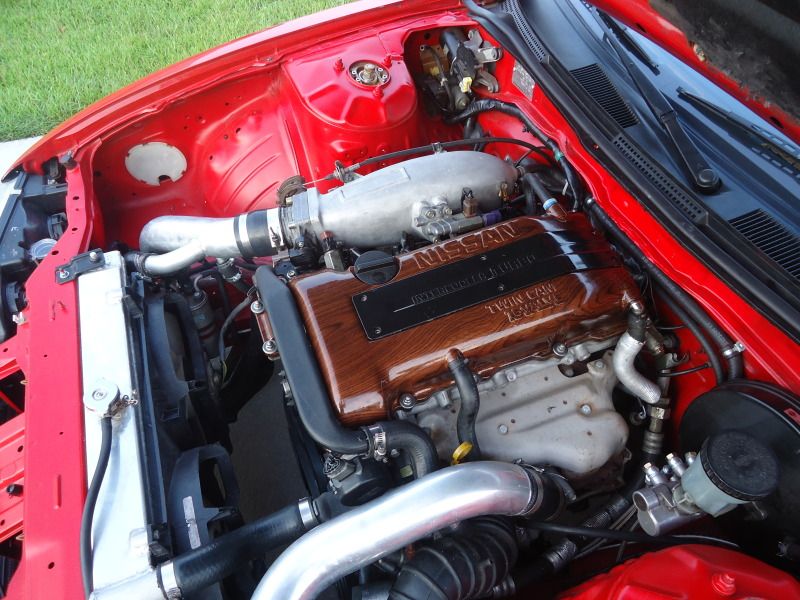
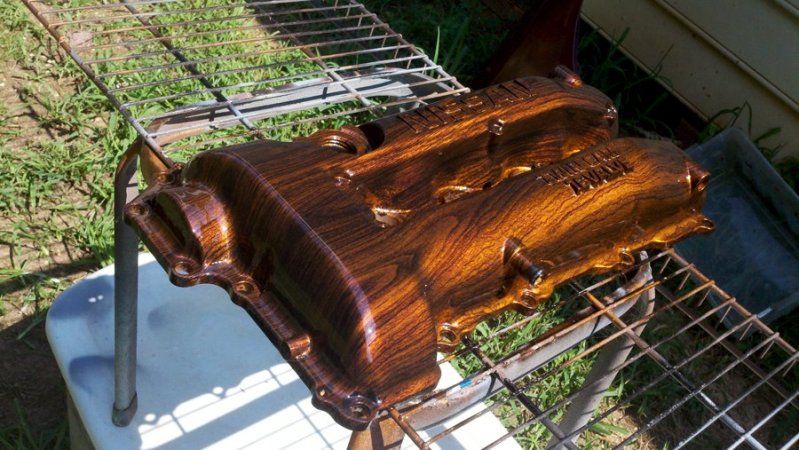
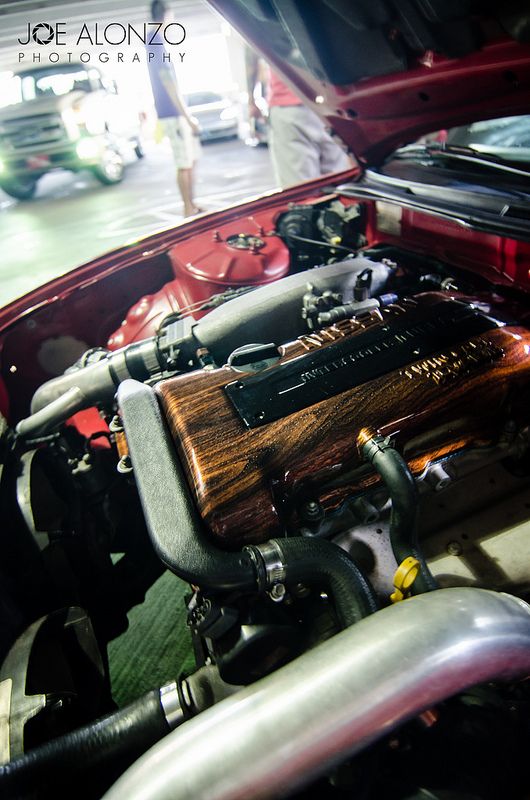
Next was something I've also wanted to do for a while, but never had spare cash that could be blindly spent on stuff. As I posted before, someone in the area copied my valve cover colors. I wasn't cool with that. I also didn't feel like repainting it, so I sent it off. I originally planned to do wrinkle red, but that seemed too boring. So I did the next best thing:

It came out awesome, but unfortunately after driving it, the finish didn't hold up and about 8 cracks formed. Luckily, the guy is awesome and said he will re-do no problem and is even refunding me some money for shipping.
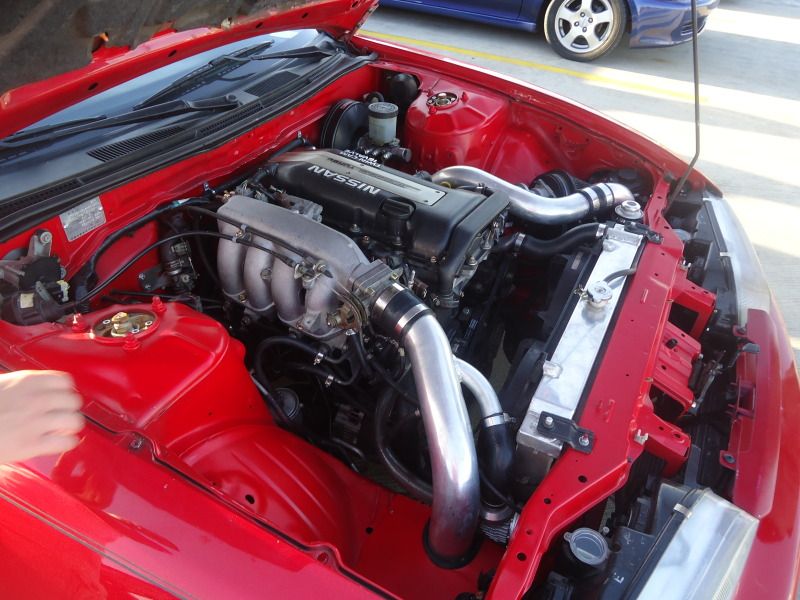
I also picked up a Freddy intake manifold for super cheap, but had to revert back to the stock mani until I can find an angled fitting for the IACV hose as a straight fitting is right on the fuel rail and kinks the hose, blocking it off. While I was at it I installed some ISIS rocker arm stoppers. Cheap insurance, right? I also got rid of the fugly K&N filter and installed an HKS filter. Much nicer imo..


While I was there, I pulled the wring harness. I needed to re-loom a few areas, but most importantly I wanted to relocate the ignitor into the cabin, resleeve the CAS/MAF section, and shorten the coil pack subharness connector so I could tuck it behind the head. It was all very simple, and the only wire I had to cut and extend was the ground for the ignitor. For the coil pack connector, I just folded it back as to not jeopardize the harness.


Next on the to-do list was to replace my brake pads as they were on the squealers. Nothing special, but while I was doing it I found that one of the dust boots on the front calipers was ripped, but not all the way to the piston, so it isn't leaking yet. I decided to go ahead and rebuild them like I've been planning to do. I've also been toying with the idea on changing the color scheme up. What better time? Instead of painting them, I've decided to powder coat them. I've already gotten both the powder and the rebuild kit, I just need to find some time to do it. That will be coming up soon..
-
Hoffman5982
- Posts: 1805
- Joined: Sat Sep 29, 2007 7:20 pm
- Car: '95 sr20det 240sx
Re: Hoffman5982's Super Awesome Driveway Swap- Finally Runni
Well I guess I should have also added that I got my tach working. I decided to see if the auto ecu works(it does), and after plugging it in the tach sprang to life. I checked the manual ecu and the pin going from the plug to the board was fried. I haven't fixed it as the auto ecu hasn't thrown codes and it actually seems to pull a little harder. I did a pull going by sound like I've always done and found that i've never taken the motor over 5.5k. Even with the tach working I haven't gone past 6.5k. Call me a pu**y but I'm just paranoid. I'm still running 5lbs of boost. I got a manual boost controller and the boost gauge went out. Figures..
-
nevertheless
- Posts: 1378
- Joined: Tue Jan 22, 2008 11:12 am
- Car: 1993 240sx hatch
1995 Nissan D21 - Location: Omaha, Nebraska
- Contact:
Re: Hoffman5982's Super Awesome Driveway Swap- Finally Runni
Wow, that engine bay is clean!
-
badbob2121

- Posts: 1989
- Joined: Sat Jan 16, 2010 9:23 am
- Car: '92 Nissan 240SXS13 Hatch ELLIS JUAN
'12 Ford Mustang GT RTR - Location: St. Louis
Re: Hoffman5982's Super Awesome Driveway Swap- Finally Runni
Wow, sucks about the cracking powder coating.. looks great though..
you should should coat/spray your exhaust manifold heat shield black...
you should should coat/spray your exhaust manifold heat shield black...
-
mechanicalmoron
- Posts: 790
- Joined: Fri Apr 29, 2011 1:04 am
Re: Hoffman5982's Super Awesome Driveway Swap- Finally Runni
That's a baller valve cover, if the guy can fix it successfully so it holds up.
-
homeslicej2
- Posts: 5446
- Joined: Mon Jan 15, 2007 5:46 pm
- Car: 1990 Nissan 240SX S13 SR'd hatch
Re: Hoffman5982's Super Awesome Driveway Swap- Finally Runni
Really like the way your bay looks, not tucked, but clean and tidy. I like that. Extreme tuck bays are cool to look at, but seem problematic and too much work when an issue arises.
-
Hoffman5982
- Posts: 1805
- Joined: Sat Sep 29, 2007 7:20 pm
- Car: '95 sr20det 240sx
-
Hoffman5982
- Posts: 1805
- Joined: Sat Sep 29, 2007 7:20 pm
- Car: '95 sr20det 240sx
Re: Hoffman5982's Super Awesome Driveway Swap- Finally Runni
Well I guess I can update this.
A good bit has happened since my last post. Not as much as I'd like, but I'm a lazy bum so get over it.
First thing's first. I finally got my valve cover back. This time he actually sandblasted it and sprayed a nice copper undercoat. Came out really well. Only problem is after a couple of heat cycles what looks like dust started showing in the finish. It's not bad, but really shows in pictures. Lucky me.
After that I picked up some Euro fender markers. I sat on them for about a money as I couldn't bring myself to cutting my fenders. I finally grew some balls and got it done.

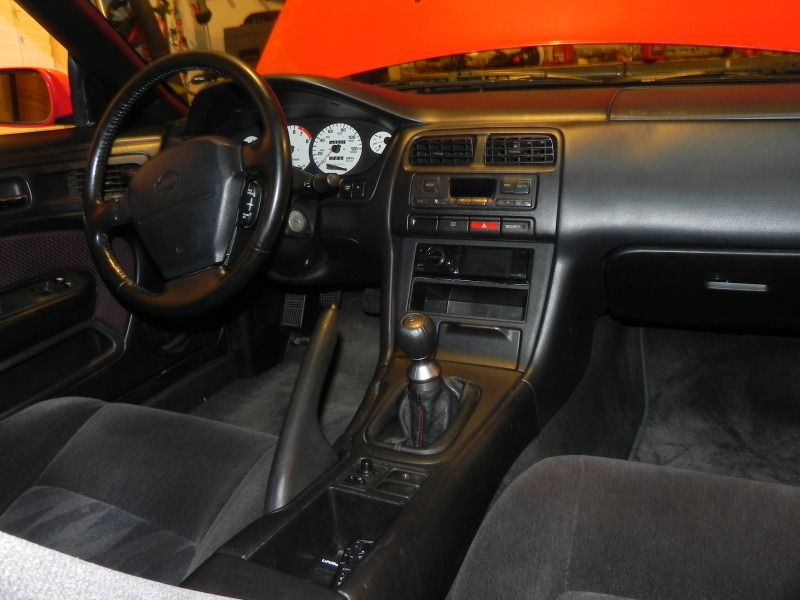
Around the same time I ordered a brand new S15 Shift Knob, a new Kenwood KIV-701 head unit, an almost ab-less air bag, and a clean leather wrapped steering wheel. No more lame Altima steering wheel. I'm picking up some really clean front leather seats this week and will eventually do some leather door inserts to match.
Now, if you remember I've been helping a friend build his s14. The benefit of him being a really close friend and me helping him every step of the way, he was gracious enough to give me a few things. I've gotten an uncracked dash with the defrost vent, center console, a new dash harness to replace my molested one, and an entire rear end with 90k miles.

The subframe bushings look brand new, so I'm leaving those alone. But I did order some Energry Suspension Differential bushings to go with the ES Master Kit. Still haven't really started on that other than stripping the subframe down and cleaning it.
These past 2 weeks I've been slowly doing the dash harness. Having it out is a blessing. My intent was an as oem as possible DCC install, which I've achieved I believe. All the wires for the sensors are run inside the harness which means no stray wires running everywhere. I still need to run a sub harness for the gauges and shielded wires to the rear for my speakers and I can resleeve and install it with the dash and all.
Updates with the engine bay. The ghetto fabulous Monster can overflow is now gone! While I thought it was cool, It became an eye sore. As of now, a newer factory overflow is back in. In the Monster can's place is an aluminum power steering reservoir. I've been wanting to do this for a while, but didn't want to spend $250 for the ChaseBay's setup, although I might order the reservoir later on. I got a Lee's reservoir for cheap, and did all AN lines. I had a 10AN welded on to the flange on the pump. I wanted to do this right. I need to order a 14x1.25 adapter to run the feed directly to the rack and eliminate the cooling loop, but that will come in the next week or so.
The guy who welded it wasn't happy with how it came out, so this was free! It hold fine and honestly looks fine to me


When I order the rack adapter I'm also ordering a 45* fitting to run this better.

The great thing about having car friends is scoring Earl's Nylon Braided lines for free.


Overall I spent about $85, which included having to re-order 2 fittings. When I had the bung welded on I finally, after almost 2 years, had a flange for the BOV properly welded. I have been sitting on a new HKS SSQV v.3 for a few months as my v.1 has gotten battered to sh** where it was.

Then I went to a car show, where I got all of 3 pictures taken.


Which brings us to the present. A few nights ago I have a buddy bring his fender roller over and roll all of my fenders. I also decided that it'd be fun to slam my car at the same time.

This was bottoming the fronts out before taking collars out. I also couldn't turn the car. So I raised it a little.

I need better wheels..
I'll leave with an updated bay shot. I need to work on the clutter on the firewall.

A good bit has happened since my last post. Not as much as I'd like, but I'm a lazy bum so get over it.
First thing's first. I finally got my valve cover back. This time he actually sandblasted it and sprayed a nice copper undercoat. Came out really well. Only problem is after a couple of heat cycles what looks like dust started showing in the finish. It's not bad, but really shows in pictures. Lucky me.
After that I picked up some Euro fender markers. I sat on them for about a money as I couldn't bring myself to cutting my fenders. I finally grew some balls and got it done.
Around the same time I ordered a brand new S15 Shift Knob, a new Kenwood KIV-701 head unit, an almost ab-less air bag, and a clean leather wrapped steering wheel. No more lame Altima steering wheel. I'm picking up some really clean front leather seats this week and will eventually do some leather door inserts to match.
Now, if you remember I've been helping a friend build his s14. The benefit of him being a really close friend and me helping him every step of the way, he was gracious enough to give me a few things. I've gotten an uncracked dash with the defrost vent, center console, a new dash harness to replace my molested one, and an entire rear end with 90k miles.
The subframe bushings look brand new, so I'm leaving those alone. But I did order some Energry Suspension Differential bushings to go with the ES Master Kit. Still haven't really started on that other than stripping the subframe down and cleaning it.
These past 2 weeks I've been slowly doing the dash harness. Having it out is a blessing. My intent was an as oem as possible DCC install, which I've achieved I believe. All the wires for the sensors are run inside the harness which means no stray wires running everywhere. I still need to run a sub harness for the gauges and shielded wires to the rear for my speakers and I can resleeve and install it with the dash and all.
Updates with the engine bay. The ghetto fabulous Monster can overflow is now gone! While I thought it was cool, It became an eye sore. As of now, a newer factory overflow is back in. In the Monster can's place is an aluminum power steering reservoir. I've been wanting to do this for a while, but didn't want to spend $250 for the ChaseBay's setup, although I might order the reservoir later on. I got a Lee's reservoir for cheap, and did all AN lines. I had a 10AN welded on to the flange on the pump. I wanted to do this right. I need to order a 14x1.25 adapter to run the feed directly to the rack and eliminate the cooling loop, but that will come in the next week or so.
The guy who welded it wasn't happy with how it came out, so this was free! It hold fine and honestly looks fine to me
When I order the rack adapter I'm also ordering a 45* fitting to run this better.
The great thing about having car friends is scoring Earl's Nylon Braided lines for free.
Overall I spent about $85, which included having to re-order 2 fittings. When I had the bung welded on I finally, after almost 2 years, had a flange for the BOV properly welded. I have been sitting on a new HKS SSQV v.3 for a few months as my v.1 has gotten battered to sh** where it was.
Then I went to a car show, where I got all of 3 pictures taken.
Which brings us to the present. A few nights ago I have a buddy bring his fender roller over and roll all of my fenders. I also decided that it'd be fun to slam my car at the same time.
This was bottoming the fronts out before taking collars out. I also couldn't turn the car. So I raised it a little.
I need better wheels..
I'll leave with an updated bay shot. I need to work on the clutter on the firewall.
Re: Hoffman5982's Super Awesome Driveway Swap- Finally Runni
Lookin snazzy!
-
420sxWETDREAMS

- Posts: 514
- Joined: Sun Feb 24, 2008 3:37 am
- Car: 1991 240sx Hatchback
- Location: @ your moms house
Re: Hoffman5982's Super Awesome Driveway Swap- Finally Runni
Looks dope! Loving the valve cover wood grain look.
-
Hoffman5982
- Posts: 1805
- Joined: Sat Sep 29, 2007 7:20 pm
- Car: '95 sr20det 240sx
Re: Hoffman5982's Super Awesome Driveway Swap- Finally Runni
Thanks guys!
Also, I completely forgot to mention the toe rods. I originally ordered Stance, and after almost 2 months of waiting I called and they said it'd be another 3 weeks. If you remember, I waited 6 months for their coilovers. I wasn't about to go through this again. I decided to cancel that order and go with these:

I'm happy I went ahead and upgraded. It was only a matter of like $30 and well worth it imo, considering I had them the following week. Comparing these to ISIS arms is crazy. The rod end and lock nuts move so smoothly compared to the ISIS arms, and being titanium makes them light as hell. Very happy with these and can't wait to get them on.
Also, I completely forgot to mention the toe rods. I originally ordered Stance, and after almost 2 months of waiting I called and they said it'd be another 3 weeks. If you remember, I waited 6 months for their coilovers. I wasn't about to go through this again. I decided to cancel that order and go with these:
I'm happy I went ahead and upgraded. It was only a matter of like $30 and well worth it imo, considering I had them the following week. Comparing these to ISIS arms is crazy. The rod end and lock nuts move so smoothly compared to the ISIS arms, and being titanium makes them light as hell. Very happy with these and can't wait to get them on.
Re: Hoffman5982's Super Awesome Driveway Swap- Finally Runni
Superb work here! Keep us posted!!!
-
kouki munster

- Posts: 2195
- Joined: Wed Nov 09, 2005 6:13 pm
- Car: 97 base 240
- Location: Anderson, SC
Re: Hoffman5982's Super Awesome Driveway Swap- Finally Runni
They are expensive but well worth the monies, adjustment and correctly aligning the spherical bearings on them is a breeze.(I also have a great deal of their other parts on my car, and am completely satisfied)
-
Hoffman5982
- Posts: 1805
- Joined: Sat Sep 29, 2007 7:20 pm
- Car: '95 sr20det 240sx
Re: Hoffman5982's Super Awesome Driveway Swap- Finally Runni
For sure. After seeing just how nicely made they are I am more than happy saving up a little extra to buy them.kouki munster wrote:They are expensive but well worth the monies, adjustment and correctly aligning the spherical bearings on them is a breeze.(I also have a great deal of their other parts on my car, and am completely satisfied)
So I picked up a minty fresh front lip last week. I'm probably going to paint it, but haven't fully decided. Also had a few shots taken by a buddy.

-
nevertheless
- Posts: 1378
- Joined: Tue Jan 22, 2008 11:12 am
- Car: 1993 240sx hatch
1995 Nissan D21 - Location: Omaha, Nebraska
- Contact:
-
audtatious

- Moderator
- Posts: 25014
- Joined: Sun Oct 27, 2002 5:31 pm
- Car: 2017 Q60 Red Sport. Gone: 2014 Q50s, 2008 G37s coupe, 2007 G35s Sedan, 2002 Maxima SE, 2000 Villager Estate (Quest), 1998 Quest, 1996 Sentra GXE
- Location: Stalking You
- Contact:
Re: Hoffman5982's Super Awesome Driveway Swap- Finally Runni
Great project, keep it up.
-
jsturges18
- Posts: 297
- Joined: Wed Nov 03, 2010 1:42 pm
- Car: 1990 240sx hatch - totaled/parts car
1990 240sx hatch - replacement
2005 pt cruiser
2004 350Z - Location: connecticut
Re: Hoffman5982's Super Awesome Driveway Swap- Finally Runni
really like how simple and clean your car is. great work!
how did that amber tint go on the lights? was it similar to window tint? it made big difference and looks much better
how did that amber tint go on the lights? was it similar to window tint? it made big difference and looks much better
-
Hoffman5982
- Posts: 1805
- Joined: Sat Sep 29, 2007 7:20 pm
- Car: '95 sr20det 240sx
Re: Hoffman5982's Super Awesome Driveway Swap- Finally Runni
Thanks! And yeah, pretty much the same as window tint except it was thicker and I had to use a hair dryer to make it stick. Cost a whopping $7 off ebay and hasn't started lifting at all, so I'm happy.jsturges18 wrote:really like how simple and clean your car is. great work!
how did that amber tint go on the lights? was it similar to window tint? it made big difference and looks much better
Well guys, I finally landed another job, so expect to see some actual updates soon.
In the mean time, My VLSD tried to kill itself the other night. I don't know if I didn't properly torque the cover down properly 2 years ago or what, but the other night I was driving and started hearing a roaring sound from the rear. I get it home slowly and look under and the dif is covered in fluid. Great.
So I pulled it out. What I found was hilarious and scary at the same time. Not one, not two, not even three, but all the bolts on the cover were loose. The 2 on each side were snug, but the rest were almost completely backed out. Pull the cover and it's practically empty. Luckily everything looks ok, so I ordered a new gasket and put some fluid in it. Of course, my OCD will not allow me to stop there. So I thoroughly cleaned it and put fresh hardware on.

I also decided to throw half of my ES differential bushings on since it has been clunking horribly at low speeds. When I pulled the dif the centers literally just fell out. I'm waiting to put the two bushings that are on the subframe in until I get the new subframe finished.

Hopefully I'll have it put back together tomorrow.
Now for the sad/exciting news. Take a look at this picture:

This is the last picture with the Z Track wheels. Stock wheels are back on, Z wheels will hopefully be sold this weekend.
What's to come....?
Re: Hoffman5982's Super Awesome Driveway Swap- Finally Runni
Shame you don't live closer. I've been wanting track Z33 wheels for a while.
My VLSD has been making some crazy whining noise on decel. I should take a look at mine too, pretty sure it's very worn out.
My VLSD has been making some crazy whining noise on decel. I should take a look at mine too, pretty sure it's very worn out.