hey new blood here and my 720 I just picked up
-
synack7350
- Posts: 364
- Joined: Sun Jan 09, 2011 3:08 pm
- Car: nissan '83 720 king cab pickup 2wd 2.4L Z24
- Location: Boaz, AL
Re: hey new blood here and my 720 I just picked up
man I'm super bummed today my idle is all over the place and its acting like there's a huge friggin vac leak but I can't find one. I can barely keep it rich enough with the choke closed and idle all the way up mixture screw all the way out. I got really frustrated with it so I'm taking it to a fellar down the way that builds race cars I guess he's the local carb master. I hope he can get it sorted. I want this bit done so I can move on %$&#*&$%
-
synack7350
- Posts: 364
- Joined: Sun Jan 09, 2011 3:08 pm
- Car: nissan '83 720 king cab pickup 2wd 2.4L Z24
- Location: Boaz, AL
Re: hey new blood here and my 720 I just picked up
pffft I'm dumb I had my vac lines wrong finally got it all sorted after some more tinkering. its still not perfect but on its way. The mechanic was out sick so I had to get it all sorted myself. I'll take a bunch of pics just so no one else runs into the same mistakes. As a rewards I dropped 450 on 2 kenwood 12" and a class d mono block (300 watt). yay I have bass  tomorrow going to get the pics and get the rest of my fuel stuff sorted. That and play with my new system. I couldn't wait so I installed it in the dark. Sounds good though
-
synack7350
- Posts: 364
- Joined: Sun Jan 09, 2011 3:08 pm
- Car: nissan '83 720 king cab pickup 2wd 2.4L Z24
- Location: Boaz, AL
Re: hey new blood here and my 720 I just picked up
if anyone needs a hosed receiver dryer for air conditioning let me know I have a new one kicking around that was sent to me by mistake. I'll give ya a good price;)
-
synack7350
- Posts: 364
- Joined: Sun Jan 09, 2011 3:08 pm
- Car: nissan '83 720 king cab pickup 2wd 2.4L Z24
- Location: Boaz, AL
Re: hey new blood here and my 720 I just picked up
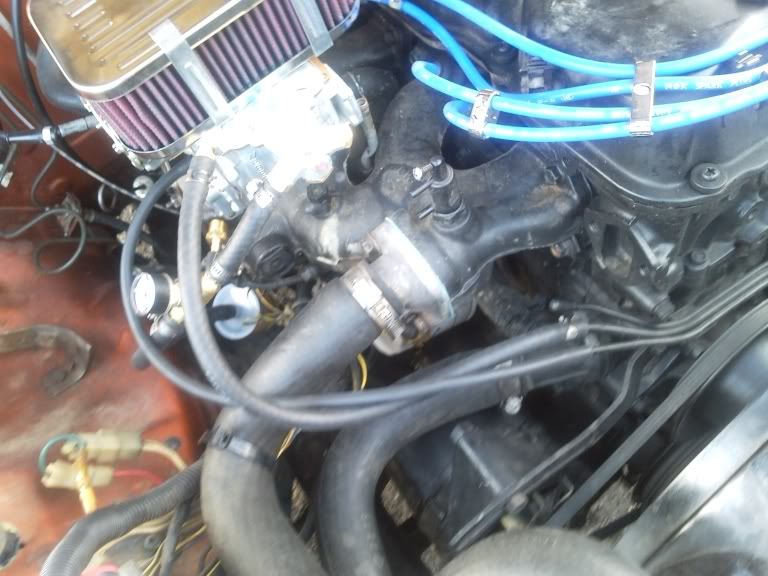
Vac delete and weber carb install vac lines how it should be!!!!
made a mistake on my install thought I'd post this up so yall would have an easier time than I did with it.
vac lines from carb. the top fitting is your vapor outlet 1/4 id tubing but you can get by with 5/16th ( i just use fuel lines. I ran it into the rail then out the other side to the purge on the charcoal canister.
the bottom line is vac advance for the dizzy it connects to the port next to the mixture screw. ran it into the rail then t'd it after the rail one line to the dizzy one to the vac from diz port on the charcoal canister, and thats it for lines from the carb minus fuel.
lines from carb to rail.
the outet of the rail under the exhaust side near the dizzy

where I T'd the vac advance line one goes to dizzy the other to vac on the charcoal cannister

this is the charcoal cannister and the connections

just used vac plugs to plug the unused vac stuff on the intake. going to get some 1/4 inch npt plugs (plumbing stuff) and close those ports eventually.

here's my fuel pressure gauge, it is a spectre from auto zone I think it was like 15 bucks. I made a custom T from plumbing stuff (brass) all 1/8 inch npt threads with 5/16th inch hose barbs. cause the mr gasket pressure gauge I got from advanced didn't come with a T, but that gauge sucks the first one didn't work at all and the second one I got didn't work worth a crap either. Stay away from them. The spectre fuel pressure gauge comes with a plastic T that will work fine, I just figured sine I already put $20 into this brass T by god I was going to use it.
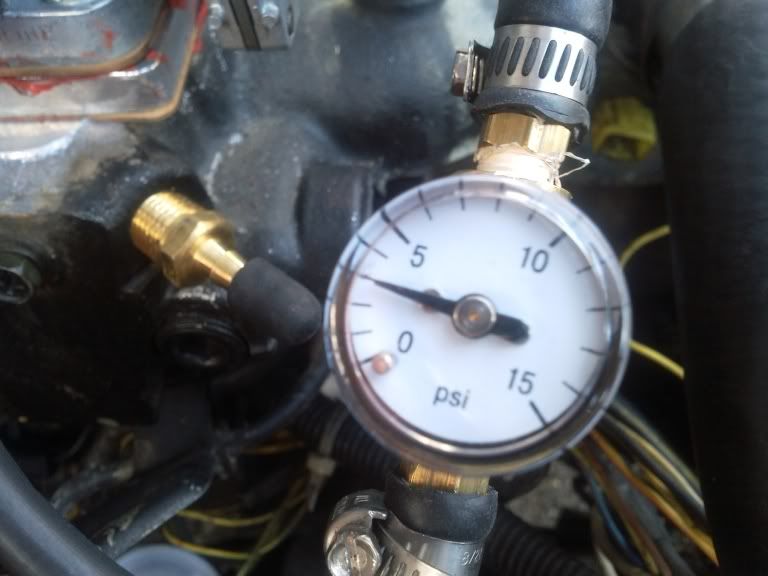
I was using a spectre fuel pressure regulator but it crapped out on me in 15 minutes (while I was going down the road) cut fuel off completely. didn't need it anyway with the return lines bypassed I get solid 3 psi off my pump (no surging or anything its perfect) I hear carter makes an Ideal pump for those of you that need to replace the one you have and are thinking of going to a weber.
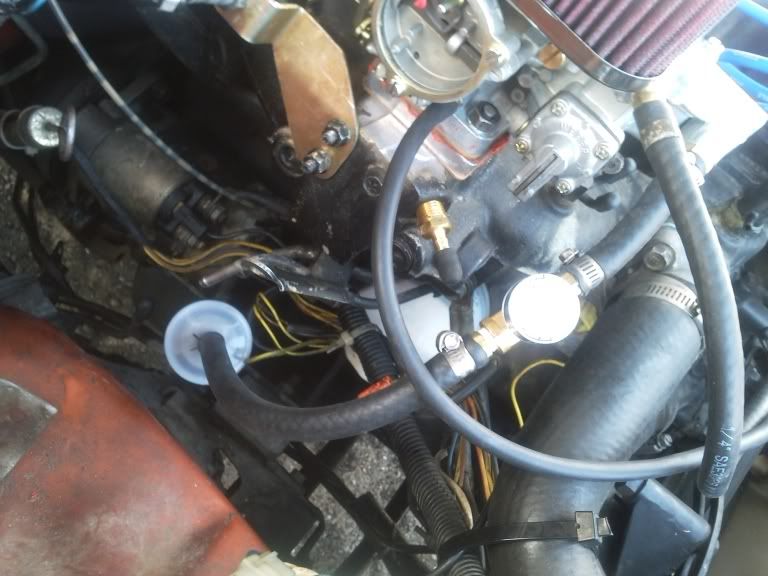
here is my fuel return line delete. I moved the fuel inlet on the carb to the left side away from the engine. (heat makes gas vaporise in the line). I installed the fuel filter right at the fuel supply rail outlet then hosed up to the pressure gauge then finally to the carb. I did have the regulator between the filter and the gauge. I have the fuel return rail capped with a vac plug just to keep dirt out of it.
egr valve was delete and capped no smog here

finally my amp and sub box I have the subs facing away so the seats will recline. I take a picture next time I pull them out they are kenwood 12's x2

hope this helps future inexperienced carb installers! or vac line deletion enthusiasts.
made a mistake on my install thought I'd post this up so yall would have an easier time than I did with it.
vac lines from carb. the top fitting is your vapor outlet 1/4 id tubing but you can get by with 5/16th ( i just use fuel lines. I ran it into the rail then out the other side to the purge on the charcoal canister.
the bottom line is vac advance for the dizzy it connects to the port next to the mixture screw. ran it into the rail then t'd it after the rail one line to the dizzy one to the vac from diz port on the charcoal canister, and thats it for lines from the carb minus fuel.
lines from carb to rail.
the outet of the rail under the exhaust side near the dizzy
where I T'd the vac advance line one goes to dizzy the other to vac on the charcoal cannister
this is the charcoal cannister and the connections
just used vac plugs to plug the unused vac stuff on the intake. going to get some 1/4 inch npt plugs (plumbing stuff) and close those ports eventually.
here's my fuel pressure gauge, it is a spectre from auto zone I think it was like 15 bucks. I made a custom T from plumbing stuff (brass) all 1/8 inch npt threads with 5/16th inch hose barbs. cause the mr gasket pressure gauge I got from advanced didn't come with a T, but that gauge sucks the first one didn't work at all and the second one I got didn't work worth a crap either. Stay away from them. The spectre fuel pressure gauge comes with a plastic T that will work fine, I just figured sine I already put $20 into this brass T by god I was going to use it.
I was using a spectre fuel pressure regulator but it crapped out on me in 15 minutes (while I was going down the road) cut fuel off completely. didn't need it anyway with the return lines bypassed I get solid 3 psi off my pump (no surging or anything its perfect) I hear carter makes an Ideal pump for those of you that need to replace the one you have and are thinking of going to a weber.
here is my fuel return line delete. I moved the fuel inlet on the carb to the left side away from the engine. (heat makes gas vaporise in the line). I installed the fuel filter right at the fuel supply rail outlet then hosed up to the pressure gauge then finally to the carb. I did have the regulator between the filter and the gauge. I have the fuel return rail capped with a vac plug just to keep dirt out of it.
egr valve was delete and capped no smog here
finally my amp and sub box I have the subs facing away so the seats will recline. I take a picture next time I pull them out they are kenwood 12's x2
hope this helps future inexperienced carb installers! or vac line deletion enthusiasts.
-
synack7350
- Posts: 364
- Joined: Sun Jan 09, 2011 3:08 pm
- Car: nissan '83 720 king cab pickup 2wd 2.4L Z24
- Location: Boaz, AL
Re: hey new blood here and my 720 I just picked up
well back to school and aced some more tests yay so I get more time to fiddle. I installed a manual choke on the carb, I figured since the auto would defective I'd rather have manual anyway so I could control mixture and always know the position of my choke plates. I installed some chrome edging o clean up that hacked up piece I mounted speakers to in the rear. it worked out ok using door edge trim but i'd like to find some slightly wider to bridge that carpet better and a little taller to better hide the transitions around the light. its obvious when I post pictures. reorientated my subs and completed my install looks sharp. I'll take pics tomorrow. I have brakes to do tomorrow as well as a 2 inch drop. that'll prolly be a whole day affair. wednesday I'm going to install my new windshield weather gasket thingy. then an alignment, and rejet my idle circuit with the bigger idle jet that should be here by then. lots to do but its all little easy stuff now
-
synack7350
- Posts: 364
- Joined: Sun Jan 09, 2011 3:08 pm
- Car: nissan '83 720 king cab pickup 2wd 2.4L Z24
- Location: Boaz, AL
Re: hey new blood here and my 720 I just picked up
well went to replace the shoes on the rear, got the drums off and low and behold its beautiful in there. shoes are good drum is great. so hit all the parts with brake cleaner and closed it up. Was going to do the front brakes too ( i figure they probably are the source of the constant squeaking, but didn't have time after installing my 2 inch drop blocks and letting out the torsions. I got the front end to drop about an inch and a half and I still have room on the torsions but I wanna let it settle thinking it might go ahead and sink that extra half inch, if not tomorrow is a new day. Gotta get my windshield seal installed before the rain gets here.
-
synack7350
- Posts: 364
- Joined: Sun Jan 09, 2011 3:08 pm
- Car: nissan '83 720 king cab pickup 2wd 2.4L Z24
- Location: Boaz, AL
Re: hey new blood here and my 720 I just picked up
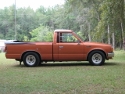
well sad to say the windshield seal replacement didn't work out. I had a feeling the windshield would end up breaking during this project it being so old, heavily pitted, and having a star cracked in the center of it. Sure enough will wrapping the seal around the windshield she cracked all the way across from that weak point. new windshield with installation $167 friday. Which is 1/2 the price I expected pay for a new windshield without installation so I'm pretty fricken happy about it. Just bummed I can't roll my ride for a couple of days. It looks awesome slammed 2 inches. I'm really psyched about how this truck is coming together. Just need some hotter fire on my ignition, the rubber suspension bits replaced, the all thats left is cosmetic exterior work. gonna start looking for some matte black 2 stage paint, after I get the suspension square.
-
breadbox

- Posts: 8549
- Joined: Tue Oct 17, 2006 4:09 pm
- Car: 89 Nissan 240SX
89 Koop
84 720 4x4KC - Location: Va Bch
Re: hey new blood here and my 720 I just picked up
so that plastic piece with the three vacuum lines on the intake, can I just put a set screw there and get rid of that thing? now that I have weber.
-
synack7350
- Posts: 364
- Joined: Sun Jan 09, 2011 3:08 pm
- Car: nissan '83 720 king cab pickup 2wd 2.4L Z24
- Location: Boaz, AL
Re: hey new blood here and my 720 I just picked up
well you can delete everything except the line to the dizzy if you don't have emissions where you are. Pezi even deleted the charcoal cannister (i haven't yet). can use whatever method you think is best for plugging vacuum source, just wanna make sure nothin is leaking. the manifold outlets are all 1/4inch npt so the proper way to plug them is with plumbing plugs.
-
flinterman2000
- Posts: 1011
- Joined: Mon May 04, 2009 5:32 pm
- Car: 2000 Nissan Wingroad, 85 Datsun 720 Pick Up.
Re: hey new blood here and my 720 I just picked up
After seeing the link for the conversion, I think that is what I'll be doing.synack7350 wrote:awesome take lots of pics for us not so mechanically inclined types
-
MetalFab
- Posts: 226
- Joined: Sun Feb 28, 2010 10:02 pm
- Car: 1985 720 4x4 reg cab flatbed.
- Location: Northern California
- Contact:
Re: hey new blood here and my 720 I just picked up
I didn't do anything to the plastic tripple vac piece on the front of the motor, just left it open. Pretty sure it's just a vac operated temperature sensor for the stocker carb. capping it won't change anything.
Looks clean, I've been too lazy to find brass plugs for it all, that and some paint and most people wouldn't know the difference. Better to tig it and grind it down for an extra clean look, just not a project for a daily driver. Thanks for posting tons of pics dude.
Looks clean, I've been too lazy to find brass plugs for it all, that and some paint and most people wouldn't know the difference. Better to tig it and grind it down for an extra clean look, just not a project for a daily driver. Thanks for posting tons of pics dude.
-
synack7350
- Posts: 364
- Joined: Sun Jan 09, 2011 3:08 pm
- Car: nissan '83 720 king cab pickup 2wd 2.4L Z24
- Location: Boaz, AL
Re: hey new blood here and my 720 I just picked up
yeah I know its just a switch bt I had the plugs so I just stuck them on there (mostly so I don't lose the plugs) I think I capped the unused rails as well. yeah tig and some grinding would be a permanent solution, for those without welders who want to keep the stock ports could also go with the hex style flush type NPT plugs. Its prolly what I'll look for.
-
synack7350
- Posts: 364
- Joined: Sun Jan 09, 2011 3:08 pm
- Car: nissan '83 720 king cab pickup 2wd 2.4L Z24
- Location: Boaz, AL
Re: hey new blood here and my 720 I just picked up
well i've been contemplating replacing the ball joints for a couple of months now after reading fastboatmans thread on the subject (great thread). Well forgive my ignorance but I never knew how to use paypal and never did any ebay shopping, but finally tackled it this weekend (since my truck has been sitting at the glass place  ). found all 4 ball joints for like 38 bucks with free shipping (awesome!). also found electric door lock conversion kit with remote key fob for like 35 bucks (cheapest anywhere else is like 117) Also got a couple of chrome door switches for I think a chevy nova, for the interior switches for 6.99 plus 4 bucks shipping. As long as I get all the crap I ordered in a timely manner I'll be a friggin happy camper with ebay. the windshield place said they couldn't get my windshield in till tomorrow. I hope they don't break this one. I've been without my truck for almost a week now, I just lowered it and finished the system, got the idle jets for the carb and pezi's door sill running boards. If they break it again, I'm just going to have to work on it down at their shop and they can all be damned lol.
Re: hey new blood here and my 720 I just picked up
-
synack7350
- Posts: 364
- Joined: Sun Jan 09, 2011 3:08 pm
- Car: nissan '83 720 king cab pickup 2wd 2.4L Z24
- Location: Boaz, AL
Re: hey new blood here and my 720 I just picked up
thanks bro, I'm glad its givin ya some ideas. Just got my ball joints in so that'll be next, fastboatman has an excellent thread on that. Interior is really cheap to do, (as long as you are creative), vinyl paint works wonders, and walmart carpet did the whole interior counting dash cap (91bucks) paints and carpet for about 200 bucks. wiring and lights was another 100.
Going to do electric locks conversion w/ keyless entry as soon as I get the ball joints and alignment done (keep me from locking my keys in the truck. I'll do pics of that. found a fourdoor kit for 38bucks on ebay. I only have 2 doors so I might find something to do with the extra solenoids.
Going to do electric locks conversion w/ keyless entry as soon as I get the ball joints and alignment done (keep me from locking my keys in the truck. I'll do pics of that. found a fourdoor kit for 38bucks on ebay. I only have 2 doors so I might find something to do with the extra solenoids.
-
Rev_D21

- Posts: 5946
- Joined: Sun Jan 12, 2003 9:49 pm
- Car: 1986.5 D21 LB HD 2WD V6 5Speed
1991 D21 Reg 2WD Auto
1995 D21 Reg 2WD 5Spd
1996 D21 Reg 4WD 5Spd
2012 Versa 1.6S 5-Speed - Location: Somwhere in Western NY
- Contact:
Re: hey new blood here and my 720 I just picked up
I like how you did the fuel psi gauge. I also like your choice in ignition wires, I have the same ones on my KA.
-
synack7350
- Posts: 364
- Joined: Sun Jan 09, 2011 3:08 pm
- Car: nissan '83 720 king cab pickup 2wd 2.4L Z24
- Location: Boaz, AL
Re: hey new blood here and my 720 I just picked up
thanks rev, the ngk wires are clean I really like them, all pre labeled and such
-
Rev_D21
- Posts: 5946
- Joined: Sun Jan 12, 2003 9:49 pm
- Car: 1986.5 D21 LB HD 2WD V6 5Speed
1991 D21 Reg 2WD Auto
1995 D21 Reg 2WD 5Spd
1996 D21 Reg 4WD 5Spd
2012 Versa 1.6S 5-Speed - Location: Somwhere in Western NY
- Contact:
Re: hey new blood here and my 720 I just picked up
Yes, they are very good cables and when the time comes I will replace them with the same thing again.
-
synack7350
- Posts: 364
- Joined: Sun Jan 09, 2011 3:08 pm
- Car: nissan '83 720 king cab pickup 2wd 2.4L Z24
- Location: Boaz, AL
Re: hey new blood here and my 720 I just picked up
Man, after that windshield fiasco, i've just been driving my truck. I was so bummed not having it for a week. well they sent the old timers and finally got the windshield installed properly (no leaks yay  ).
).
put on a new rotor a dizzy cap yesterday and to my surprise found a reluctor and a tcm (I think its the transistor style control module anyway). For some reason this whole time I was thinking this was a points style dizzy. I was really happy to put away the feeler gauges, and return the dwell meter. I'm pretty sure it was the oem cap and rotor I replaced. I actually had to hack off the cap as one of the screws wouldn't budge with any of my traditional screw removal tricks. the cap and rotor was baaaaad. runs way better with the new stuff. I'm gonna do the coils prolly today. I might check compression too since I'll be in that vicinity. hope my 2 and 3 cyls are strong. Not ready for a head job financially yet.
been really procrastinating on the suspension. Its a big job that I want to do right. got the ball joints, need to get shocks and all the rubber bushings under there, going to do the front brakes, shocks, and replace the wheel bearings while I'm in there too. Anything else anyone can think of that'd be convenient to do while I have the arms tore apart? I imagine inspect, sway bar, tie rods, and control arm bushings, reindex them for the new ride height, I've not seen any mention on here about tie rods, all I know about them is when they fail you won't hold an alignment. any comments regarding tie rods and such would be appreciated.
Next week is spring break so I imagine I'll get to work on it then, I have the time no excuses. oh I lost my ugly brown book so I guess i'll have to dish 20 bucks on another one
-
captainzeros

- Posts: 209
- Joined: Sun Jan 24, 2010 8:00 pm
- Car:
1981 Datsun 720 Longbed
1973 Datsun 240Z - Location: Independence, OR
Re: hey new blood here and my 720 I just picked up
Yep, stock dizzy is transistorized.
-
synack7350
- Posts: 364
- Joined: Sun Jan 09, 2011 3:08 pm
- Car: nissan '83 720 king cab pickup 2wd 2.4L Z24
- Location: Boaz, AL
Re: hey new blood here and my 720 I just picked up
yep so finally back to work rather than just tinkering here and there (deleted charcoal cannister, ran stainless vac lines to dizzy, installed a tac, replaced ignition coils, with new mounting hardware and some shiny chrome covers, you know tinkering). Well today I started on the ball joints and stuff. got one side done completely, as well as new hardware for the sway bar end links and new brake pads on the front, deleted the squeakers all together I hate those things. I bought the ball joints on ebay but they sent me the wrong ones. didn't realize it till I had the old ones out, and since I used the heavy hammer not planning on reusing these ball joints removal method. I was in kind of a bind. Luckily O'reily auto parts had what I needed between two stores. I honestly didn't expect to find them and was expecting the apartment manager to pitch a fit in the morning seeing my truck all tore apart in her parking lot. expecting another nice day tomorrow so i'll be finishing it up and taking some pictures. Any one planning this job... lots of brake cleaner, lots of simple green, and lots of shop towels. Its a mess. it all comes apart and goes back together pretty easy. I just looked over fastboatmans thread a couple of times and then went at it. I think I could have fingered it out just fine though by just looking at it all. Its pretty simple.
-
synack7350
- Posts: 364
- Joined: Sun Jan 09, 2011 3:08 pm
- Car: nissan '83 720 king cab pickup 2wd 2.4L Z24
- Location: Boaz, AL
Re: hey new blood here and my 720 I just picked up
ehh didn't take pics of the ball joints figured boatman has that covered. but today I installed some power locks so I won't lock my keys in the truck. here's my mounting locations of the thinger majoos.

a little bending of the control rod is necessary to make sure you aren't side loading the solenoid, wanna make operation as easy and friction free for the thingermajoo's so they last forever.

just another pic of the mounting stuff. yeah I used rivets on the slotted flat stock I don't plan on taking it off.

it was a straight forward easy but time consuming install. gotta be patient with the wires and channeling. I found the kit for a 4 door conversion on ebay for like 38 bucks came with everything you need. The only thing I used outside of the kit was a couple of blue butt splices (two wires needed to be lengthened), a bit of wire, and the rivets, oh and some of that cheap plastic wire channel (10 ft will do the job) just to keep friction and the elements off my wires. If any of yall are interested in this install search ebay its the best deal you are going to find. otherwise you'll get fleeced just buying the box with remotes for like 100 bucks. I just searched power lock conversion.
a little bending of the control rod is necessary to make sure you aren't side loading the solenoid, wanna make operation as easy and friction free for the thingermajoo's so they last forever.
just another pic of the mounting stuff. yeah I used rivets on the slotted flat stock I don't plan on taking it off.
it was a straight forward easy but time consuming install. gotta be patient with the wires and channeling. I found the kit for a 4 door conversion on ebay for like 38 bucks came with everything you need. The only thing I used outside of the kit was a couple of blue butt splices (two wires needed to be lengthened), a bit of wire, and the rivets, oh and some of that cheap plastic wire channel (10 ft will do the job) just to keep friction and the elements off my wires. If any of yall are interested in this install search ebay its the best deal you are going to find. otherwise you'll get fleeced just buying the box with remotes for like 100 bucks. I just searched power lock conversion.
-
fastboatman29212
- Posts: 493
- Joined: Sun Jul 25, 2010 6:45 pm
- Car: left this forum. Sold my truck.
- Location: South Carolina
Re: hey new blood here and my 720 I just picked up
I'm glad the thread I posted helped some. As for me, I am not a trained mechanic, so I nearly peed my pants once I got it all done. I think I told everyone all about my accomplishment, strangers and all! 
Anyway, nice job on the power locks.
My next big job is to adjust the valves and install a new valve cover gasket. It runs so good now that I just hate to take it all apart. I love driving this truck.
Oh, I will also be installing a new clutch this summer.
Anyway, nice job on the power locks.
My next big job is to adjust the valves and install a new valve cover gasket. It runs so good now that I just hate to take it all apart. I love driving this truck.
Oh, I will also be installing a new clutch this summer.
-
synack7350
- Posts: 364
- Joined: Sun Jan 09, 2011 3:08 pm
- Car: nissan '83 720 king cab pickup 2wd 2.4L Z24
- Location: Boaz, AL
Re: hey new blood here and my 720 I just picked up
yeah the ball joints were a bear, i'm still sore from the job guess I'm showing my age a little. I was always intimidated by suspension but after lowering and the ball joints I'm confident I can tackle any suspension / steering issue. I can't wait to see your diy on valve adjustments. I'm certain mine need adjustment but I'm not going to tear into it until I see some pics of the process. I just feel there is too much that can go wrong and since its my DD I can't be without it if I totally foobar the motor.
-
MetalFab
- Posts: 226
- Joined: Sun Feb 28, 2010 10:02 pm
- Car: 1985 720 4x4 reg cab flatbed.
- Location: Northern California
- Contact:
Re: hey new blood here and my 720 I just picked up
I have a slight clatter in my valves as well and the one thing stopping me from adjusting them is that there is no mark on my pulley o.O I'm totally confused on why it's not there. I've cleaned it off even.. and I am unsure how to go about this without having the marks to tell you where TDC is on every cylinder lol. It's not too complicated, (I've done it on VW's, but nothings complicated on those motors) I've tried it on a chevy, the old mechanic I used to hang with said to run the motor and adjust it by sound, 3/4 turn past when it stops clacking.... well..
A few weeks later that motor blew up so don't believe everything someone tells you haha.
How's the truck runnin after a few weeks of the weber? I'm kickin myself for not at least ordering a rebuild kit when I had the cash to.
A few weeks later that motor blew up so don't believe everything someone tells you haha.
How's the truck runnin after a few weeks of the weber? I'm kickin myself for not at least ordering a rebuild kit when I had the cash to.
-
synack7350
- Posts: 364
- Joined: Sun Jan 09, 2011 3:08 pm
- Car: nissan '83 720 king cab pickup 2wd 2.4L Z24
- Location: Boaz, AL
Re: hey new blood here and my 720 I just picked up
ah man sweet as pie. I drove to huntsville today as a test drive as that's where i'm transferring to this fall (UAH physics baby) got new primaries in her and she sounds like a fricken race car. waiting on the secondaries so I can really get her tuned proper. I'm at elevation here in the foot hills of the Appalachians (nothing like the rockies) still mountains. so I needed to get bigger jets to really let her go.. I'm going to order some headers next month when the cash comes in and do valves as soon as I see the diy. I'm treating my little truck like a princess.
I'm thinking of saving up for a new motor though. I don't know what to stick in her. alot of guys go with the KA but that would nullify my weber and headers. Besides I kind of like that the only electronic parts on my scooter are in the dizzy and the coils. It makes it hella simple though at times I wish I could mess with the advance curves. I'm just not willing to fork over the cash for a msd 6al box or two. think cost wise it might be most effective to just buy a reman'd z24. that way I could really tinker with my extra motor while still having my dd. you know flow it and see what a machine shop can bore it. It'd be interesting to see how much you can really get out of these emission motors. (while maintaining at least 25mpg). Also wanna get a 5 speed in her, instead of the old 4 geared auto (it sucks). 1st 2 gears are hella close and the last 2 gears are hella close. in between is bog city. 70mph ='s 4000 rpm on the tach
the suspension is just about new now though, minus shocks which I'm waiting for from summit (pro comp toxics for the drop). also got strut rod bushings in the mail should be here tomorrow, gonna do the rear end like pezi did when I do the shocks then an alignment finally. I'm not going through the hassle of the control arm bushings just yet, I'll wait till I hear noises, then I'll just remove them and have o'reily's press them in.
sorry a bit long winded the gf's gone and I'm pretty lit lol.
-
lambohaha
- Posts: 61
- Joined: Thu Mar 24, 2011 6:55 am
- Car: `85 720 2wd std cab
- Location: Madison, Fl.
Re: hey new blood here and my 720 I just picked up
Kinda new here myself but I noticed your thread and then I noticed your truck. I had that in an `84. Truly miss that truck and seeing yours I miss it even more lol. Anyway, I seen where you`re doing a power lock install. I locked my keys inside once way back when. Anyways, I found out that you could take a butter knife and go in beside the outside door handle to lift the door lock open. Just lift the handle and there`s enough room to slide the knife in and pop it open. Just thought I`d share that. lol Just make sure you have a butter handy lol.
-
synack7350
- Posts: 364
- Joined: Sun Jan 09, 2011 3:08 pm
- Car: nissan '83 720 king cab pickup 2wd 2.4L Z24
- Location: Boaz, AL
Re: hey new blood here and my 720 I just picked up
lol yeah nice to know I got a tool box on the back of mine with like everything you could think of. Its just a convenience / preventative measure. I'm pretty happy with them.
-
Rev_D21
- Posts: 5946
- Joined: Sun Jan 12, 2003 9:49 pm
- Car: 1986.5 D21 LB HD 2WD V6 5Speed
1991 D21 Reg 2WD Auto
1995 D21 Reg 2WD 5Spd
1996 D21 Reg 4WD 5Spd
2012 Versa 1.6S 5-Speed - Location: Somwhere in Western NY
- Contact:
Re: hey new blood here and my 720 I just picked up
Your pic actually inspired me to get moving on my Hardbody project. Here's what I did but the Tee didn't cost me anywhere near what you say you paid. I have maybe $30 total into this gauge setup tops.synack7350 wrote:here's my fuel pressure gauge, it is a spectre from auto zone I think it was like 15 bucks. I made a custom T from plumbing stuff (brass) all 1/8 inch npt threads with 5/16th inch hose barbs. cause the mr gasket pressure gauge I got from advanced didn't come with a T, but that gauge sucks the first one didn't work at all and the second one I got didn't work worth a crap either. Stay away from them. The spectre fuel pressure gauge comes with a plastic T that will work fine, I just figured sine I already put $20 into this brass T by god I was going to use it.

-
synack7350
- Posts: 364
- Joined: Sun Jan 09, 2011 3:08 pm
- Car: nissan '83 720 king cab pickup 2wd 2.4L Z24
- Location: Boaz, AL
Re: hey new blood here and my 720 I just picked up
sweet yeah what are those jic fittings? or regular npt plumbing? looks nice though. all the extra bits in there makes me think you got a ka24 in there. fuel injected right?