Beat92's "Overkill is underated" build thread

General discussion forum about the 240sx, and a great place to introduce yourself to the board!
Beat92240
Posts: 212
Joined: Sat Aug 14, 2010 5:36 pm
Car: R33 RB26 S13 Coupe

Post

Well ladies and gents...its the moment we've all been waiting for:
The motor is finally finished. After searching 3 continents for materials needed by both Ricky and Sean at Raw Brokerage, Brad at Courson Racing Engines in Western PA, and myself, the wait is finally over. And I must say...boy was it worth it.
Image

Image

Image

Image
And, for good measure....
Image

The car is also mostly assembled. The trunk is the last bit of body work needed. We finally got a game plan together on a tube support to hold the rear bumper on. Still looking into a really solid vialbe option for the front bumper. Anyone have any ideas or pictures on how they held on their aftermarket bumper? We have a plan, but I'm always open to other options.

We sprayed the car matte black for now, since we're vinyl wrapping the whole thing soon and the kit was all white. Hopefully this will decreases visability of missed spots if any come up. So I'll have some pictures of the car all one color hopefully tomorrow when i get the trunk back.

Also got some tires, so, in another massive step, the car will be actually sitting and rolling on its wheels as soon as i can get some time to go get the tires mounted up.

The hard work is finally paying off, but unfortunately, now were down to all the little steps to make it work. And I'm not a fan of small tedious work. But at least it finally looks like a car again!


the a3k
Posts: 1198
Joined: Fri Apr 20, 2007 10:09 am
Car: 1996 Black S14 RB25
Location: North Jersey

Post

DAYUMMMMMMMMMMMMMMMMMMM

wanna build my rb?????

Beat92240
Posts: 212
Joined: Sat Aug 14, 2010 5:36 pm
Car: R33 RB26 S13 Coupe

Post

the a3k wrote:DAYUMMMMMMMMMMMMMMMMMMM

wanna build my rb?????

Haha! not after that ordeal man! It was so hard to find the little stuff, no wonder why these things aren't done a whole lot. Had to go all the way to Australia to get the shims for the valves. But if anyone is building one, Australia is where its at for parts! I got a good bit of my stuff from down under. But thanks for the enthusiasm there at the beginning too. haha

Beat92240
Posts: 212
Joined: Sat Aug 14, 2010 5:36 pm
Car: R33 RB26 S13 Coupe

Post

So we've come a long way, and shes finally getting all buttoned up. The body is nearly done finally too. Everything is pretty much on except center support for the front bumper and the rear bumper. Then its just to aligning everything, but i figured its together enough now to give some pictures. We're wrapping the car black, so we sprayed the thing black for now just so if any corners are somehow missed by the wrap, its not the white of the kit or the grey of the primer showing through, it'll be black under the black wrap too so it wont be as noticable. So thats why it looks like it has a not so good paint job on it now, so don't beat me up over it.

Lets take a step back to day 1 loading the car off the trailer for comparison:
Image

And now, for the first time on here own for wheels in the almost year that i've had it:
Image

Image

Image

Image

And finally a shot of the flushness:
Image

Keep in mind the coils arn't adjusted yet either, waiting for the motor to get in for that, if i did it now it would just be a waste of time, and we all know coilovers arn't the most exciting thing to adjust.

Like i said, needs some body panel adjustments, but you get the idea. Now the countdown is on to get the motor in and get it fired up! and YES! I will provide a video when that happens.

User avatar
badbob2121
Posts: 1989
Joined: Sat Jan 16, 2010 9:23 am
Car: '92 Nissan 240SXS13 Hatch ELLIS JUAN
'12 Ford Mustang GT RTR
Location: St. Louis

Post

looking very good!

User avatar
Madhatter969
Posts: 124
Joined: Tue Nov 09, 2010 4:30 pm
Car: 95' SE s14 - build project
05' Evo VIII - DD
Location: NWA

Post

very nice man.

Beat92240
Posts: 212
Joined: Sat Aug 14, 2010 5:36 pm
Car: R33 RB26 S13 Coupe

Post

Well I haven't really done an update on the build thread recently...But believe me I have been hard at work day in and day out on the car.

Been running over and double and triple checking the charging/starting/interiror harnesses to make sure everything works. Last thing I want to do is get the motor in and then not have it crank because I forgot a wire when I re-did the harness. So far I must say I've suprised myself. Turns out everything actually works....after you put in all the fuses and relays (yeah trouble shot the headlights not opening for like 2 hours and made sure every connection was good until I remember I took the relays out.)

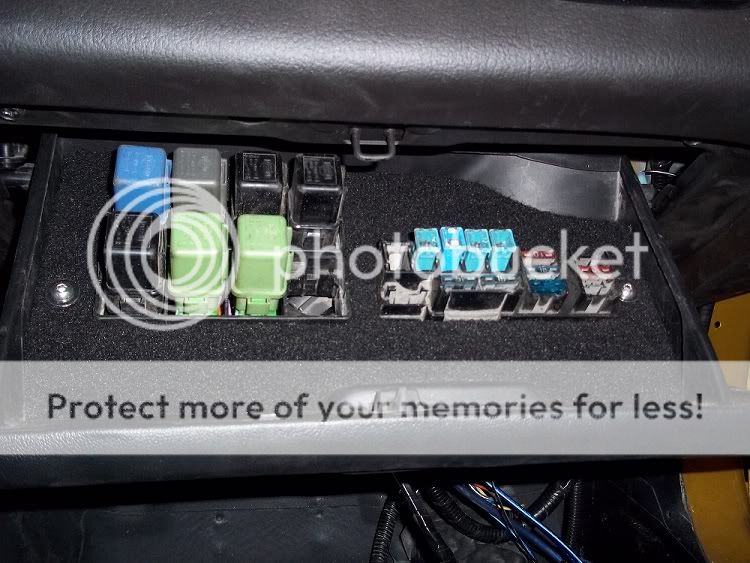
We did end up making a bad a** insert for my glove box for the relocation for my underhood relay box/distribution box. Looks real good and I'll have some pictures up here later this week when I get around to it and after I get it back in once I'm 110% the wiring is all good.

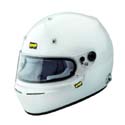
I also got a track seat, a Momo SuperCup. Reasonably priced, very comfortable, and most importantly, a little more forgiving to my fat a** getting in so i don't have to worry about staying on a diet to drive my car. We then immediately stripped the cover off the seat and wrapped the back of the seat in 3M carbon fiber wrap to match the rest of the interior accents. Which turned out AMAZING. again, pictures of this coming as soon as I get the seat rail adapter in, hopefully this week.

Also finished welding up a custome rear bumper support since the factory one was no where near close to fitting. Didn't do a tubular since we don't have the material at my shop to bend it, so we just did it with some thick square stock, but it turned out really well. I'll have pictures of this when it comes back from powder coat.

I also did a bulb housing replacement:

If you're like me, sealed beam lenses sound like a pain in the a** to replace every time a bulb goes out. So you can go for the chincy E-bay ones that look like a set of pepperoni nipples through a wet white t-shirt on antartica (pause for mental image if you do so wish)...or you can go for the better looking, but slightly more expensive HELLA coversion kit like I did.

The kit is way better quality than I expected honestly for the price. The whole housing is very solid, and the front lens is GLASS, not plastic or something cheaper. Very solid feeling piece. It then just has a whole in the back of the lense that you can purchase to accept either a 9004 bulb, or in my case, an H4 (many more applications available for the H4 of course)

Image

Image

The HELLA kit comes with a nice little bootie to cover the bulb to resist corrosion on the bulb connectors, very handy. It then plugs directly into the factory headlight wiring. Absolutely no cutting, splicing, anything. Just plug it right in:

Image

Then, if you're anything like me..you realized all the bolts holding the thing in were rusted when you took the bulb off....so I drilled out the old holes so I could fit in my weapon of choice on my front end: Stainless hex head pan head screws for looks....

Image

Finally, you put the housing back on...and BAM! nice brand new OEM looking housings with a lot less rice than the ebay knock offs:

Image

So as you can see, with a little love on the headlight cover, you can make your whole headlight assembly look brand new for about 100 bucks and probably only about an hour of your time. Yes these are my original 92 headlight covers, just prepped correctly and re-sprayed in a satin black to clean them up. Very worth while if you have a couple bucks to clean your car up and want a nice easy project for the weekend.

Ill be back with upadted pictures this week on everything else. thanks for tuning in.

User avatar
TheRealNap0le0n
Posts: 688
Joined: Wed May 06, 2009 5:21 pm
Car: 1998 q45
Location: Saint Cloud, FL
Contact:

Post

sick... the hella buckets are way worth it... i bought a set of 4 for my thirdgen camaro when i had it... it was like $200 for the set.

User avatar
Coolwhip
Vendor
Posts: 3138
Joined: Fri Feb 06, 2004 7:29 am
Car: RB26 Raw Brokerage War Machine
Location: Orlando, FL
Contact:

Post

you know I love this car :blush:

User avatar
240life
Posts: 1313
Joined: Mon Sep 24, 2007 6:02 am
Car: 1993 Nissan 240SX S13 Coupe SR20DET blacktop
Location: ME
Contact:

Post

car looks pretty sick..always wanted that style hood, just dont have the aero to pull it off

Beat92240
Posts: 212
Joined: Sat Aug 14, 2010 5:36 pm
Car: R33 RB26 S13 Coupe

Post

Thanks Ricky. I know I've already said it, but big shout out to u and Sean for helping me and my engine builder brad Courson along the way. Ill be getting at you guys about some fuel/clutch/power steering/brake lines to finish it real soon.

And thanks man. The over all goal has been to try to make it kind of cartoonish and over the top, but still as tasteful as possible. Much of it really wouldn't be able to get pulled off by itself I don't think, but all together everything works for my liking.

User avatar
240sxAli4Life
Posts: 493
Joined: Mon Sep 27, 2010 7:08 pm
Car: 1990 S13 Hatch SOHC... SOLD :(
1993 S13 Hatch DOHC!! Super Sexy!!
Location: Florence, KY

Post

I cant belive i didnt see this thread before, until now! EXCELLENT WORK SIR! This is pretty much a dream car, for anyone here! I WANT TO SEE A VIDEO OF IT RUNNING SO BAD... I CANT STAND IT!!!!!!!

Beat92240
Posts: 212
Joined: Sat Aug 14, 2010 5:36 pm
Car: R33 RB26 S13 Coupe

Post

Thanks for the enthusiasm. As I've said before it makes all the hours I've spent and the little social life I've had over the last year of this build seem worth it.

So as promised, heres some shots of what we did finally installed in the car starting with the custom relocated fuse box. This is the underhood relay box and underhood power distribution i think its called. As I said, rewired the whole car to make it extra clean and sexy under the hood, so these got moved to the super secret location of in the glove box:
Image
Just did a little squaring up with it, about an hour to make it with the proper equipment and experience...but makes it look a lot better. Pretty happy with how it turned out, and even better in person. Since I took out the glovebox light (or maybe it just doens't have one from factory, I don't know since this is my first 240), i also used a hood pin through the ground circuit out of a remote start we had laying around as a trigger for a 15 inch white neon to light it up at night. This way when the glovebox is closed, the pin is pushed back, which breaks the ground through the metal surround on the glovebox. Open the glovebox and the hood pin springs the whole way out, causing the pin to be grounded out on the metal surround around the glovebox. Works extremely well and you cant tell the switch or the light is in there, but I'm sure it will help me out if i ever have something go on me in the middle of the night.
Also finally got around to installing my one-of-a-kind (as far as I know) Carbon Fiber Momo Super Cup seat. This thing is super comfortable and looks great. I would highly recommend it for a racing seat. We then had some spare 3M carbon wrap laying around, so we immediately took the fabric off the seat, and spent a couple hours wrapping it in the carbon to add a little flare to it. Turned out very nice!
Image
Finally I just have a top shot from the car. Finally able to see into it with the windsheild pulled. Just giving a little idea of the overall car assembly. Don't knock me for the headlight covers, I'm not a fan of the carbon so I'll probably end up body coloring them. I just like the fact that the vented cover is right where my intakes are for the RB, so for functionality, they were hard to pass up.
Image

the a3k
Posts: 1198
Joined: Fri Apr 20, 2007 10:09 am
Car: 1996 Black S14 RB25
Location: North Jersey

Post

soooooo....

once youre done with your car, you can build my rb25 s14.

thanks

ChiNegroNate
Posts: 11
Joined: Thu Nov 03, 2011 8:16 pm

Post

nice build thread :dblthumb:

Beat92240
Posts: 212
Joined: Sat Aug 14, 2010 5:36 pm
Car: R33 RB26 S13 Coupe

Post

Unforunately I had the turbo in my daily go out on me, so I haven't had a lot of time or money to put toward this thing lately. BUT, I finally got a chance last night to do some work on it. Heres what was accomplished:

Spec Mini Twin Disk Clutch all mounted up:
Image

Doin my best Slim Pickins' impersonation:
Image

Since I got rid of all the factory coolant and turbo hard lines, there had to be a new point for the water return lines to t back into the coolant system. Everything else was real easy into the factory outlets or inlets with some simple AN to NPT adapters. That left the only trick to be the return lines. I finally figured the simplest way to be the solution and got a pair of -4 bungs, then had them welded into a simple straight pipe. I then t'd this into the coolant return line from the heater core to the inlet just behind the thermostat. Best I could tell from the remains of my factory hardlines is that this is, in escence, where the factory lines ended up going.
Image

We also used our limited metal working access at the shop to construct a rear bumper. We have no benders or anything to make anything tubular, so we just used some square stock to make a solid support, then blew a bunch of holes in it with a holesaw for some lightening. After a dose of powdercoat, it looks good enough to slap on the car where no one will ever see.
Image
Last edited by Beat92240 on Tue Jan 24, 2012 6:32 am, edited 1 time in total.

Beat92240
Posts: 212
Joined: Sat Aug 14, 2010 5:36 pm
Car: R33 RB26 S13 Coupe

Post

the a3k wrote:soooooo....

once youre done with your car, you can build my rb25 s14.

thanks
I'd love to if you can get it to me! And a pile of money...Haha! But its actually probably going to suck after I finish this. I'll just start saving for the next project! I can't remember a time since I was 16 I haven't had some kind of different and high end build I was doing. I live by the name of this thread, but I'm not so sure how I'm going to top myself after this one...

Beat92240
Posts: 212
Joined: Sat Aug 14, 2010 5:36 pm
Car: R33 RB26 S13 Coupe

Post

Got a lot of stuff done this weekend for the first time in a long time because USPS is ran as terrible as the rest of our government and can't deliever packages on time for me to repair my daily driver...but the good news is I decided to spend all that time on the 240.

So here we go...I started by running -6AN fuel line front to back:

Image

I then finished my sunroof plug. A while ago we made one out of Fiberglass to fill the whole, I was just waiting on some aluminum rivet nuts for use with our thread setter. This allows me to remove the plug when I want to simply with a 4 mm allen key in the end of one of my drills in a matter of a few seconds...if I ever want to do a nice ride around town with the top open:

Image

Image

I also changed all the wiring around for my gauges, factory relays, switches, and almost all the accesories in the car to run off of a kill key mounted in the car and mounted all the distribution under where the radio goes:

Image

Finally I created a filler plate to mount my Haltech IQ3 to so it looks all nice and finished. I then wrapped the plate in the same 3M Dinoc carbon I covered my gauge pod and shifter bezel in:

Image

I also got lucky enough to score a ultra mint non-HUD dash off of a member on here in central PA. So put that thing in, and redyed all of my interior to match the now gloss black finish of the dash.

As for a sneak peak as to what were doing with the paint on the car: we're wrapping it 3M matte black, because frankly I love the way it makes the wheels stand out, so I'm going to keep it that way. I already have the wrap, just waiting for the cage to go in so we don't damage the wrap at all while welding. But heres another GTI we're doing at the shop in 3M Orange warp to change it from black to orange. The picture does it no justice:

Image

User avatar
badbob2121
Posts: 1989
Joined: Sat Jan 16, 2010 9:23 am
Car: '92 Nissan 240SXS13 Hatch ELLIS JUAN
'12 Ford Mustang GT RTR
Location: St. Louis

Post

I love this build, Im looking forward to seeing it finished

Keep it coming!

straightracen123
Posts: 23
Joined: Thu Jan 19, 2012 12:32 am
Car: 1989 240sx hatch
Location: illinois

Post

This is a sick build!!

Beat92240
Posts: 212
Joined: Sat Aug 14, 2010 5:36 pm
Car: R33 RB26 S13 Coupe

Post

As much as it pains me to say this...The whole project is now up for sale. Please forward the info to any of your friends, and check out the semi-part out here:
pa-s13-coupe-bn-blister-widebody-ssr-18 ... 52822.html

I wish I could complete it because its so close and after spending hundreds if not thousands of hours working on a project that I will never see completed. Thanks everyone that has subscribed to this thread over the years to follow it from the beginning. I just hope someone else that cares about it as much as I do completes it the right way and finally shows some videos of it running, and possibly, just maybe would take me for a ride in what has been my soul source of life and devotion for the past year + of my life.

HellaFlushSR20s13
Posts: 35
Joined: Tue Feb 07, 2012 1:09 am
Car: 91 s13 Coupe
S13 Sr20det red top

Post

Damn this is one clean a** build bro from the bottom up, much respect on all the time and work and $$ invested that takes some dedication. Sorry to hear bout the circumstances I'll put the good word out for you on some other forums... I've had to do the same in the past it blows I ended up sellin my old track car for a g less cus I wanted to see it go to a person that would respect all the work I did and not some stupid kid who would wreck it the second he "learned" how to clutch kick, f*** economy man what are you gonna do

User avatar
alms24sebring
Posts: 7332
Joined: Wed Nov 15, 2006 12:18 am
Car: '97 Nissan 240sx. First Nissan. First love. Sold.
'04 Nissan Sentra SER SpecV
Location: Alexandria VA

Post

Why is this my first time seeing this thread!?!?!?!

Ahh! I just read the entire thread and am humping in mid air :boink: . Great build my man, I cant wait to see that vid you promised as I drool all over my keyboard.

Beat92240
Posts: 212
Joined: Sat Aug 14, 2010 5:36 pm
Car: R33 RB26 S13 Coupe

Post

HellaFlushSR20s13 wrote:Damn this is one clean a** build bro from the bottom up, much respect on all the time and work and $$ invested that takes some dedication. Sorry to hear bout the circumstances I'll put the good word out for you on some other forums... I've had to do the same in the past it blows I ended up sellin my old track car for a g less cus I wanted to see it go to a person that would respect all the work I did and not some stupid kid who would wreck it the second he "learned" how to clutch kick, friggin economy man what are you gonna do

Thanks man, much appreciated. I wasn't on a whole lot of forums...well basically just nico I guess...I like it here so never found a need to go anywhere else...haha.

And yeah I feel you then. It was a hard decision, but had to look a little longer term. I still hope I don't regret the decision, though i can pretty much understand that I'll never have the heart or will power to do anything as in depth and detail oriented as this ever again unfortunately.

Beat92240
Posts: 212
Joined: Sat Aug 14, 2010 5:36 pm
Car: R33 RB26 S13 Coupe

Post

It has finally happened. Took one BIG step forward and dumped the motor in this weekend. It was actually very very easy in comparison to how everyone made it out to be. I'm still crossing my fingers on the electrical part, but as far as phsyically getting the motor in and hooked up it was very easy actually.

I couldn't find a whole lot on the basic line up of the motor mounts, so we kind of took a few quick pictures just to give people a bit more of an idea on where these mounts get drilled in to:

Heres the driverside mount front hole:
Image

Heres what we ended up doing for the top holes. It would have been much easier if they just made it go in the factory motor mount holes, but that didn't seem possible with the mounts I had, so we had to extend the top hole a little and drill a new bottom one:
Image

Finally with it all mounted looks like this:
Image

Copy for the other side to get the total package:
Image

Trans mount bolts right into the factory holes...very straight forward:
Image

By the way, this is the McKinney mount kit. I then got the Raw Brokerage Aluminum Driveshaft which worked perfectly with it (of course)

Come away with a finished product something like this:
Image

Image

And a little attempt at photography of the garage since one of my other favorite cars of all time was in there that weekend:
Image

Now its just time to button it up and get the ECU since thats the last part of the puzzle until I can fire it up.

Body panels are getting aligned this weekend so I can start getting it wrapped. I'll also be finishing up the pumbing of it and some interior work this weekend as well. I'll keep it posted!

Beat92240
Posts: 212
Joined: Sat Aug 14, 2010 5:36 pm
Car: R33 RB26 S13 Coupe

Post

Well its been a hell of a long last 2 weeks, but after a ton of messing around, late nights, and days of losing hope...it actually made it to the dyno.

After wasting a bunch of time trying to find a coolant leak that just happened to be a loose coolant plug in the spark plug galley, we attempted to start again and it still wouldn't start. After some testing I found my ignitor chip was bad (big surprise). So I had to do some local searching and last saturday found a local shop (kind of local, still a haul) that would sell me some LS1 coils and harnesses. So I spent saturday installing them in hopes of actual start up on Sunday so I could leave Friday for my tune date. We still weren't getting spark from a few coils, even though after checking time and again we knew the wiring was solid. Turned out that a few pins were actually loose in the harness ECU plug. So we seated those in and she fired right up.

I had a little time during the week to go in after my normal job and clean up the wiring, but didn't have a whole heck of a lot of time between that, taking it to get aligned, taking it to get an exhaust put on, and inspected to do much else. After everything was said and done, I loaded it on a trailer Thursday night and left the whole deal in the shop until Friday departure day. After making the 5 hour trip across PA, we finally arrived at Evans-Tuning.

Jeff Evans has done a couple of my cars in the past, a lot for very good friends of mine, and we've all been dealing with him for the better part of a decade. He's also done a couple real GT-R's lately, so I felt more than comfortable passing it off to him. Heres a couple videos:

[youtube]http://www.youtube.com/watch?v=cPrd2s30 ... ure=relmfu[/youtube]

[youtube]http://www.youtube.com/watch?v=AAAp61gY ... ure=relmfu[/youtube]


It ended up doing slightly lower than I expected (I expected 480 whp, it did 460whp). I was a little down by the low numbers. That was until I drove it for the street tune. The car is hands down the smoothest, best driving car I've ever owned. It far exceded every expectation of drivability I imagined. Throttle response is instant. Power is smooth and constant. Its just an amazing car. Never loses grip. Just saying dyno numbers does no justice to how perfect the car really is in my mind. So some may say its low power for what it is, I spent a bunch of money for not a lot of power, what have you. But in the end its exactly what I wanted. Can I slap on a big single and make double the power? sure. But would I want to for what I plan on doing with the car? I think I'm good.

So now I get to finish the body, fix a few things that I didn't get to get to since I was so rushed, and finish this thread up in the next month or two depending on how my work goes. Enjoy.

User avatar
badbob2121
Posts: 1989
Joined: Sat Jan 16, 2010 9:23 am
Car: '92 Nissan 240SXS13 Hatch ELLIS JUAN
'12 Ford Mustang GT RTR
Location: St. Louis

Post

Simply awesome...

460whp is nothing to be upset about... especially in a s13.. :rotfl

Jared.S
Posts: 22
Joined: Tue May 08, 2012 7:51 pm
Car: 1990 Nissan 240sx coupe xe
Location: Jasper Alabama
Contact:

Post

Thank you so much for not doing the silvia Front...

Beat92240
Posts: 212
Joined: Sat Aug 14, 2010 5:36 pm
Car: R33 RB26 S13 Coupe

Post

My buddy that went with me to the tune date got me some additional pictures of it. And I'm bored as hell stuck over in Germany for work. Missing the s*** outta my baby. So I figured I'd throw some more pictures up that he took of the tune date just to cronicle it a little more for future reference.

Unloading the thing from the trailer in front of Evans-Tuning
Image

Some guys from Canada were there before me getting some NA K series EG hatches re-tuned, so I figured I had better take the spare time I was given to do the half hour break in on the Kaaz 2 way rear diff. Surprisingly the half hour went quicker than I though. Probably because this was the longest I had been able to drive the car at that point so it was more exciting than anything else.
Image

Still seemed to be making some tire drags on the tight turns at the end of it. Didn't matter to me, just seeing if anyone else has heard this on their Kaaz 2 ways. Nothing loud and clunky, just more like its a welded diff. Seems logical to be normal to me. Anyone not have some draggage with their 2 ways in tight turns?
Image

He thought it was going to be a tight fit to get the dyno's under the fenders....
Image

He was right..it was a little snug. I actually have some red paint left on the skirts from where it was rubbing during pulls
Image

Then he got creative with some filters....
Image


and I suppose he wanted to rep pittsburgh in this one...
Image
We're not photographers...but we do like cars. So all you guys that are beasts with the cameras and photoshop don't rip him appart too bad (if you do I won't tell him though)

Set up this enormous fan to help with the cooling. Even though the car had no real issues itself. I was surprised how well it hold temp. Especially since I just through coolant in. Didn't bleed it or anything. Guess that Max swirl tank must be doing something...
Image

I'm pretty excited. But its that nervous excited....
Image

Jeff had to wade through tons of left over wiring that hadn't been cleaned up yet to do that work on the Haltech Platinum Pro plug-in with EQ3 dash. believe it or not I didn't even have time to throw some zip ties on the wiring because I was so far behind schedule trying to get to this point.
Image

Had to take the hood off because ol' mister massive fan was coming dangerously close to lifting my hood up far enough to blow my hood prop (and by hood prop I mean jack handle with a glove on each end) off. So this picture got snapped shortly after. First day I got to wear this shirt!
Image

After the dyno tune, it was time to take it out on the street for the first time. I settled into place and was so excited. Not only my first time actually driving the car, but first time driving a nissan, 240, and any sort RWD car with some power. I was beyond excited. Until we realized Jeff couldn't close his door while harnessed in. After making fun of him for about 2 minutes...he finally used his foot to get it closed. Apparently he has some long legs.
Image

And here it is...a picture of the first time she was on the road. What an amazing experience. It's come a long way from the very first picture I posted on here until now. And though its still a decent amount of work away from the finished product still, this was a huge step.
Image

User avatar
S13AL
Posts: 444
Joined: Sun May 03, 2009 4:31 pm
Car: 1991 240sx hatch with blacktop s13 sr20det, HKS Hipermax III suspension, HKS Sport exhaust, Blitz downpipe, S15 Sylvia HLSD, 300zx/J30 5 lug and brakes, and mesh wheels
Location: Kirkland, Wa

Post

Must be a lot of fun to drive!


Return to “240sx General Discussion”