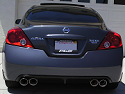
ya i did and ironically a little light was able to go through the thick paint lol i'm going to take out the bulbs. heres an idea for anyone who wants to do what i did but wants the parking lights to work fine, spray VHT night shade on the reflector. it will look black but once u turn on the light, it will be as if you didnt paint it.
ok, i have some bad news! i was low on paint so i bought an extra can before starting the project. i had enough for the first light but had to use the new can for the 2nd light. turns out they were different colors lol it got late, so i litterly taped the light together and drove home. tomorrow ill finish the driver side light (aka the light from hell with horrible luck). but until then, here are a couple of teaser pics
baking my lights (right now!!!)
-
srwong
- Posts: 1325
- Joined: Wed Aug 27, 2008 6:44 pm
- Car: 2009 Altima Coupe 3.5 SE CVT
- Location: Bakersfield, CA
- Contact:
Re: (Hussain)
niiiice..... good job man... good luck with that other light... lol
Re: (srwong)
Looks real good...really thinking about do this now. My only concern is condensation getting in. Anyone know how to prevent it or is the heat gun good enough?
-
JLAUDIO85

- Posts: 863
- Joined: Tue Sep 25, 2007 3:24 am
- Car: 08 Black Altima Coupe 2.5SL CVT.
- Location: Toronto
Re: (Hussain)
seeen...looks legit man good job
-
Infantry1327

- Posts: 1339
- Joined: Fri May 30, 2008 10:29 pm
- Car: 08' Nissan Altima Coupe SE
Re: (im89)
Hussain that looks sick. I think one of these days I am going to haft to try again. You should defenetly get chrome yurn signal bulbs. That would make it look sick. Or get LED bulbs.
P.S. It has always cracked me up how much nor cal kids say hella. My little cousin lives in Folsom Lake and its always hella this and hella that
P.S. It has always cracked me up how much nor cal kids say hella. My little cousin lives in Folsom Lake and its always hella this and hella that
-
YeR iTz MiKe
- Posts: 93
- Joined: Sun Oct 04, 2009 6:03 am
- Car: 2009 Nissan Altima Coupe White
Re: baking my lights (coderedk)
hey dude, what kind of lip / girll do you have?coderedk wrote:subscribed
-
PHENOMenalVinyl
- Posts: 4607
- Joined: Fri Apr 11, 2008 4:17 pm
- Car: 08 altima coupe 2.5 mt
- Location: New York City
- Contact:
Re: baking my lights (Hussain)
i tok out the refl;ector but i added extra leds where the amber was i have 3 red lights and then the audi lites under the inside of the light like in the middleHussain wrote:the problem is, most people take out the reflector and to me it looks horible when you take out the reflector. ive only seen one other person paint the reflector and thats what made me want to paint my lights so bad.
the silicone wasnt anything special, just some clear silicone. i put a good amount to where it looks like everything is sealed. if it gets moisture, ill put some more silicone.
it took me a while for the lights because i started with the passenger light and took my time and then with driver side, every step has been hella harder. hella harder to take the light off the car, hella harder to open it... passenger light should take about 4 hours because you have to let the paint dry and let the silicone dry once you seal it.
but bro i would use black silicone bc w/ the clear it wont cover up the scratches or anything u put in it u know
-
blackteam02

- Posts: 906
- Joined: Tue Mar 10, 2009 7:24 am
- Car: Devil in a Blue Dress
Re: (Hussain)
looks damn good Hussain! wish i had the guts & time to try this.a nice vid on the driver light process would be nice too..i have a lot of questions but afraid to ask.the write-up thats up already seems incomplete to me.
-
coupecrazy1232
- Posts: 741
- Joined: Mon Oct 13, 2008 6:31 pm
- Car: 2008 Nissan 350Z Nismo 1430
- Contact:
Re: (blackteam02)
Hussain ur total bastard!!!! lol jk since u just finished yours you are stealing all my thunder!!! I painted my amber piece black as well....but they wont be the same becuz i "messed up" the turn signal reflector bowl so i just went with it and now its black as well...so they wont look the same but damn close lol
on a side note do u mind if i just post my pics here when i get it finished so people can see some different options...just dont want to thread jack...
also any questions feel free to ask me as well!
on a side note do u mind if i just post my pics here when i get it finished so people can see some different options...just dont want to thread jack...
also any questions feel free to ask me as well!
Re: (Infantry1327)
thank you everyone for all the compliments
lol ya we always say that over here... Folsom isnt too far from me, my brother loves folsom and tried to talk my parents into buying a house there instead of Elk Grove (Elk Grove and Folsom are both next to sacramento).Infantry1327 wrote:P.S. It has always cracked me up how much nor cal kids say hella. My little cousin lives in Folsom Lake and its always hella this and hella that
i dont care too much because all the edges will be covered by the fender, hood, bumper, grill, so no one will even see the edges. maybe later on ill try to clean up the edges a little but right now i'm just so tired and just want to be done with this damn project lolPhEnoM78 wrote:but bro i would use black silicone bc w/ the clear it wont cover up the scratches or anything u put in it u know
go ahead and ask any questions you have.... honestly, i thought the write up was incomplete and sort of s***ty but once i started actually doing it, the write-up isnt bad. it shows you how to take off the light and how long and what temp to put in the oven. once you take it out of the oven you pretty much just go crazy attacking all the edges till you pry it open and the faster the better so that it doesnt cool down.blackteam02 wrote:looks damn good Hussain! wish i had the guts & time to try this.a nice vid on the driver light process would be nice too..i have a lot of questions but afraid to ask.the write-up thats up already seems incomplete to me.
no problem, you can post pics here if you want.... so how are yours coming along? working on both at the same time or just trying to complete one and then move on to the next? i had amazingly bad luck with the driver side lol every single step just had so many things go wrong. taking it off the car seemed like Nissan wired my car wrong because the wires were so short you couldnt even pull the light out enough to stick your hand behind and unplug the bulbs. then once it was off, it was harder to open then the passenger side one. then once i opened it and painted, i messed up on the paint. then when i tried to repaint, i used to wrong paint. then when trying to reassemble things to go home and call it a night was a lot harder. just every step of the way ive had bad luck with the driver sidecoupecrazy1232 wrote:on a side note do u mind if i just post my pics here when i get it finished so people can see some different options...just dont want to thread jack...
also any questions feel free to ask me as well!
Re: (Hussain)
heres a pic of the ghetto light with tape on it lol ill fix it later on today.
-
PHENOMenalVinyl
- Posts: 4607
- Joined: Fri Apr 11, 2008 4:17 pm
- Car: 08 altima coupe 2.5 mt
- Location: New York City
- Contact:
Re: (coupecrazy1232)
bro i have 3 sitting in my room right now do you want one if so email me [email protected]coupecrazy1232 wrote:Hussain ur total bastard!!!! lol jk since u just finished yours you are stealing all my thunder!!! I painted my amber piece black as well....but they wont be the same becuz i "messed up" the turn signal reflector bowl so i just went with it and now its black as well...so they wont look the same but damn close lol
on a side note do u mind if i just post my pics here when i get it finished so people can see some different options...just dont want to thread jack...
also any questions feel free to ask me as well!
-
coupecrazy1232
- Posts: 741
- Joined: Mon Oct 13, 2008 6:31 pm
- Car: 2008 Nissan 350Z Nismo 1430
- Contact:
Re: (PhEnoM78)
thanks bro but i actually like it better now!!! im putting a pic up right now of it painted and one strip of LEDs on it up on facebook....PhEnoM78 wrote:bro i have 3 sitting in my room right now do you want one if so email me [email protected]
yeah i am doing one right now and yes the drivers side was a b**** for me to take off cuz the wires barely reach the damn headlight...it took me an hour and a half to open the bastard up but i was taking my precious time so i didnt screw anything up...but its well worth the time and money to do this mod cuz it looks sick!!Hussain wrote:no problem, you can post pics here if you want.... so how are yours coming along? working on both at the same time or just trying to complete one and then move on to the next? i had amazingly bad luck with the driver side lol every single step just had so many things go wrong. taking it off the car seemed like Nissan wired my car wrong because the wires were so short you couldnt even pull the light out enough to stick your hand behind and unplug the bulbs. then once it was off, it was harder to open then the passenger side one. then once i opened it and painted, i messed up on the paint. then when i tried to repaint, i used to wrong paint. then when trying to reassemble things to go home and call it a night was a lot harder. just every step of the way ive had bad luck with the driver side
-
The_alchemist
- Posts: 194
- Joined: Wed Sep 09, 2009 8:24 pm
- Car: 09 Winter Frost 3.5SE CVT
Re: (Hussain)
lights look good bro I wish I could do this but I know I would straight f*ck it up

Re: (The_alchemist)
This looks great. I am going to attempt this in the near future
Re: (The_alchemist)
its not that bad and i think almost anyone can do it. just leave yourself at least 1 full day to do it and like me and coupecrazy1232 were saying, the driver side light is a b**** to take off. once you got the lights off, just put it in the oven for 350 degrees and 5 minutes (i was scared so i tried doing less and it wouldnt get hot enough, needs at 4-5 min of 350 degrees) and try to make sure none of the light touches any edges of the oven while its in there. and just pry open the light with a flat head screw driver.The_alchemist wrote:lights look good bro I wish I could do this but I know I would straight f*ck it up
Re: (coupecrazy1232)
ya the driver side was so bad that i seriously thought someone messed up on my car at Nissan idk why they would make the wires that short! i mean you can BARELY take the light out enough to stick your hand behind and take out the lights...coupecrazy1232 wrote:
thanks bro but i actually like it better now!!! im putting a pic up right now of it painted and one strip of LEDs on it up on facebook....
yeah i am doing one right now and yes the drivers side was a b**** for me to take off cuz the wires barely reach the damn headlight...it took me an hour and a half to open the bastard up but i was taking my precious time so i didnt screw anything up...but its well worth the time and money to do this mod cuz it looks sick!!
i thought about LEDs a while back but decided not to. the only place ill probably LEDs on my car is on the fins of my stillen front fascia. looks pretty easy since i'd just hook them up to the fog light wires since i dont have fog lights anymore
-
coupecrazy1232
- Posts: 741
- Joined: Mon Oct 13, 2008 6:31 pm
- Car: 2008 Nissan 350Z Nismo 1430
- Contact:
Re: (Hussain)
yeah i thought the same thing!!! i was like damn nissan sure is cutting corner to save 5 cents for an extra 6 inches of wiring! lolHussain wrote:
ya the driver side was so bad that i seriously thought someone messed up on my car at Nissan idk why they would make the wires that short! i mean you can BARELY take the light out enough to stick your hand behind and take out the lights...
i thought about LEDs a while back but decided not to. the only place ill probably LEDs on my car is on the fins of my stillen front fascia. looks pretty easy since i'd just hook them up to the fog light wires since i dont have fog lights anymore
-
xfactor0707
- Posts: 445
- Joined: Thu Jun 26, 2008 8:24 am
- Car: Nissan Altima Coupe 2.5s
- Contact:
Re: FN-QR (mcheddadi)
The baked headlight mod is going to take over the entire forum now . I am definately doing this in the near future
coupecrazy1232 wrote:
yeah i thought the same thing!!! i was like damn nissan sure is cutting corner to save 5 cents for an extra 6 inches of wiring! lol
thanks for the compliment... the rear diffuser (sigh) lol thats going to be a while. i want to get side skirts and end caps first. i want to have end caps bondo'd onto the rear bumper instead of just double sided tape or something and i'm going to have the whole rear bumper painted and i'm going to see if he can extend the rear diffuser and bumper a little bit because my tips are a little too big. so thats in the future... i plan to do a lot to my car in 2010 though.mcheddadi wrote:yo hussain, that looks SOOO GOOD man! seriously your car the way you did it is sooo awesome. Its one of my top 5.
fix that rear diffuser though lol
at first i was a little scared about baking it but honestly you don't have to worry if you put it in for 350 degrees for 4-5 minutes AND MAKE SURE NO PART OF THE LIGHT IS TOUCHING THE METAL PARTS OF THE OVEN (except for the bottom being on the rack of course). take it out and pry open and nothing will happen to the light... i just have to see how the sealing part works and hopefully i dont get any moisture inside.xfactor0707 wrote:The baked headlight mod is going to take over the entire forum now . I am definately doing this in the near future
now for me to take the car part again and work on the driver side light
-
PHENOMenalVinyl
- Posts: 4607
- Joined: Fri Apr 11, 2008 4:17 pm
- Car: 08 altima coupe 2.5 mt
- Location: New York City
- Contact:
Re: (Hussain)
bro s*** took me like 5 days bc i did glueing too and painting and drilling n s*** thoughHussain wrote:
its not that bad and i think almost anyone can do it. just leave yourself at least 1 full day to do it and like me and coupecrazy1232 were saying, the driver side light is a b**** to take off. once you got the lights off, just put it in the oven for 350 degrees and 5 minutes (i was scared so i tried doing less and it wouldnt get hot enough, needs at 4-5 min of 350 degrees) and try to make sure none of the light touches any edges of the oven while its in there. and just pry open the light with a flat head screw driver.
Re: (PhEnoM78)
ya if you do that, it'll take a long time. a basic job like mine though, should take 1 full day if you do both lights at the same time.. while the paint is drying on one, be working on the other and so on. if you do 1 at a time, should take 2 days for a basic job like mine taking your time.
well, here are some more pics. these are pics of the lights on for the ppl who had questions about painting the amber. its strange but light still shines through the thick paint if you leave the bulb inside the reflector. also another pic is of the blinker on so ppl can see that the blinker still functions properly
and with the blinker on
Re: (Hussain)
ok so i just uploaded a video since everyone has been asking for videos. after i get the headlight off of the car ill make another video showing how i opened the headlight.. sooo stay tuned lol
http://www.youtube.com/watch?v=l5lVz8Y26fQ
http://www.youtube.com/watch?v=l5lVz8Y26fQ

Re: (Hussain)
Hussain wrote:at first i was a little scared about baking it but honestly you don't have to worry if you put it in for 350 degrees for 4-5 minutes AND MAKE SURE NO PART OF THE LIGHT IS TOUCHING THE METAL PARTS OF THE OVEN (except for the bottom being on the rack of course). take it out and pry open and nothing will happen to the light...
Baking headlights is generally a relatively simple process...you just have to remember to be careful about it. You've done a great job, Hussain!
I would, however, suggest placing the lights on a cookie sheet so they're not resting on the preheated rack inside the oven.
Re: (ESP)
ya thats something i forgot to mention. what me and my friend did is that he got a towel a little wet (not soaking wet) and put it on a cookie sheet and then we put the headlight on that. so the light doesnt touch any metal and we wet the towel so it doesnt catch on fire lol oh ya and thanks for the complimentESP wrote:
Baking headlights is generally a relatively simple process...you just have to remember to be careful about it. You've done a great job, Hussain!
I would, however, suggest placing the lights on a cookie sheet so they're not resting on the preheated rack inside the oven.
-
LongBeachCoupe

- Posts: 9482
- Joined: Thu Aug 23, 2007 1:43 pm
- Car: 08 Altima Coupe (RIP Hurricane Sandy)
2005 Lexus RX
FN-QR
unplug the damn running light!good work!
Whats the stuff sticking out of the top of the hookah where the coal goes?Also whats that big ice bucket thing on it, i have a little tray to catch the ash, is that like an ash garbage can?
Whats the stuff sticking out of the top of the hookah where the coal goes?Also whats that big ice bucket thing on it, i have a little tray to catch the ash, is that like an ash garbage can?
Re: FN-QR (LongBeachCoupe)
lol ya its an ice box (technically an "ice condenser"). it cools the piping so the smoke is colder and colder smoke is smoother... the thing that looks like its sticking out of the head is something in the background on my friend's garage door lol
ok, heres a vid that ppl will actually like (unlike the other one). this one sort of explains what to do after the headlight comes out of the oven
http://www.youtube.com/watch?v=3Um9hRCrL8o
turns out the vid isnt working right now (still processing or something) but should work shortly.
EDIT: vid is working now
Modified by Hussain at 7:18 PM 1/7/2010
-
2008AltiCoupeDan
- Posts: 931
- Joined: Thu Feb 19, 2009 5:23 am
- Car: 2008 Altima Coupe 2.5s - Gone, 2008 Subaru WRX Premium - built
- Contact:
Re: FN-QR (Hussain)
ive used this pic like- 50 times on Nico already- but im too damn lazy to take another lol
:P
:P