
I rarely post on these forums, so forgive me if I don't answer any of your questions or respond in a timely manner.
You can read the whole build thread here as i don't feel like formatting it to work here.
http://om1kron.blogspot.com
archive drop down is on the left, build started march 2008 when I bought the car.
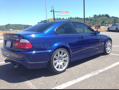
It now looks like this.
Converting an S13 Redtop Harness to work with an S14 plus full wire tuck and sleeving job.
I'm a busy guy and this is already posted on zilvia, freshalloy, violent running tribe, and zeroyon... It's hard enough to keep up with those so I centralized everything in the blog and then copy and paste into forums with wysiwyg editors.
This site doesn't have one, and has a picture limitation on posts.
So enjoy.
http://om1kron.blogspot.com
now back to work on this new dash fusebox dealio.
Modified by 137 at 3:51 PM 4/3/2009
So I went from this.... to this... (S14 Build)
-
OutToWinPAHC

- Posts: 8810
- Joined: Thu May 31, 2007 12:19 pm
- Car: 2015 Chevy Silverado
Nissan Skyline R33 GTS-t
Nissan Skyline R32 GTR
Nissan RB20 E46 RHD
2015 Harley Vrod Muscle
1990 Nissan Patrol - Location: PA
- Contact:
Re: So I went from this.... to this... (137)
Did you really spray paint nice work wheels? Other then that I guess its progress.
-
burntricer
- Posts: 1126
- Joined: Tue Jan 02, 2007 6:51 am
- Car: 90 S13 SR20DET Redtop
Re: So I went from this.... to this... (OutToWinPAHC)
not a fan of the changes.
personally i would have left it how it was, maybe with a SR.
personally i would have left it how it was, maybe with a SR.
Re: So I went from this.... to this... (OutToWinPAHC)
One of the main reasons I dont post here... read the center cap guy... and spray paint?OutToWinPAHC wrote:Did you really spray paint nice work wheels? Other then that I guess its progress.
lol no
-
spooled240

- Posts: 6487
- Joined: Sat Jan 20, 2007 8:45 pm
- Car: kouki s14
Re: (spooled240)
yup, all documented in the blog bro.spooled240 wrote:did you buy this car off craigslist? I think I remember this car on there but I may be wrong.
-
s14tan
- Posts: 4253
- Joined: Sun Jun 17, 2007 4:55 pm
- Car: 95 ZenKi SE w/ S14 SR GT28r and bolt ons
- Contact:
Re: (!Zar!)
Leave the guy alone people, its his car, let him do with it as he pleases.
What is the sizing on the Volk GT-Us?
What is the sizing on the Volk GT-Us?
Re: (s14tan)
17x9 +9 fronts and 18x10 +13 rearss14tan wrote:Leave the guy alone people, its his car, let him do with it as he pleases.
What is the sizing on the Volk GT-Us?
-
White Comet

- Posts: 19033
- Joined: Thu Jun 15, 2006 7:22 am
- Car: fc, s13 and mazda6, Sierra
- Location: lancaster, pa
Re: (137)
i've seen the build thread on zilvia and i really like what you're doing with it. i just ordered stuff from wirecare.com so i can't wait to get the sheathing on the wires and completely finish my tuck
-
SlamStretchPoke
- Posts: 9
- Joined: Sun Feb 15, 2009 5:59 am
- Car: slammed and poking vw gti 1.8t
Re: (White Comet)
that is clean!!!!
-
mattblancarte
- Posts: 1978
- Joined: Sat Jun 21, 2008 4:14 pm
- Car: 2005 BMW M3 Comp. Coupe
Re: (SlamStretchPoke)
Off topic, but the freestyle vid on your blog is badass.
Re: (mattblancarte)
I second this.mattblancarte wrote:Off topic, but the freestyle vid on your blog is badass.

Re: (SlamStretchPoke)
... on the outsideSlamStretchPoke wrote: [img]
that is clean!!!!
-
1990pignose

- Posts: 63
- Joined: Wed Nov 12, 2008 5:22 pm
- Car: 1990 Nissan 240sx coupe
Re: (240lookis)
^^^ i agree with him
mostly show style but still very nice
mostly show style but still very nice
Re: (s14tan)
What are you talking about?s14tan wrote:Leave the guy alone people, its his car, let him do with it as he pleases.
What is the sizing on the Volk GT-Us?
Brush up on reading comprehension.
I was giving him a COMPLEMENT.
Re: (SlamStretchPoke)
still think so?SlamStretchPoke wrote:
that is clean!!!!
look at the fitment of the front end... gross whole thing was held together by zipties, the bumper exploded driving on the freeway.
So I kind of needed a new bumper, fenders were already destroyed hence why the front sagged, on top of not having that bash bar.
It was all replaced with an authentic vertex lang kit.

Re: So I went from this.... to this... (137)
5 hours of work converting my ford Taurus fan connector over to a Nissan plug, then sleeving it... wanna see how and why?
Look no further.
I think I spent about an hour in front of the car de-pinning the relay all of the wiring was originally soldered to. I then decided to grab a bbq torch lighter and de-solder that way. Worked great, until I decided I wasn't going to use the relay anymore anyway, so I kind of wasted my time.
So as you may know I've been reading many "how-to's" on how to wire up a ford Taurus fan as OEM as possible into my car.
This was pulled from my s13 (Chloe) and worked just fine before, but the amperage draw of the fan was so high that the alternator couldn't provide enough power to run the fan nor could the system even take it running on high.
Some fun statistics for you.
1995 Ford Taurus (3.8L)Dual speedlow: ~2500 cfm, Amp draw ~23.75Ahigh: ~3800cfm, Amp draw ~46.5A
The problem with the fan going into high is the stock relays are all 40amp... So that could either burn out a fuse, cause a major accessory power draw (add up having your lights on, radio blasting, ac running, etc.) Hell makes me want to upgrade my alternator now lol.
Anyway the point is you need stronger relays for the car if you're going to run this fan. I have decided to go with AEI component relays. you'll see on a drawing below the quantity I'm going to order (replacing ALL of my relays)
http://www.boardrelays.com/
----------------------------------------------
The instructions are as follows for this modification.(all horrible spelling has been corrected. -137)
[quote=""http://forums.hybridz.org/showthread.php?t=99700""]
The two diagrams above show how to build and wire an auto relay switched 2-speed FORD TAURUS fan. Parts needed......10 gauge wire for the power circuit. 18 gauge wire for the control circuit.
Three relays...1) High speed relay, TYCO VF7-12V,70amps2)Low speed relay and Aux relay, standard BOSCH relays
Two switches...1)Low speed temp. switch- Adj. Flexilite, FLX-31147 from SUMMIT.2)High speed temp. switch from Standard Motor Products, TS-158 or TS-392.
I put the adj. low speed switch and the three relays in separate relay boxes and mounted them in the engine comp. The high speed temp switch I mounted where one of the heater hoses went.
Est. cost of parts, less the fan, is $50.00 . 10 gauge wire is used in the power circuit and 18 gauge in the control circuit. The 12V switched control circuit can be connected to any live connection with ignition on.
The control circuit shown is as follows..... When the temp. reaches your set low speed figure, let's say 190 deg.the low speed relay is energized through pin 86, 85 connects to 87A of the AUX relay and pulls 30 of that relay, 87 of the low speed relay and 30 are closed sending power to the fan to run at low speed.
When the temp. reaches your high speed switch figure, let's say 210 deg. pin 86 of the AUX. relay energizes through 85 and 30 releases from 87A of the low speed relay and connects with 85 of the high speed relay which through 87 of that relay powers the fan to run at high speed.
ARE we confused yet?????
When the temp falls below the high speed switch figure the AUX relay will switch back to the low speed relay.
Therefore low and high speeds will never be on at the same time and you will have the following conditions...1) No fan on.2) Low speed on.3) High speed on.
This set-up has worked great since installation of it and I fought heat problems for a year because of my blower set-up before this change and NO in dash switches.........
[/quote]----------------------------------------------
Now the way he want's to wire it up is all fine and dandy, but I'm going with more traditional OEM wiring, I don't see where I will need all of these thermo's and what not. I have a nismo thermostat so that should actually put the car's natural cooling ability to use before I even need the electric fan to kick on. The DIF fan controller's look real nice but at 150, 200 dollars (which has integrated relays.) is just unnecessary imo. More for the non Do It Yourselfer aka D.I.Y er lol.
Here is the OEM wiring charts for you to reference how I'm rolling. As mentioned above I'm replacing the stock relays with 60amp relays.
and here is the electric fan wiring layout, pay attention to the area I highlighted, now on my s13 (Chloe) this was all manually wired to the car, not integrated in an oem manner what so ever. So I'm going to use the oem fan plug from the Electric Fan
you can see here that there is a white/red wire in pin seat number 1 which goes to the fan relay #2 this is going to be our HIGH speed fan relay, the second wire is brown/white our LOW speed wire going to fan relay #1. Confused, OK I'll hold the actual plug itself I'm talking about.
I'll touch back later at how I am integrating that third (fail safe) relay into this oem setup.
So I have a power line for high, I have a power line for low, and look I even have dual grounds going to a stock location, so why wire the fan up separately when I can utilize this awesome plug?
Exaaaaaaactly...
let's get to work shall we?
Here is the Ford Taurus fan plug... the pin out goes like this.
1. blue (HIGH SPEED) 2. black/red (LOW SPEED) 3. black (GROUND)I may not have them in that order but that's not important. - 137
I am using the plug from the stock electric fan which goes to the above pictured plug I don't remember the exact color pin out, nor can I find that in the maintenance manual. So f**k it, we're going to make our own pin out.
So lets start by taking the ground wire, extending it, and then splitting it into two so it can utilize not one, but two oem grounding points.
soldering.
done
So basically pins 3 (black) and 4 (yellow/green) on this plug will be going to pins 3 (black) and 4 (black) on E30.
now for the black/red wire, I've decided to use the green wire for low speed, this will be going into pin seat #1 on this plug.
The blue wire on the Taurus plug (pin #1) will go to the blue wire which we're going to put in pin seat #2 on the oem plug.
all of this heat shrink initially was a great idea until I had to figure out how in the hell to get the water proof grommet back onto the Taurus plug, on top of the grommet cap. GODDAMMIT!
so I had to slice all of the heat shrink off, shimmy that crap on while widening some of the holes and filing down my crappy soldering.
here is all of the heat shrink re-applied now that the cap is where it's supposed to be.
before I sleeve anything I group the wires in section and do a tight, and I mean TIGHT wrap of electric tape, probably two go around's with the roll and cut. Moderately spaced which helps with the sleeve material I slide on.
finished product... but the project is far, from over.
make sure to head over to http://om1kron.blogspot.com to check out any updates I may have not had a chance to post here, as I do update this thread on about 8 different websites.
Thanks for looking again.
part 1 of the weekend update, see the rest on the blogspot.
Not many updates, my car most likely is going to be towed to my new pad, I'm just spending tonight bolting things up... Fun, Fun, Fun...
Took the exhaust out to see how it lines up with my, er... down pipe which is temporary.
Top Fuel Catback, well without the cat. Also washed my wheels off today, friends threw some tarps or some s*** over them, I think they scratched the paint off of the inner lip on one of the wheels... =(
That's what happens when you have roommates.
So what size spacers do you guys recommend, the coils are set to have the wheels in the wells but I'm thinking 5mm spacers, 10 will have them out too far. I don't really have adjustable arms or anything back here as you can see above. All stock, should fix that to save my tires and help dial things in.
Will most likely go with battle version in the rear.
And no the car is not painted yet, it's still black.
Going to roll it out of the garage this weekend and turn it around to give me more access to the passenger compartment.
more updates later on om1kron.blogspot.com
-
LovesBigTurbos
- Posts: 74
- Joined: Fri Feb 06, 2009 8:39 am
- Car: VW Gti T3/T4 Turbo, 03 350z sold
Re: part 1 of the weekend update, see the rest on the blogspot. (137)
wasn't this car for sale on autotrader? I know i saw it on there.
Re: part 1 of the weekend update, see the rest on the blogspot. (LovesBigTurbos)
I think so some time back in 1998... I found it on craigslist.LovesBigTurbos wrote:wasn't this car for sale on autotrader? I know i saw it on there.
then bought it.
thanks for looking, I spose.
blogspot updated.
Re: S14 Build... VRT 137. (137)
In the previous entry I had mentioned in the video that I had blown the ECU and the car pretty much wont start now. Well I re-did the wiring for the car last night.
Video Blog Update 4-03-2009
In the video I highlighted the path on the ecu that fried. you can see by the circular diode the circuit snapped or burned up. No longer connecting the power path for this circuit.
So I took the ECU apart and tried to salvage it.
I made sure this wire is not touching anything surrounding it.
It's very important if you attempt this that you triple check your work.
You don't have to put electric tape on it when finished because the cover on this side of the ecu has a hump. So the wire wont be penetrated by any of the other leads from the pressure of putting the cover back on. (just to clear your paranoia.)
Tests out OKAY.
finished product...
Spent the last 7 hours making this mess. I have now completed the inner wiring of the car making a lot of stuff shorter. Falling asleep soldering is bad, so I didn't tackle any of the long wire you still see.
December harness.
April harness
oh yeah... car starts.

Re: S14 Build... VRT 137. (137)
Sick a$$ stuff bro... want more!!! lol
update... see the in between progress at om1kron.blogspot.com
Alright we have another mixed media update on my build thread. I would just like to give a tour of my hard work, granted you cant see any of it.
I know it's there, I know it's all secure, and I know I've used just as much electric tape as those ***holes from Nissan putting it all back together lol.
Simone Video Blog : http://vimeo.com/4642015
After the interior tour, I got to work putting the engine bay back together. I did film a tidbit about my kouki turn signal sub-harness project but I will save that for a future video.
I put the front bumper on the car to help line the intercooler up when putting the hot pipe back on.
Once that was all said and done. We did this for the children. Because...
they are the future.
Simone Video Blog 2009-05-13 pt.2 : http://vimeo.com/4642796
After that video and pissing off my neighbors even more who deserve me pissing them off because they're cowardly f***tards. I parked my car in front of the house of the b**** who most likely called the cops.
Since I have lived here, I've never had a cop show up to my house to complain about my car, two new sets of ***holes moved in and now cops start showing up.
Going to be a wonderful relationship, but that aside.
I decided to park the car in the shade for a hot minute, while I cleaned all of the s*** out of my garage. So at least I know it will get me to the curb lol. The turbo timer kept the car on obviously while I walked back to my house.
So more death smoke for the neighbor, less for me.
b****.
got sick of seeing this s*** laying around my garage, so me and the spiders battled for aero supremacy, obviously I won.
I feel sorry for the ***hole who thinks these will be fun to take off. Oh yeah my brother since he's painting it hahaha.
fastenal goodness.
yeah down here too.
oh yeah they fit the hood, that's why I couldn't find the nuts to hold that piece of s***.
I swear that bonnet is more beat than the flappiest beef curtains you can find on the net.
Please believe it.
Believe it please.
Now...
I am calling it a day.
day.
-
hatersloveme

- Posts: 18
- Joined: Tue May 05, 2009 7:06 am
- Car: 1992 nissan 240sx
Re: (hatersloveme)
like this.hatersloveme wrote:sweet!!! its super nice on the out side, but whats the inside look like????
http://vimeo.com/4672699
Re: (ViolentRunning13)
i really like where youre going with the project man. i love the gtus too!!!! car is gonna look very nice. digital climate control ftw! oh yeah.... fucck your neighbors..... you know damn well as i do they called the cops because you were working on your car in your drive way??? lol wtf??? anyways, good luck on finishing her up.