Well I recently purchased some clear corner lenses off of "FleaBay" to replace my amber ones and I searched on here to see how to replace them and I found a few threads but none with pictures for our S13s. So that's when I decided to take some step by step pics of my partake of the install, so here it goes:
Lenses fresh out of the box
Side view of the lens
The driver's side lens easily comes out with a little elbow grease pushing the lens towards the back of the car
Here is the lens popped out, next you must remove the bulb from the lens and disconnect the connector
Then slide the female side connector off of the metal bracket if you can. Mine wouldn't budge so I had to break mine and then cut the remainder off. Then slide the female connector back onto the new bracket of the clear lens
Then you can use an adhesive of your choice and line the edge of the new foam and slide the lens back into place and there's the driver's side
Now onto the passenger side. The lens slides right out just like driver's side by pushing it out towards the rear of the car.
There is no sliding bracket on this one so you only need to remove the bulb. No harness disconnecting here.
The new passenger side lens holes are different from the stock one in this case so some slight "modifications" are required. You can either notch the new lens in order to fit the bulb or simply round it out just enough to wiggle the bulb in. The second option is what I chose to do since I was feeling kinda lazy. You can use a drill with a boring bit or a pyramid type bit like I used.
Finished product after modifying the new lens
Now just carefully wiggle the bulb into the new lens
Then just like the driver's side lens, take your adhesive of choice and line the foam with it and then slide the lens back into place. If your passenger side lens comes with the extra bracket like the driver's side did be sure to remove it before sliding the the lens into place. It should be easily removed with a phillips head screw driver. If you just don't care, there should be enough room behind the fender to just leave it on. I decided to remove it since my stock lens didn't have the bracket on it and since I had to break my other one on the stock driver's side lens so I replaced the broken one to make it as good as new.
Finished product
Before
After
I hope this helps some of you out a little more since I know pictures are worth a thousand words and I personally like to see pictures of an install like this myself. Just let me know if you have any questions, I would be glad to help out!
Modified by 1sikvert at 12:52 PM 10/4/2007
S13 Clear Corner Install (with pics!!!)
-
ishkabibble
- Posts: 4667
- Joined: Sun Nov 05, 2006 5:08 pm
- Car: 1992 Nissan NX2000 hardtop
1993 Nissan NX2000 t-top
1997 Infiniti I30t
Re: (ishkabibble)
No problem I will have some daytime pics up tonight.
Re: (1sikvert)
those are sidemarkers not corner lights
-
S13_convert
- Posts: 199
- Joined: Thu Sep 13, 2007 9:06 am
- Car: 2009 370Z Touring, Sport, Nav, 6MT
1994 240SX convertible - Location: San Diego, CA
Re: (STARBUCKS)
W/EAre you always a prick?STARBUCKS wrote:those are sidemarkers not corner lights
Re: S13 Clear Corner Install (1sikvert)
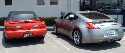
Here's the daytime pics as requested. I hope everyone enjoys!
Modified by 1sikvert at 1:05 AM 4/8/2010
Modified by 1sikvert at 1:05 AM 4/8/2010
-
ishkabibble
- Posts: 4667
- Joined: Sun Nov 05, 2006 5:08 pm
- Car: 1992 Nissan NX2000 hardtop
1993 Nissan NX2000 t-top
1997 Infiniti I30t
-
cmkelly
- Posts: 788
- Joined: Mon Jun 26, 2006 4:09 pm
- Car: 1992 Nissan 240SX Vert
2006 Acura TL
2001 Nissan Pathfinder LE
1996 Toyota 4Runner 4x4
Re: (ishkabibble)
Yes, yes they do.
-
supra brit

- Posts: 1785
- Joined: Tue Jun 15, 2004 7:20 am
- Car: '93 Supra, '94 240sx 'vert
- Contact:
Re: (supra brit)
Don't worry, I didn't. I don't like amber on my cars, my taillights are next!supra brit wrote:Very nice. I hope you didn't use amber bulbs though
-
distant240sx
- Posts: 121
- Joined: Sat Mar 17, 2007 2:43 am
- Car: 1992 240sx convertible
Re: (1sikvert)
Nice. I like alot. looks really good. Are you planning on doing the same to the rear ones, too?
Re: (distant240sx)
I haven't decided whether or not I was going to do the same to the rear yet since they are red and not horrible amber. lol. I need to do something with the taillights first though. Either black them out or get the "JDM Type" 1/2 red 1/2 clear ones.
-
distant240sx
- Posts: 121
- Joined: Sat Mar 17, 2007 2:43 am
- Car: 1992 240sx convertible
Re: (cmkelly)
Hey, if you want something to do to your tail ligts,
You can check out my thread. Costs about $25.00, and you can find all the parts at any parts store,if not you can find them online. zerothread?id=281219
You can check out my thread. Costs about $25.00, and you can find all the parts at any parts store,if not you can find them online. zerothread?id=281219
Re: S13 Clear Corner Install (1sikvert)
if you wanted to could that pair directly replace the rear 2 instead?
Re: (1sikvert)
im glad im not the only one that feels that way.1sikvert wrote:Don't worry, I didn't. I don't like amber on my cars, my taillights are next!
Re: S13 Clear Corner Install (S-13)
I'm not exactly sure. I'll look around a bit and let you know. If the brackets are the same though it should work. Otherwise just "fabricate" a little and make them work.S-13 wrote:if you wanted to could that pair directly replace the rear 2 instead?