Regardless ... I have been asked to post close-ups and details about the radio knobs that I installed (after knicking the idea from another clever member, LOL). I can't remember his name but I knicked the carbon fiber idea AND the knob idea form him so HE should get the credit for this. I shall also post the recently complete custom VHT tail design I did as well as the other lighting stuff.
The radio knobs are available on Ebay. They are size 21 x 17 with a silver finish. Here is the link, pictures follow ...
http://www.ebay.com/itm/3p-21x17-SILVER ... 2671wt_966
They are from China (I know!) but these really ARE quality pieces and they fit snug as the OEM black knobs and perform the same. I added a bit of paper inside the passenger knob as it went too far down on the spindle to allow pushing inwards. After using these knobs, I reckon the absolute pefect fit is 22 x 16 but mine fit perfectly snug and don't wiggle - they just allow a wee bit more of the yellow light surrounding them at night.

.

.

.

.

.

.
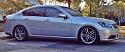
The rest of the exterior and lighting mods:
1) Morimoto Xeonon 6k headlamps (done ages ago),
2) New design for the eyebrows using VHT NIghtshades and clearcoat
3) Phillips 'DayLight-8' LED DRLs (also ages ago)
4) Front side markers also covered with VHT Nightshades leaving a very lightly tinted square over the actual bulb
5) New design for the tail turning lenses VHT Nightshades and clearcoat with light / dark coats to make bars of light
6) Vled Triton turn signal bulbs, Vled brand LED bulbs everywhere else inside and out.
7) Trunk spoiler
8) Roof spoiler
9) Plasti-Dipped grill and peeled dip off of the emblem - taped over the rows of little nipples so they are still chrome
10) Plasti-Dip on the rear trunk trim pieces, upper and lower - scored the letters and peeled the dip from them
.

..

.

.

.

.

.

.

.

.
Thanks to my mate, Marty for the use of his driveway whilst we waited to go to rugby practice!
.