PA15-INFI Installation on a 2006-2007 Infiniti M35/M45

Re: PA15-INFI Installation on a 2006-2007 Infiniti M35/M45
Done for sure this time. Brain fart on first attempt...
-
asavage
- Posts: 33
- Joined: Tue Apr 20, 2010 1:01 pm
- Car: 2006 M35 Sport RWD
- Location: Duvall, Wash.
- Contact:
Re: PA15-INFI Installation on a 2006-2007 Infiniti M35/M45
I installed this on our 2006 M35 Sport with working Sat & Nav, last week, right before moving to Denver for six months. Some notes to add . . .
First, the instructions for this thing aren't good. The unit seems well-made, and the sound is fantastic, but the instructions are not going to lead you step-by-step. They are not only poorly written, they're poorly Xeroxed! Fortunately, the instructions seem to be the only part of the package that lacks quality. Here's a link to the PA15-INFI manual (PDF) (mirror link).
(click on any image for larger)

Excellent description, and I'm glad you warned me about the plastic pull tabs that release the front edge of the seat being fragile.
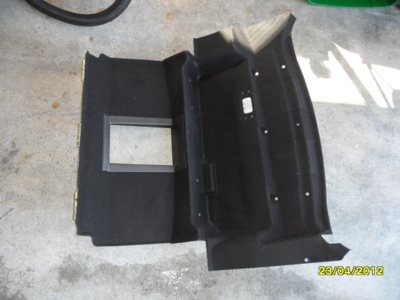
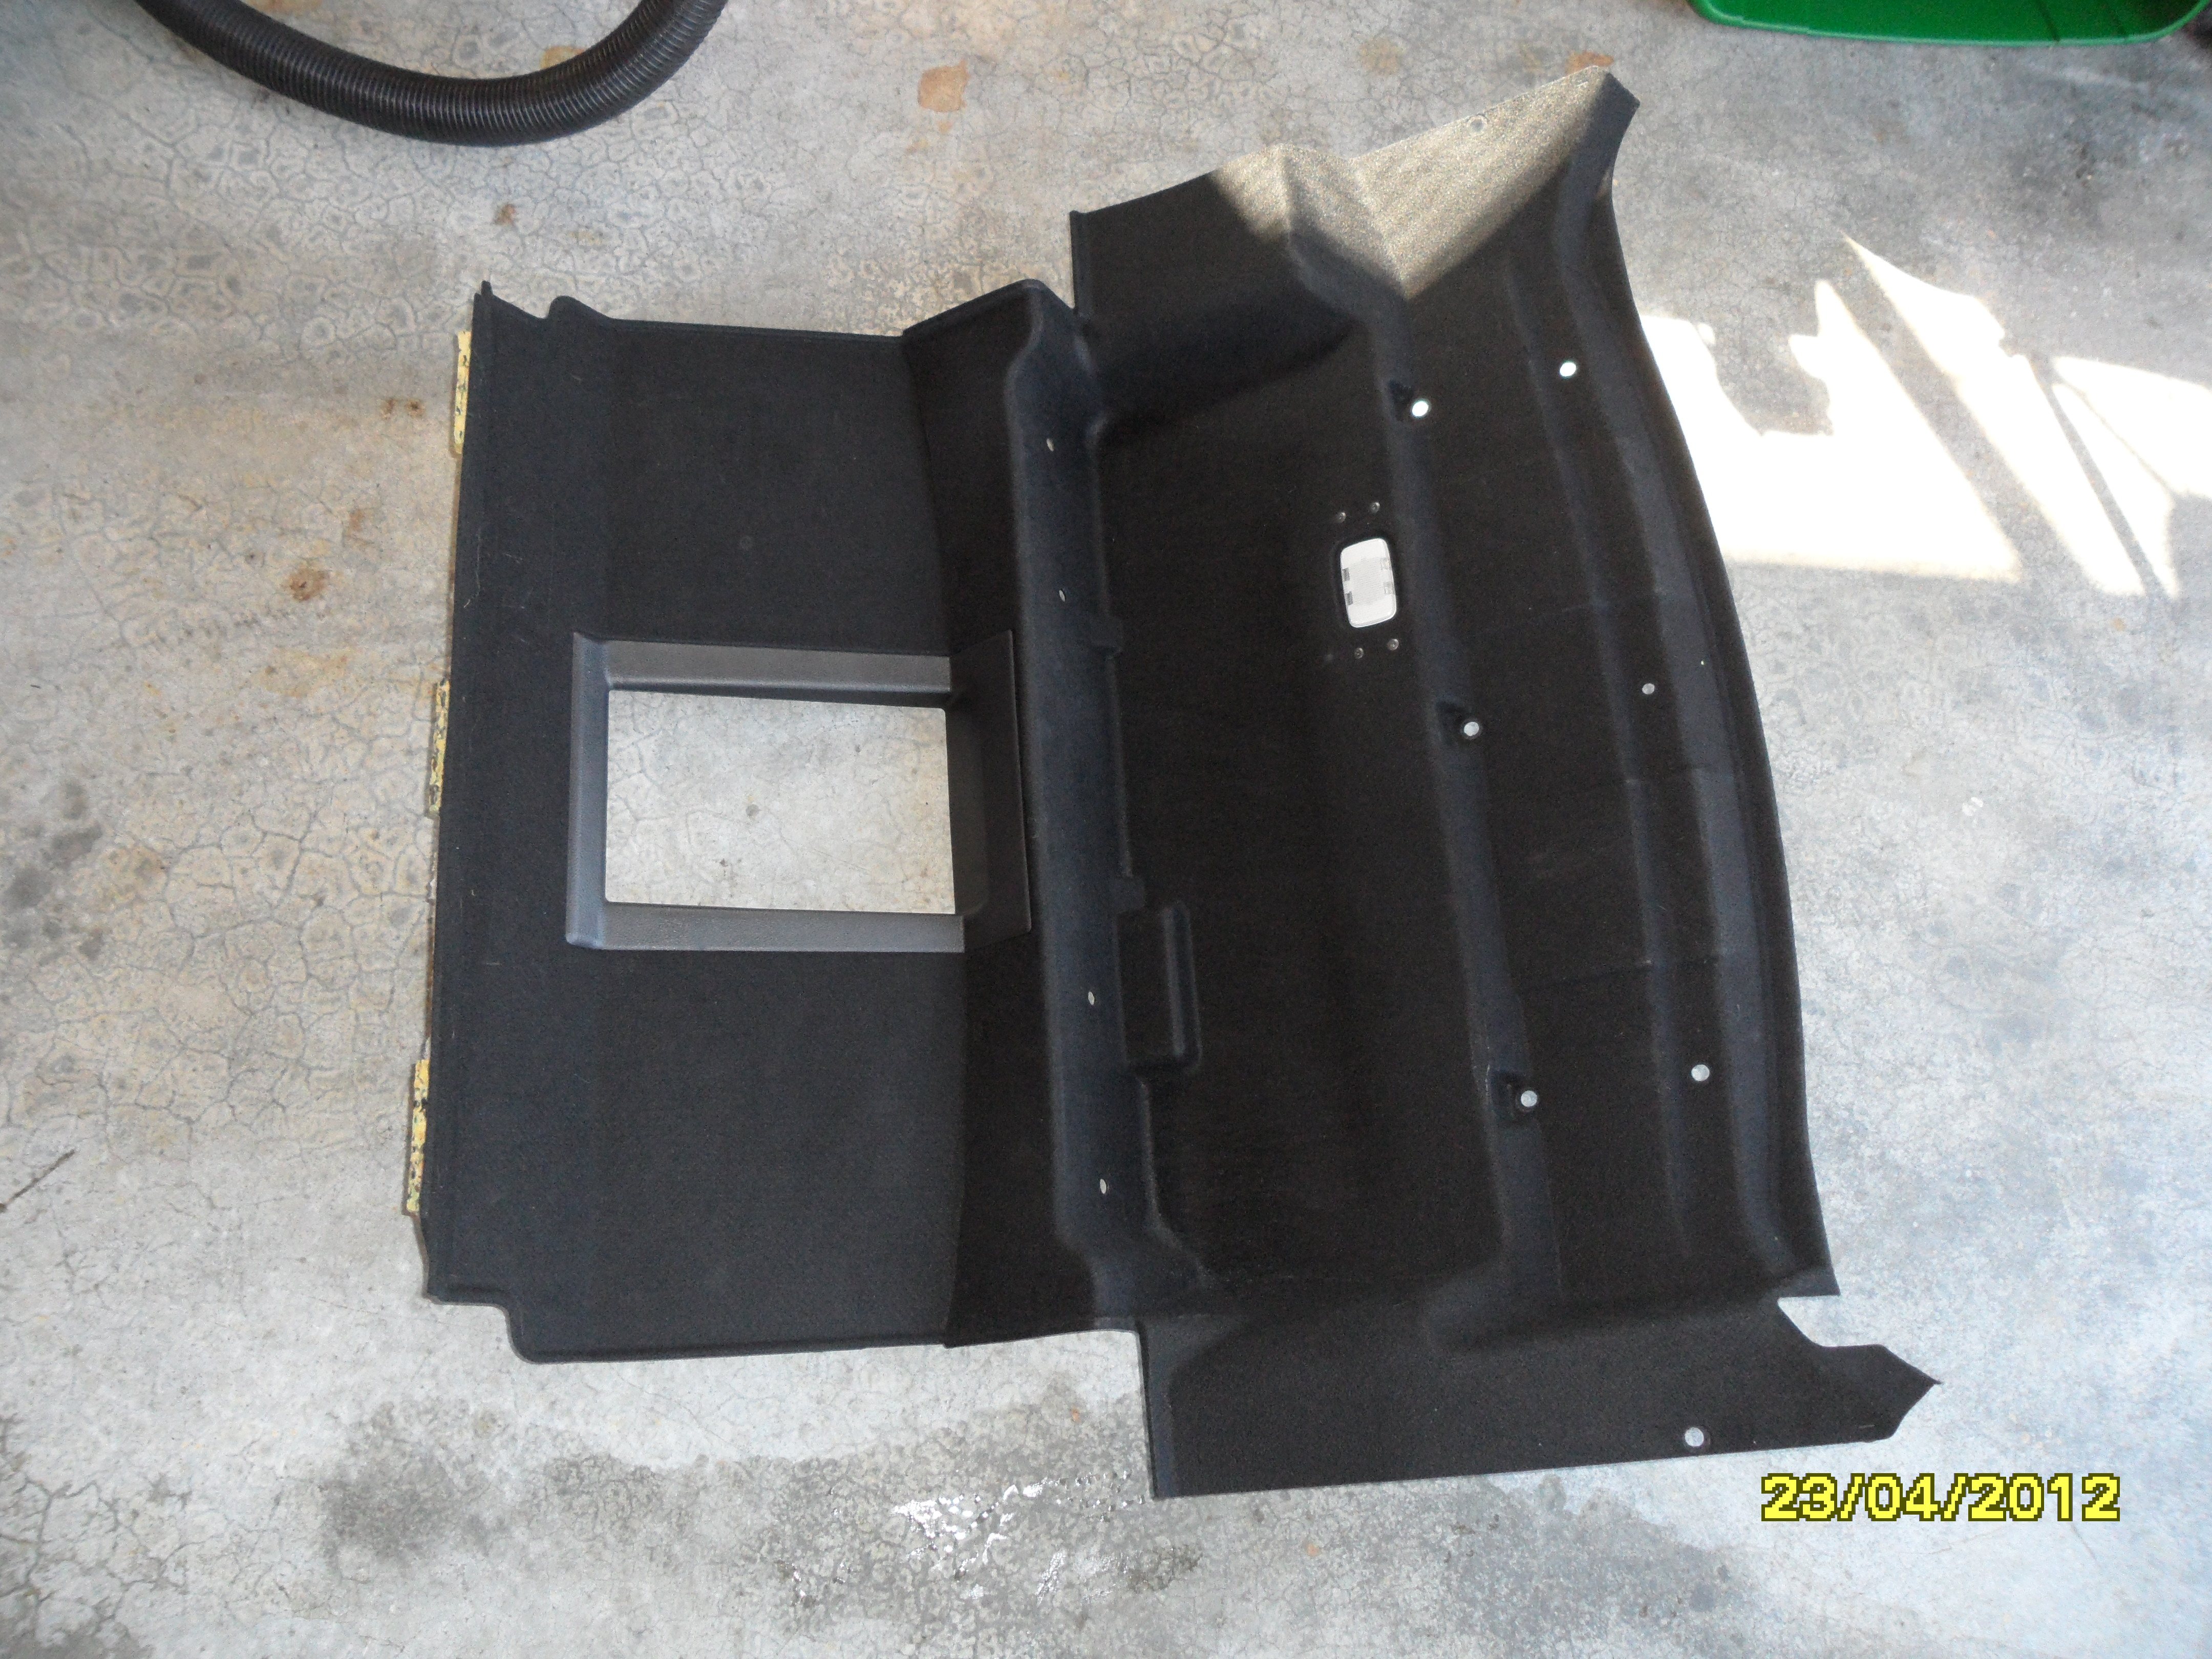
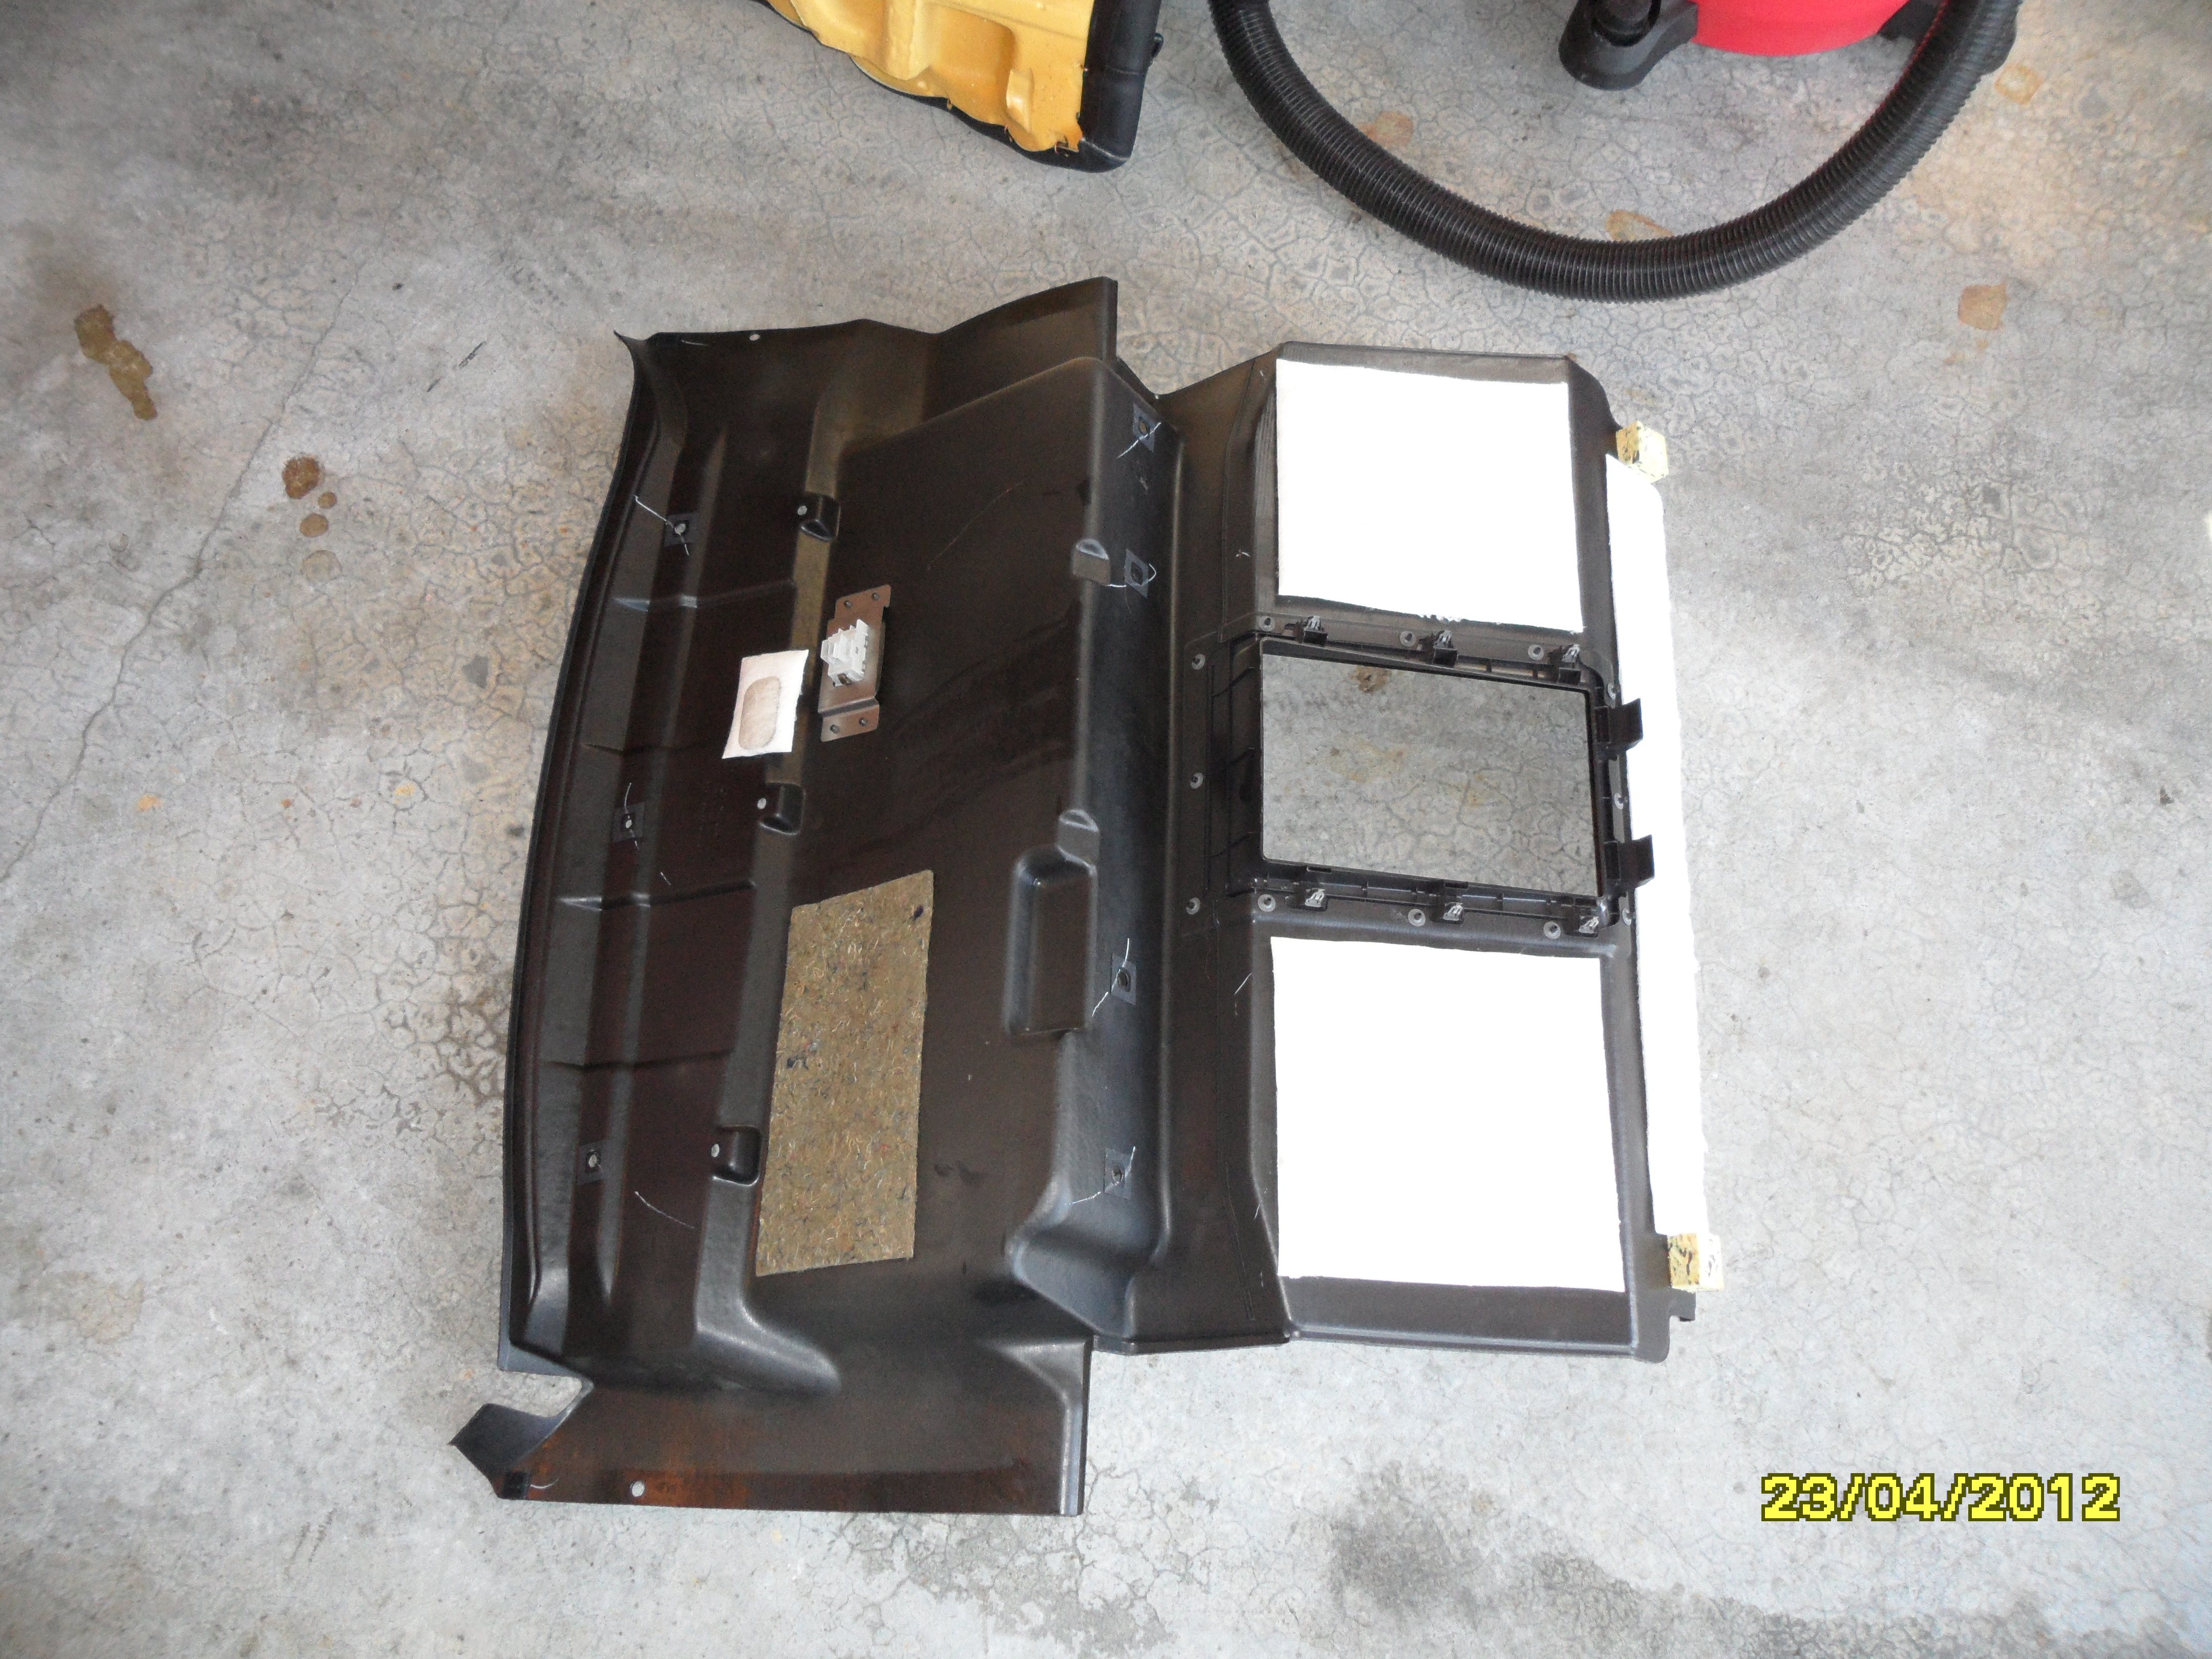
To remove the upper trunk liner, first remove all the push-pin retainers, disconnect the trunk light harness connector from its light socket. The liner won't come out due to the six steel push clips on the pass-through trim on the trunk side.
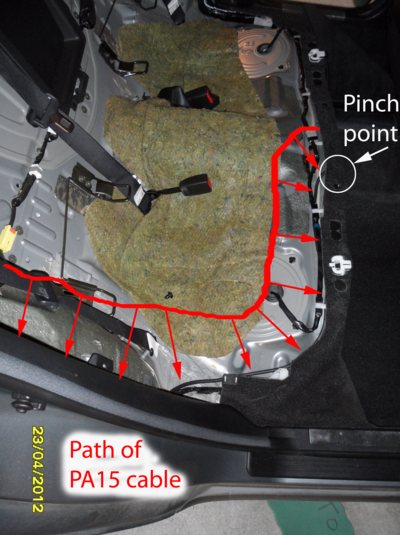
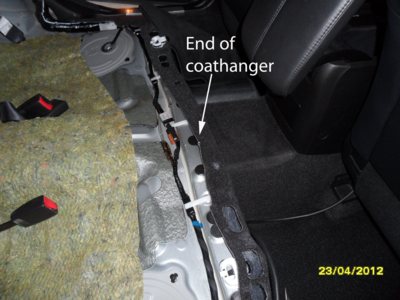
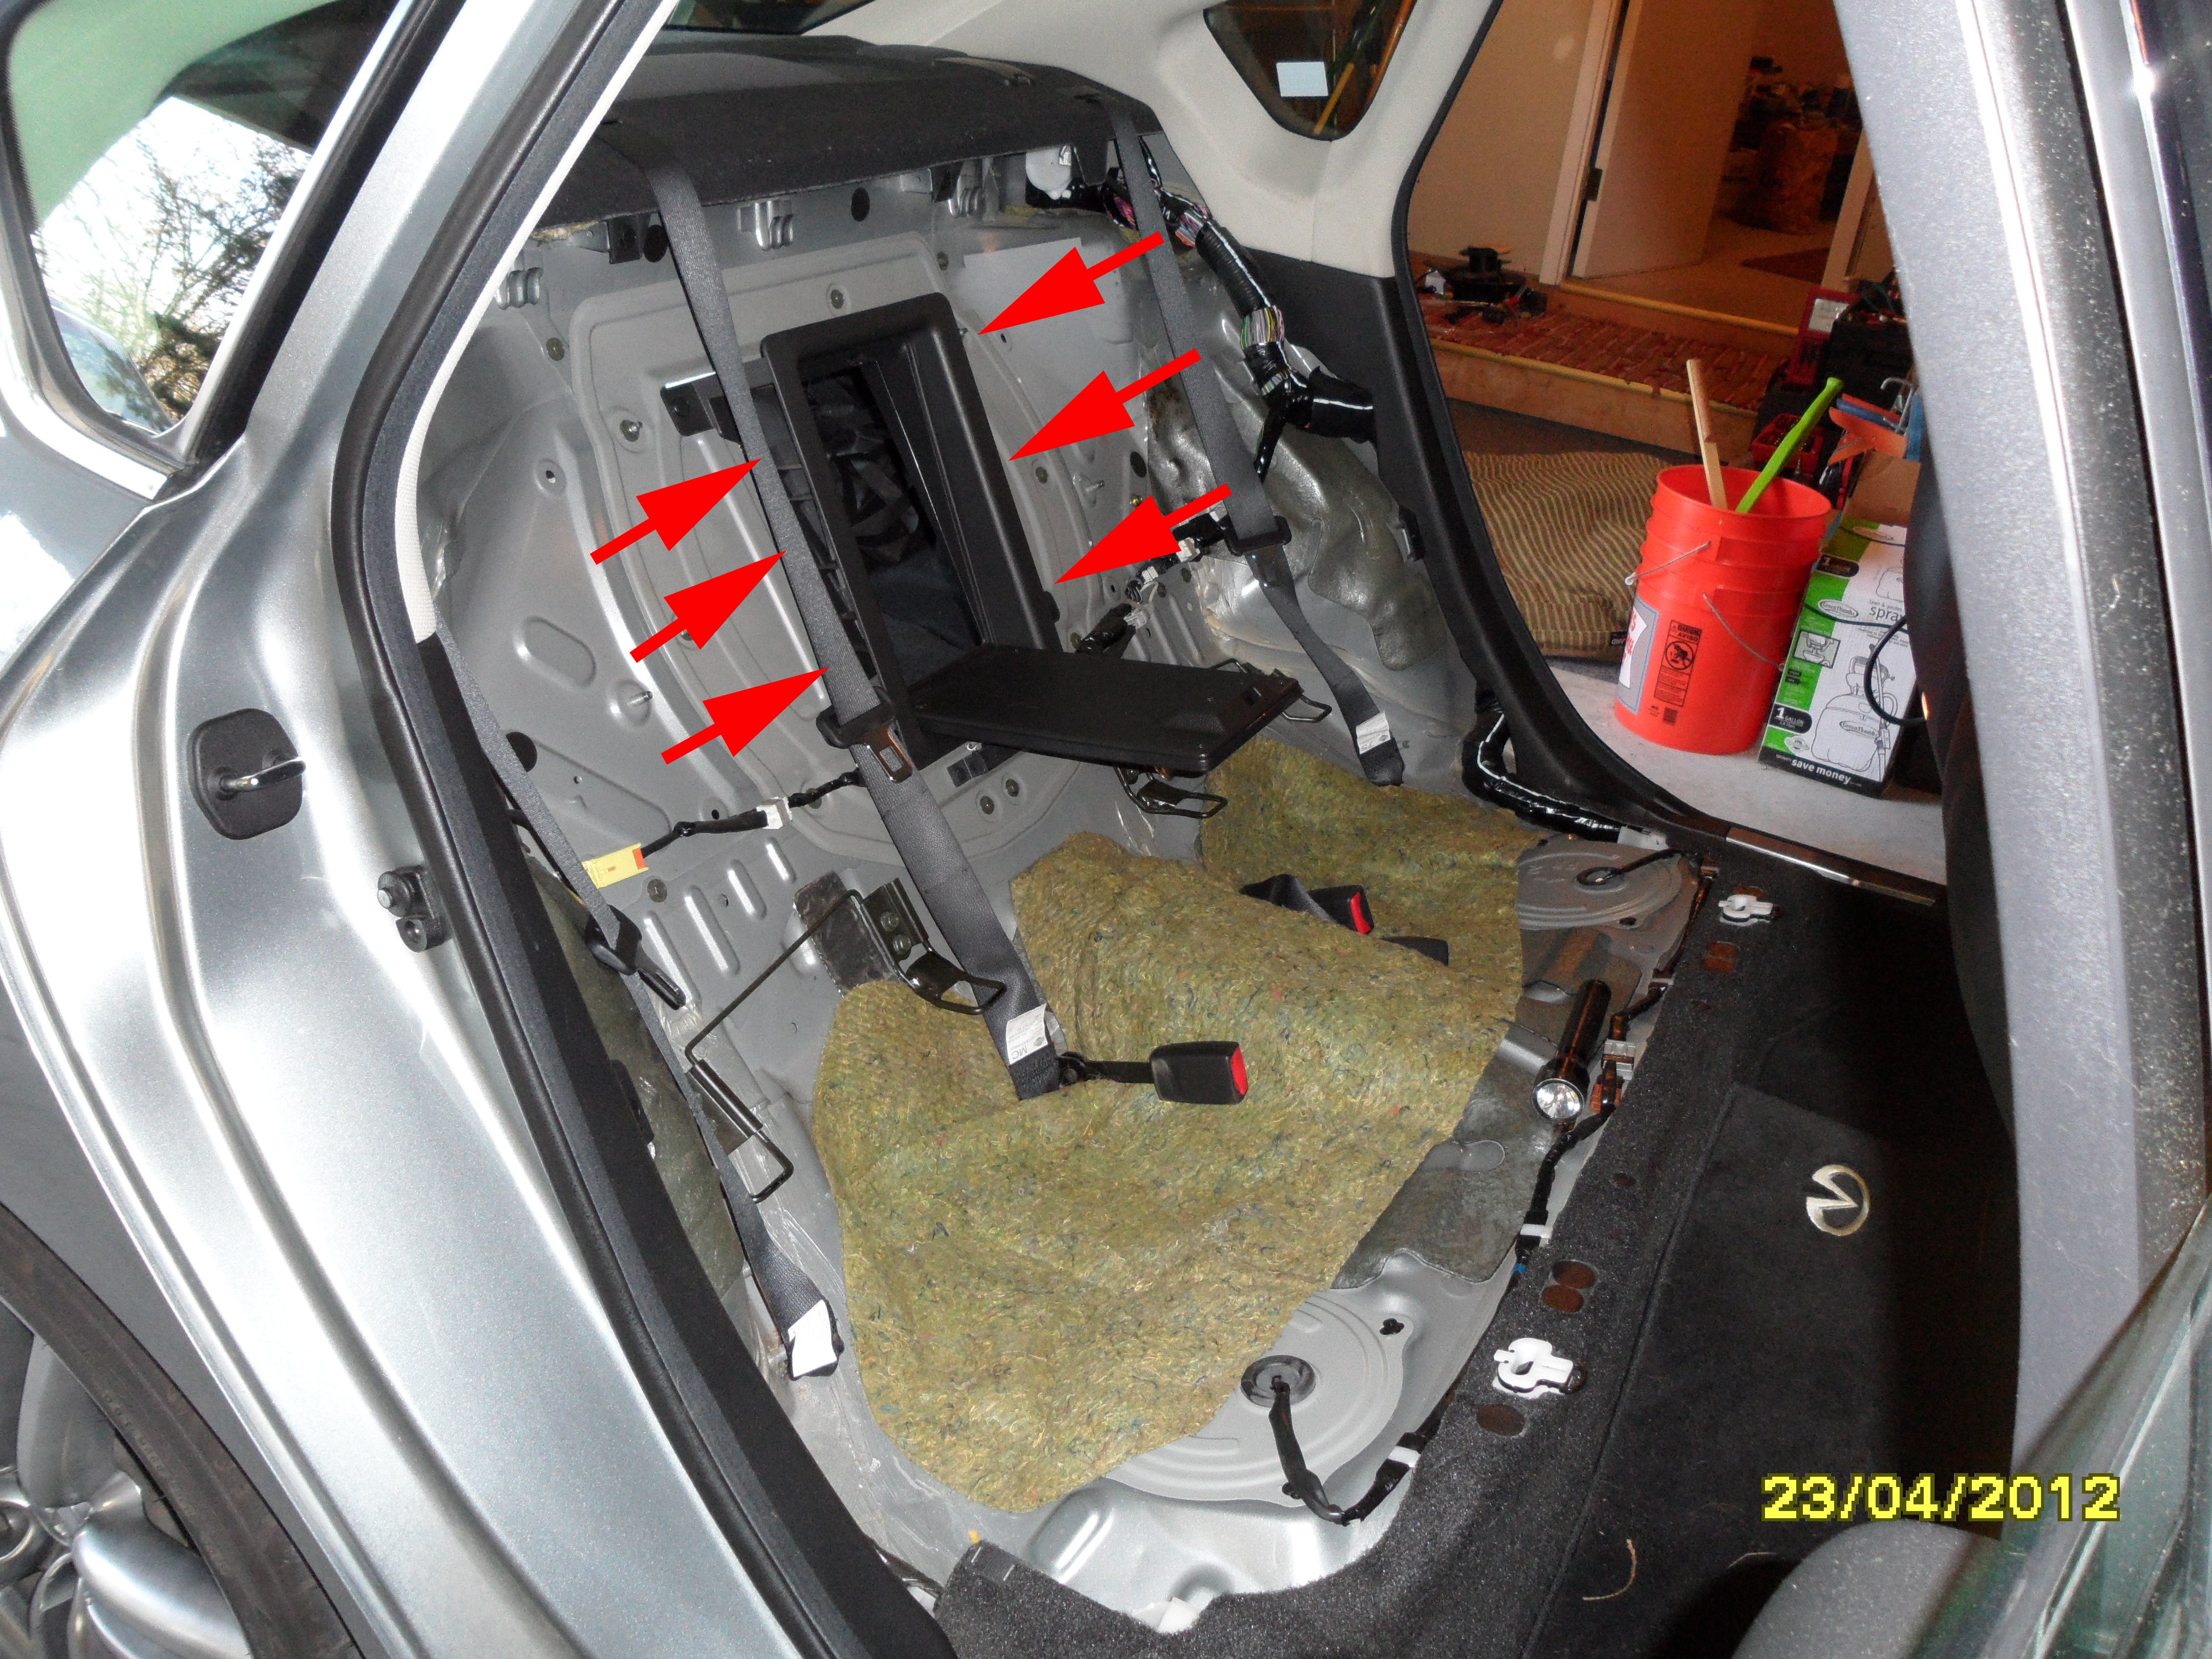
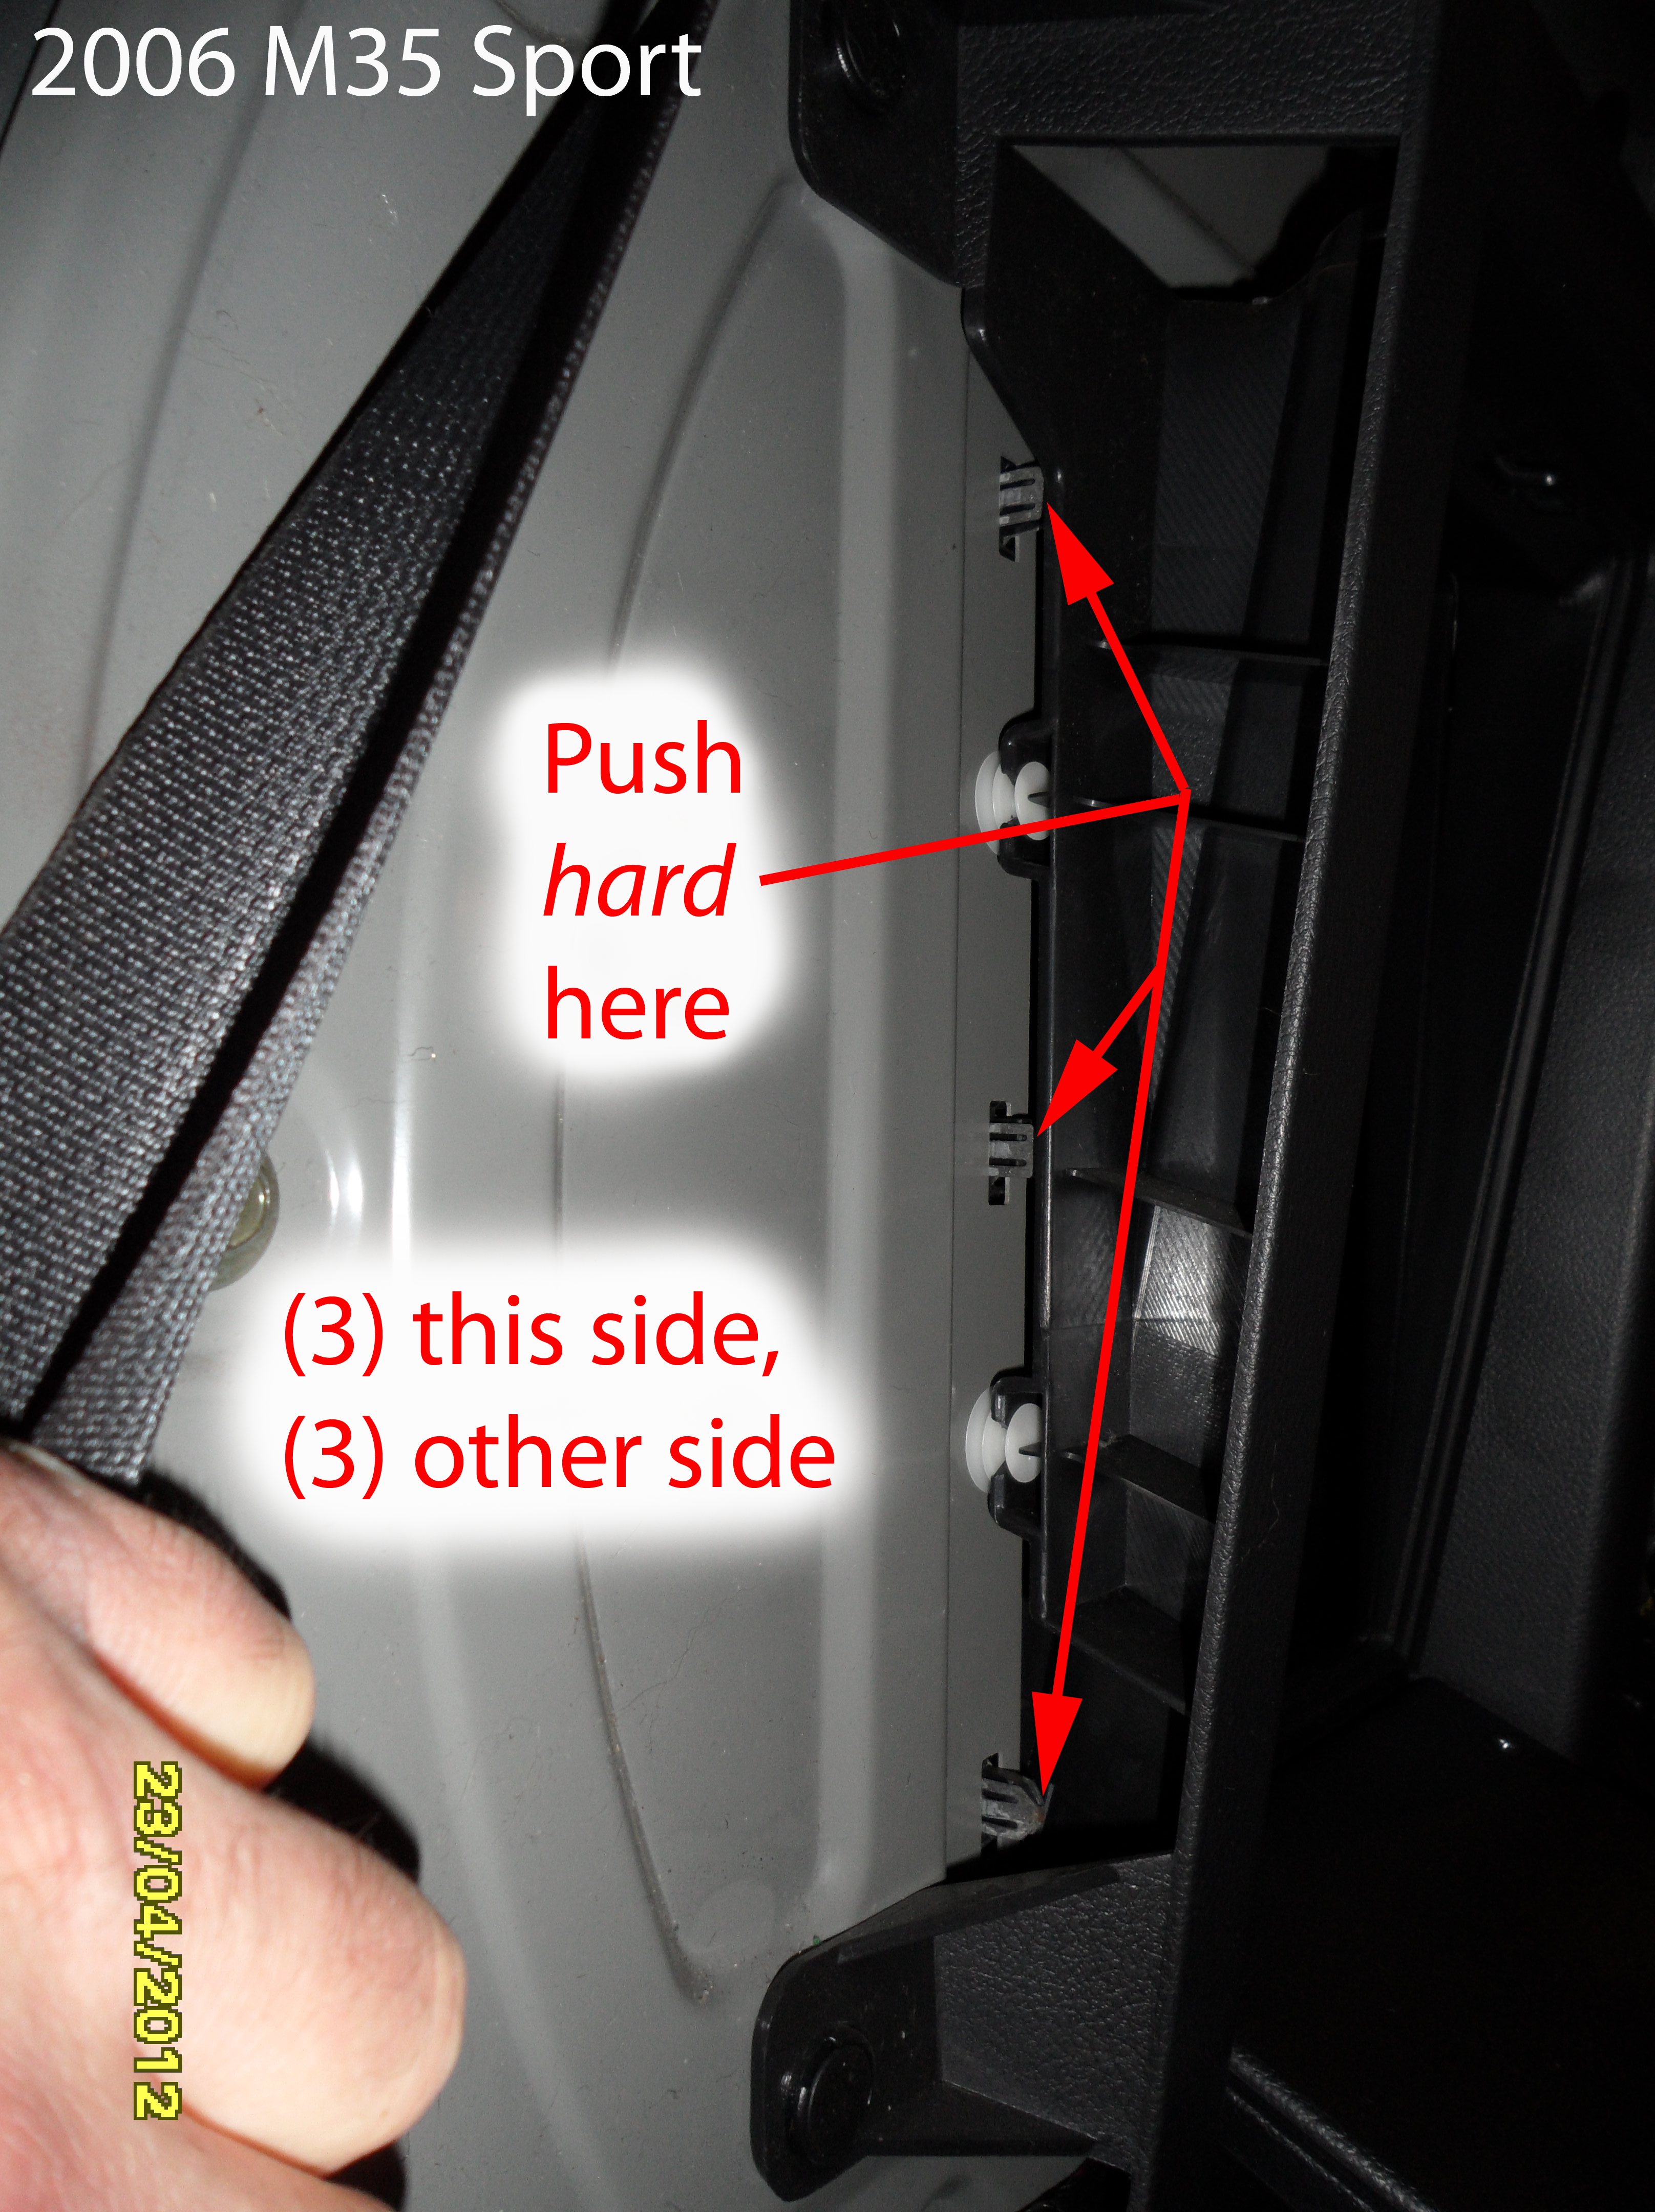
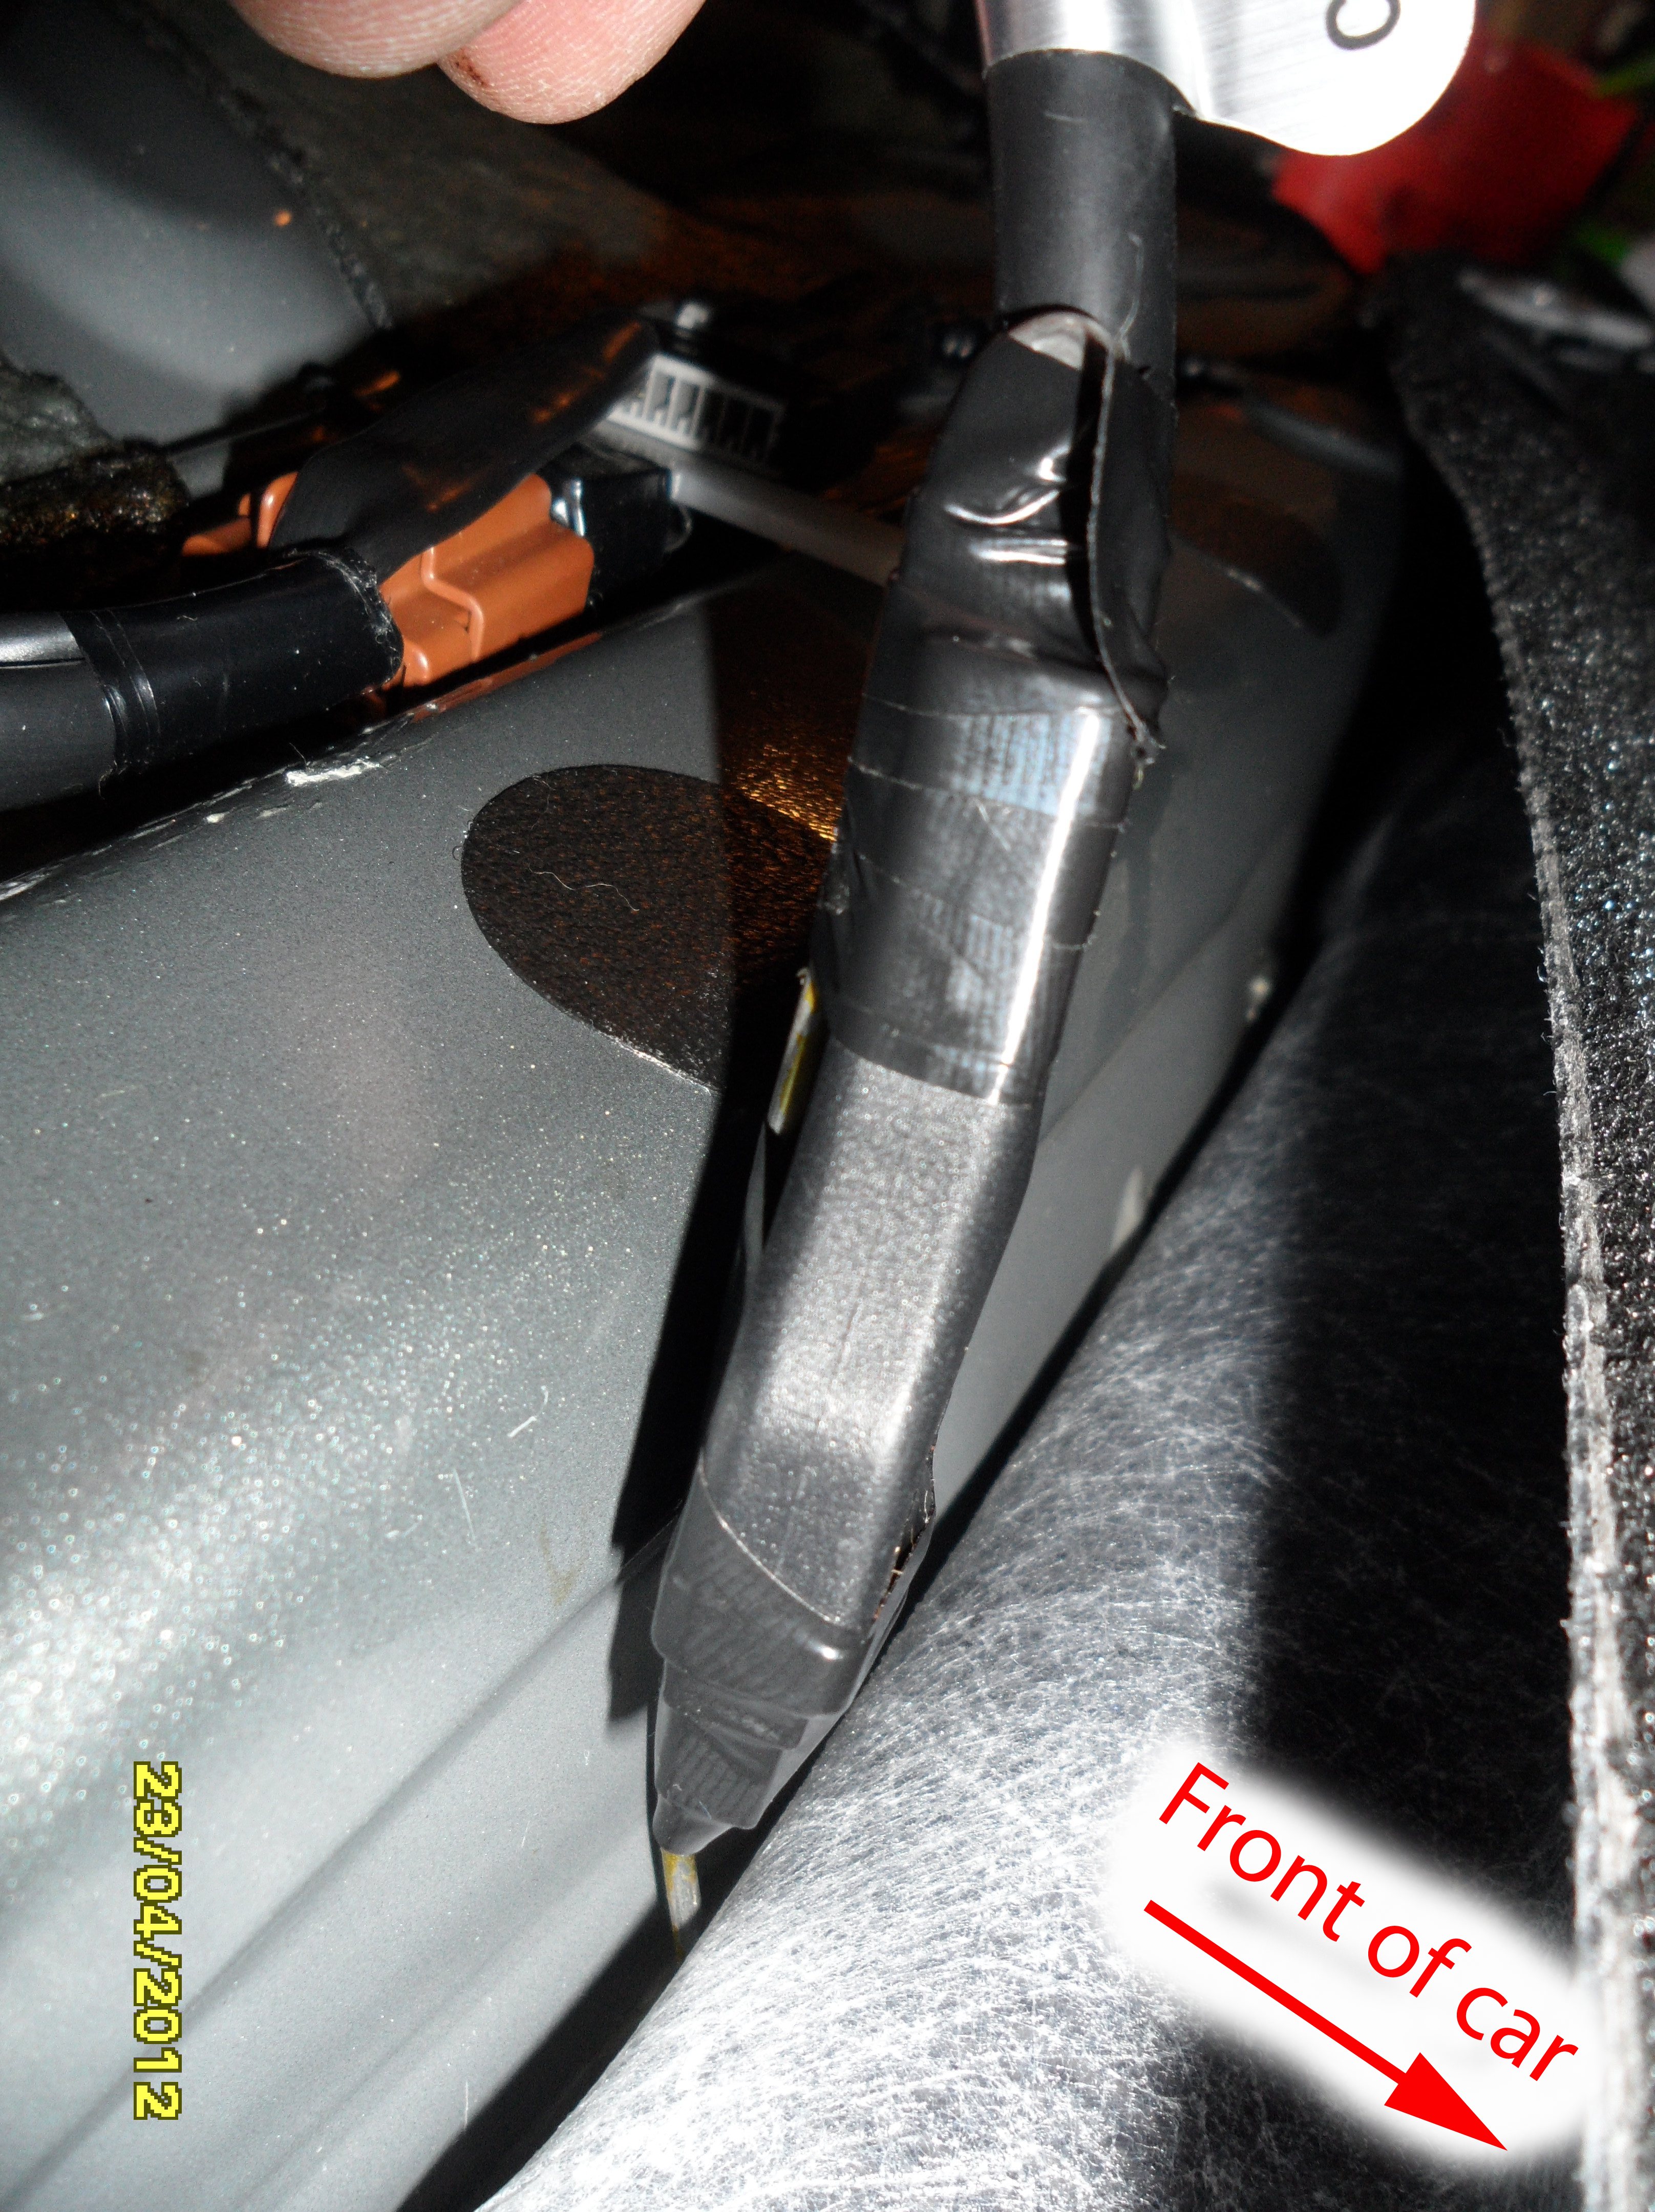
Working inside the car, you can see the trouble spots:


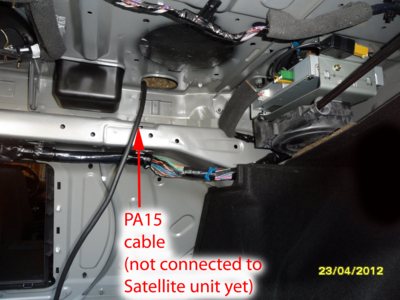
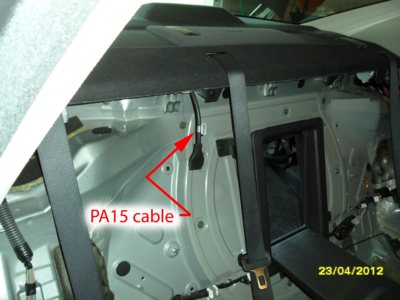
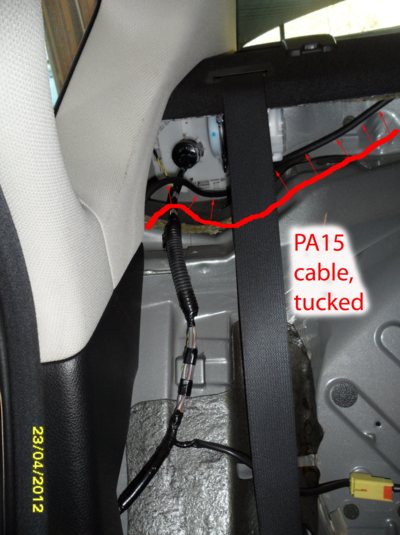
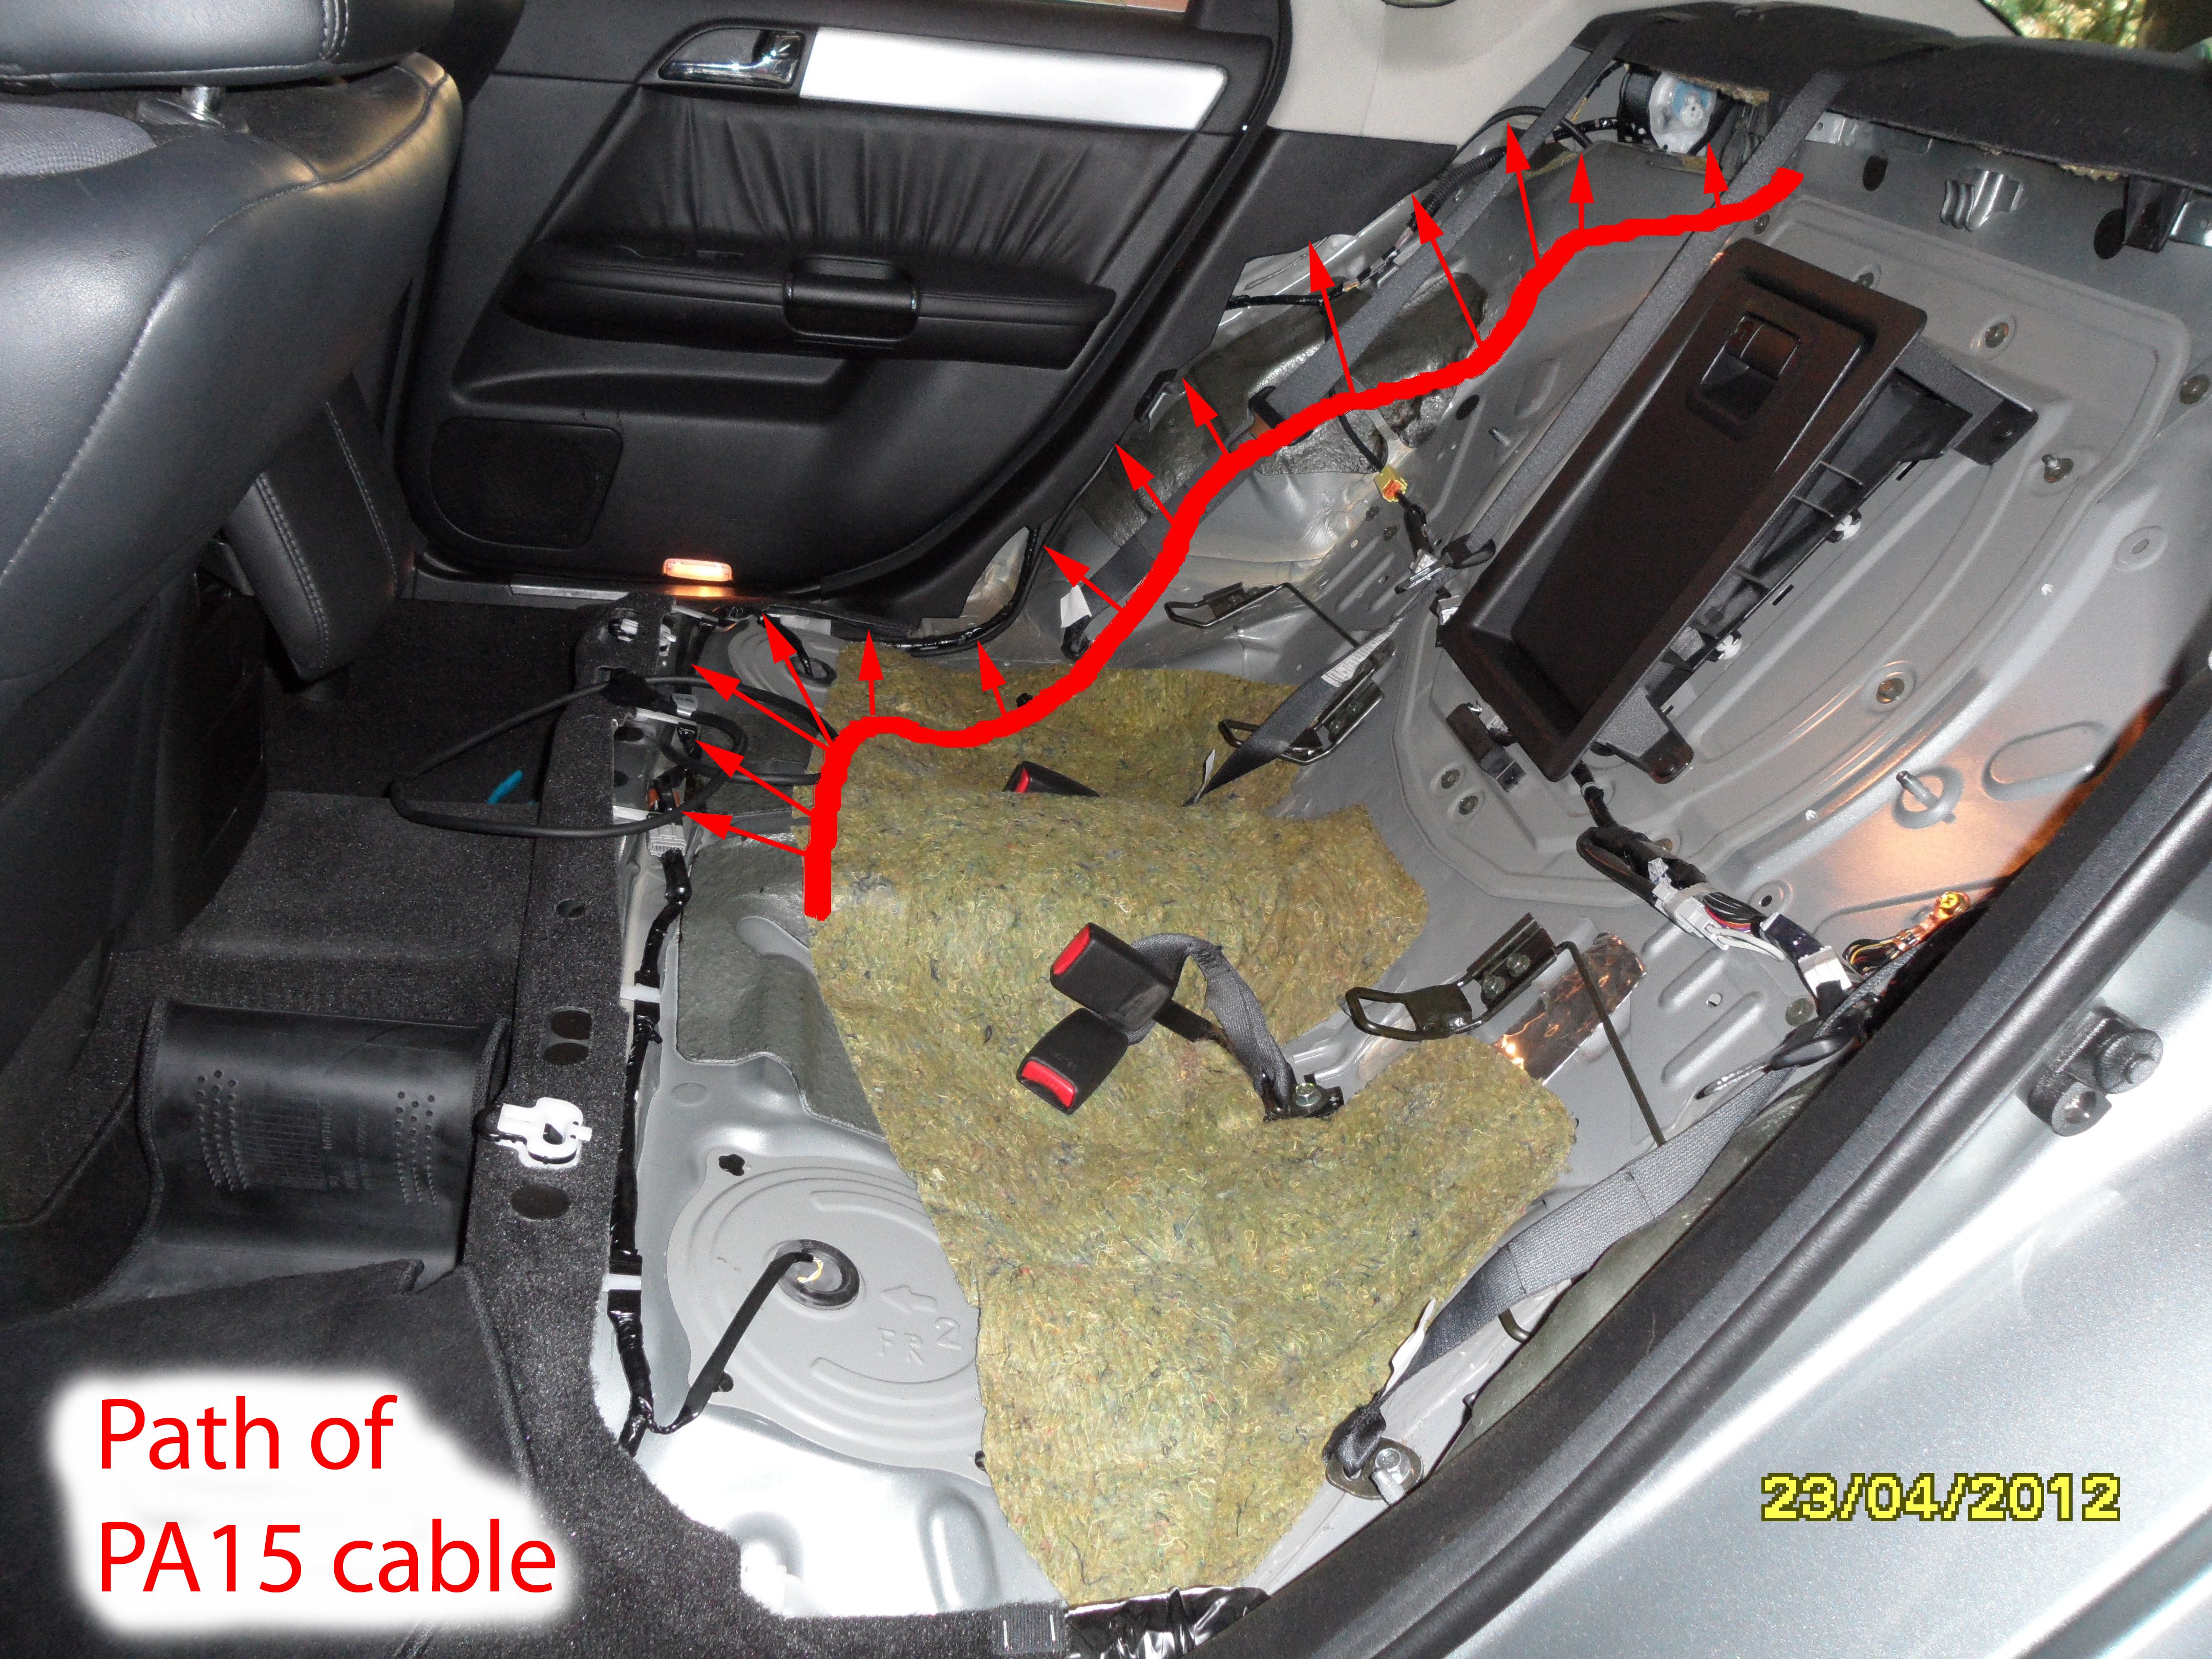
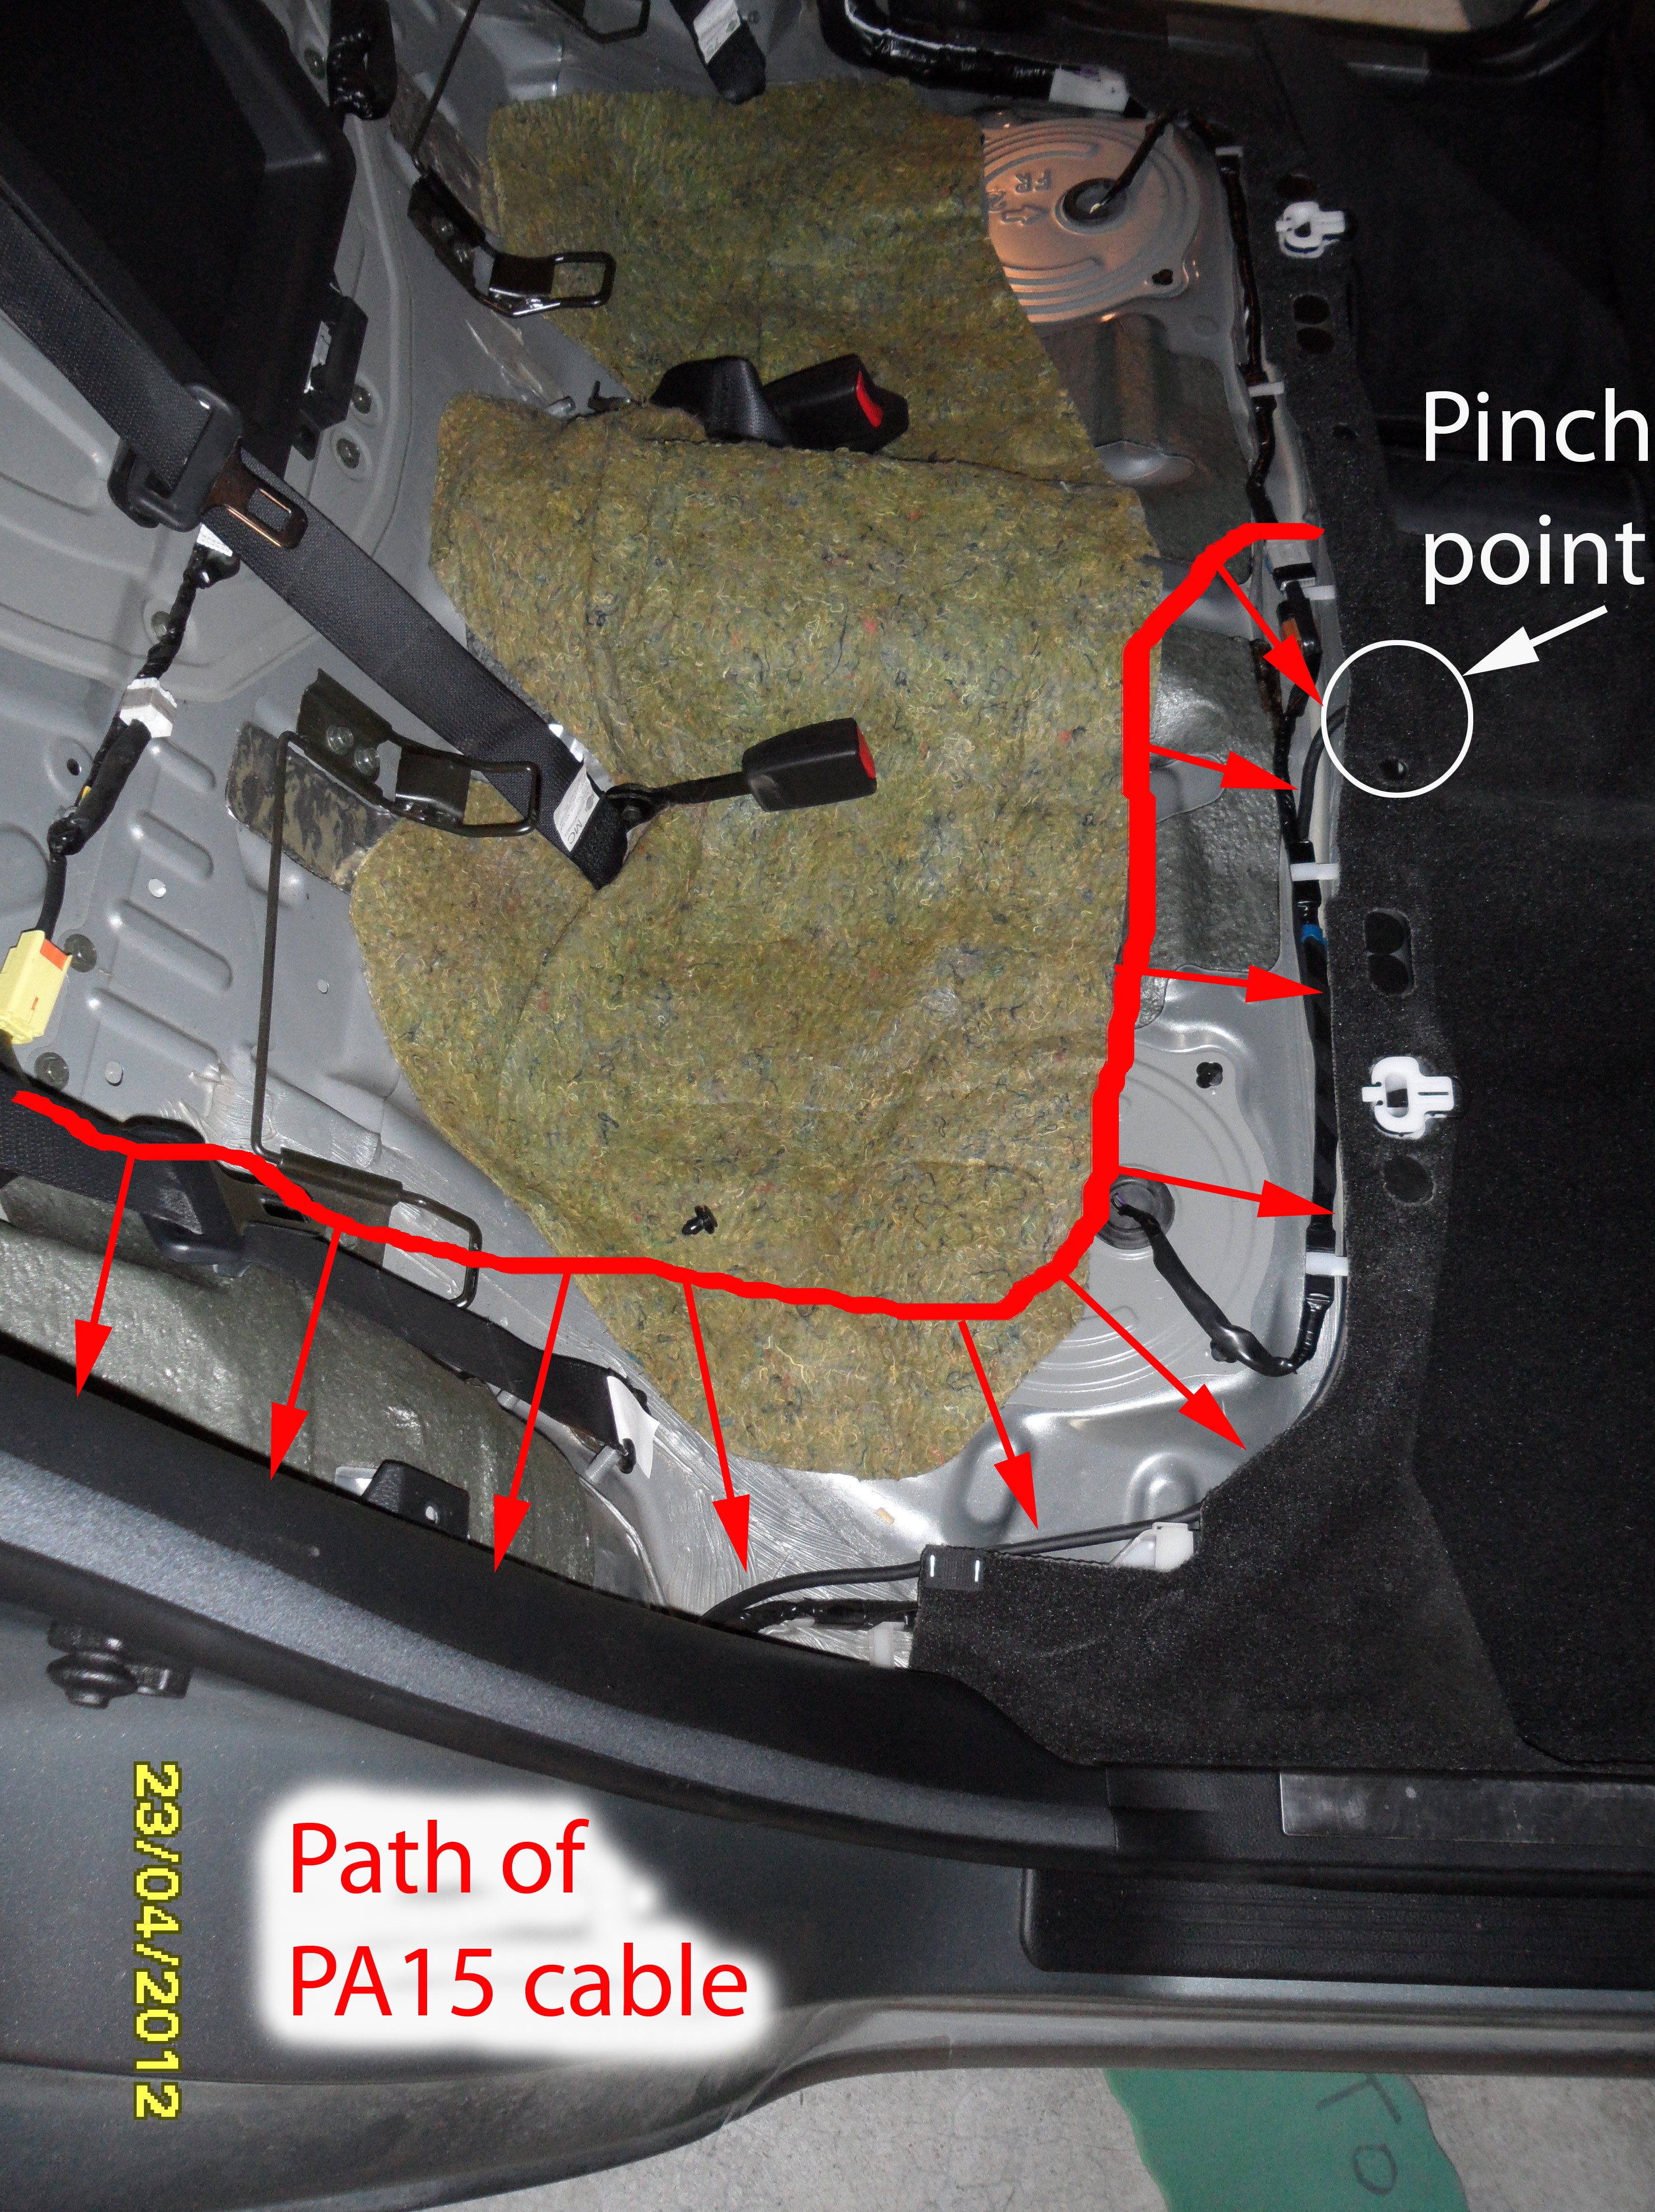
I routed the PA15 cable off to the passenger's side of the back seat, tucking it behind existing wiring harnesses and panels where possible. There's only one place where I feel that the cable could become pinched, and that's the transition from under the seat to under the carpet going forward. Not a place where there is typically a lot of weight on the forward edge of the seat.
(click on any image for larger)


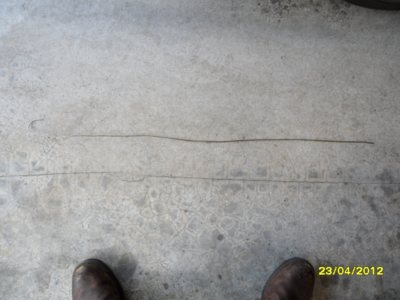
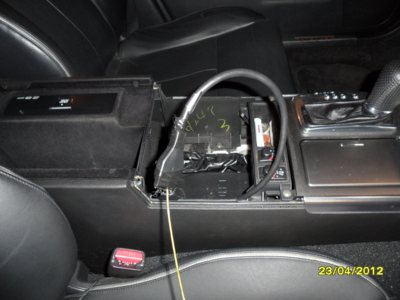
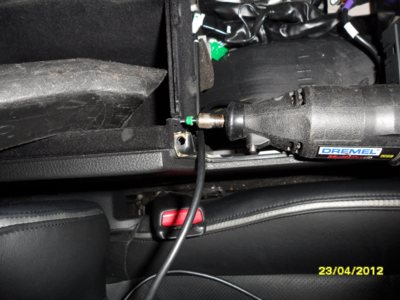
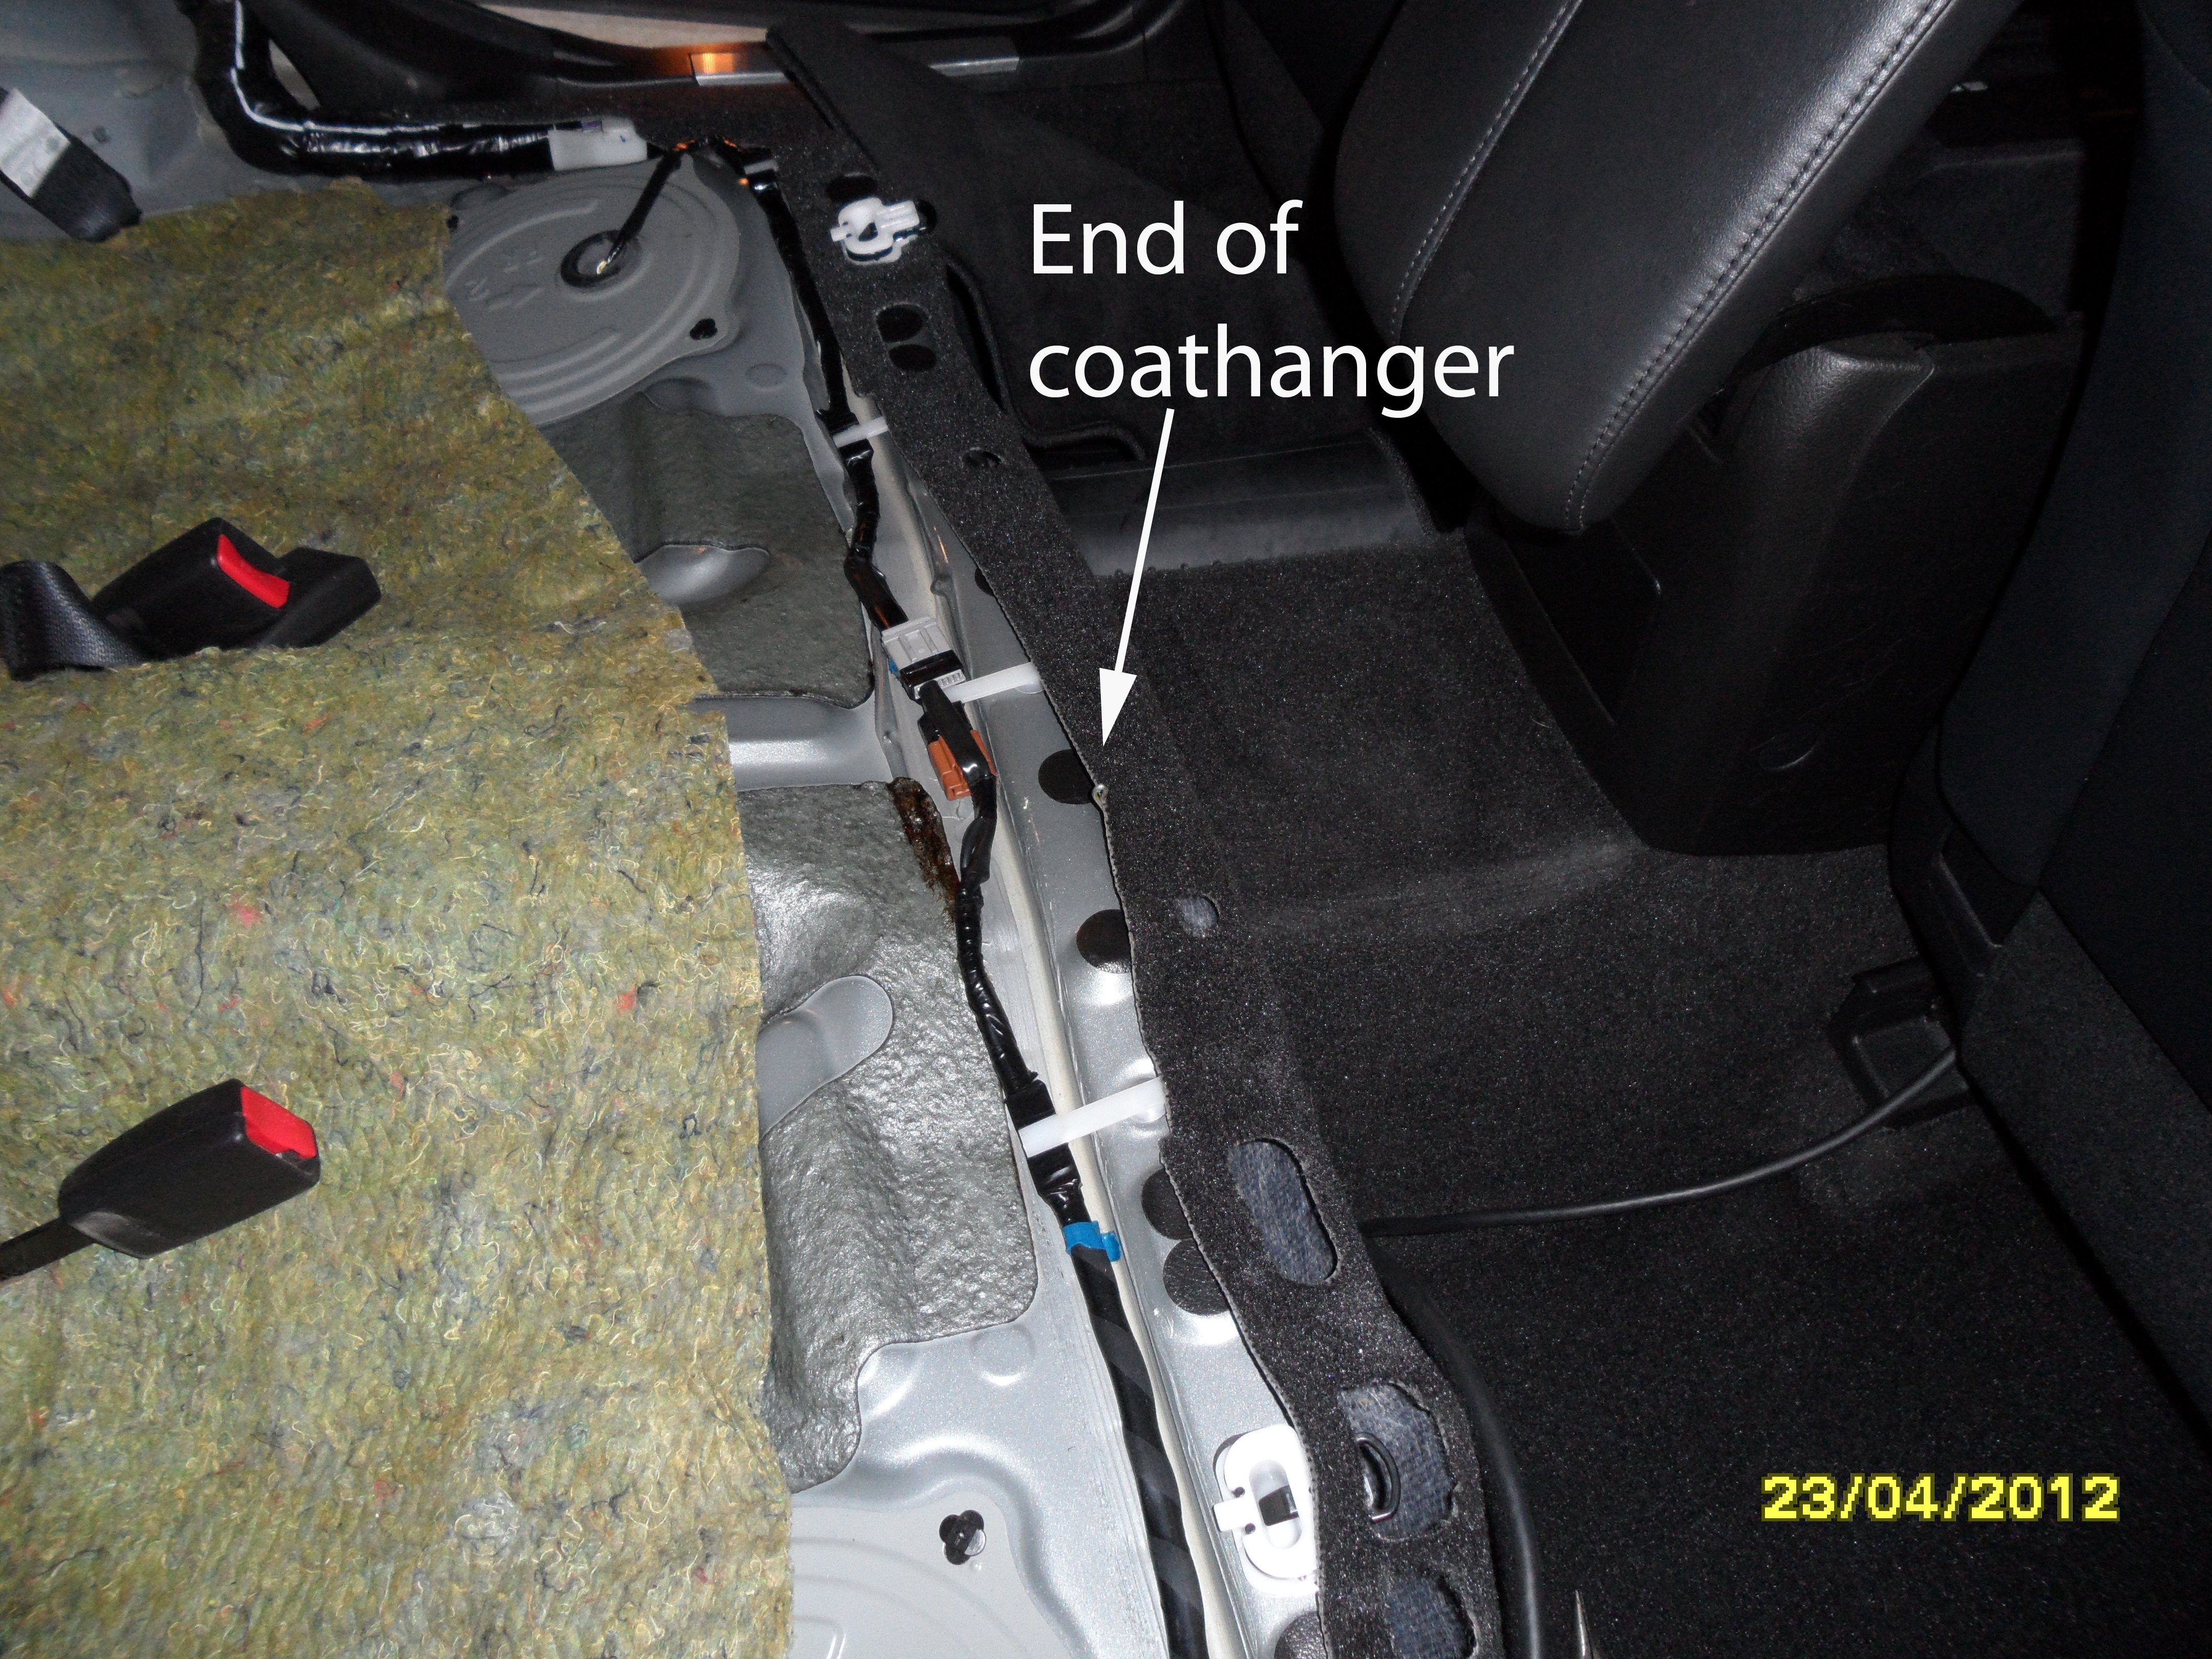
Next, snaking the PA15 cable to the console. Wire coathangers are handy all-purpose tools, aren't they? I straightened one out, bent a loop in one end so it wouldn't snag while pushing it toward the rear seat . . .

. . . then, I removed the cupholder and snaked the coathanger through the console and under the carpet, from the front.
Electrical tape joins the PA15 cable to the snake:

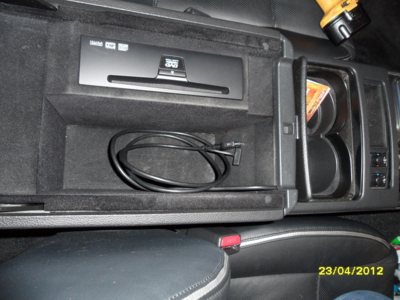
And just a bit of pulling and wiggling, the PA15 cable comes up.
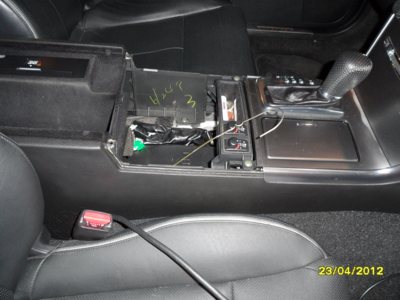
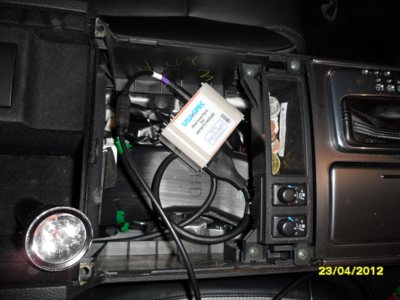
The interface box fits in here. Really.
If you need to change any of the four DIP switches, or if you're connecting a 3.5mm socket to the RCA sockets, now's the time to do it.
If you have the seat temp controls, you'll probably want to unscrew the panel and set it off to the side for this part.
Carefully guide & tuck the interface box to the left of the shifter.
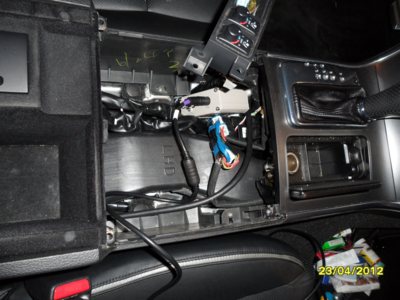
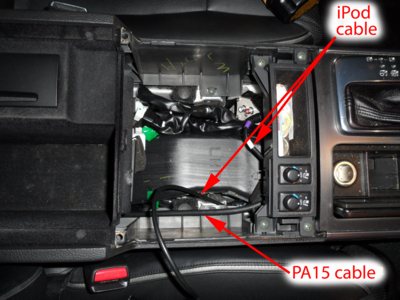
I keep the iPod cable here.
In order to do that, I Dremeled a slot for the iPod cable. I have a Shop-Vac nozzle to the left while cutting the slot, to keep the plastic chaff from going everywhere.

We use it with our iPhones, and it works great. The setup instructions to get the Presets set are . . . well, you have to read them repeatedly for it to make sense. We generally just use the controls on the iPhone instead, but we do have the Presets set too.
It took me around 1.5-2 hours to install, including unloading/reloading the trunk & taking the pics. It took twice that long to make this post! There was about 2' of extra PA15 cable that I nylon-tied into a nice circle and fastened above the Satellite Radio unit.
First, the instructions for this thing aren't good. The unit seems well-made, and the sound is fantastic, but the instructions are not going to lead you step-by-step. They are not only poorly written, they're poorly Xeroxed! Fortunately, the instructions seem to be the only part of the package that lacks quality. Here's a link to the PA15-INFI manual (PDF) (mirror link).
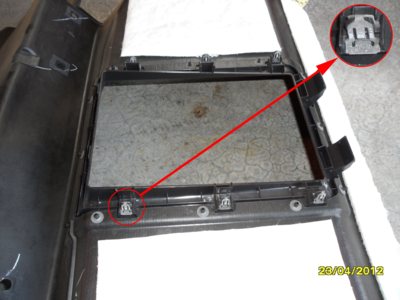
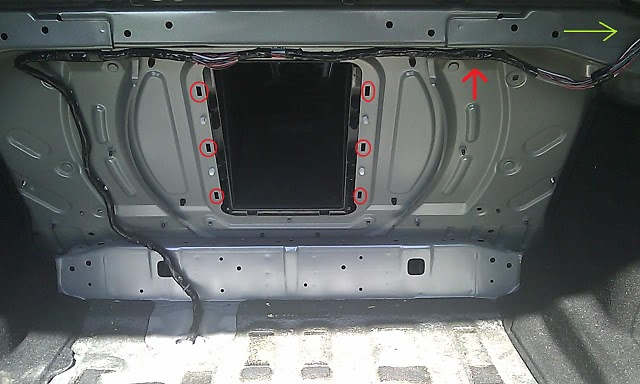
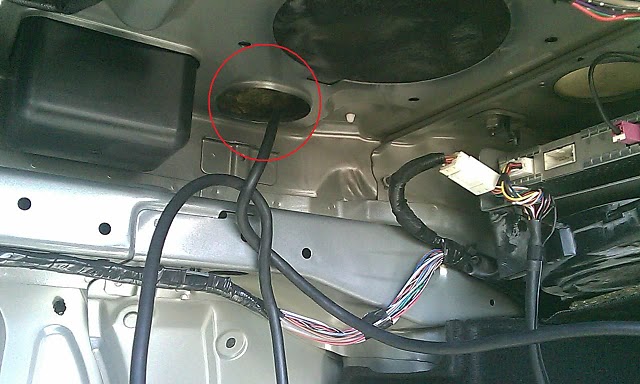
In our car, those took quite a bit of force to dislodge. First, here's the trunk upper lining out of the car, for reference.ellis wrote:I first removed all the push rivets in the trunk but to get the pass-thru fasteners to come out I had to get on the back seat and gently push them free one by one. They go into these slots where the red circles are: (green arrow is where the xm unit is located and the red arrow is where I snaked the cable through)
(click on any image for larger)

ellis wrote:I did have to take out the back seat. There’s two pull tab/rings. Sit in the back seat and put your hand between your legs. Feel around where the seat meets the carpet – that’s about about where the tabs are. Be sure to not pull hard on these, as they are not designed very well. I grabbed the ring with one hand and the seat bottom with the other and jiggled them both until the seat came loose. After you get the seat bottom out there are four nuts you have to unscrew then just lift the backrest out. The backrest hangs on some L-brackets so you literally have to lift the setback up and then out.
Excellent description, and I'm glad you warned me about the plastic pull tabs that release the front edge of the seat being fragile.
To remove the upper trunk liner, first remove all the push-pin retainers, disconnect the trunk light harness connector from its light socket. The liner won't come out due to the six steel push clips on the pass-through trim on the trunk side.
Working inside the car, you can see the trouble spots:
I didn't have any trouble, didn't need to press the lock tab with a tool, but you can't see it, it's all Braille.ellis wrote:Here’s the XM Y-harness. I unplugged it by myself. It would be easier with a friend to pull the plug out while you hold the unlock down on the plug with a little screw driver.
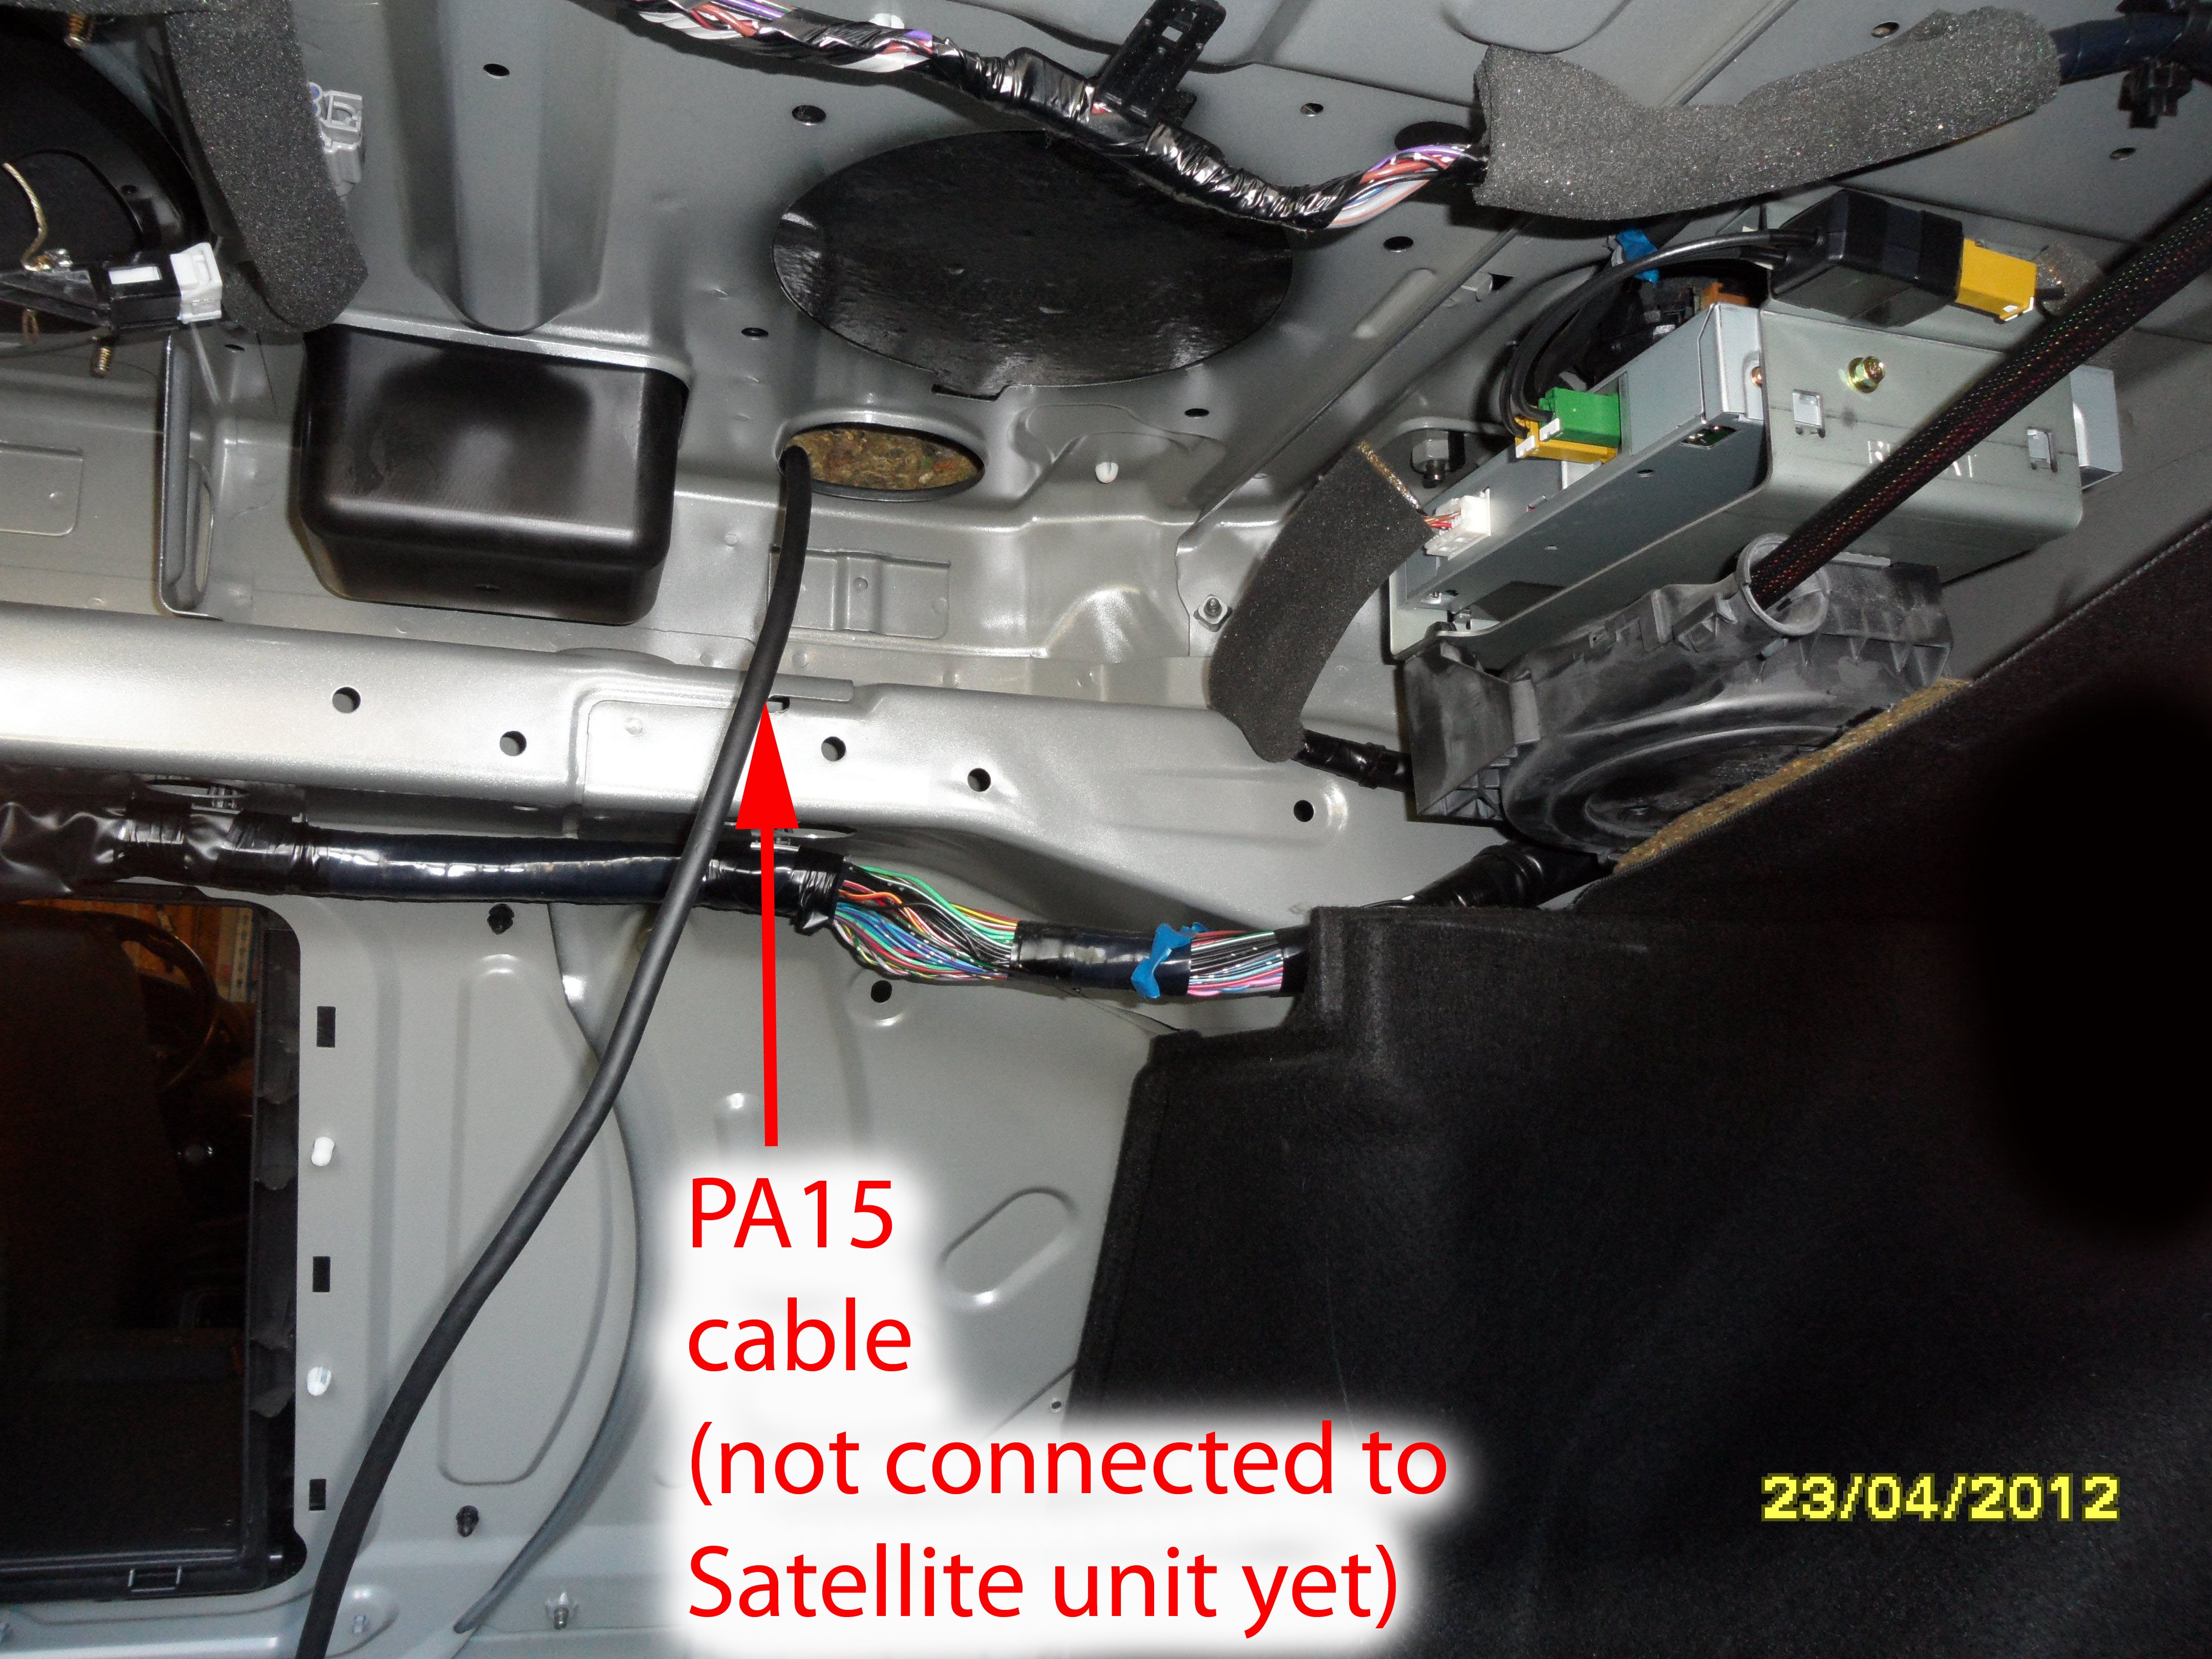
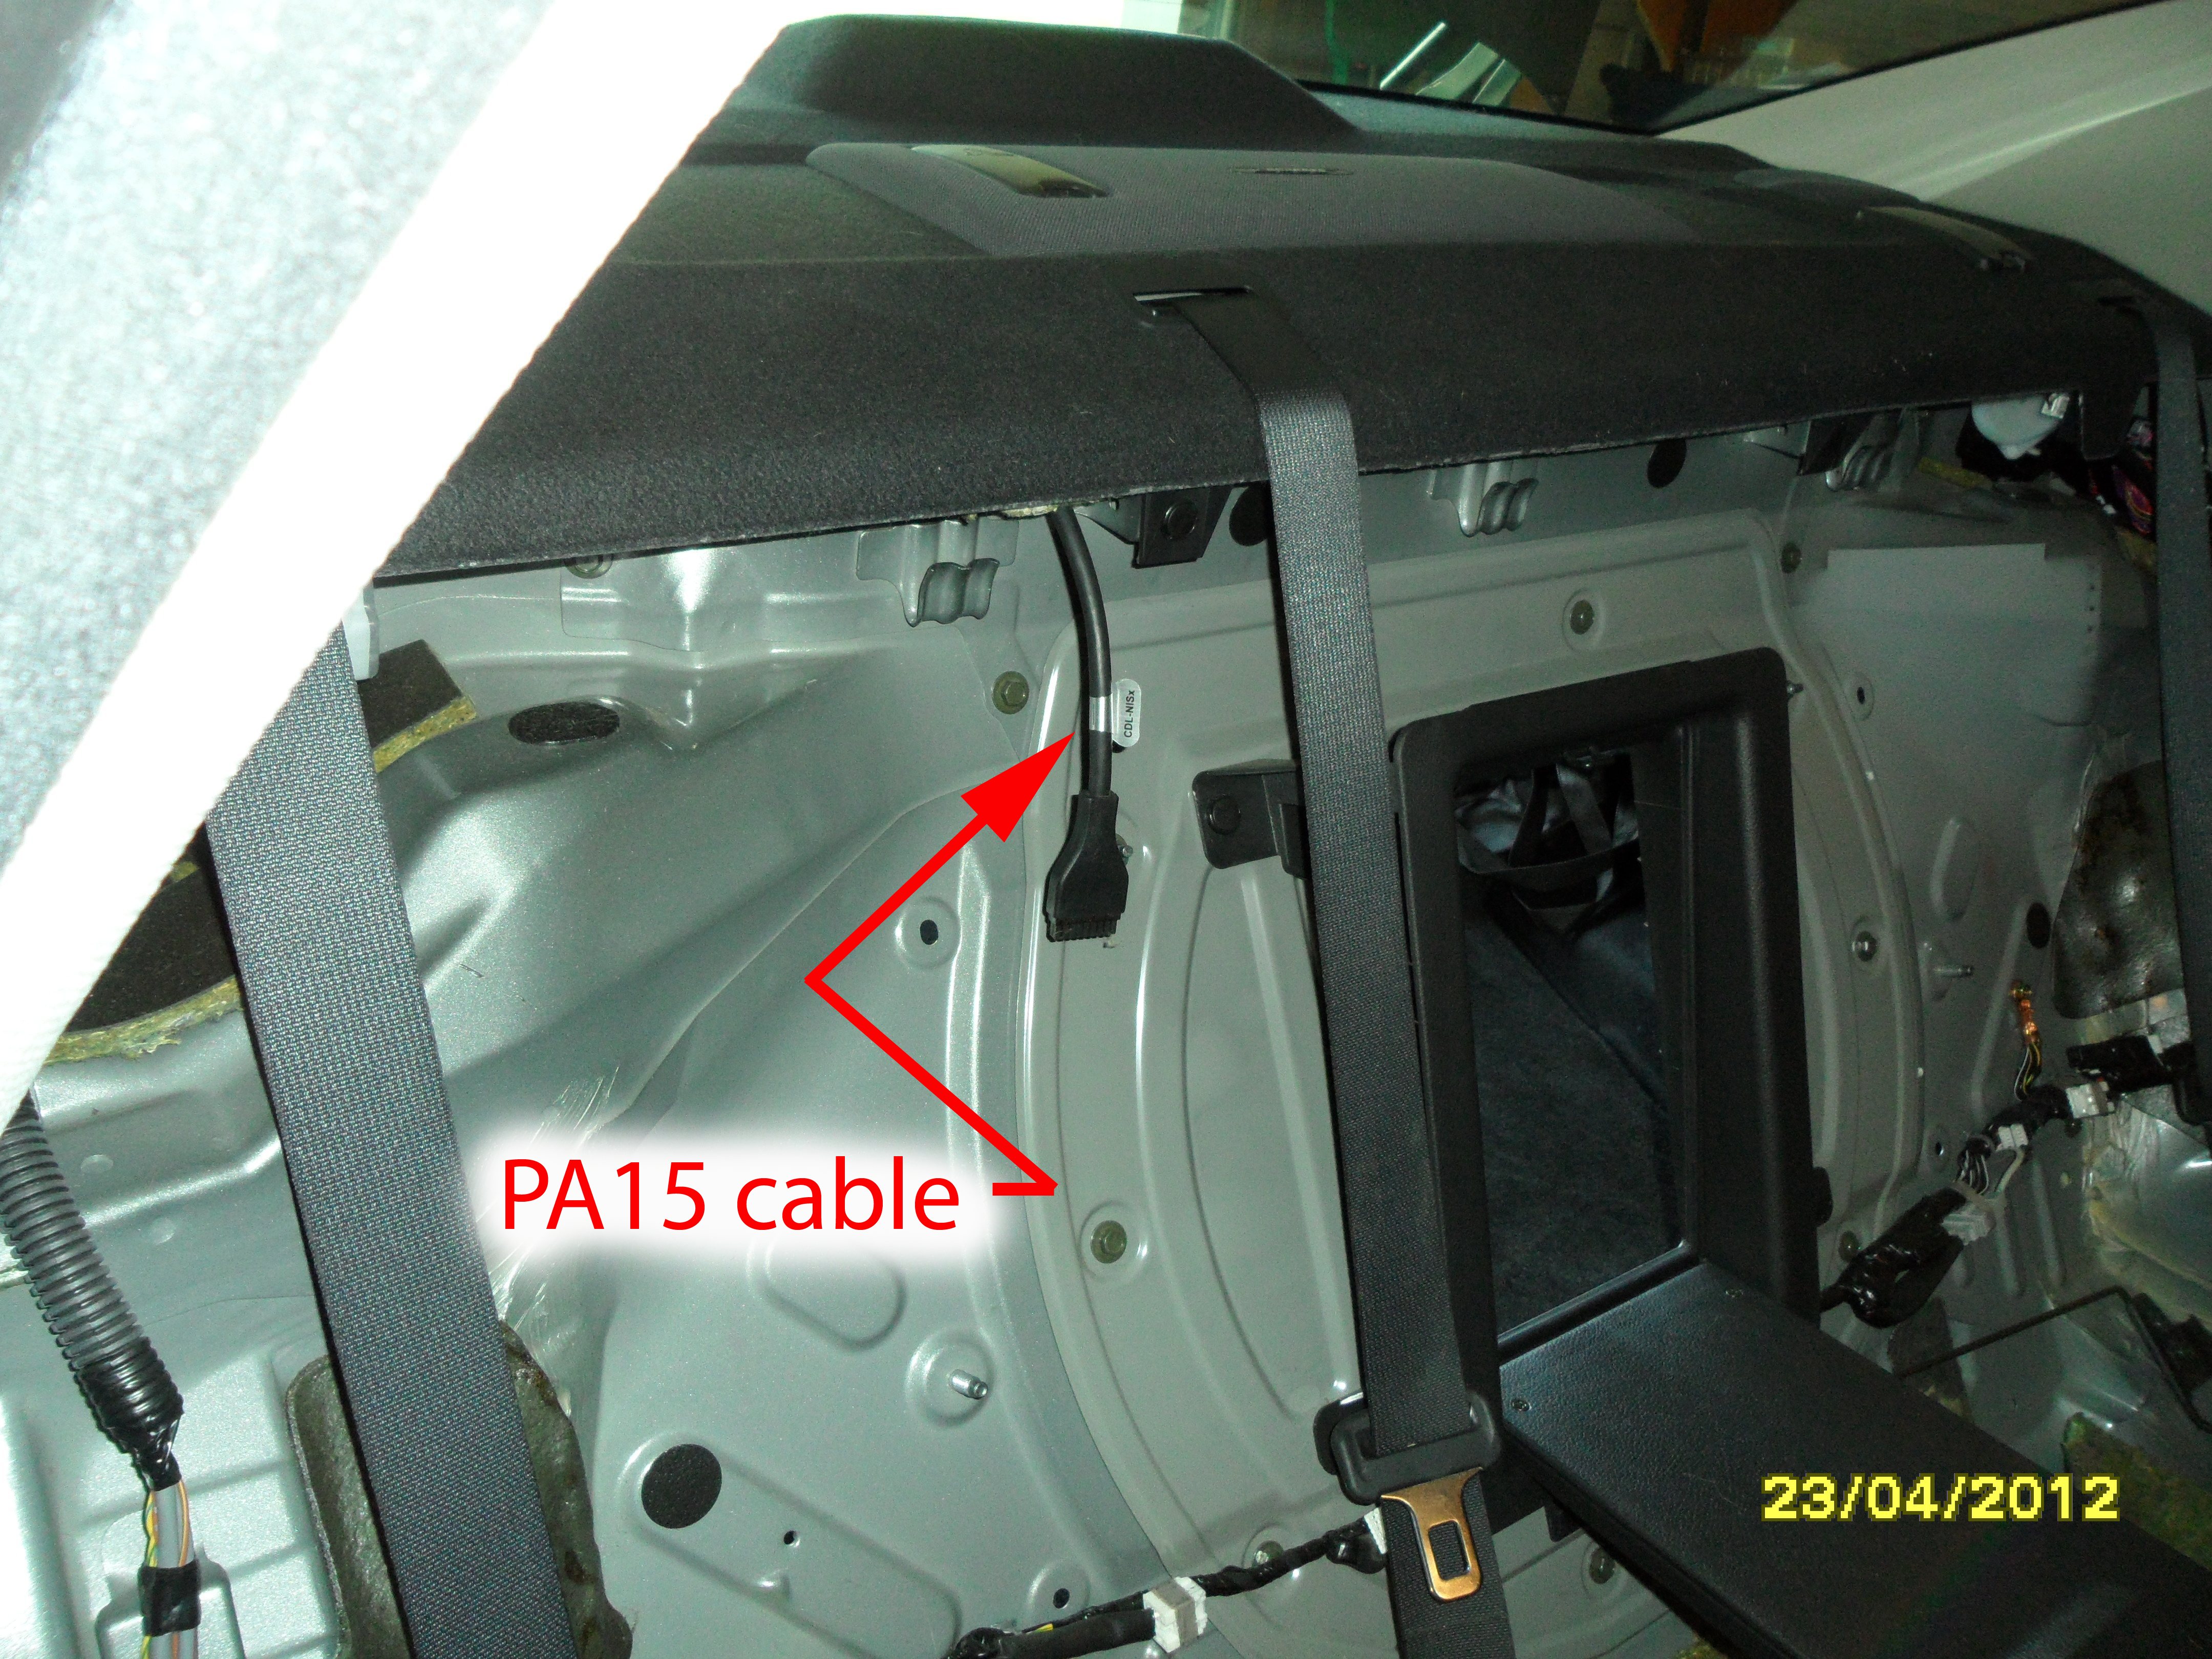
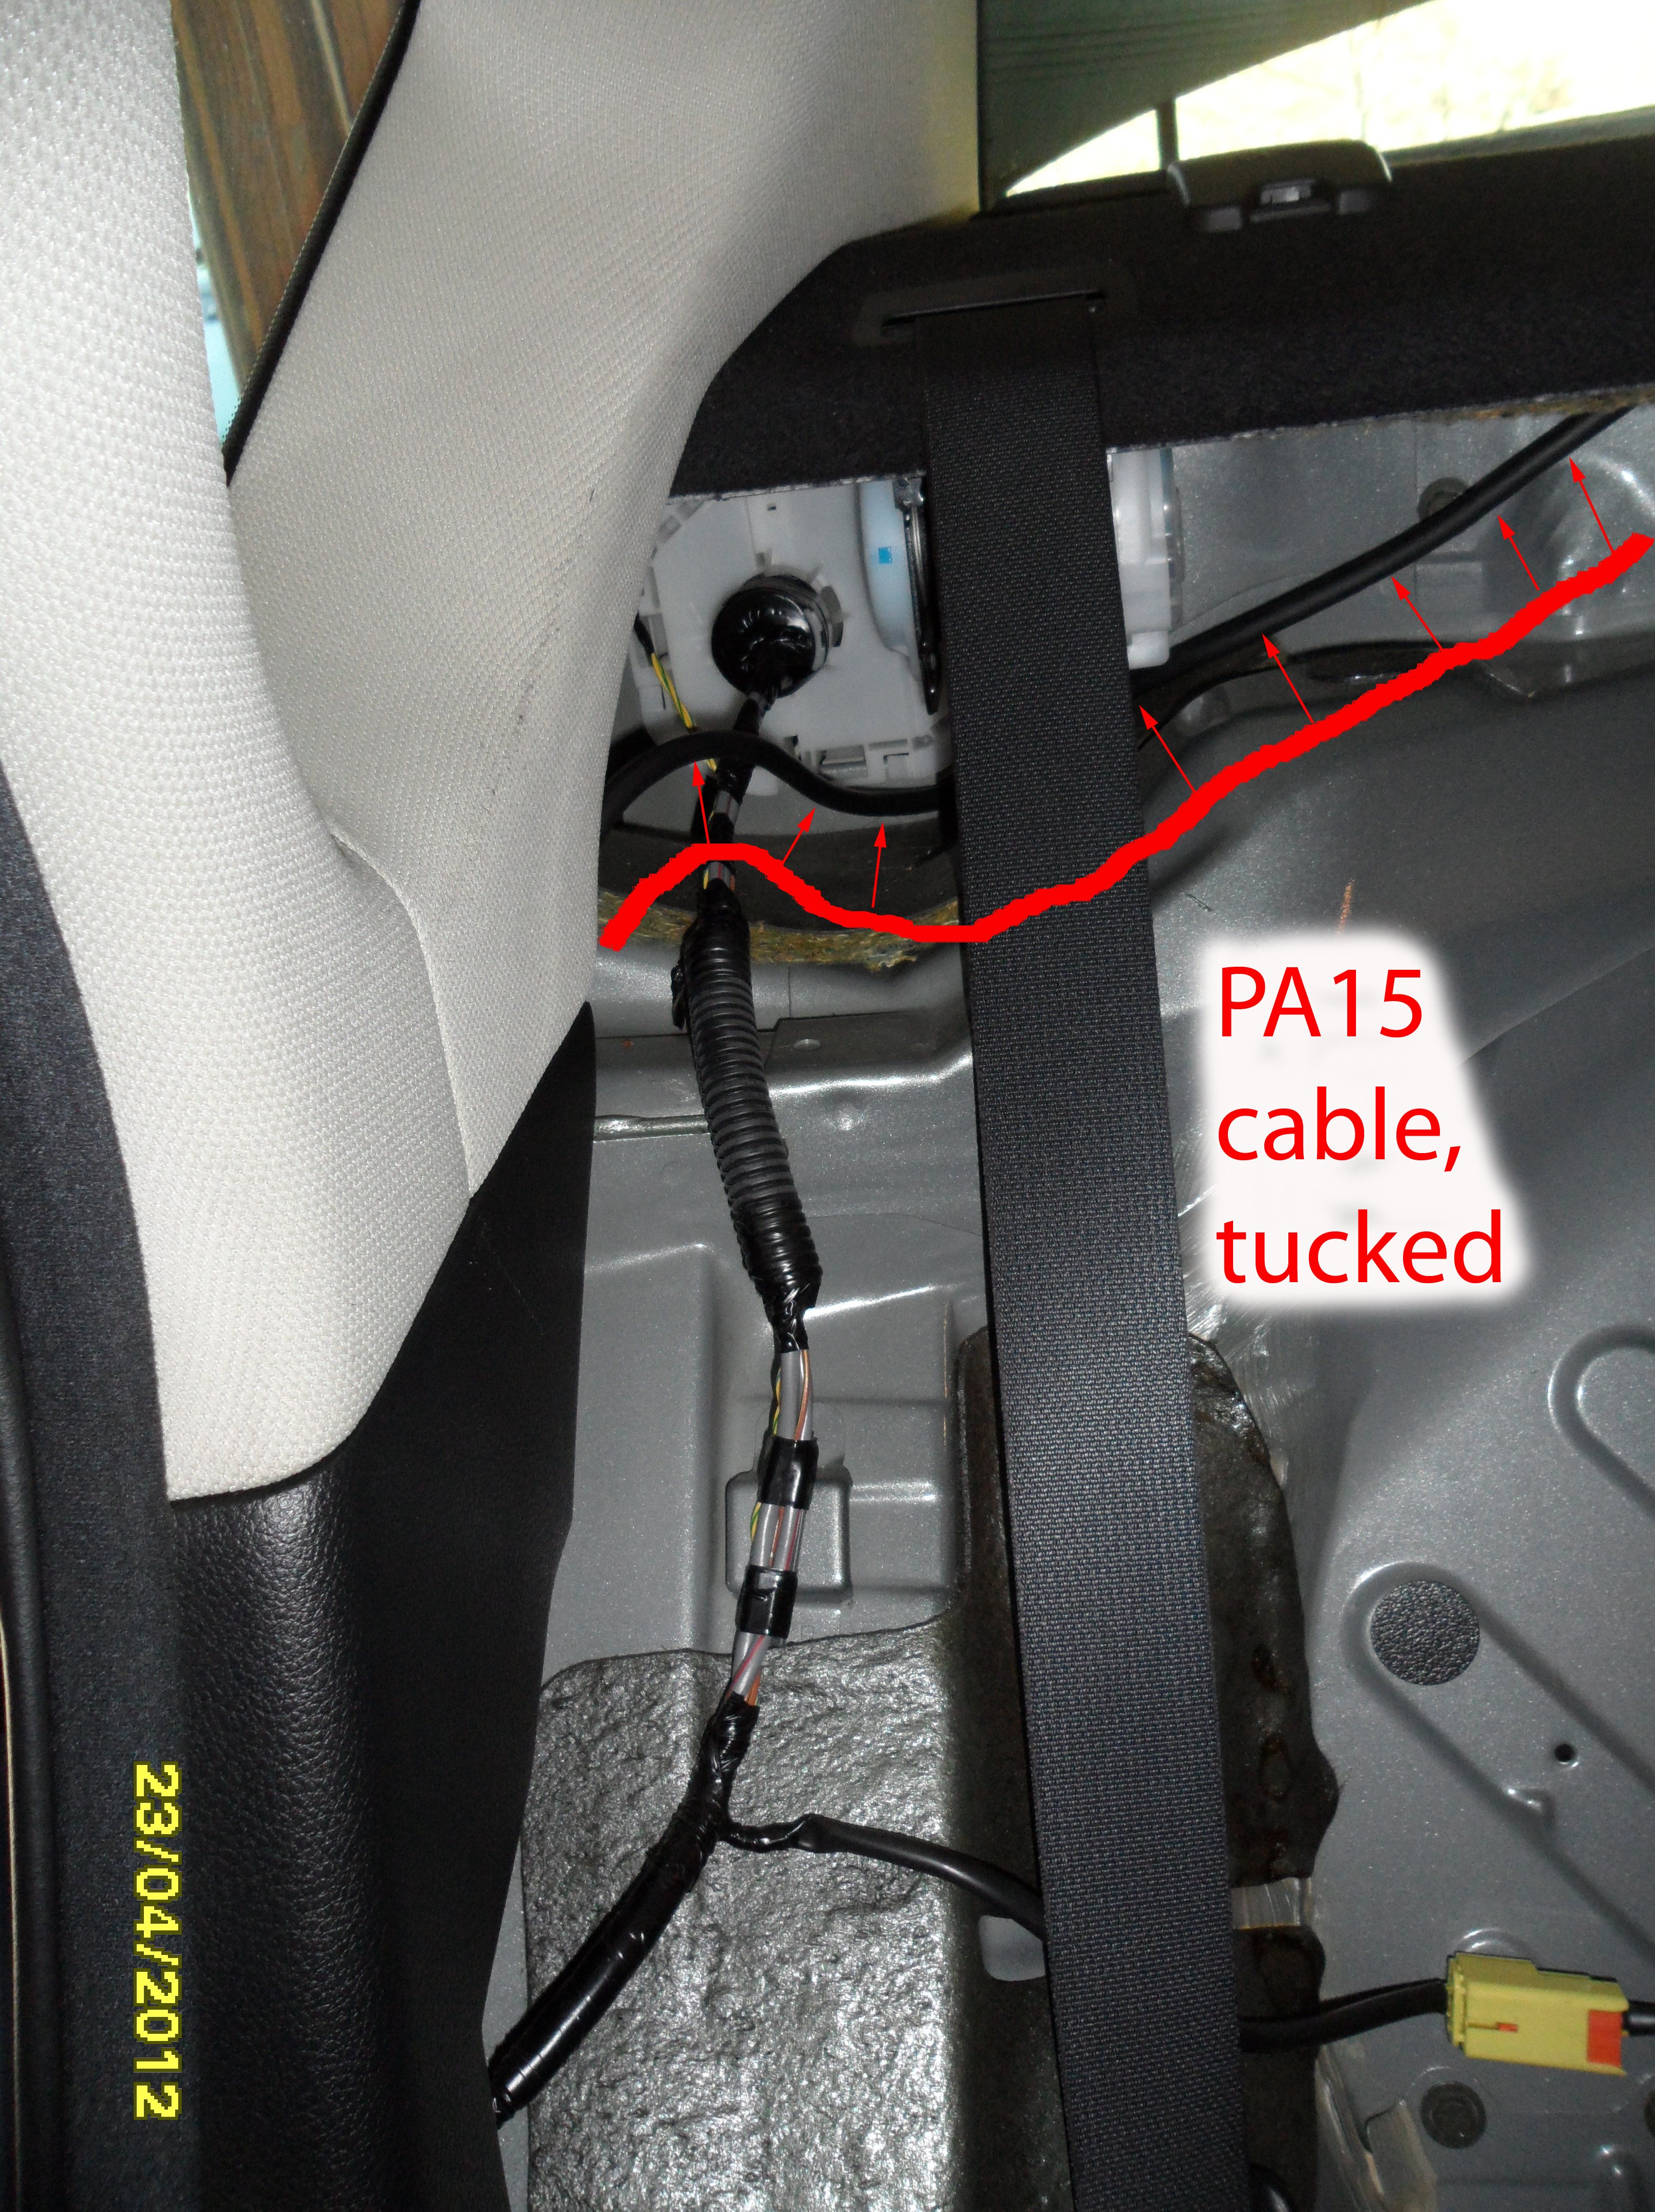
I routed the PA15 cable off to the passenger's side of the back seat, tucking it behind existing wiring harnesses and panels where possible. There's only one place where I feel that the cable could become pinched, and that's the transition from under the seat to under the carpet going forward. Not a place where there is typically a lot of weight on the forward edge of the seat.
(click on any image for larger)
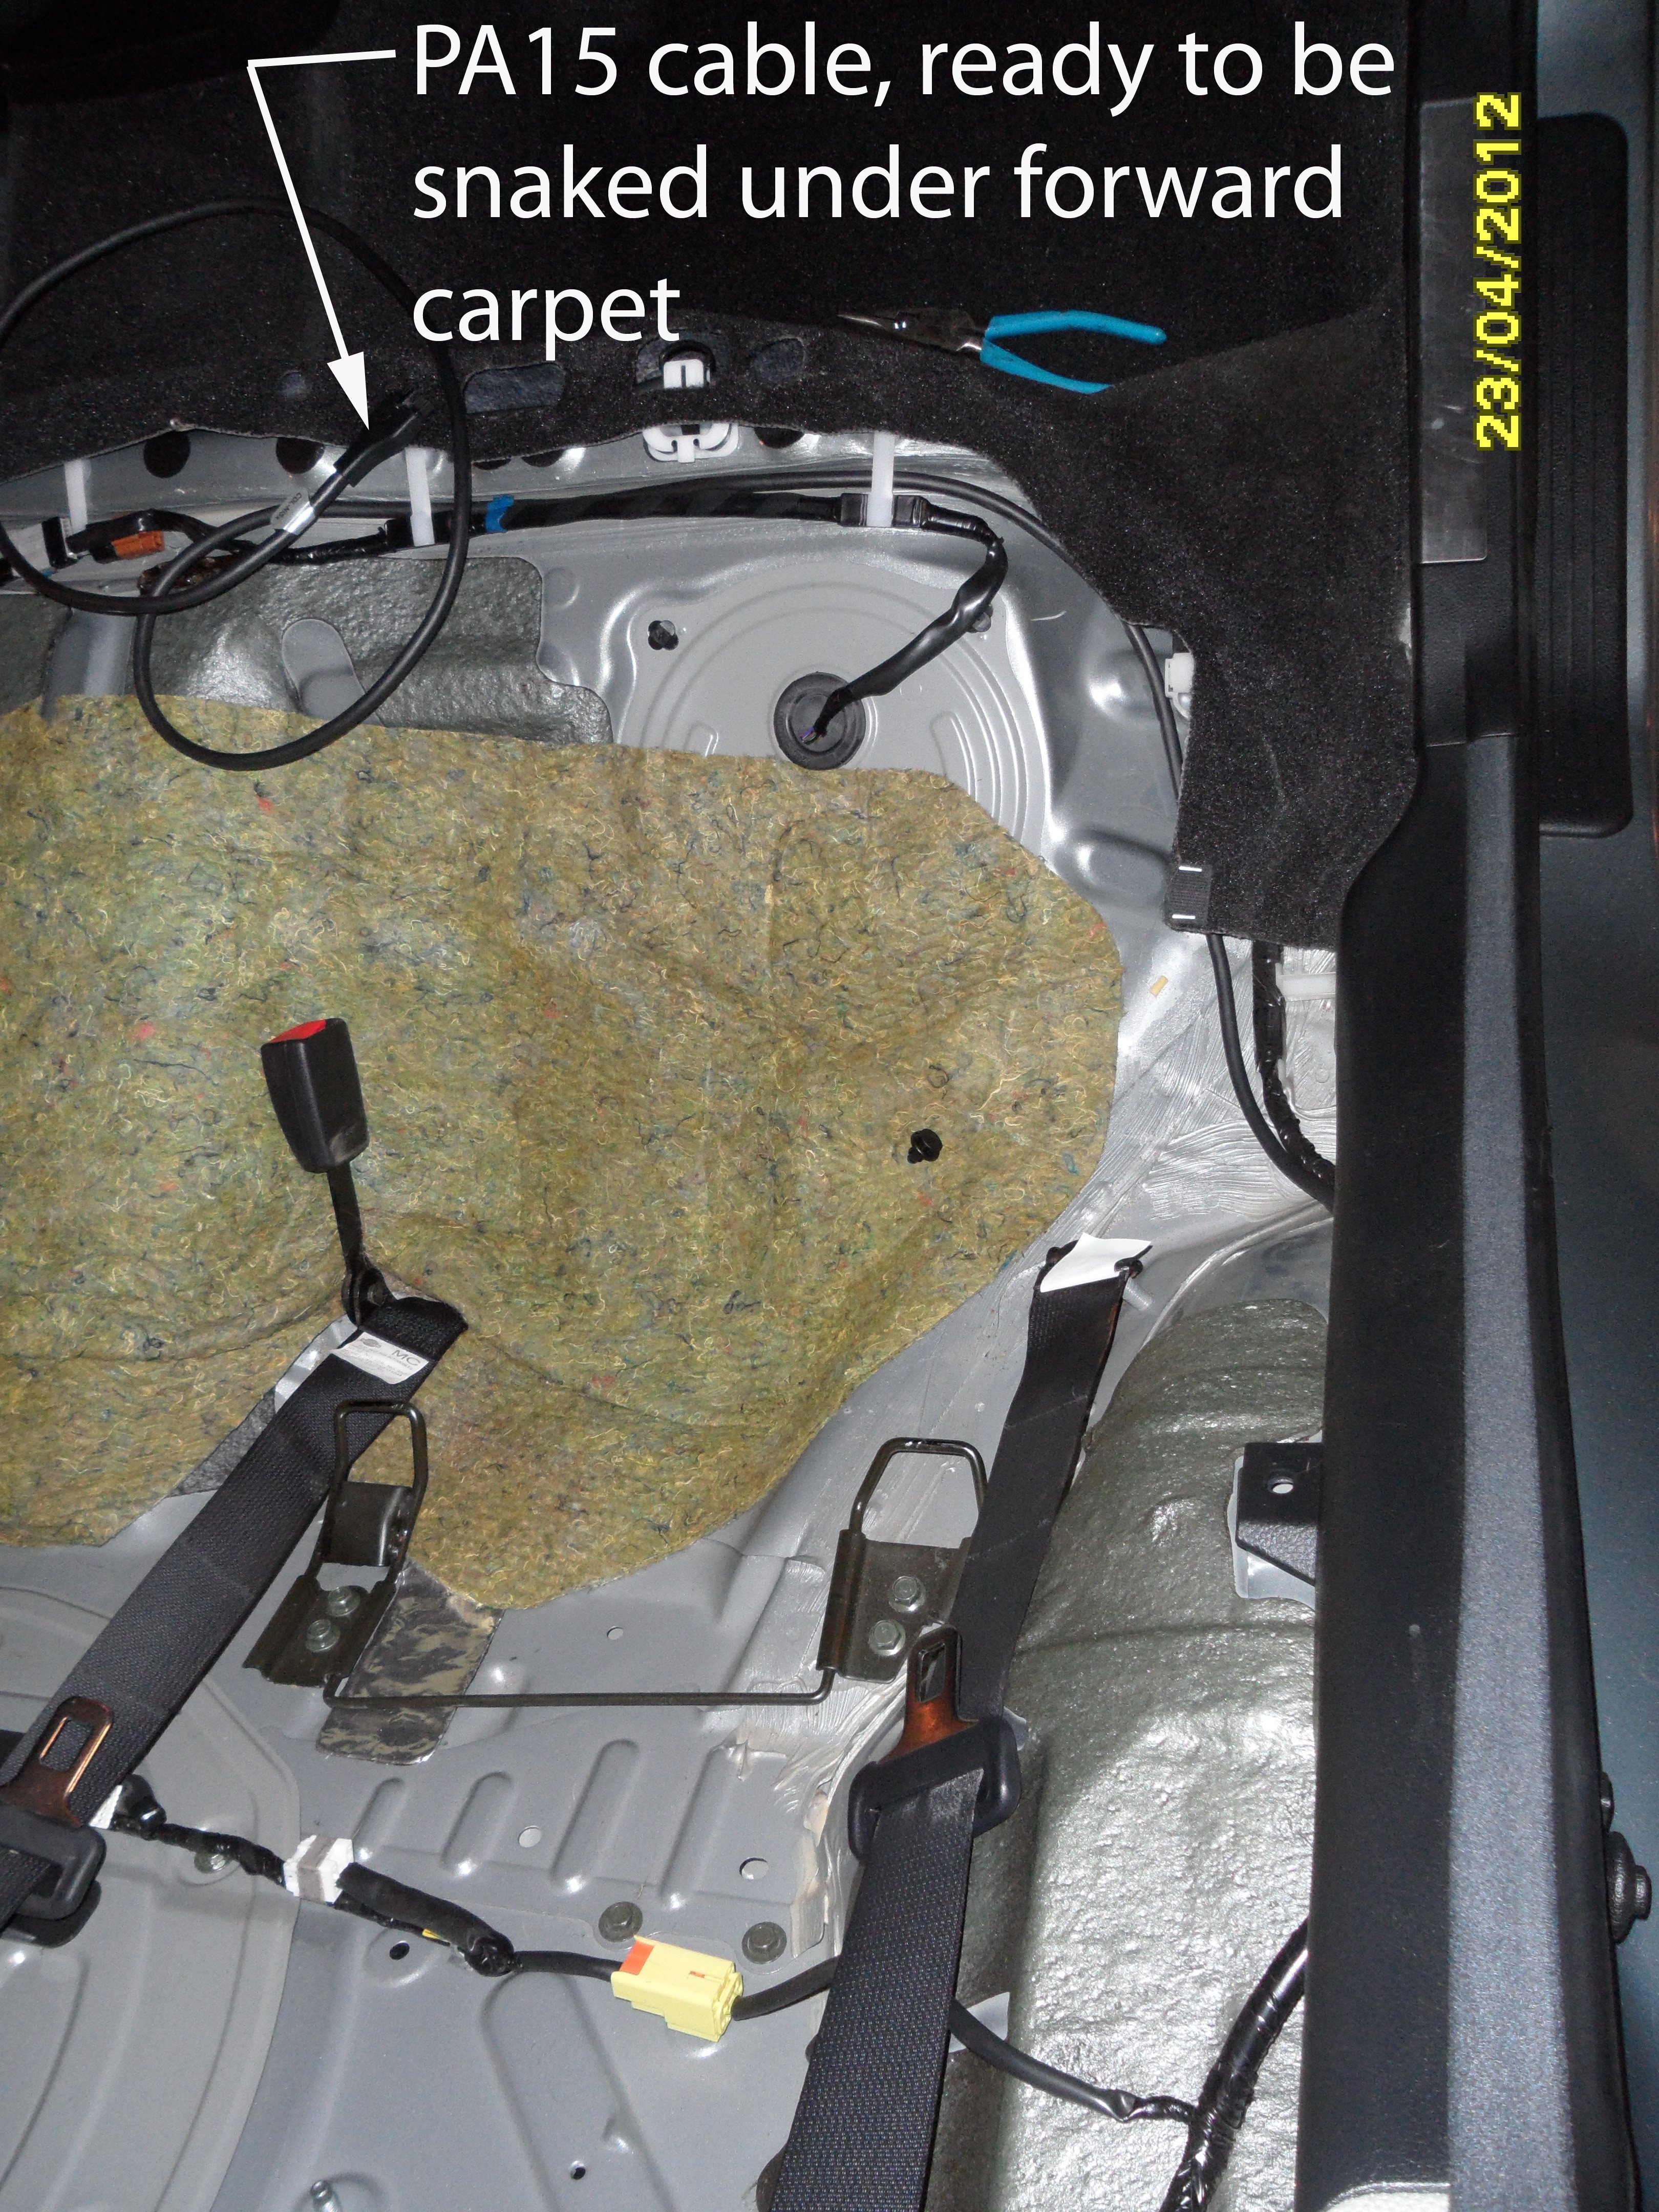
Next, snaking the PA15 cable to the console. Wire coathangers are handy all-purpose tools, aren't they? I straightened one out, bent a loop in one end so it wouldn't snag while pushing it toward the rear seat . . .


. . . then, I removed the cupholder and snaked the coathanger through the console and under the carpet, from the front.

Electrical tape joins the PA15 cable to the snake:
And just a bit of pulling and wiggling, the PA15 cable comes up.
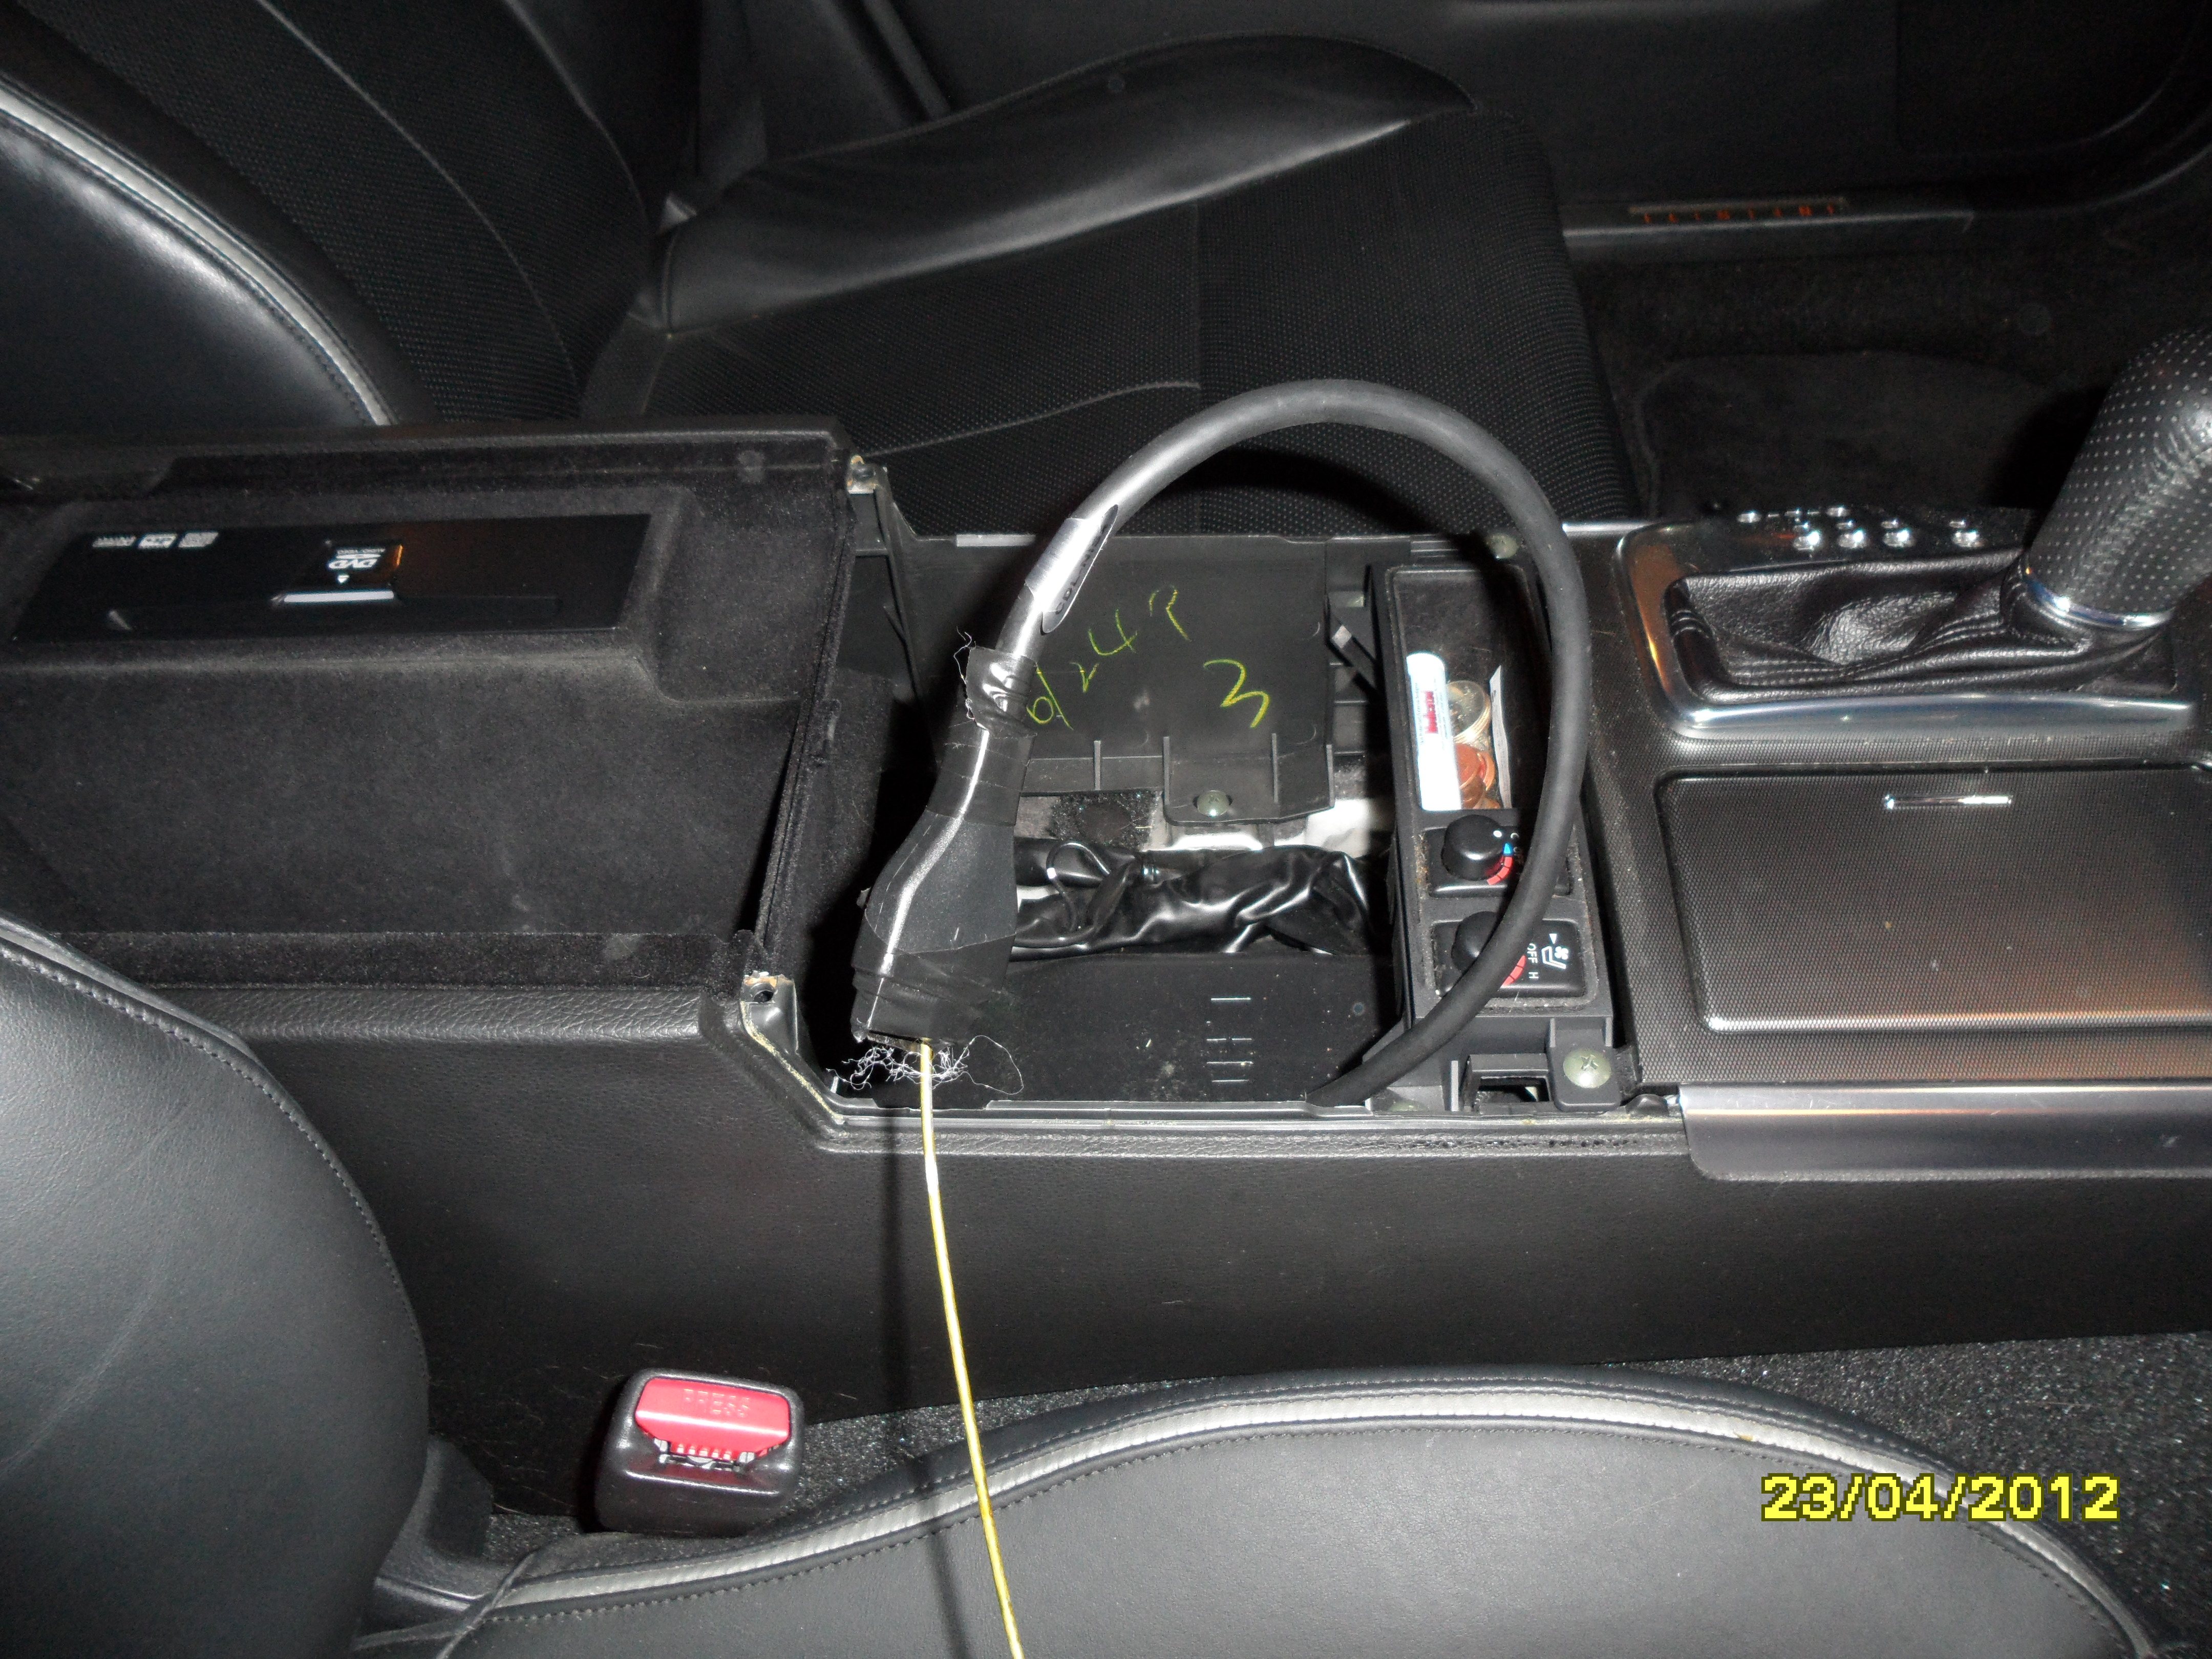
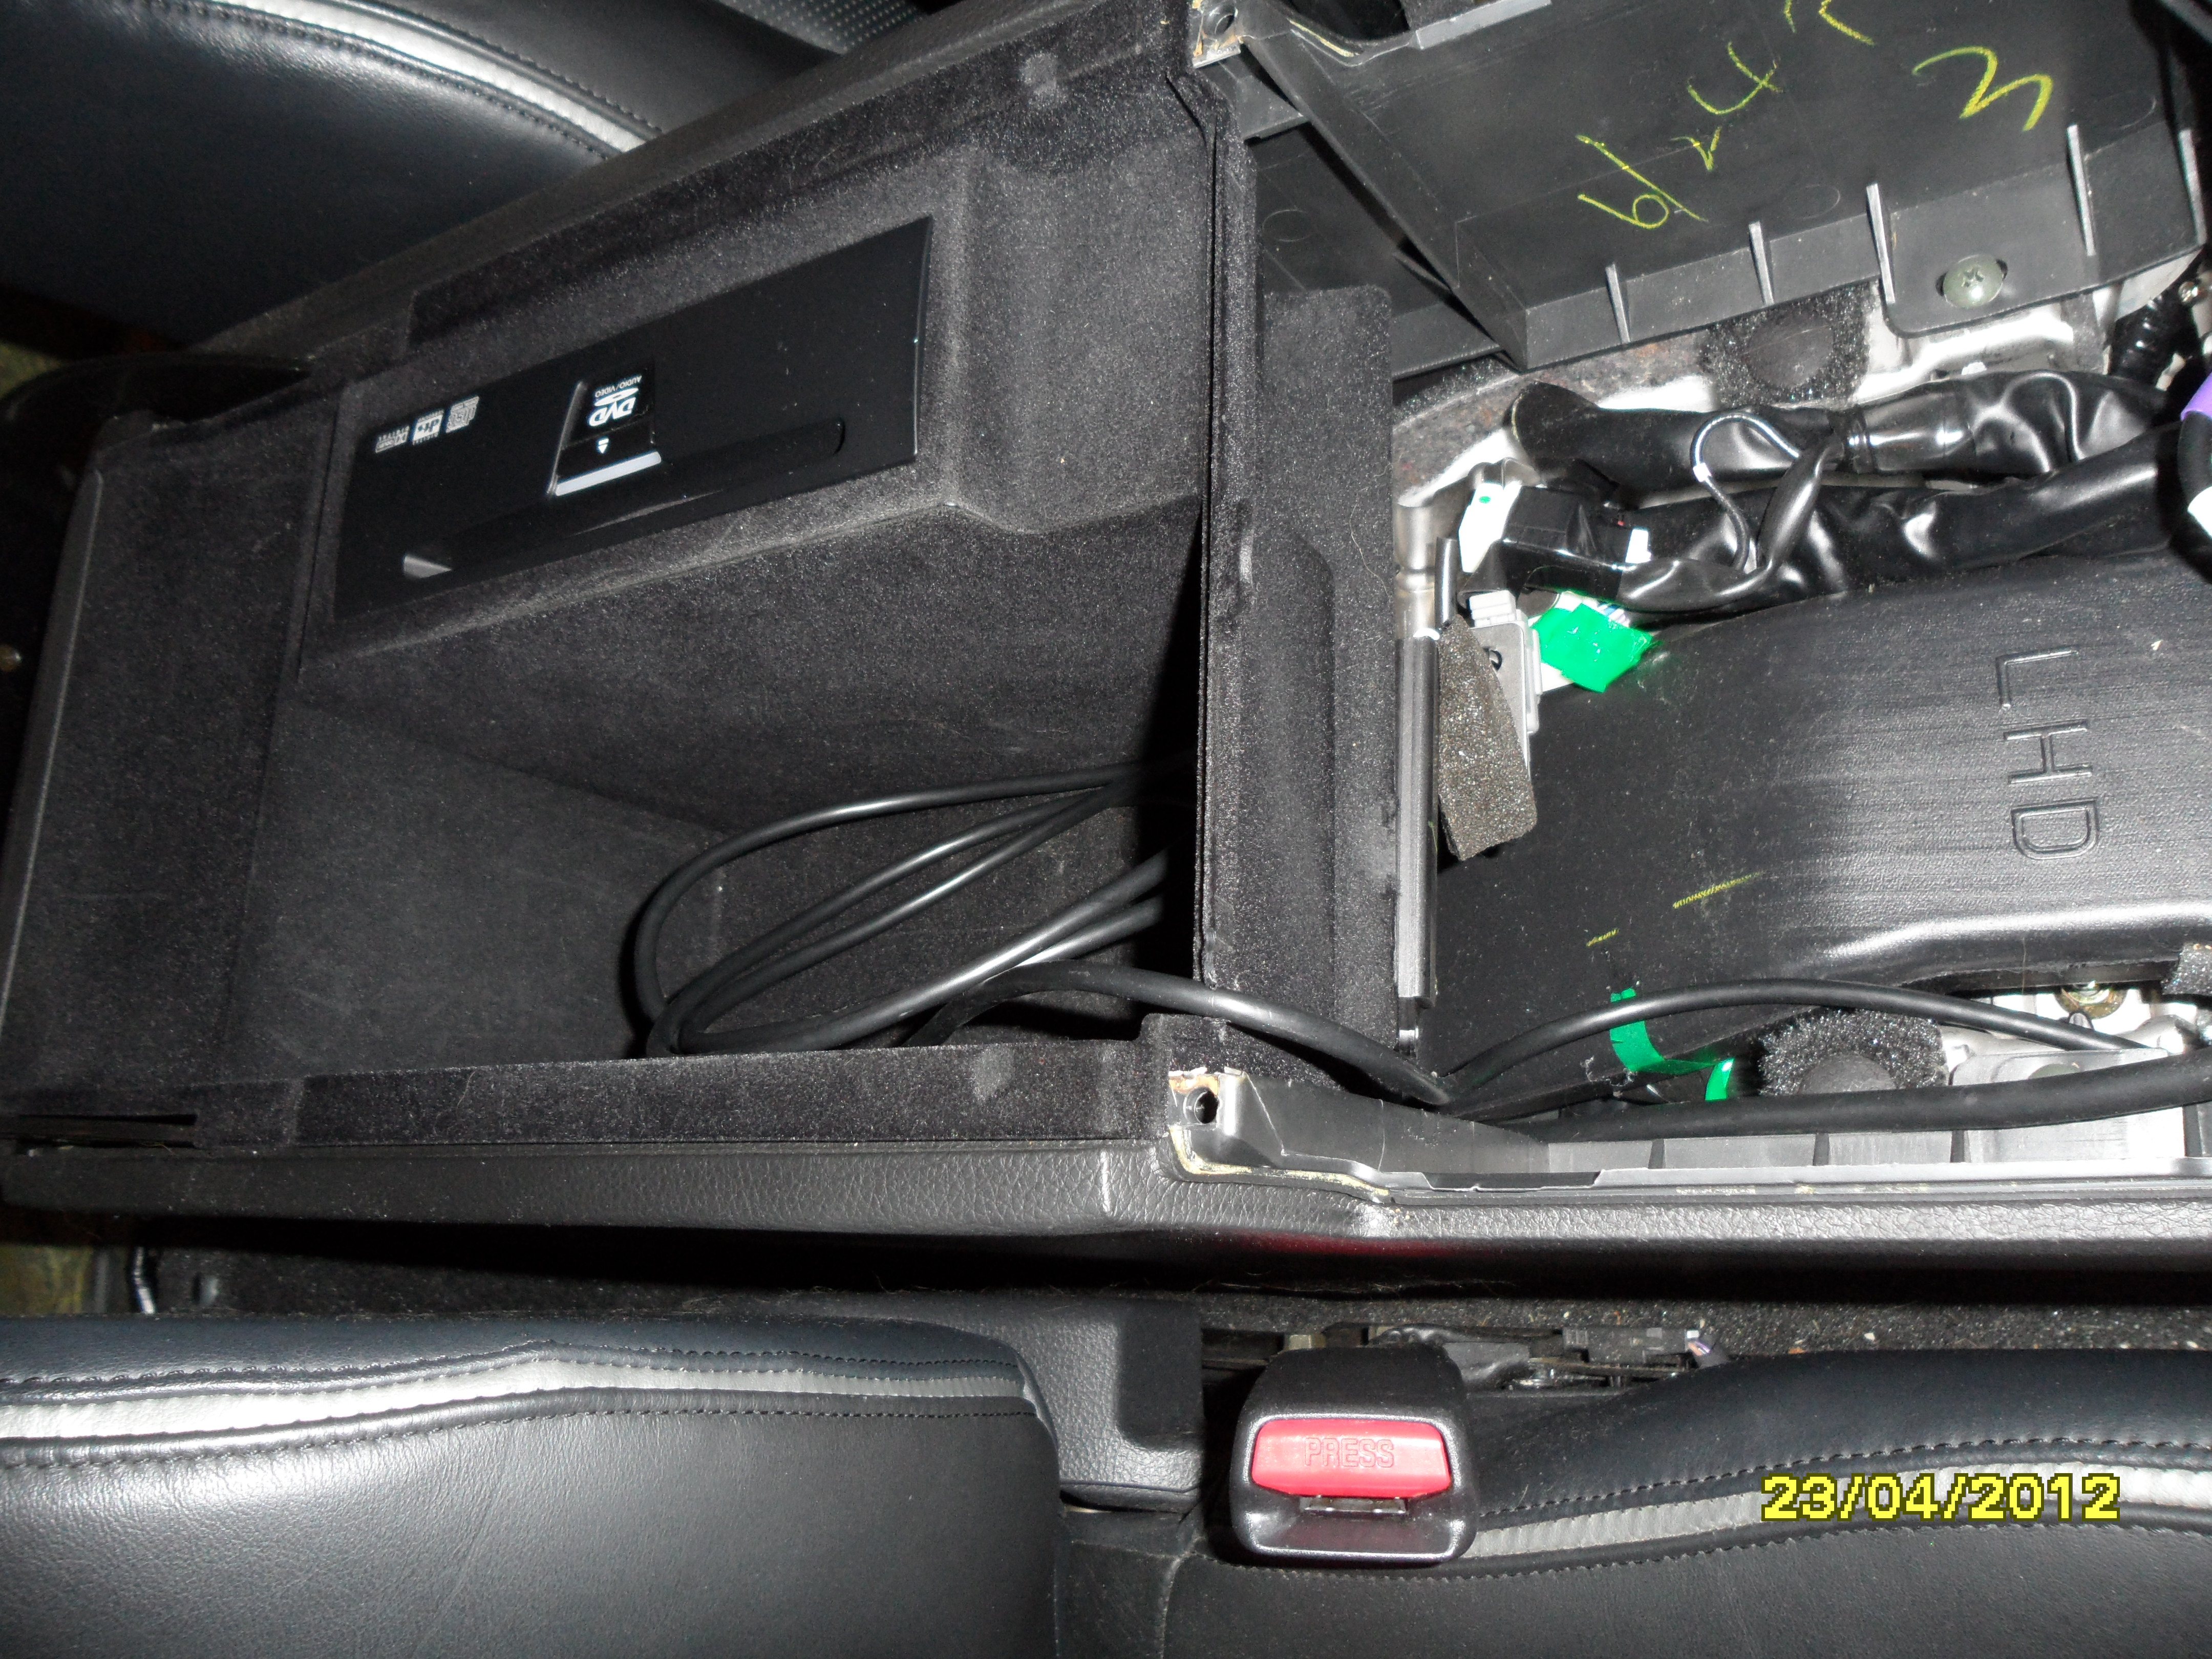
The interface box fits in here. Really.
If you need to change any of the four DIP switches, or if you're connecting a 3.5mm socket to the RCA sockets, now's the time to do it.
If you have the seat temp controls, you'll probably want to unscrew the panel and set it off to the side for this part.
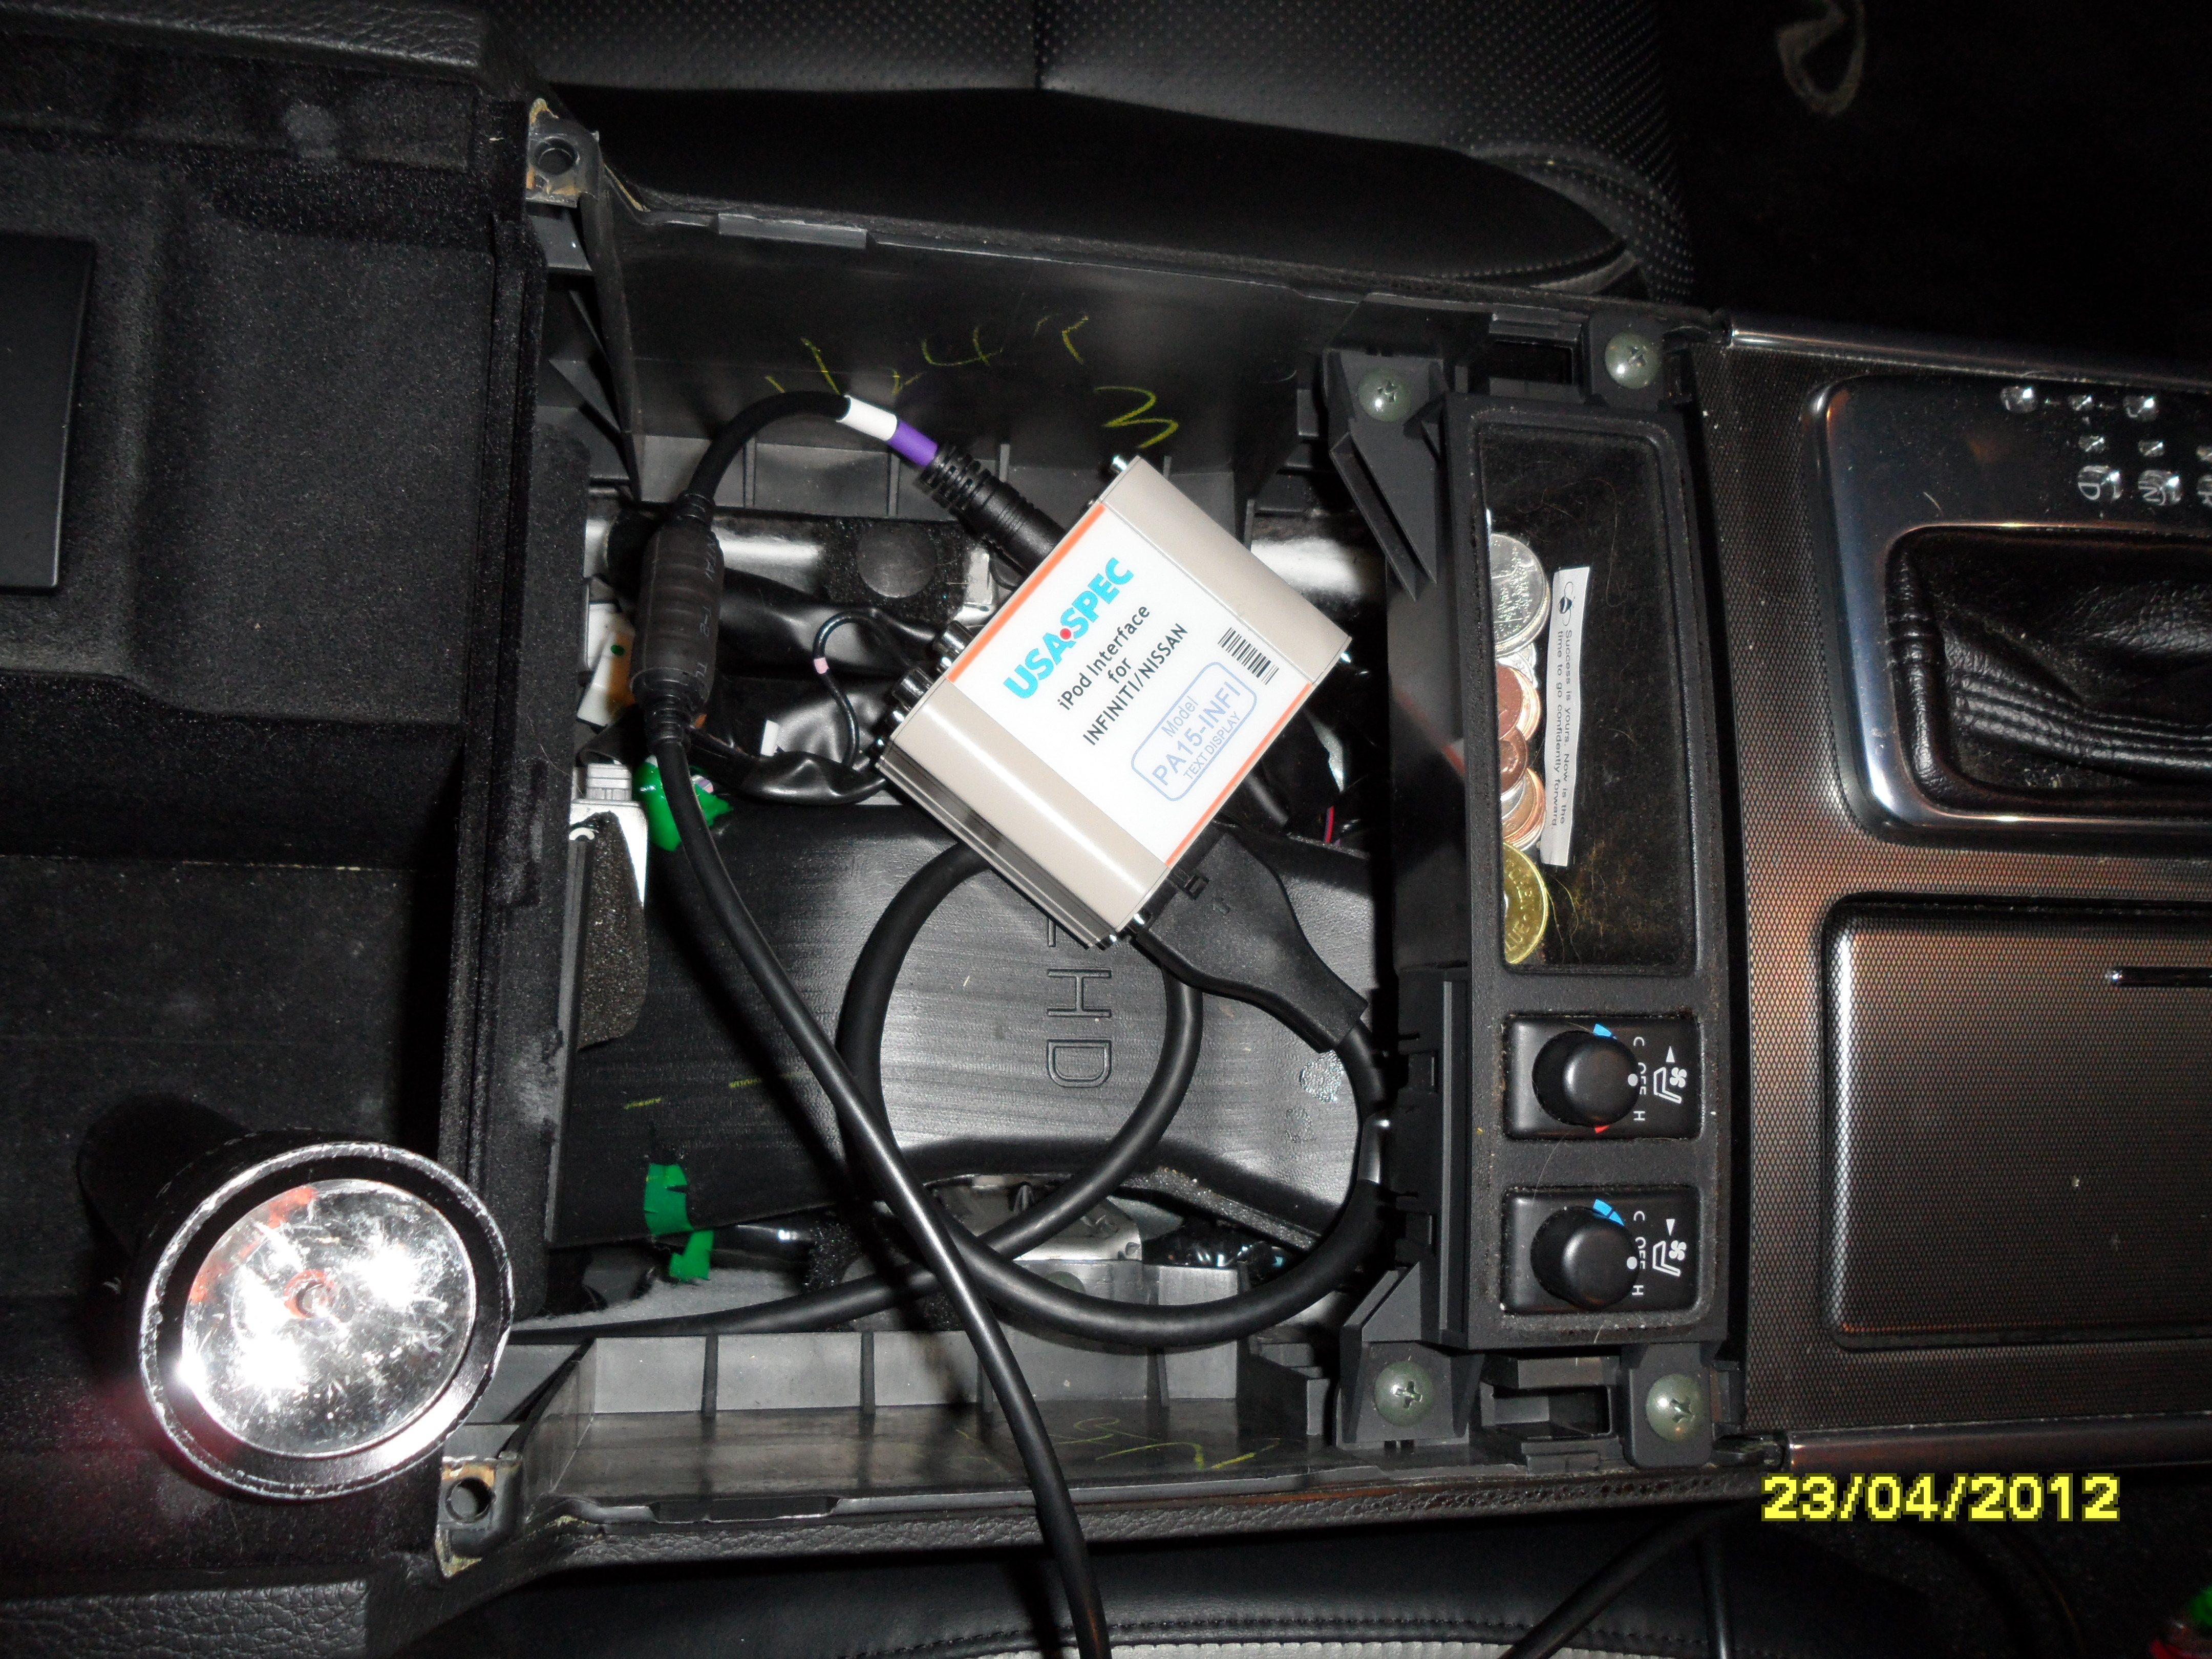
Carefully guide & tuck the interface box to the left of the shifter.

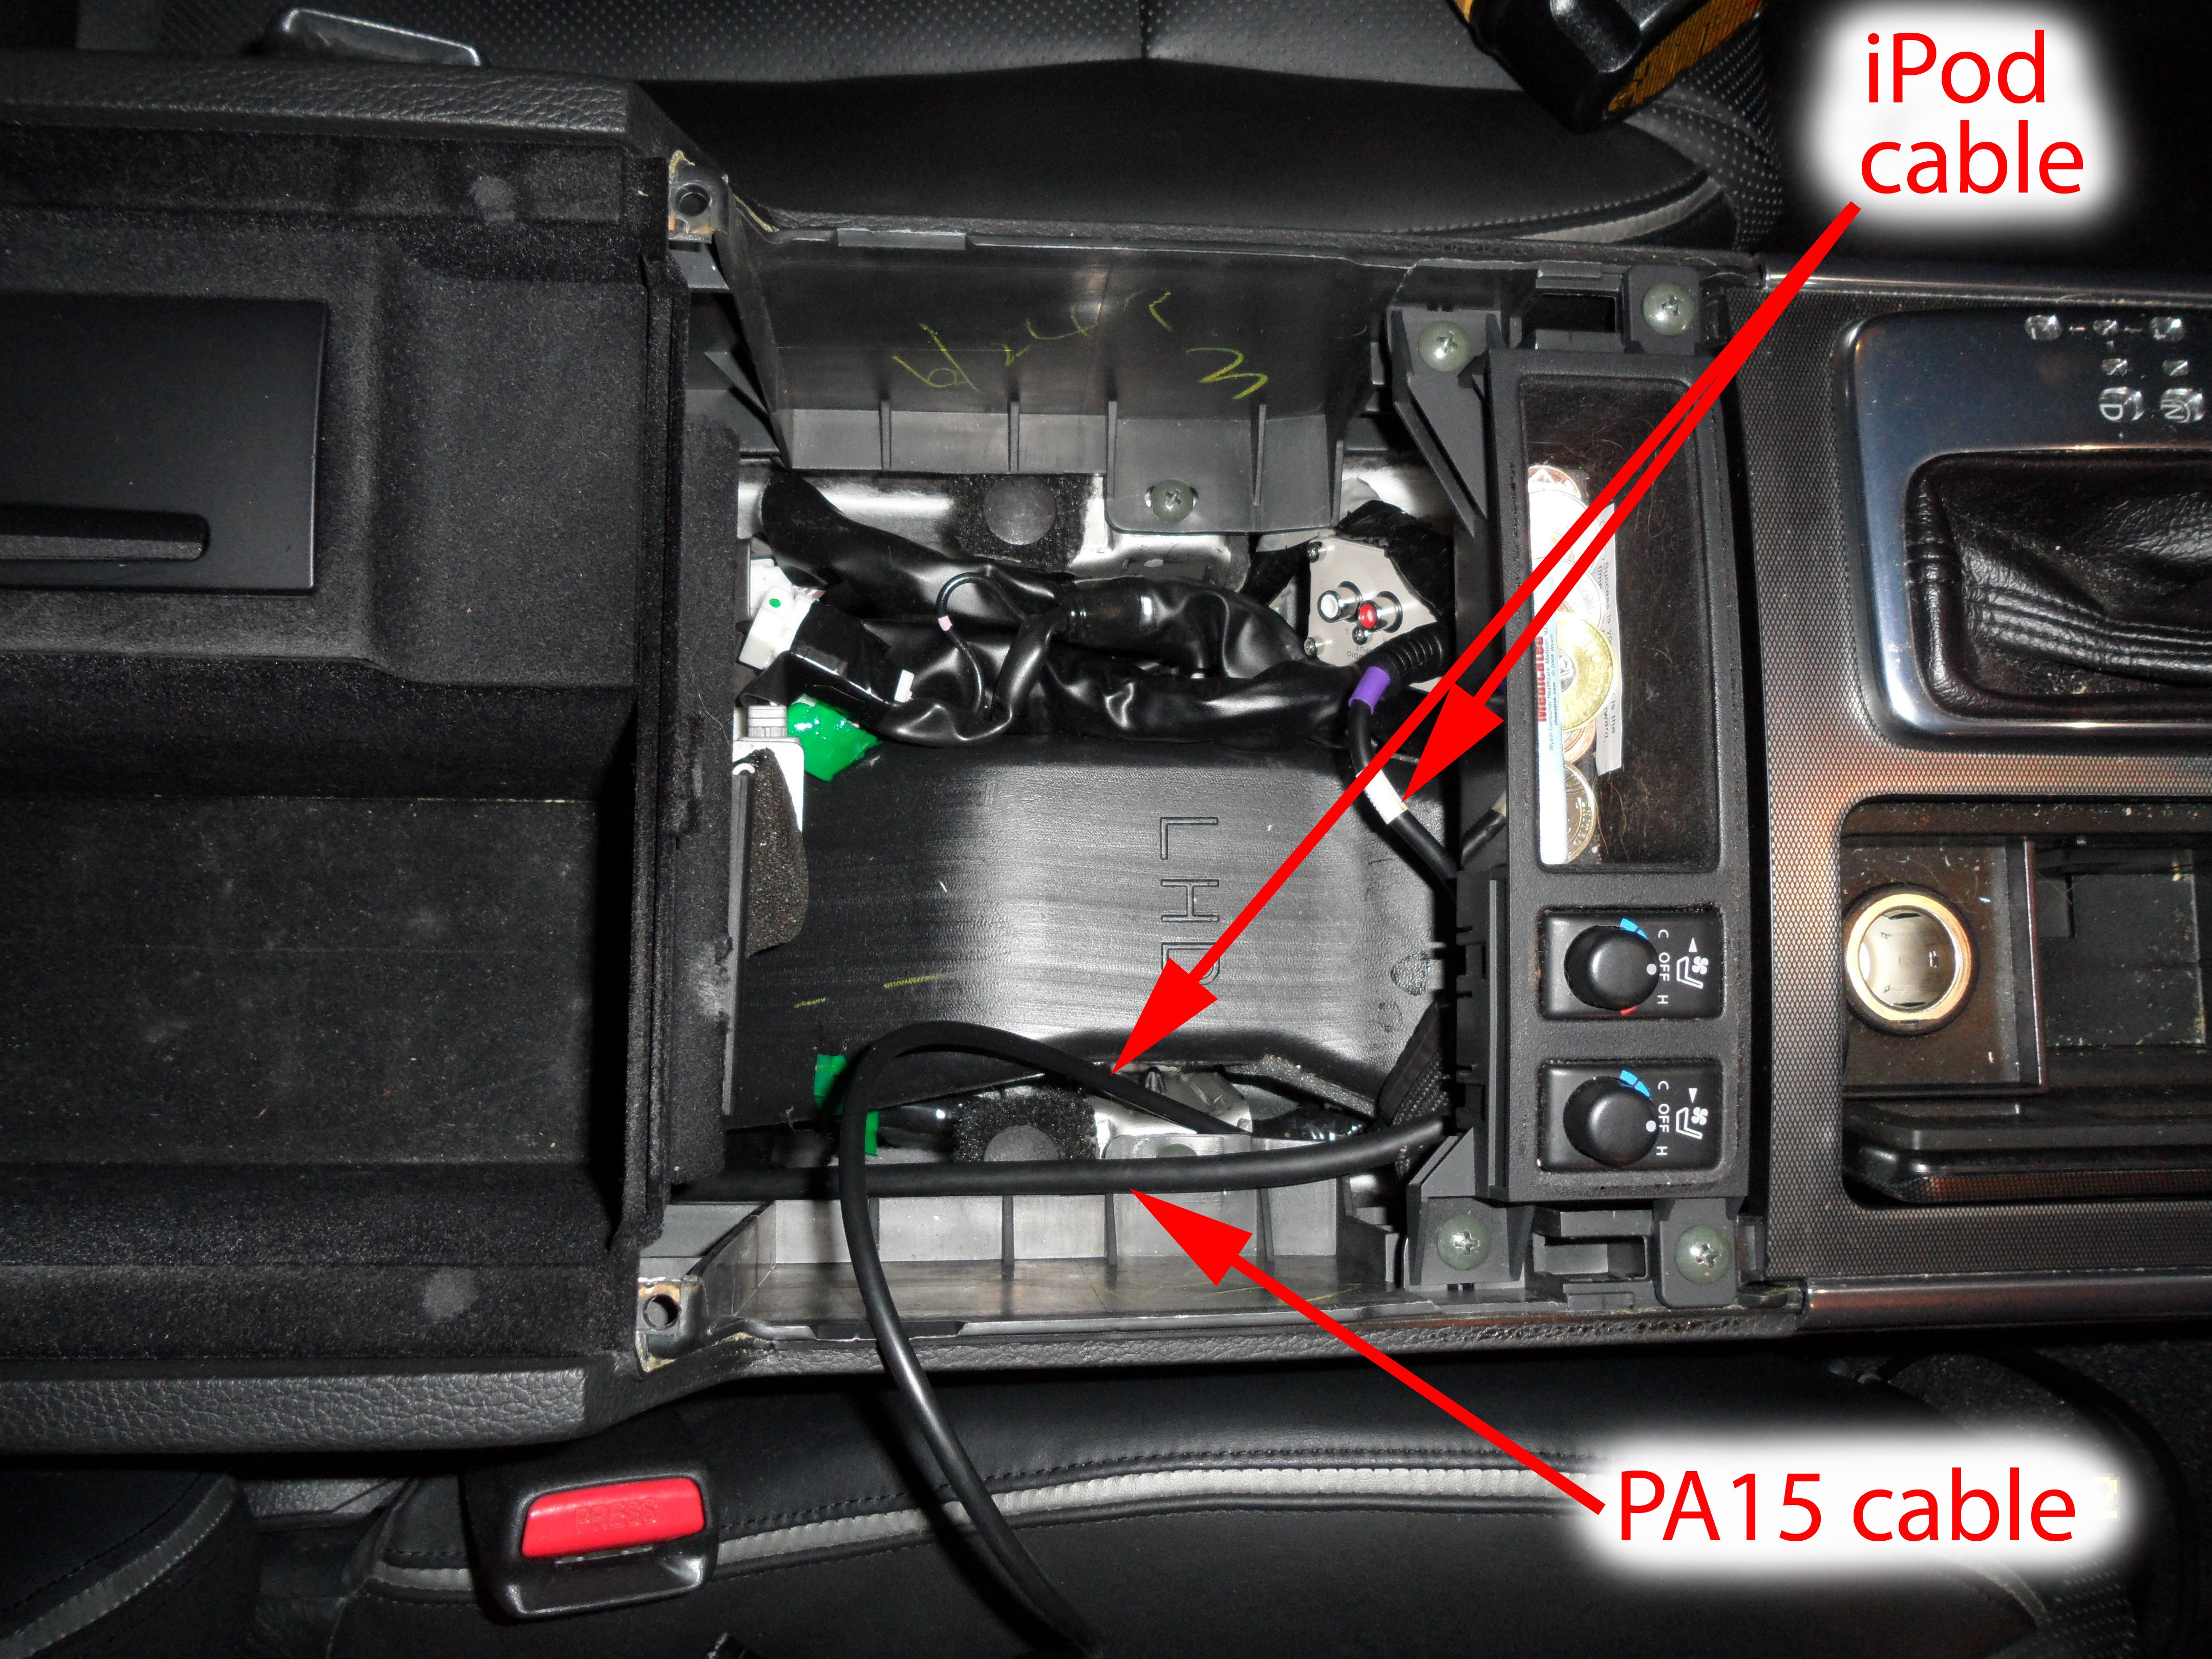
I keep the iPod cable here.

In order to do that, I Dremeled a slot for the iPod cable. I have a Shop-Vac nozzle to the left while cutting the slot, to keep the plastic chaff from going everywhere.

We use it with our iPhones, and it works great. The setup instructions to get the Presets set are . . . well, you have to read them repeatedly for it to make sense. We generally just use the controls on the iPhone instead, but we do have the Presets set too.
It took me around 1.5-2 hours to install, including unloading/reloading the trunk & taking the pics. It took twice that long to make this post! There was about 2' of extra PA15 cable that I nylon-tied into a nice circle and fastened above the Satellite Radio unit.
Last edited by asavage on Tue Feb 26, 2013 10:43 pm, edited 4 times in total.
-
Ilya

- Moderator
- Posts: 9209
- Joined: Fri Apr 23, 2010 11:20 pm
- Car: 2011 M56x but I spend a lot of time on my 2015 Kawasaki Vulcan S. Former owner of a 2007 M35x. Also take care of my wife's 2016 QX60.
- Location: Charlotte, NC
- Contact:
Re: PA15-INFI Installation on a 2006-2007 Infiniti M35/M45
Going to add this as a secondary link to the original FAQ link.
Re: PA15-INFI Installation on a 2006-2007 Infiniti M35/M45
You make AWSOME arrows!!!!!! Great pics of your install. I really like where you mounted the cable. I still have my unit under the passenger seat with the ipod plug and the 3.5 tucked under the center console.
Blake
Blake
Re: PA15-INFI Installation on a 2006-2007 Infiniti M35/M45
Thanks for these instructions. Took me 2 hours yesterday - most of the time trying to get the hanger to appear on the other side 
I also have a couple of scratches on my hand, but the iPod connection and the sound quality make up for it!
I also have a couple of scratches on my hand, but the iPod connection and the sound quality make up for it!

Re: PA15-INFI Installation on a 2006-2007 Infiniti M35/M45
So i'm trying to load the photos for this install, and none of them are loading. in fact it says I cannot connect to asavage.dyndns.org. Perhaps the domain has been abandoned? If so, is there any archive of these photos for this version of the install instructions?
thanks
raj
thanks
raj
-
asavage
- Posts: 33
- Joined: Tue Apr 20, 2010 1:01 pm
- Car: 2006 M35 Sport RWD
- Location: Duvall, Wash.
- Contact:
Re: PA15-INFI Installation on a 2006-2007 Infiniti M35/M45
I moved to the Denver area for the summer, left the server at home. It only required two reboots in eight months, and one was just for a patch I wanted to apply. The other was a remote power-cycle (I love my APC MasterSwitch+: old-school hardware from the dot-com era).
I just moved back home (Duvall, Wash.), taking 12 days and dragging a 5k lb trailer behind a minivan to get here, and the server had a "swap file full" error while I was driving and I didn't catch it until half an hour ago. It's rebooted and pics should load here again. Sorry for the inconvenience, but I built that server in about 2001 and it's extremely overdue for upgrades. Maybe by the end of the year . . .
I just moved back home (Duvall, Wash.), taking 12 days and dragging a 5k lb trailer behind a minivan to get here, and the server had a "swap file full" error while I was driving and I didn't catch it until half an hour ago. It's rebooted and pics should load here again. Sorry for the inconvenience, but I built that server in about 2001 and it's extremely overdue for upgrades. Maybe by the end of the year . . .
-
Ilya
- Moderator
- Posts: 9209
- Joined: Fri Apr 23, 2010 11:20 pm
- Car: 2011 M56x but I spend a lot of time on my 2015 Kawasaki Vulcan S. Former owner of a 2007 M35x. Also take care of my wife's 2016 QX60.
- Location: Charlotte, NC
- Contact:
Re: PA15-INFI Installation on a 2006-2007 Infiniti M35/M45
Sounds like my job :Pasavage wrote:I built that server in about 2001 and it's extremely overdue for upgrades. Maybe by the end of the year . . .
-
EmDash
- Posts: 16
- Joined: Sun Nov 04, 2012 11:39 pm
- Car: '06 Black M35 with Tech Package, Brakemotive rotors, Tein H Techs, 19" Sport Rims
- Location: San Francisco, CA
Re: PA15-INFI Installation on a 2006-2007 Infiniti M35/M45
Finally did this today...thanks for the awesome detailed directions asavage. I can't tell you how many times I read this post before I did it...LOL. (I had it open on my iPad, and various computers for a couple of months studying up before I did it). What a nerd.
Anyway, It went pretty smoothly, considering that I did this install on the street in front of my apartment (I literally live a block over from Haight Ashbury in SF). The only issues I had were snaking the coat hanger through to the back (sometimes it will go ABOVE the carpet, and sometimes gets lost in between the carpet "padding"...you'll see. Just be patient.)
Also, I had a hard time fitting the unit under the shifter. Make sure you slot it vertically between the "padding" on the left and the white plug to the right of that. Also, getting the back seat loose (and back in place) was kind of a pain, but I'm nitpicking.
I'm loving this thing with my iPhone 5, and am finally getting the hang of the wacky controls!
Re: PA15-INFI Installation on a 2006-2007 Infiniti M35/M45
Okay, so I've had this PA15-INF in my 07 M45 for a couple of years now. I've had my iPad 1, classic iPod, iPad Mini (with 30 pin lightening adapter), 4th gen iPod, iPhone 4s, and an iPhone 5 hooked up to this thing. One at a time of course. It charged and played them all flawlessly and is still performing like the day I installed it. Money well spent.
-
Ilya
- Moderator
- Posts: 9209
- Joined: Fri Apr 23, 2010 11:20 pm
- Car: 2011 M56x but I spend a lot of time on my 2015 Kawasaki Vulcan S. Former owner of a 2007 M35x. Also take care of my wife's 2016 QX60.
- Location: Charlotte, NC
- Contact:
Re: PA15-INFI Installation on a 2006-2007 Infiniti M35/M45
Same here with my PA15-NIS (non-SAT). Unit works like new. USA Spec. FTW.
-
finikM35

- Posts: 248
- Joined: Thu Dec 20, 2012 8:36 pm
- Car: 2007 M35x tech package
5/16 plenum spacer, element 114 exhaust, ztube,k&n, grounding kit, uprev tuned, D2 coilovers. - Location: Brooklyn NY
Re: PA15-INFI Installation on a 2006-2007 Infiniti M35/M45
Wow this thing has a great sound! with Infinity speakers and tweeters installed and an AMP everything sounds x10 better. No more burning MP3 cds. If you don't have RCA or aux in your M this is a must!
-
relentless1
- Posts: 111
- Joined: Tue Nov 09, 2010 8:40 am
- Car: 2006 Infiniti M35 Sport
2006 Lexus GS300
2015 Infiniti QX80
Re: PA15-INFI Installation on a 2006-2007 Infiniti M35/M45
If this is installed on an M that has the Satellite/Tech Package, are you able to use the Bose Centerpoint and do you have sound coming from the Headrest speakers? Currently, when I connecty my iPhone to the Aux connection, Bose Centerpoint is off and no sound comes from the headrest speakers.
-
finikM35
- Posts: 248
- Joined: Thu Dec 20, 2012 8:36 pm
- Car: 2007 M35x tech package
5/16 plenum spacer, element 114 exhaust, ztube,k&n, grounding kit, uprev tuned, D2 coilovers. - Location: Brooklyn NY
Re: PA15-INFI Installation on a 2006-2007 Infiniti M35/M45
I had XM radio and i don't have speakers in the seats unfortunately  every other speaker works fine.
-
Blackzilla

- Posts: 80
- Joined: Wed Feb 25, 2015 10:25 pm
- Car: 2007 Infiniti M45, 2014 Mazda 6
- Location: Mesa, Arizona
Re: PA15-INFI Installation on a 2006-2007 Infiniti M35/M45


I went to install the PA15-INFI in my 2007 M45 and it turns out it would need to be installed where the radio is and not in the trunk. Next i find out that i have the wrong cable for it. Mine is a 12 pin not a 16 pin which is what i was sent. Does this mean i need the PA15-NIS instead? If someone could let me know before i do a swap that would be awesome. In the second picture the bottom cable is the one they sent. Here's the link for the one i think i need http://www.amazon.com/USA-PA15-NIS-Inte ... B003UTFLXE
-
Ilya
- Moderator
- Posts: 9209
- Joined: Fri Apr 23, 2010 11:20 pm
- Car: 2011 M56x but I spend a lot of time on my 2015 Kawasaki Vulcan S. Former owner of a 2007 M35x. Also take care of my wife's 2016 QX60.
- Location: Charlotte, NC
- Contact:
Re: PA15-INFI Installation on a 2006-2007 Infiniti M35/M45
I don't remember what my cable looked like, but more than likely I believe you will.
-
asavage
- Posts: 33
- Joined: Tue Apr 20, 2010 1:01 pm
- Car: 2006 M35 Sport RWD
- Location: Duvall, Wash.
- Contact:
Re: PA15-INFI Installation on a 2006-2007 Infiniti M35/M45
You do not have SAT, right?Blackzilla wrote:I went to install the PA15-INFI in my 2007 M45 and it turns out it would need to be installed where the radio is and not in the trunk.
From the PA15 Manual:

-
Blackzilla
- Posts: 80
- Joined: Wed Feb 25, 2015 10:25 pm
- Car: 2007 Infiniti M45, 2014 Mazda 6
- Location: Mesa, Arizona
Re: PA15-INFI Installation on a 2006-2007 Infiniti M35/M45
Yup I guess I goofed on that so thanks for the quick responses! here's to hoping the NIS works just as well
-
asavage
- Posts: 33
- Joined: Tue Apr 20, 2010 1:01 pm
- Car: 2006 M35 Sport RWD
- Location: Duvall, Wash.
- Contact:
Re: PA15-INFI Installation on a 2006-2007 Infiniti M35/M45
We've been quite pleased with our installation, it's given zero problems after install and the sound quality is excellent.
-
Blackzilla
- Posts: 80
- Joined: Wed Feb 25, 2015 10:25 pm
- Car: 2007 Infiniti M45, 2014 Mazda 6
- Location: Mesa, Arizona
Re: PA15-INFI Installation on a 2006-2007 Infiniti M35/M45
love this just finished the install. i ended up having to use the NIS instead of the INFI
-
Blackzilla
- Posts: 80
- Joined: Wed Feb 25, 2015 10:25 pm
- Car: 2007 Infiniti M45, 2014 Mazda 6
- Location: Mesa, Arizona
Re: PA15-INFI Installation on a 2006-2007 Infiniti M35/M45
another quick question before i ask USA Spec for support. has anyone had a problem where the right speakers are extremely quiet? im guessing maybe a pin got messed up maybe but im not completely sure
-
kmiles
- Posts: 319
- Joined: Sun Mar 27, 2011 2:59 pm
- Car: 2015 Q70 3.7 AWD - Hermosa Blue
Sold - 2007 M35x
Re: PA15-INFI Installation on a 2006-2007 Infiniti M35/M45
I haven't had the problem you describe. I agree it could be a bad pin, but it also could be a bad cable. I've found the techs at USA Spec to be very helpful.
-
asavage
- Posts: 33
- Joined: Tue Apr 20, 2010 1:01 pm
- Car: 2006 M35 Sport RWD
- Location: Duvall, Wash.
- Contact:
Re: PA15-INFI Installation on a 2006-2007 Infiniti M35/M45
No sound balance problems here. But, I'm not using the same product as you.
-
Blackzilla
- Posts: 80
- Joined: Wed Feb 25, 2015 10:25 pm
- Car: 2007 Infiniti M45, 2014 Mazda 6
- Location: Mesa, Arizona
Re: PA15-INFI Installation on a 2006-2007 Infiniti M35/M45
thanks for the responses. ill ask USA Spec!