Official Lighting Thread
-
Larz
- Moderator
- Posts: 2894
- Joined: Thu Feb 21, 2013 8:55 pm
- Car: 2019 Q70-L RWD
- Location: Ft Lauderdale, Florida
- Contact:
Re: Official Lighting Thread
a-HA! That explains how the highs and lows match so well, LOL.
-
CPJ LB

- Posts: 1026
- Joined: Sat Aug 28, 2010 4:06 pm
- Car: 12 G37X Sedan- stealthy modded
14 Altima 2.5
08 Tahoe
06 M35 S (gone)
14 Versa 4dr (gone) - Location: CA 2 CT
Re: Official Lighting Thread
Upgraded from the stock HID bulbs (D2S, Philips 4300K) to the Morimoto XB35 5500K - they are the new generation Morimoto D2S HID bulbs that are compatible with our OEM ballasts.
First, a friend of mine installed these HID bulbs in his G35 and I was amazed to see the HID’s in person!!! They looked really good and a lot more intense than the stock HID’s. He had them on for only 2 months and has had no issues — the prior generation Morimoto’s did not work well with the Infiniti OEM ballasts… so after some convincing and reading through HIDPlanet’s Forum, I took the chance….it was only a $50 gamble….LOL!
the shipping was really quick and I got to work on installing them myself. I ran into a delay because my pair of jack stands were tucked away in storage so I drove over to my buddy’s place and did the work in his garage….
I watched a DIY video on Youtube as a reference point:
https://www.youtube.com/watch?v=i_wzgNbjJR8
Anyway, the installation was pretty straight forward. I did one side at a time.
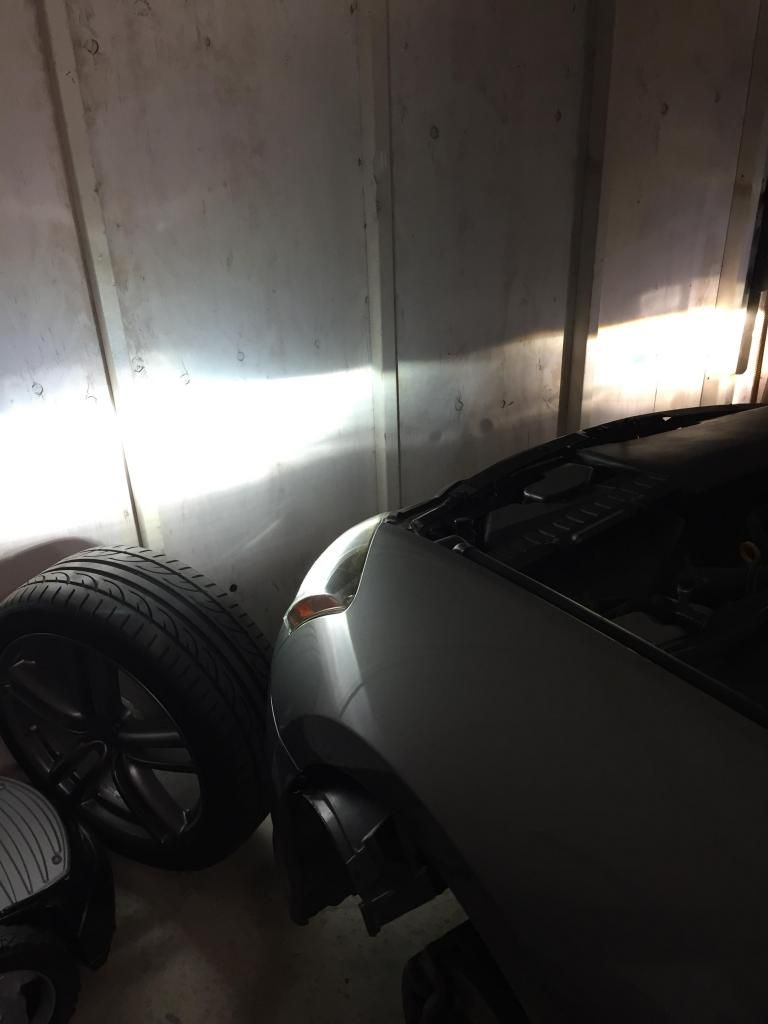
1. Jacked the car up - used the OE ‘scissor’ style floor jack and for extra safety, used a 3.5 ton hydraulic floor jack and 2 ton jack stand for support.
2. Removed the wheels - had to use my handy breaker bar (1/2” drive) and 21” deep socket to break loose the lug nuts (damn mechanics over tightened them with an impact wrench)
3. removed the plastic tabs/button fasteners in the fender liners (just the top two) and pulled back the fender liner in order to reach in and access the back of the headlight cover
4. Once the back headlight cover is off(by turning counter-clockwise), you’ll see the back of the bulb connector which leads from the ballast (big silver piece). turn the connector counter-clockwise and pull straight out
5. Then push down and outwards the two silver pins which holds the actually bulb in place to prevent movement.
6. hold the base of the bulb and pull straight out (avoid touching the headlight housing and the surrounding parts (since my bulbs weren’t burnt out, I stored them in the container which the new bulbs were packaged)
7. Cleaned the new HID bulbs with alcohol wipes (provided) and used a new set of latex gloves at this point
8. Installed the HID bulb within the headlight housing and made sure the base of the bulbs' slots were securely seated.
the rest is reverse order from step 5
i took a few pix to show the light output on the XB 5500K….i still have awhile to break them in but initially, they are a lot better than my OEM bulbs…$50 price was a steal for a good upgrade. So if it's time for you to change your bulbs, the Morimoto XB35 D2S are a great option.
Driver side wheel off and upper fender liner rolled back to access back of headlight

View of bulb connector to HID bulb

New bulb installed - test fit. Driver side: new bulb / Passenger side: used OEM bulb…. only 5 mins of initial new bulb usage and the light output is intense.
Night drive test….new bulbs installed….what a difference!! its worth doing the job yourself - if you have the time and tools...


First, a friend of mine installed these HID bulbs in his G35 and I was amazed to see the HID’s in person!!! They looked really good and a lot more intense than the stock HID’s. He had them on for only 2 months and has had no issues — the prior generation Morimoto’s did not work well with the Infiniti OEM ballasts… so after some convincing and reading through HIDPlanet’s Forum, I took the chance….it was only a $50 gamble….LOL!
the shipping was really quick and I got to work on installing them myself. I ran into a delay because my pair of jack stands were tucked away in storage so I drove over to my buddy’s place and did the work in his garage….
I watched a DIY video on Youtube as a reference point:
https://www.youtube.com/watch?v=i_wzgNbjJR8
Anyway, the installation was pretty straight forward. I did one side at a time.
1. Jacked the car up - used the OE ‘scissor’ style floor jack and for extra safety, used a 3.5 ton hydraulic floor jack and 2 ton jack stand for support.
2. Removed the wheels - had to use my handy breaker bar (1/2” drive) and 21” deep socket to break loose the lug nuts (damn mechanics over tightened them with an impact wrench)
3. removed the plastic tabs/button fasteners in the fender liners (just the top two) and pulled back the fender liner in order to reach in and access the back of the headlight cover
4. Once the back headlight cover is off(by turning counter-clockwise), you’ll see the back of the bulb connector which leads from the ballast (big silver piece). turn the connector counter-clockwise and pull straight out
5. Then push down and outwards the two silver pins which holds the actually bulb in place to prevent movement.
6. hold the base of the bulb and pull straight out (avoid touching the headlight housing and the surrounding parts (since my bulbs weren’t burnt out, I stored them in the container which the new bulbs were packaged)
7. Cleaned the new HID bulbs with alcohol wipes (provided) and used a new set of latex gloves at this point
8. Installed the HID bulb within the headlight housing and made sure the base of the bulbs' slots were securely seated.
the rest is reverse order from step 5
i took a few pix to show the light output on the XB 5500K….i still have awhile to break them in but initially, they are a lot better than my OEM bulbs…$50 price was a steal for a good upgrade. So if it's time for you to change your bulbs, the Morimoto XB35 D2S are a great option.
Driver side wheel off and upper fender liner rolled back to access back of headlight
View of bulb connector to HID bulb
New bulb installed - test fit. Driver side: new bulb / Passenger side: used OEM bulb…. only 5 mins of initial new bulb usage and the light output is intense.
Night drive test….new bulbs installed….what a difference!! its worth doing the job yourself - if you have the time and tools...
-
Larz
- Moderator
- Posts: 2894
- Joined: Thu Feb 21, 2013 8:55 pm
- Car: 2019 Q70-L RWD
- Location: Ft Lauderdale, Florida
- Contact:
Re: Official Lighting Thread
Great job, mate ! Great photos as well. Thank you for going to all that trouble!
Those bulbs seem to be a very good choice for those who may not want to go to the expense of purchasing the Osram CBI bulbs, while still getting a vast improvement over the OEM bulbs. Please keep us updated as time goes on regarding reliability, etc.
Those bulbs seem to be a very good choice for those who may not want to go to the expense of purchasing the Osram CBI bulbs, while still getting a vast improvement over the OEM bulbs. Please keep us updated as time goes on regarding reliability, etc.
-
CPJ LB
- Posts: 1026
- Joined: Sat Aug 28, 2010 4:06 pm
- Car: 12 G37X Sedan- stealthy modded
14 Altima 2.5
08 Tahoe
06 M35 S (gone)
14 Versa 4dr (gone) - Location: CA 2 CT
Re: Official Lighting Thread
@ Larz & Ilya: thanks guys!!! I agree, it is a cheaper option when its time to change out the HID bulbs. Don't get me wrong, I'd still get a pair of the Osram CBI's 
Anyways, I just got back in tonight from taking a drive in the rain--I wanted to see how the new bulbs worked in the rain....the new HID bulbs (5500K) worked really well!! There was no 'wash out' of the road and street signs...the lights illuminated very well. However, I did see a guy with 'blue/purple' light bulbs which looked like halogens (possibly 8000K) so I'm sure HE was struggling to view the road ---
I felt like turning around to catch up with the guy and drive next to him so he could eventually see the road
-
MOWellsinVA
- Posts: 257
- Joined: Tue Sep 21, 2010 8:09 pm
- Car: 2007 Infiniti M45 Sport (Obsidian Black w/ Graphite interior)
- Location: Henrico, VA
Re: Official Lighting Thread
I have to give these a try. $50.00? That's a steal. My original OEM bulbs just don't seem to put out enough light, and these look to have impressive light output.
-
CPJ LB
- Posts: 1026
- Joined: Sat Aug 28, 2010 4:06 pm
- Car: 12 G37X Sedan- stealthy modded
14 Altima 2.5
08 Tahoe
06 M35 S (gone)
14 Versa 4dr (gone) - Location: CA 2 CT
Re: Official Lighting Thread
It might be time to change out the bulbs...HID bulbs will diminish their light output over time, but our eyes get so used to them, we tend not to recognize they aren't what they used to be (brightness) until you match your headlights next to another car with HID's...that was my experience. I drive an 06, so I figured my bulbs were eventually on it's way out...and seeing other cars' light output, made me realize that it was time. I enjoy night driving much more now...MOWellsinVA wrote:I have to give these a try. $50.00? That's a steal. My original OEM bulbs just don't seem to put out enough light, and these look to have impressive light output.
here's the link to the site. There are different HID output options as well (I selected the 5500K for it's white light brightness).
http://www.theretrofitsource.com/compon ... KgUVorF8vE
-
MOWellsinVA
- Posts: 257
- Joined: Tue Sep 21, 2010 8:09 pm
- Car: 2007 Infiniti M45 Sport (Obsidian Black w/ Graphite interior)
- Location: Henrico, VA
Re: Official Lighting Thread
No doubt you are right about the aging bulbs! I have decided that I will order a pair and get them installed ASAP. I was driving out to shop with my wife tonight in the dark drizzle and felt that the M45 really needs brighter lamps to be safe, especially in the winter months.
-
MOWellsinVA
- Posts: 257
- Joined: Tue Sep 21, 2010 8:09 pm
- Car: 2007 Infiniti M45 Sport (Obsidian Black w/ Graphite interior)
- Location: Henrico, VA
Re: Official Lighting Thread
CPJ LB:
Thanks for the link to The Retrofit Source. 5,500K bulbs ordered!
Thanks for the link to The Retrofit Source. 5,500K bulbs ordered!
-
Mjkkb2
- Posts: 693
- Joined: Mon Oct 21, 2013 11:37 am
- Car: 2018 Infiniti QX60 AWD
2011 Infiniti M37S
2011 Nissan Quest
2001 Infiniti I30t(sold) - Location: Richmond VA
Re: Official Lighting Thread
So these bulbs are not compatible with my M37S?IlyaKol wrote:Y51 M is bi-xenon...one projector both low beam and high beam.
And if so, is there another bulb that's better than oem?
-
Ilya

- Moderator
- Posts: 9208
- Joined: Fri Apr 23, 2010 11:20 pm
- Car: 2011 M56x but I spend a lot of time on my 2015 Kawasaki Vulcan S. Former owner of a 2007 M35x. Also take care of my wife's 2016 QX60.
- Location: Charlotte, NC
- Contact:
Re: Official Lighting Thread
Not sure what you mean?Mjkkb2 wrote:So these bulbs are not compatible with my M37S?IlyaKol wrote:Y51 M is bi-xenon...one projector both low beam and high beam.
And if so, is there another bulb that's better than oem?
Why wouldn't it be compatible? If your car is D2S, it's D2S (do you already have Xenon lights?)...instead of buying a separate high beam bulb, you buy one set of bulbs for both high and low.
-
DoN_BLaZe34
- Posts: 1750
- Joined: Fri Jul 23, 2010 4:40 pm
- Car: 2007 M45 Sport - Sold
2006 FX45 - Traded
2014 Q70S 5.6 - Sold
2017 Q70L 5.6 - Current - Location: Jersey
Re: Official Lighting Thread
Pretty sure all Y51's come with HIDs. As a result these should fit ur carMjkkb2 wrote:So these bulbs are not compatible with my M37S?IlyaKol wrote:Y51 M is bi-xenon...one projector both low beam and high beam.
And if so, is there another bulb that's better than oem?
-
Mjkkb2
- Posts: 693
- Joined: Mon Oct 21, 2013 11:37 am
- Car: 2018 Infiniti QX60 AWD
2011 Infiniti M37S
2011 Nissan Quest
2001 Infiniti I30t(sold) - Location: Richmond VA
Re: Official Lighting Thread
I got confused. Thought that these only fit older M's, based on the folks (and their cars) that posted with m35 and 45's.
-
Ilya
- Moderator
- Posts: 9208
- Joined: Fri Apr 23, 2010 11:20 pm
- Car: 2011 M56x but I spend a lot of time on my 2015 Kawasaki Vulcan S. Former owner of a 2007 M35x. Also take care of my wife's 2016 QX60.
- Location: Charlotte, NC
- Contact:
Re: Official Lighting Thread
I'm a Y51 and I have these bulbs. They are for cars that use D2S sized bulbs...that could be a 2004 Acura TL or a 2015 Infiniti M. Many many cars use that bulb size. It's the most common OEM HID Bulb size.
I'm not sure what Y51's (or if all as Don suggests) come with HID's, so you'll have to determine if you have HID's/Xenon lights before purchasing.
I'm not sure what Y51's (or if all as Don suggests) come with HID's, so you'll have to determine if you have HID's/Xenon lights before purchasing.
-
Mjkkb2
- Posts: 693
- Joined: Mon Oct 21, 2013 11:37 am
- Car: 2018 Infiniti QX60 AWD
2011 Infiniti M37S
2011 Nissan Quest
2001 Infiniti I30t(sold) - Location: Richmond VA
Re: Official Lighting Thread
ok, thanks for clarifying. I got HIDs and would love a little brighter output than stock.
-
Ilya
- Moderator
- Posts: 9208
- Joined: Fri Apr 23, 2010 11:20 pm
- Car: 2011 M56x but I spend a lot of time on my 2015 Kawasaki Vulcan S. Former owner of a 2007 M35x. Also take care of my wife's 2016 QX60.
- Location: Charlotte, NC
- Contact:
Re: Official Lighting Thread
If you have factory HID's/Xenon's, you are D2S and these bulbs will work for you.
If you want to verify, Google the "Sylvania Automotive Light Guide" and search for your car.
If you want to verify, Google the "Sylvania Automotive Light Guide" and search for your car.
Re: Official Lighting Thread
I wish you guys that take these pic with the headlights would take pictures from inside the car in a city environment with street lights and other car lights around so I could get a real perspective instead of taking pics in slasher chainsaw massacre areas with no lights making your headlights look like the sun is shining down lol. My stocks look like these pics, but when I'm in the urban area half the time I think my lights are off until I approach another car or I look at my dash.
-
Larz
- Moderator
- Posts: 2894
- Joined: Thu Feb 21, 2013 8:55 pm
- Car: 2019 Q70-L RWD
- Location: Ft Lauderdale, Florida
- Contact:
Re: Official Lighting Thread
Chainsaw slasher? Bloody Nora!
I see your point and it's a great one. I use the Osram 66240 xenarc CBIs and in the slasher areas, the difference is absolutely amazing (also in snowy conditions). You're right though - unde big city crime lights, there is always a washout effect. However, I can honestly say that the Osrams are less affected by the crime lights than my OEM lights. You can still see the white from the Osrams in front of your car, but you lose the visible depth of field usually seen farthest in front of the car. When you are next to other cars, you can see the clean cut-off of your Osrams along the side of adjacent cars, and the roadway in front of your car is less affected by the washout normally caused by bright city lights.
I see your point and it's a great one. I use the Osram 66240 xenarc CBIs and in the slasher areas, the difference is absolutely amazing (also in snowy conditions). You're right though - unde big city crime lights, there is always a washout effect. However, I can honestly say that the Osrams are less affected by the crime lights than my OEM lights. You can still see the white from the Osrams in front of your car, but you lose the visible depth of field usually seen farthest in front of the car. When you are next to other cars, you can see the clean cut-off of your Osrams along the side of adjacent cars, and the roadway in front of your car is less affected by the washout normally caused by bright city lights.
Re: Official Lighting Thread
Hello everyone,
I've been a long time lurker and am a first time poster. I own a 2006 M45 Sport Black Obsidian with Graphite interior. I purchased it with 62k miles give or take and it currently has 95k or so miles on it. I purchased it with INJEN intake and Stillen exhaust already installed, and let me tell you I love this thing. My question is ( and yes I have looked around to see if the answer is around and couldn't find it) has anyone ever changed the whole fog light housing and upgraded to an LED fog light housing? I was looking at possibly doing this : http://www.vleds.com/bulb-type/fog-ligh ... ype-t.html .
I'm pretty sure it wouldn't be a direct replacement ( if you know of any please let me know ), but wanted to get some opinions. The reason for me even looking at a housing replacement is because my left housing "glass" was cracked ( a lot of highway driving ), and to replace it is just as much, if not more then the housings above. What do you all think? Any constructive opinions will be greatly appreciated. Thanks in advance.
P.S. This is a link to a direct OEM replacement: http://parts.infinitiusa.com/nissanpart ... &siteid=15
adding a link to ebay with a better picture of oem for comparison: http://www.ebay.com/itm/Infiniti-M35-M4 ... e9&vxp=mtr
-
Six_Legs

- Posts: 264
- Joined: Mon May 05, 2014 11:28 am
- Car: 2007 Infiniti M45 Sport
1995 Nissan 240SX SE 5spd - Location: Nor Cal
Re: Official Lighting Thread
@JFT47
Found this. Nissan Sentra fogs fit the M and are cheaper.
http://www.autolightsbulbs.com/2004-200 ... 13904.aspx
Found this. Nissan Sentra fogs fit the M and are cheaper.
http://www.autolightsbulbs.com/2004-200 ... 13904.aspx
-
Larz
- Moderator
- Posts: 2894
- Joined: Thu Feb 21, 2013 8:55 pm
- Car: 2019 Q70-L RWD
- Location: Ft Lauderdale, Florida
- Contact:
Re: Official Lighting Thread
Here is a link to a thread I started when I upgraded my fogs, headlamps, and added DRLs to my 07 M front end. Vled's are by far the very best quality LEDs I have used. However, those do not appear to be compatible with Infiniti. It may take some modification of the housing, bumper insert, and wiring to switch to the Vled fogs.JFT47 wrote:Hello everyone,
I've been a long time lurker and am a first time poster. I own a 2006 M45 Sport Black Obsidian with Graphite interior. I purchased it with 62k miles give or take and it currently has 95k or so miles on it. I purchased it with INJEN intake and Stillen exhaust already installed, and let me tell you I love this thing. My question is ( and yes I have looked around to see if the answer is around and couldn't find it) has anyone ever changed the whole fog light housing and upgraded to an LED fog light housing? I was looking at possibly doing this : http://www.vleds.com/bulb-type/fog-ligh ... ype-t.html .
I'm pretty sure it wouldn't be a direct replacement ( if you know of any please let me know ), but wanted to get some opinions. The reason for me even looking at a housing replacement is because my left housing "glass" was cracked ( a lot of highway driving ), and to replace it is just as much, if not more then the housings above. What do you all think? Any constructive opinions will be greatly appreciated. Thanks in advance.
I recommend the link in my post OR the link provided by SixLegs. I dunno why the OEM Infiniti fogs are so much higher in price. When I changed mine out for the NIssan fogs, I could find absolutely NO difference in design or quality. Many of us have installed the Nissan fogs and have no troubles.
new-mods-completed-this-week-t588873.ht ... og%20light
-
Six_Legs
- Posts: 264
- Joined: Mon May 05, 2014 11:28 am
- Car: 2007 Infiniti M45 Sport
1995 Nissan 240SX SE 5spd - Location: Nor Cal
Re: Official Lighting Thread
^^^THIS
That was the link I wanted, no patience...lol!! Referenced it more than once in the past but was in a hurry earlier.
Osrams and PIAA's still on my to do list. Sadly, Light@Day DLR's aren't avail anymore.
It's just as well with the Osram DRLs. They only worked properly for a few weeks which absolutely shocked me. I went back to Phillips Daylight-8 DRLs. Phillips are in my opinion the absolute best. They are also smaller and thinner so they fit our cars much better.
-
CPJ LB
- Posts: 1026
- Joined: Sat Aug 28, 2010 4:06 pm
- Car: 12 G37X Sedan- stealthy modded
14 Altima 2.5
08 Tahoe
06 M35 S (gone)
14 Versa 4dr (gone) - Location: CA 2 CT
Re: Official Lighting Thread
FYI guys...the online shop that I order many of my light bulbs (the basic replacements for all my cars) like the OSRAM wedge bulbs, fog light bulbs (non-LED), etc...is having a discount.... However, I buy my HID bulbs at Retrofit Source. I believe that Powerbulbs is out of Europe and you can get the "hard to get lighting items" only found in the EU, but I've never experienced any issues with their shipping (which is normally free), it's just a day or two longer than US shipping time frames...great service.
Here's the link:
http://www.powerbulbs.com/us
discount code: MONSTER20
Hope this helps....
Here's the link:
http://www.powerbulbs.com/us
discount code: MONSTER20
Hope this helps....
Re: Official Lighting Thread
Hey guys, I went to change my lights after purchasing a set of Morimoto XB35 5500K bulbs and to my surprise I have different bulbs. It looks like I don't have HID bulbs as I don't see a ballast and the model number of the bulb is Phillips 12258LL.
Is there a way I can convert to an HID system so I can use the bulbs I bought? If not, what should I do?
Thanks
Is there a way I can convert to an HID system so I can use the bulbs I bought? If not, what should I do?
Thanks
-
Ilya
- Moderator
- Posts: 9208
- Joined: Fri Apr 23, 2010 11:20 pm
- Car: 2011 M56x but I spend a lot of time on my 2015 Kawasaki Vulcan S. Former owner of a 2007 M35x. Also take care of my wife's 2016 QX60.
- Location: Charlotte, NC
- Contact:
Re: Official Lighting Thread
Just buy a set of AMP ballasts from TRS...
Re: Official Lighting Thread
Is this http://www.theretrofitsource.com/compon ... MUmh_54rYg all I need?IlyaKol wrote:Just buy a set of AMP ballasts from TRS...
-
moedawg140
- Posts: 175
- Joined: Sat Jan 23, 2010 8:47 pm
- Car: 06 M35 S (Adv. Tech)
LI Quad
G37 BBK with H&R DRS
(15mm F, 10mm R)
Focal 165KRX2 (F)
Infinity Kappa 63.9i (R)
Alpine Type-X 10"
JL HD900/5 (sub chnl.)
RF CPCD10-03
Morimoto 4,300K H11
Re: Official Lighting Thread
Hello everyone,
I installed the D2S Morimoto XB 4,500K bulbs (http://www.theretrofitsource.com/compon ... TYWSSFViko) to replace my OEM HIDs because I wanted brighter light, and suffice to say, I am very disappointed. The bulb is bright I suppose, but the light is a really warm color, about the same color as regular halogen lights. It's more of a 3,800K color that is outputted, in my opinion. I have had these for the last few weeks, and I thought the color would change to a more whiter or bluer color after around 20 hours of use, but was unable to see a significant difference in color output after running the bulbs every time I drove, day and night.
I should have just purchased what I thought would be a great HID bulb to use, which is the D2S OSRAM XENARC 66240 CBI 5,500K - originally (as far as I know) recommended by Larz - the first time. I purchased the OSRAM XENARC 66240 CBI this morning, and I will let everyone know how they compare to the Morimoto and OEM bulbs. Thank you Ilya for also posting the discount code that you used, because it still worked for me!
Larz, do you have any pictures of the the flank bulbs that you use for the parking lights? I currently use the 5 LED bulb, and if your halo effect you created looks snazzy, I may want to change out my bulb to the flank!
Update - The V3 Triton front and rear bulbs are still functioning well, and the VLEDS puddle lights are still lighting up the ground whenever they are on!
-
Brian35XR
- Posts: 142
- Joined: Sun Jul 20, 2014 8:12 am
- Car: 2011 Infiniti M37x
2006 Infiniti M35x
2004 Infiniti G35 - Sold
Re: Official Lighting Thread
the new TRS morimoto XB bulbs are very poor quality and about half i'd say have that ugly yellow/green problem. they try to say they start off that color and need atleast 40+ hours of burn in but they stay the same color afterwards!!!moedawg140 wrote:Hello everyone,
I installed the D2S Morimoto XB 4,500K bulbs (http://www.theretrofitsource.com/compon ... TYWSSFViko) to replace my OEM HIDs because I wanted brighter light, and suffice to say, I am very disappointed. The bulb is bright I suppose, but the light is a really warm color, about the same color as regular halogen lights. It's more of a 3,800K color that is outputted, in my opinion. I have had these for the last few weeks, and I thought the color would change to a more whiter or bluer color after around 20 hours of use, but was unable to see a significant difference in color output after running the bulbs every time I drove, day and night.
check hidplanet.com and you'll see tons of posts complaining of the same issue. they changed manufacturers between the time they shifted from 5000k/6000k to 5500k/6500k. i'd ask for a refund.
-
Larz
- Moderator
- Posts: 2894
- Joined: Thu Feb 21, 2013 8:55 pm
- Car: 2019 Q70-L RWD
- Location: Ft Lauderdale, Florida
- Contact:
Re: Official Lighting Thread
This is the bulb I used. It comes in 6k or 5k - the 5k matches the CBI headlamps better. After changing the bulb, the trick comes in twisting the housing back into the headlamp hole. Start the twist at different points along the notches so that the LEDs end up facing straight down or straight up (different effects) instead of just randomly twisting it back in.moedawg140 wrote:Hello everyone,
I should have just purchased what I thought would be a great HID bulb to use, which is the D2S OSRAM XENARC 66240 CBI 5,500K - originally (as far as I know) recommended by Larz - the first time. I purchased the OSRAM XENARC 66240 CBI this morning, and I will let everyone know how they compare to the Morimoto and OEM bulbs. Thank you Ilya for also posting the discount code that you used, because it still worked for me!
Larz, do you have any pictures of the the flank bulbs that you use for the parking lights? I currently use the 5 LED bulb, and if your halo effect you created looks snazzy, I may want to change out my bulb to the flank!
http://www.vleds.com/shop-bulb-numbers/ ... 4-hpf.html
** PS: You will love the CBI bulbs. Sharper cut-offs and much wider coverage on the sides. Very close to daylight and on long trips I had much less eye fatigue. Also less wash-out under those high intensity roadway lamps.