
new direction
new direction
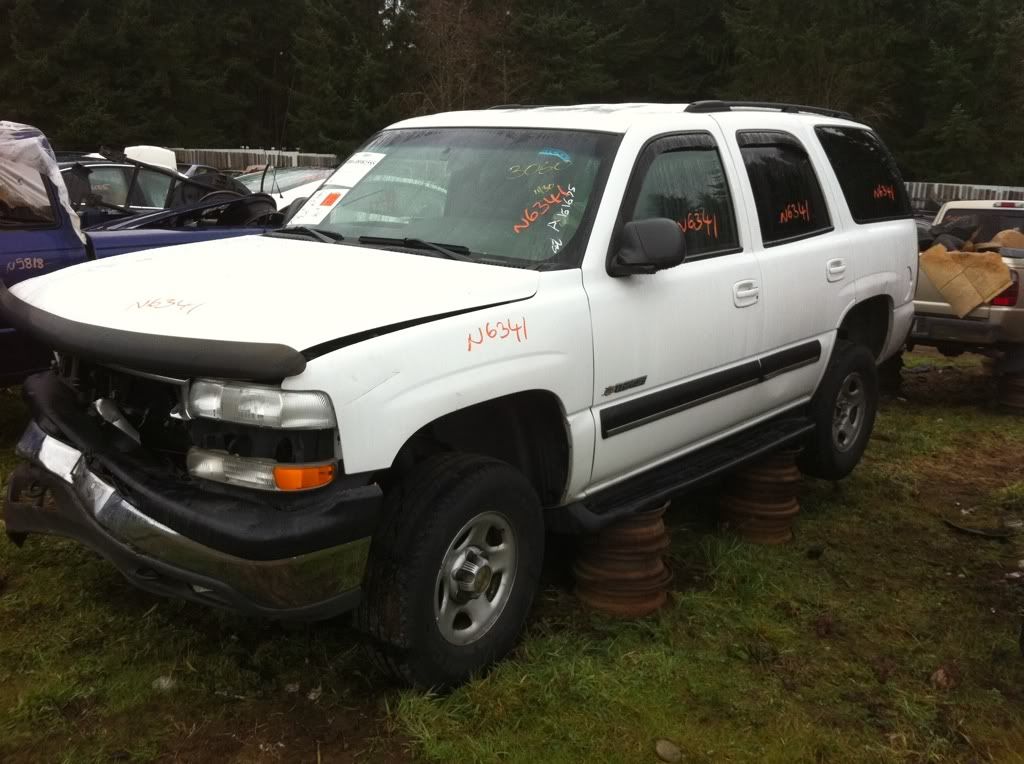
so yesterday I was browsing CL and hoping to find something I couldn't live without. came across a 2003 Tahoe and bought the 5.3L, transmission, t/case, wiring harness, and PCM.
-
Rev_D21

- Posts: 5946
- Joined: Sun Jan 12, 2003 9:49 pm
- Car: 1986.5 D21 LB HD 2WD V6 5Speed
1991 D21 Reg 2WD Auto
1995 D21 Reg 2WD 5Spd
1996 D21 Reg 4WD 5Spd
2012 Versa 1.6S 5-Speed - Location: Somwhere in Western NY
- Contact:
Re: new direction
That's crazy! How much did all that end up costing if you don't mind my asking?
Re: new direction
still not done, I've made a few changes. Rebuilt the 5.3L,

rebuilt the 4L60E,

rebuilt a NP241C, not using theNP246 as its a fully automatic transfer case,

then I came across a king cab for cheap,

so I removed the cab...

and I installed it...

I had to modify the cab to fit the gas tank and I installed a pathy tank as well...


so now I will be finishing the chassis making the trans mount, drivelines, exhaust...

rebuilt the 4L60E,
rebuilt a NP241C, not using theNP246 as its a fully automatic transfer case,
then I came across a king cab for cheap,
so I removed the cab...
and I installed it...
I had to modify the cab to fit the gas tank and I installed a pathy tank as well...
so now I will be finishing the chassis making the trans mount, drivelines, exhaust...
Re: new direction
Awesome.
-
Rev_D21
- Posts: 5946
- Joined: Sun Jan 12, 2003 9:49 pm
- Car: 1986.5 D21 LB HD 2WD V6 5Speed
1991 D21 Reg 2WD Auto
1995 D21 Reg 2WD 5Spd
1996 D21 Reg 4WD 5Spd
2012 Versa 1.6S 5-Speed - Location: Somwhere in Western NY
- Contact:
Re: new direction
Awesome project!
Re: new direction
so I've been struggling over the crossmember for the transmission the past couple of days and it finally started to work the way I planned.


the plan is to run 2 pieces of angle iron from front to back, one for each bolt.


my buddy help me out with the welding...


the plan is to run 2 pieces of angle iron from front to back, one for each bolt.
my buddy help me out with the welding...
Re: new direction
well, so I did little stuff today, I finished welding the transmission crossmember, the auxillary tank mount, the rear body mounts, the passenger side e-brake cable and the switching valve mount. then put on the stock exhaust manifolds to reconsider those...

I still need to weld in the actual angle iron for the trans mount, but the trans is in place and sitting on the crossmember.


the stock manifolds sit flush to the head so I won't need any mods there but they hang over the frame more than the headers. decisions to be made...


I still need to weld in the actual angle iron for the trans mount, but the trans is in place and sitting on the crossmember.
the stock manifolds sit flush to the head so I won't need any mods there but they hang over the frame more than the headers. decisions to be made...
Re: new direction
thanks for all the input guys. I've searched a little more and it seems that the Toyota guys doing LS swaps are using S-10 headers so I'm going to order a set of those and see how they fit. In the mean time, I'm trying to get my buddy to bring over the bed that was being modified for the dual tanks. I need to get it fitted and cut down 14" in the front. I still need to run the fuel lines and possibly reroute the rear break line. I've run the air line for the rear locker but I'm not satisfied with the connection point with the flex line. I also found out that on the accessory drive, the truck sticks out almost 4" from the block were the LS2 corvette accessory drive is just over 2" from the block. so I'm going start looking for that setup and see if I can use that and keep the radiator and condenser together up front with dual fans.
Re: new direction
today again I did the little tedious stuff. hopefully for the last time the engine, trans and transfer are out.

I finished the engine mounts and welded them in... and like an idiot I shifted the driver side a bit because it was binding when I was pulling the engine out. didn't check it before finish welding and yep you guess it, have to redo the dr. side. grrr. got myself in a hurry and didn't double check myself. damn damn.


I did finish the parking brake cable. I finally will have parking brakes again. woo hoo.


I finished the engine mounts and welded them in... and like an idiot I shifted the driver side a bit because it was binding when I was pulling the engine out. didn't check it before finish welding and yep you guess it, have to redo the dr. side. grrr. got myself in a hurry and didn't double check myself. damn damn.
I did finish the parking brake cable. I finally will have parking brakes again. woo hoo.
Re: new direction
ok, fixed the driver side engine mount and mounted the drivetrain.

then my buddy brought the bed over and we notched to fit over the coilover towers and get ready to cut down the front to fit the cab. no the side is not completely finished...


if you notice where the slider rear mount is the bed will bed will be cut down that far. or right about where the 7" line is.

the coilover towers...


bed length after the tire...

here's a good comparison difference between the truck tail light and pathy tail light and how the truck will look from the rear.

then my buddy brought the bed over and we notched to fit over the coilover towers and get ready to cut down the front to fit the cab. no the side is not completely finished...
if you notice where the slider rear mount is the bed will bed will be cut down that far. or right about where the 7" line is.
the coilover towers...
bed length after the tire...
here's a good comparison difference between the truck tail light and pathy tail light and how the truck will look from the rear.
Re: new direction
so not much happened so far this weekend. poor planning on my part as I am waiting on parts. I feel like I've been banished from the garage 
made some heat shields for the coilover towers which will serve 2 purposes; 1 a heatshield to protect the coilover from boiling, and 2 to keep down the mud, grime, dirt from entering the engine compartment. then I cut down the exhaust manifolds.


made some heat shields for the coilover towers which will serve 2 purposes; 1 a heatshield to protect the coilover from boiling, and 2 to keep down the mud, grime, dirt from entering the engine compartment. then I cut down the exhaust manifolds.
Re: new direction
Christmas time in MAY!!!

I was hoping for more but half of those are the wife's. I received my accessory kit today so I had to fit it. Turns out I'm going to have to use the high AC mount after all. I would have to cut way too much frame for this compressor.


this will definitely fit under the hood.

and the room up front

I was hoping for more but half of those are the wife's. I received my accessory kit today so I had to fit it. Turns out I'm going to have to use the high AC mount after all. I would have to cut way too much frame for this compressor.
this will definitely fit under the hood.
and the room up front
-
confused9
- Posts: 297
- Joined: Thu Sep 06, 2007 8:48 pm
- Car: '91 HatBackwards 240sx
dead and gone '89 hatch
Re: new direction
this is SWEET  what are you using this bad boy for?
-
Rev_D21
- Posts: 5946
- Joined: Sun Jan 12, 2003 9:49 pm
- Car: 1986.5 D21 LB HD 2WD V6 5Speed
1991 D21 Reg 2WD Auto
1995 D21 Reg 2WD 5Spd
1996 D21 Reg 4WD 5Spd
2012 Versa 1.6S 5-Speed - Location: Somwhere in Western NY
- Contact:
Re: new direction
dvdswan wrote:

Re: new direction
so true, luckily I have a UPS girl which makes it so much better. lol.
Re: new direction
I started working on the exhaust today. I got the passenger side completely tacked together and started the driver side and realized I needed another 45* pipe. ooops. My buddy started helping with the bed and got it laid out and part of it removed.


the outside panel will be the length of the bed. around 4'.

the outside panel will be the length of the bed. around 4'.
Re: new direction
so I got the pass side back from my buddy.


Re: new direction
well a little of progress today but not much. I got more parts, fuel pumps because the stock ones I found out aren't actually rated for 60 psi, they can do it but for how long not sure. gauges I'm still not sure but I want to use the stock cluster, these are a back up and steel tubing for the fuel lines and finish welding the front part of the exhaust...


and the pups came to help...


and the pups came to help...
Re: new direction
so today I put the cab back on to finish the bed and install the front bed brackets. also need to finish some odds and ends for the engine. once that is done I can remove the cab for the last time and paint it.


-
Rev_D21
- Posts: 5946
- Joined: Sun Jan 12, 2003 9:49 pm
- Car: 1986.5 D21 LB HD 2WD V6 5Speed
1991 D21 Reg 2WD Auto
1995 D21 Reg 2WD 5Spd
1996 D21 Reg 4WD 5Spd
2012 Versa 1.6S 5-Speed - Location: Somwhere in Western NY
- Contact:
Re: new direction
Do you have a picture of your transmission cover plate? I have one that covers an auto with no shifter hole. Might work for you.
Re: new direction
I actually already found one and its on its way. thank you though.
so today I received the alternate AC that I wanted to stay away from just because it wasn't factory. it will actually work out very nicely. instead of removing 1/2 the frame in the front (4x6 area) all I need to do is remove the battery tray. I also have 3" from the accessories to front core support so I am pretty sure I can find a radiator and a dual fan setup to fit. I also fitted the 4WD selector in the cab no picture though.


so today I received the alternate AC that I wanted to stay away from just because it wasn't factory. it will actually work out very nicely. instead of removing 1/2 the frame in the front (4x6 area) all I need to do is remove the battery tray. I also have 3" from the accessories to front core support so I am pretty sure I can find a radiator and a dual fan setup to fit. I also fitted the 4WD selector in the cab no picture though.
-
Rev_D21
- Posts: 5946
- Joined: Sun Jan 12, 2003 9:49 pm
- Car: 1986.5 D21 LB HD 2WD V6 5Speed
1991 D21 Reg 2WD Auto
1995 D21 Reg 2WD 5Spd
1996 D21 Reg 4WD 5Spd
2012 Versa 1.6S 5-Speed - Location: Somwhere in Western NY
- Contact:
Re: new direction
Could you snap a pic of your old cover plate for me? I need to see how the 4wd cover plate mounts up to the floor and it's overall shape.
Re: new direction
I don't have the old cover 5sp/4wd one that I can remember. but here are 2 that I do have the 1st is out of a pathy 4wd auto and the 2nd is a 2wd auto.


Re: new direction
I removed the battery tray, I will need to customize the fender well a little with a ball peen so the AC compressor doesn't hit it. other than that the compressor fits nicely, I need to switch the idler and tensioner pulleys which is no biggie. I'm really surprised no one has put a kit together for an LS motor for our trucks, it has been relatively easy on mods to fit it. maybe its because of the SAS IDK. now I can make the AC high and low pressure lines. I also installed the shifter for the transmission.


Re: new direction
so today I finished tacking up the exhaust. all that's left are the hangers. also, finished the truck fuel tank, just need to install that.


Re: new direction
so today I installed the front driveline with a new CV joint on it, installed the exhaust (now I just need to put hangers on it), install the front of the engine for fitment of the radiator and its tight. I'm still fighting the bed mount radiator. Also, got the bed set to the proper height and placement for installing the front bed mounts. I will be trimming to move the rad forward about an inch and need to figure out how the hoses are going to work and I need to find some really thin electric fans now.


Re: new direction
did some more fitting today. trimmed a old pathy grille for fittings as well.


the lower hose will fit fine to the waterpump but like the top hose connection I will have to put a 90* connection for them. Called Speedway Motors earlier in the week and they have tight bending aluminum tubing.


did some fitting for the oil pan as well.

the lower hose will fit fine to the waterpump but like the top hose connection I will have to put a 90* connection for them. Called Speedway Motors earlier in the week and they have tight bending aluminum tubing.
did some fitting for the oil pan as well.
Re: new direction
well not much happened this weekend, well at least to the truck. I made some radiator brackets and the start of the heater hose brackets. I need to add some foam strips to them and need to figure a way to hold the radiator down.


Re: new direction
ok, so now I'm torn again. I picked up a LS1 intake for cheap and figured I see what the differences were. well, here's the truck intake....


and the LS1 intake...


and the best part is... no need to fab the crossover hoop...

now its decision time... I go with the LS1 intake I need to pick up possible fuel rails, injectors and the fuel filter (not cheap BTW)... oooh and the coolest part... engine covers

and the LS1 intake...
and the best part is... no need to fab the crossover hoop...
now its decision time... I go with the LS1 intake I need to pick up possible fuel rails, injectors and the fuel filter (not cheap BTW)... oooh and the coolest part... engine covers
Re: new direction
so today I worked on the bed for a little. made a filler piece and it looks like I need to align the pathy side better, its off about an 1/8" grr. I then placed the 2 front bed mounts and tacked them on the frame. then went the the back and tacked in the tailgate support and it certainly stiffened up the bedside.


