ItzGenX Build Thread.

Discuss the RB20, RB25 and RB26 series engines.
ItzGenX
Posts: 1204
Joined: Wed Sep 04, 2002 7:46 pm
Car: Smoke Purple 95' S14.5. Powered by the "Iron Man".
Location: Gulfport, MS
Contact:

Post

Here is a little bit of what I have gotten done in the past week or two. I got to fiddle around with the car for 2 or 3 days out of a couple of weeks. Most of the time was spent drinking beer in the driveway with the buddies though. :spitout: What I got done was filled in all the gaps to make the shock towers a new home and replaced some stock panels topped with primer. I didn't really take enough pics to be honest. Anyways, heres the couple I did end up taking.
Image
Image

I still need to do a ton of seam sealing and painting.


ItzGenX
Posts: 1204
Joined: Wed Sep 04, 2002 7:46 pm
Car: Smoke Purple 95' S14.5. Powered by the "Iron Man".
Location: Gulfport, MS
Contact:

Post

Image

I have been busy with life lately, but I have gotten to this point today before life called in again. My seam sealing needs some work on the finesse end of things, but it gets the job done. Majority of the engine bay has been sprayed with chemical resistant, high temp bbq grill paint of the flat black flavor :rotfl . I pulled the silly battery tray off which was not fun but came off easily enough compared to when I tore the stock shock towers off. I also pulled the engine bay wiring and fuse box for relocation to where the passenger air bag resides. I got it all pulled up to the firewall grommet on the driver side firewall. I thought I only needed to unplug the SMJ to pull the entire harness off the car, but it seems I will need to pull the dash off to get to the rest of it since it branches off into a bunch of small connectors littered under the dash. Tomorrow I will probably pull the front subframe back off to bead blast it, paint it, and put it back on along with the rest of the skyline suspension for test fitment *fingers crossed*. If I am feeling up to the task, I may pull the dash tomorrow as well :woot: .
Image
It's even more hideous when it's off the car.

l0nestar
Posts: 2251
Joined: Fri Mar 10, 2006 5:24 am
Car: 1993 Nissan 250SX
2004 Toyota Altezza
1963 Chevy Impala SS
Contact:

Post

Progress! :)

bmxarmy
Posts: 254
Joined: Tue Oct 12, 2010 7:27 pm
Car: 1961 AMC Rambler

Post

god bless flat black! haha, gotta love it!

Keep up the good work

qwertyz
Posts: 101
Joined: Sat Aug 25, 2007 12:49 pm
Car: Nissan S14 AWD

Post

good job man looks awesome

ItzGenX
Posts: 1204
Joined: Wed Sep 04, 2002 7:46 pm
Car: Smoke Purple 95' S14.5. Powered by the "Iron Man".
Location: Gulfport, MS
Contact:

Post

Oh wow, it's been a long time that I've forgotten to update. I have been kind of caught up in life and everything that comes with it, but I haven't forgotten to invest time here and there into the project. An hour of work is an hour closer to being finished right? I ended up moving everything back a couple of inches (including the towers), pics to come. Pics can also be viewed in my picasa albums

https://picasaweb.google.com/taiphoon228/DropBox#

ItzGenX
Posts: 1204
Joined: Wed Sep 04, 2002 7:46 pm
Car: Smoke Purple 95' S14.5. Powered by the "Iron Man".
Location: Gulfport, MS
Contact:

Post

If you need any picture explanations/captions, you can view the album directly from the above post. I am just going to post all the individual related pics here just for the lazies.

Image
Image
Image
Image
Image
Image
Image
Image
Image
Image
Image
Image
Image
Image
Image
Image
Image
Image
Image
Image
Image
Image
Image
Image
Image
Image
Image
Image
Image
Image
Image
Image
Image
Image

That's it for now. Engine transmission going in for a test fit soon to see where I need to make room for the starter and transfer case. Also have to fab up a transmission mount after it all clears. Then from there, I will need to work on a ton of wiring, fabbing up turbo manifold and charge pipes, order a driveshaft, figure out control of the ATESSA pump, and lines lines lines. I'm sure I am leaving something out of the to-do list, but I just tackle them as I go.

julio
Posts: 374
Joined: Fri Oct 06, 2006 1:18 pm
Car: RB26 AWD converted S14

Post

If you haven't already, you will need to chop off the atessa mount on the top of the rear diff. Good to see it moving along.

ItzGenX
Posts: 1204
Joined: Wed Sep 04, 2002 7:46 pm
Car: Smoke Purple 95' S14.5. Powered by the "Iron Man".
Location: Gulfport, MS
Contact:

Post

Yea the mounting ears were the first to go. I didn't feel like manually typing out a story for every picture. On my photo album, there are individual captions for pictures stating what was done or what you are looking at :chuckle:

ItzGenX
Posts: 1204
Joined: Wed Sep 04, 2002 7:46 pm
Car: Smoke Purple 95' S14.5. Powered by the "Iron Man".
Location: Gulfport, MS
Contact:

Post

Quick update! I tried to shoehorn it all in today, and as expected, I ran into some clearance issues. I had a bit of trouble tugging boating everything around by myself, but it went in and stopped 1.5 inches from sitting on the engine mounts. The transmission tunnel has a very useless hump spot welded on from the factory that I will need to remove and hammer under where it is at to clear the transfer case. The stock passenger side transmission bracket mounting point needs to be chopped off I think, due to the front drive shaft passing through the area, but the transfer case can clear to rest behind it just fine. I will probably cut some of it off to be safe. I will post the few pics I have for today after I get to work.

ItzGenX
Posts: 1204
Joined: Wed Sep 04, 2002 7:46 pm
Car: Smoke Purple 95' S14.5. Powered by the "Iron Man".
Location: Gulfport, MS
Contact:

Post

Ok here are the pics of today I promised.

Image
Such a cold morning to start lugging this thing around the driveway.

Image
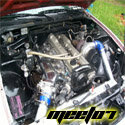
I had just enough head room to get it into the bay. There was about 1/8 inch gap from hitting the garage door.

Image
Here is a shot of the transmission starting it's way into the tunnel. It's longer than the engine bay!

Image
I had to cut the adjustment handle off the harbor freight leveler due to interference with the chain :facepalm: . It worked just fine with a cresent wrench after that :woot: .

Image
I had to shimmy, shake, huff, puff, grunt, snort, and roar to get it in that far. That's all she had due to the transfer case bumping into a mysterious hump in the transmission tunnel. Only 1.5 inches to go... :ohno: .

Image
Here is the common area where the bell housing hits the transmission tunnel with RB swaps. I have seen this done two ways, grind off the webbing on the bell housing around the starter hump, or you can simply beat the transmission tunnel until it submits to your demands.

Image
This is why I couldn't get it all the way in (that's what she said). There's a funky nonfunctional hump just behind the stock transmission bracket mounting point on the passenger side held on with just 6 spot welds.

Image
Here's a view of the shifter hole while I was sitting in the car for a break. It looks like it will center up nicely when everything is scooted back that last 1.5 inches.

Image
I channeled my anger from not being able to get the engine fully mounted. It was a Thor moment. Hopefully that is enough to clear the bell housing.

Image
There is the bastard hump on the right that ruined my progress. I will have to grind off the 6 spot welds and hammer the area it is covering to clear the transfer case. To the left of it is the stock transmission mounting point. I will probably need to trim it down in case the front driveshaft doesn't agree with it. I am positive I can't mount the transmission using those points either, so off it goes. That's the plan for tomorrow - grind, chop, bang, and try again. It SHOULD be at home in the car by the end of this weekend.

ItzGenX
Posts: 1204
Joined: Wed Sep 04, 2002 7:46 pm
Car: Smoke Purple 95' S14.5. Powered by the "Iron Man".
Location: Gulfport, MS
Contact:

Post

Didn't get everything FULLY mounted this weekend, but it is close enough. I didn't have the metal to start on the transmission mount since the metal suppliers aren't open on the weekend. I will have to go pick up some metal tomorrow so that I can get started on it.

Image
This is after the removal of the hump and mounting point in the transmission tunnel.

Image
It's not pretty, but after several test fits and a lot of banging to the point of exhaustion, the transfer case finally barely clears the tunnel.

Image
The engine finds itself sitting on a bunch of unused aluminum subframe spacer shims at the end of the day. We found the nismo engine mounts to sit the engine about 6 inches from the moon. This was going to cause problems with hood clearance and tunnel clearance.

Image
This is what I spent my Sunday doing. I welded up all the aluminum spacers to form a solid engine mount. It doesn't look it, but I saved an inch compared to the nismo mounts. The oil pan, diff, and axle flange clear the subframe by about 1/8". I had to lengthen the mounting slots so that I could use a straight bolt.

Image
Much better! Now I won't have to use a Subaru WRX STI hood. It also allowed me to lower the transmission a little to give a little more clearance with the tunnel. The transmission is being held up by a floor jack where I want it. I need to get around to fabbing up the transmission mount bracket within the week.

Image
Yay to a normal shifter location. It only sits about 1/4 past the center. I hated the Mazworx shifter location when I used the Z32TT transmission on my SR22. I couldn't use the console boot or trim piece unless I didn't use 2nd, 4th, or reverse. It centered the shifter where that cut out location is, 2 inches back, 1 inches left :facepalm: .

ItzGenX
Posts: 1204
Joined: Wed Sep 04, 2002 7:46 pm
Car: Smoke Purple 95' S14.5. Powered by the "Iron Man".
Location: Gulfport, MS
Contact:

Post

I got a little bit of fab time in today. The transmission is now fully bolted on now. I just need to remove the mount bracket later this weekend so that I can clean it up and paint it along with undercoat on the frame rail area. The idiotic Nismo mount fails here too. It also sits 1/2"+ higher than the stock unit. It doesn't make sense why Nismo would make their mounts so much taller since it raises the center of gravity for the car. No thanks to that!

Image
Stock left, Nismo right. I ended up welding the stock mount up to become a solid unit since the rubber had cracks all the way through it. Also, I figure if the engine mounts are solid, might as well make the trans mount solid too. It helps tie in the engine and trans to become a structural part of the car to increase rigidity. The vibration and noise will suck :tisk:

Image
This is the basic mocked stencil layout of the bracket. The plan of attack was to make it fit onto the transmission with nuts and bolts, then come back and make reinforcements. I do not have the prefit picture, but this is what I came up with.

Image
The phone went a little out of focus, but here you can see the 1/4" plate I welded onto the passenger side frame rail to serve as a mounting point anchor for the passenger side of the bracket. I made it way bigger then I needed so that it helps spread the load out a bit since the frame rails under our cars are thin and flimsy.

Image
Image
The mount bracket all tacked up along with a bolted on flange that will be welded onto the passenger side frame rail plate.

Image
Image
All welded up and waiting on some cooling before I handle it. You can probably see the welds in short sections to prevent warping. What I did was welded a couple inches or so and let it cool down. After cooling, I welded another short seam but in another spot in order to not heat soak any particular area.

Image
Installed onto transmission and welded up the flange onto the frame rail. This is the driver's side view.

Image
Here's the passenger side view. The flange is welded up to the plate on the frame rail now.

That's it for now. I need to get it removed, cleaned, painted etc. It's a little ghetto looking, but it should be enough to hold it all in during awd launches :mike .

ItzGenX
Posts: 1204
Joined: Wed Sep 04, 2002 7:46 pm
Car: Smoke Purple 95' S14.5. Powered by the "Iron Man".
Location: Gulfport, MS
Contact:

Post

I didn't get much done today since I was in brain fart mode. I didn't pull the trans mount back off to refinish it since my mind was set on trying to make an apparatus to bolt onto my chop saw to cut SCH 10 SS pipe at adjustable acute angles. I kind of have the image in my mind of how I want to fab it, but I do not have the pieces of steel to make it (and won't until a weekday). If you are wondering what it is that I am trying to do? It's for cutting the pieces to build a turbo merge collector. It will be a great learning experience that will probably look like poo lol. So after staring at the saw and drawing images in my head, I ended up giving my biceps a nice burn by holding my turbo in various places to help picture where I wanted actually wanted it. I hate how the rb leans towards the exhaust side. It totally kills the real estate available on that side. So after that, I ended up crawling under the car to grab measurements for the driveshaft and emailed pics of both flanges, rough measurements, etc to Shaft Masters. Hopefully they have the flanges to make it. I have no clue if any USDM car has these flanges. It doesn't look like I will get much done this weekend, but it will definitely be a 'drawing board' weekend. I could pull the dash and get started on some wiring, but I feel that should be one of the last things to dive into. I will just enjoy the weekend off :).

julio
Posts: 374
Joined: Fri Oct 06, 2006 1:18 pm
Car: RB26 AWD converted S14

Post

Rear should be a TTZ32, you can use a rear infinity flange for the trans (can't remember which model).

ItzGenX
Posts: 1204
Joined: Wed Sep 04, 2002 7:46 pm
Car: Smoke Purple 95' S14.5. Powered by the "Iron Man".
Location: Gulfport, MS
Contact:

Post

Thanks! If they aren't sure which flanges I have, I will be sure to pass on that information to them.

julio
Posts: 374
Joined: Fri Oct 06, 2006 1:18 pm
Car: RB26 AWD converted S14

Post

ItzGenX wrote:Thanks! If they aren't sure which flanges I have, I will be sure to pass on that information to them.
I'm pretty sure I used shaftmasters as well. Does he only have 4" aluminum components for a mid-shaft slip yoke? I think I grabbed the last of his 3.5" components. Anyways, I believe the awd trans flange is the rear diff flange off an M45.

ItzGenX
Posts: 1204
Joined: Wed Sep 04, 2002 7:46 pm
Car: Smoke Purple 95' S14.5. Powered by the "Iron Man".
Location: Gulfport, MS
Contact:

Post

Yea, I've seen the GTR flange before, but I can't remember what it was. I used to work at a dealership, and the only thing I can think of is the G35X with the same flange. I haven't ever tinkered with a M35/45.

DLeeTT
Posts: 60
Joined: Wed Oct 26, 2011 8:50 pm
Location: FLorida

Post

wow this build is amazing for the simple fact that you're doing all the fab work. :dblthumb:

julio
Posts: 374
Joined: Fri Oct 06, 2006 1:18 pm
Car: RB26 AWD converted S14

Post

julio wrote:
ItzGenX wrote:Thanks! If they aren't sure which flanges I have, I will be sure to pass on that information to them.
I'm pretty sure I used shaftmasters as well. Does he only have 4" aluminum components for a mid-shaft slip yoke? I think I grabbed the last of his 3.5" components. Anyways, I believe the awd trans flange is the rear diff flange off an M45.
Best part was that it arrived in less than a week!
Image

ItzGenX
Posts: 1204
Joined: Wed Sep 04, 2002 7:46 pm
Car: Smoke Purple 95' S14.5. Powered by the "Iron Man".
Location: Gulfport, MS
Contact:

Post

I have been in contact with David from Shaft Masters. The transmission flange was cross referenced from my measurements to an Infiniti flange that he will have to order (1 week lead time). The rear diff flange, I told him Z32TT as Julio has said. I made sure to just google and browse ebay for images of the Z32TT differential to look at the flange, and it did look exactly the same as the R230 diff. I don't see nissan making many variations of this flange as it is somewhat unique looking with a concave cup that looks like a flower, raised lip around the flat face area around the outside of the flange, and 6 M10-1.25P holes -- beefy as hell. I just now looked up the diff flange from the M45, and it is the same looking too. I assume nissan just recycled parts out of their parts bin when they built the M35/45.

julio
Posts: 374
Joined: Fri Oct 06, 2006 1:18 pm
Car: RB26 AWD converted S14

Post

Have the suspension figured out yet?

ItzGenX
Posts: 1204
Joined: Wed Sep 04, 2002 7:46 pm
Car: Smoke Purple 95' S14.5. Powered by the "Iron Man".
Location: Gulfport, MS
Contact:

Post

Yea, the suspension was done a while back. It was a simple mix and match game, same as running a Z32 knuckle and brake swap. The front is all GTR with Z32 front coilovers. I'll have to run the front coils pretty low in the stroke range so it doesn't sit so high, but it should work. Rears, I retained all my old arms, subframe, and same coilovers with a Z32 lower mount.

ItzGenX
Posts: 1204
Joined: Wed Sep 04, 2002 7:46 pm
Car: Smoke Purple 95' S14.5. Powered by the "Iron Man".
Location: Gulfport, MS
Contact:

Post

Not much done today for the car itself, but I did get my cutting attachment made for the chop saw so that I can start on a turbo manifold merge collector. It's basically made of angle iron, a door hinge, a piece of 1.5" SS SCH-10 pipe, 1/4" nuts, and 1/4" threaded rod.

Image
Here is my chop saw in it's normal fashion attire. It's a Evolution Fury2 14" multipurpose saw. I like the fact that it cuts through any metal I put in it with a mill finish and no heat. I also cut wood with it on the same blade :biggrin: .

Image
This is where I spent my time today. I made it so that it simply bolts onto the chop saw base. It can be adjusted by that long threaded rod on the left. The threaded rod sticking out of the pipe is to clamp 1.25" SS SCH-10 pipe inside of it. I will replace all the threaded rod with the appropriate length bolts when I go to the Home Depot.

Image
Installed onto the saw base for testing.

Image
Here it is showing that it's adjusted to 15 degrees.

That's it for today. Tomorrow I will go grab some SCH-10 PVC pipe to practice on the merge collector. Once I am confident that I have the angles I want, I will just mirror it onto the SS pipe.

User avatar
Shocker
Posts: 2082
Joined: Sun Aug 01, 2004 2:40 pm
Car: 89 240sxHB rb26/30

Post

Looks like your making good progress nice to see all the custom fab work your doing! Any special way you plan to build your manifold? (forward facing, equal, divided ect?)

User avatar
meet07
Posts: 1189
Joined: Tue May 08, 2007 5:48 am
Car: 89 180sx rb25det
Location: North Carolina
Contact:

Post

I love fab work pics too!

bmxarmy
Posts: 254
Joined: Tue Oct 12, 2010 7:27 pm
Car: 1961 AMC Rambler

Post

hey man,
I made my own 6-1 collector for the rbambler, hit me up if you get stuck with anything.

ItzGenX
Posts: 1204
Joined: Wed Sep 04, 2002 7:46 pm
Car: Smoke Purple 95' S14.5. Powered by the "Iron Man".
Location: Gulfport, MS
Contact:

Post

Thanks for the offer on helping with the collector bmx, but I think I got it down :gapteeth: . I spent the weekend playing around with pvc at different angles and ended up settling for a 11.5 degree slash cut angle. I took about 10 feet of pvc before I found angles that I liked. Then today I spent my time making it out of the real pipe, and it turned out way better than I expected. I thought I was going to end up with some minor gaps, but most of it sits pretty damn flush with maybe a human hair gap in one spot.

Image
Driveshaft came in on Wednesday, and it looked great.

Image
I test fitted it on Thursday, and it fit like a glove.

Image
Here's the PVC pipe angle I came to like the most out of all my different cuts.

Image
A shot at the inside shows they sit nice and tight. I use a digital angle finder that is made for race car hub alignments. It lets me zero it out at any angle (the saw blade). I then just make a cut, rotate the pipe with the angle finder resting on the fresh cut until it says 90 degrees, lock the pipe down, and cut again. The center pipes need 3 cuts, but it's the same repeated method.

Image
Here are the actual stainless pipes cut and trimmed down to size. My saw blade was on it's last leg as I trimmed the excess length off, so I can't start on the manifold until I get a new blade on my chop saw.

Image
It's all tacked together here. Halfway through tacking it together, my damn chinese foot pedal fails on me yet again and burns a hole through one spot on the other side. I had to switch over to my big clunky torch with a thumb button. It's actually a lot easier to fusion tack with it since a button is far faster than a full pedal sweep, but I hate giant torches.

Image
Image
These aren't very good shots since it was getting dark and my garage lighting is terrible. The flash on the phone kind of washed it out, but it still shows how the inside looks. I couldn't be happier since this was my first go at anything even close to this complex. I am learning a lot of new things along the way with this car project, including tig welding :rotfl .

bmxarmy
Posts: 254
Joined: Tue Oct 12, 2010 7:27 pm
Car: 1961 AMC Rambler

Post

Outstanding job my man! I surprised myself also at how well it fit up. Keep up the great progress.

nolan

ItzGenX
Posts: 1204
Joined: Wed Sep 04, 2002 7:46 pm
Car: Smoke Purple 95' S14.5. Powered by the "Iron Man".
Location: Gulfport, MS
Contact:

Post

Here's a small update of pictures. I have been lazy :facepalm: .

Image
Image
Image
Image
Image
Image
Image
Image
Image
Image
Image
Image
Image
Image
Image
Image
Image

It just needs to be broken down, prepped, then welded back together. After that, I can finally give myself a pat on the back :laugh: .


Return to “RB20DET / RB25DET / RB26DETT Forum”