How do you diagnose wheel bearing noise?
How do you diagnose wheel bearing noise?
I have a roaring sound comming from the front of the car. I took to dealer, they said it was a bad tire but did not tell me which one. I had them rotate and balance tires. Noticed difference in 80-90mph, no shakes. I purchacsed new tires for the car but want to be certian it is the tires because the origninal tires have like 35% tread left in front and 40% in rear. Having jacked up the front of the car today to look at the front tires they are just slightly cupped on the inside edges. I noticed if I spin the right front wheel I can hear the pads rubbing agianst the rotor like they are wraped, yet the car does not shake under normal braking, I have not done any heavy braking. Is their a way to check bearings to make sure they are good or should I just ditch the original tires which seam to have a lot of life left in them (they are the Goodyear RSA which reading the posts are quite problematic). Or could wrapped rotors sound like bad tires/bearings?
-
loystock
- Moderator
- Posts: 2072
- Joined: Sun Sep 21, 2003 9:12 pm
- Car: 10 Honda Pilot
97 Infiniti Q45
03 Infiniti Q45
97 Infiniti I30
06 Infiniti M35 Sports
04 G35 & 99 I30-RIP - Location: San Jose, CA
Re: How do you diagnose wheel bearing noise? (1scott)
Most likely, the noise is from the tires, given the uneven wear. Aside from tramlining issue with the RSA tires, performance tires usually last @ 20K miles.
It's too early for a bearing to fail. And it sound more like a grinding sound, not roaring. You can check for any axial play on the wheel (must be 0.05mm/0.002in or less). If play is excessive (very unlikely), then you have to replace the hub/bearing. You can also check for the rotor runout (0.035in for the front, max) but that requires a dial gauge . To much runout will cause the rotor to 'touch' the pads off-and-on when you spin it.
You can check the rotors for warpage by doing a high-speed braking (>45MPH) - will shake/vibrate if rotors are warped.
-
svard75

- Posts: 1564
- Joined: Mon May 11, 2009 3:26 am
- Car: 06 M35x
- Location: Toronto, Ontario, Canada
Re: How do you diagnose wheel bearing noise? (loystock)
Actually I've had my bearings go and they replaced under warranty. It was hard to hear because I had tires that were worn unevenly so they too were making a loud whine. I just took it to a dealership and complained about the noises.
Modified by msvara at 6:55 AM 12/22/2009
Modified by msvara at 6:55 AM 12/22/2009
-
asavage
- Posts: 33
- Joined: Tue Apr 20, 2010 1:01 pm
- Car: 2006 M35 Sport RWD
- Location: Duvall, Wash.
- Contact:
Re: How do you diagnose wheel bearing noise?
I'm replacing the RF wheel bearing/hub on my partner's M35 (only 89k miles!) in a few days for persistent noise up there for the past few thousand miles.
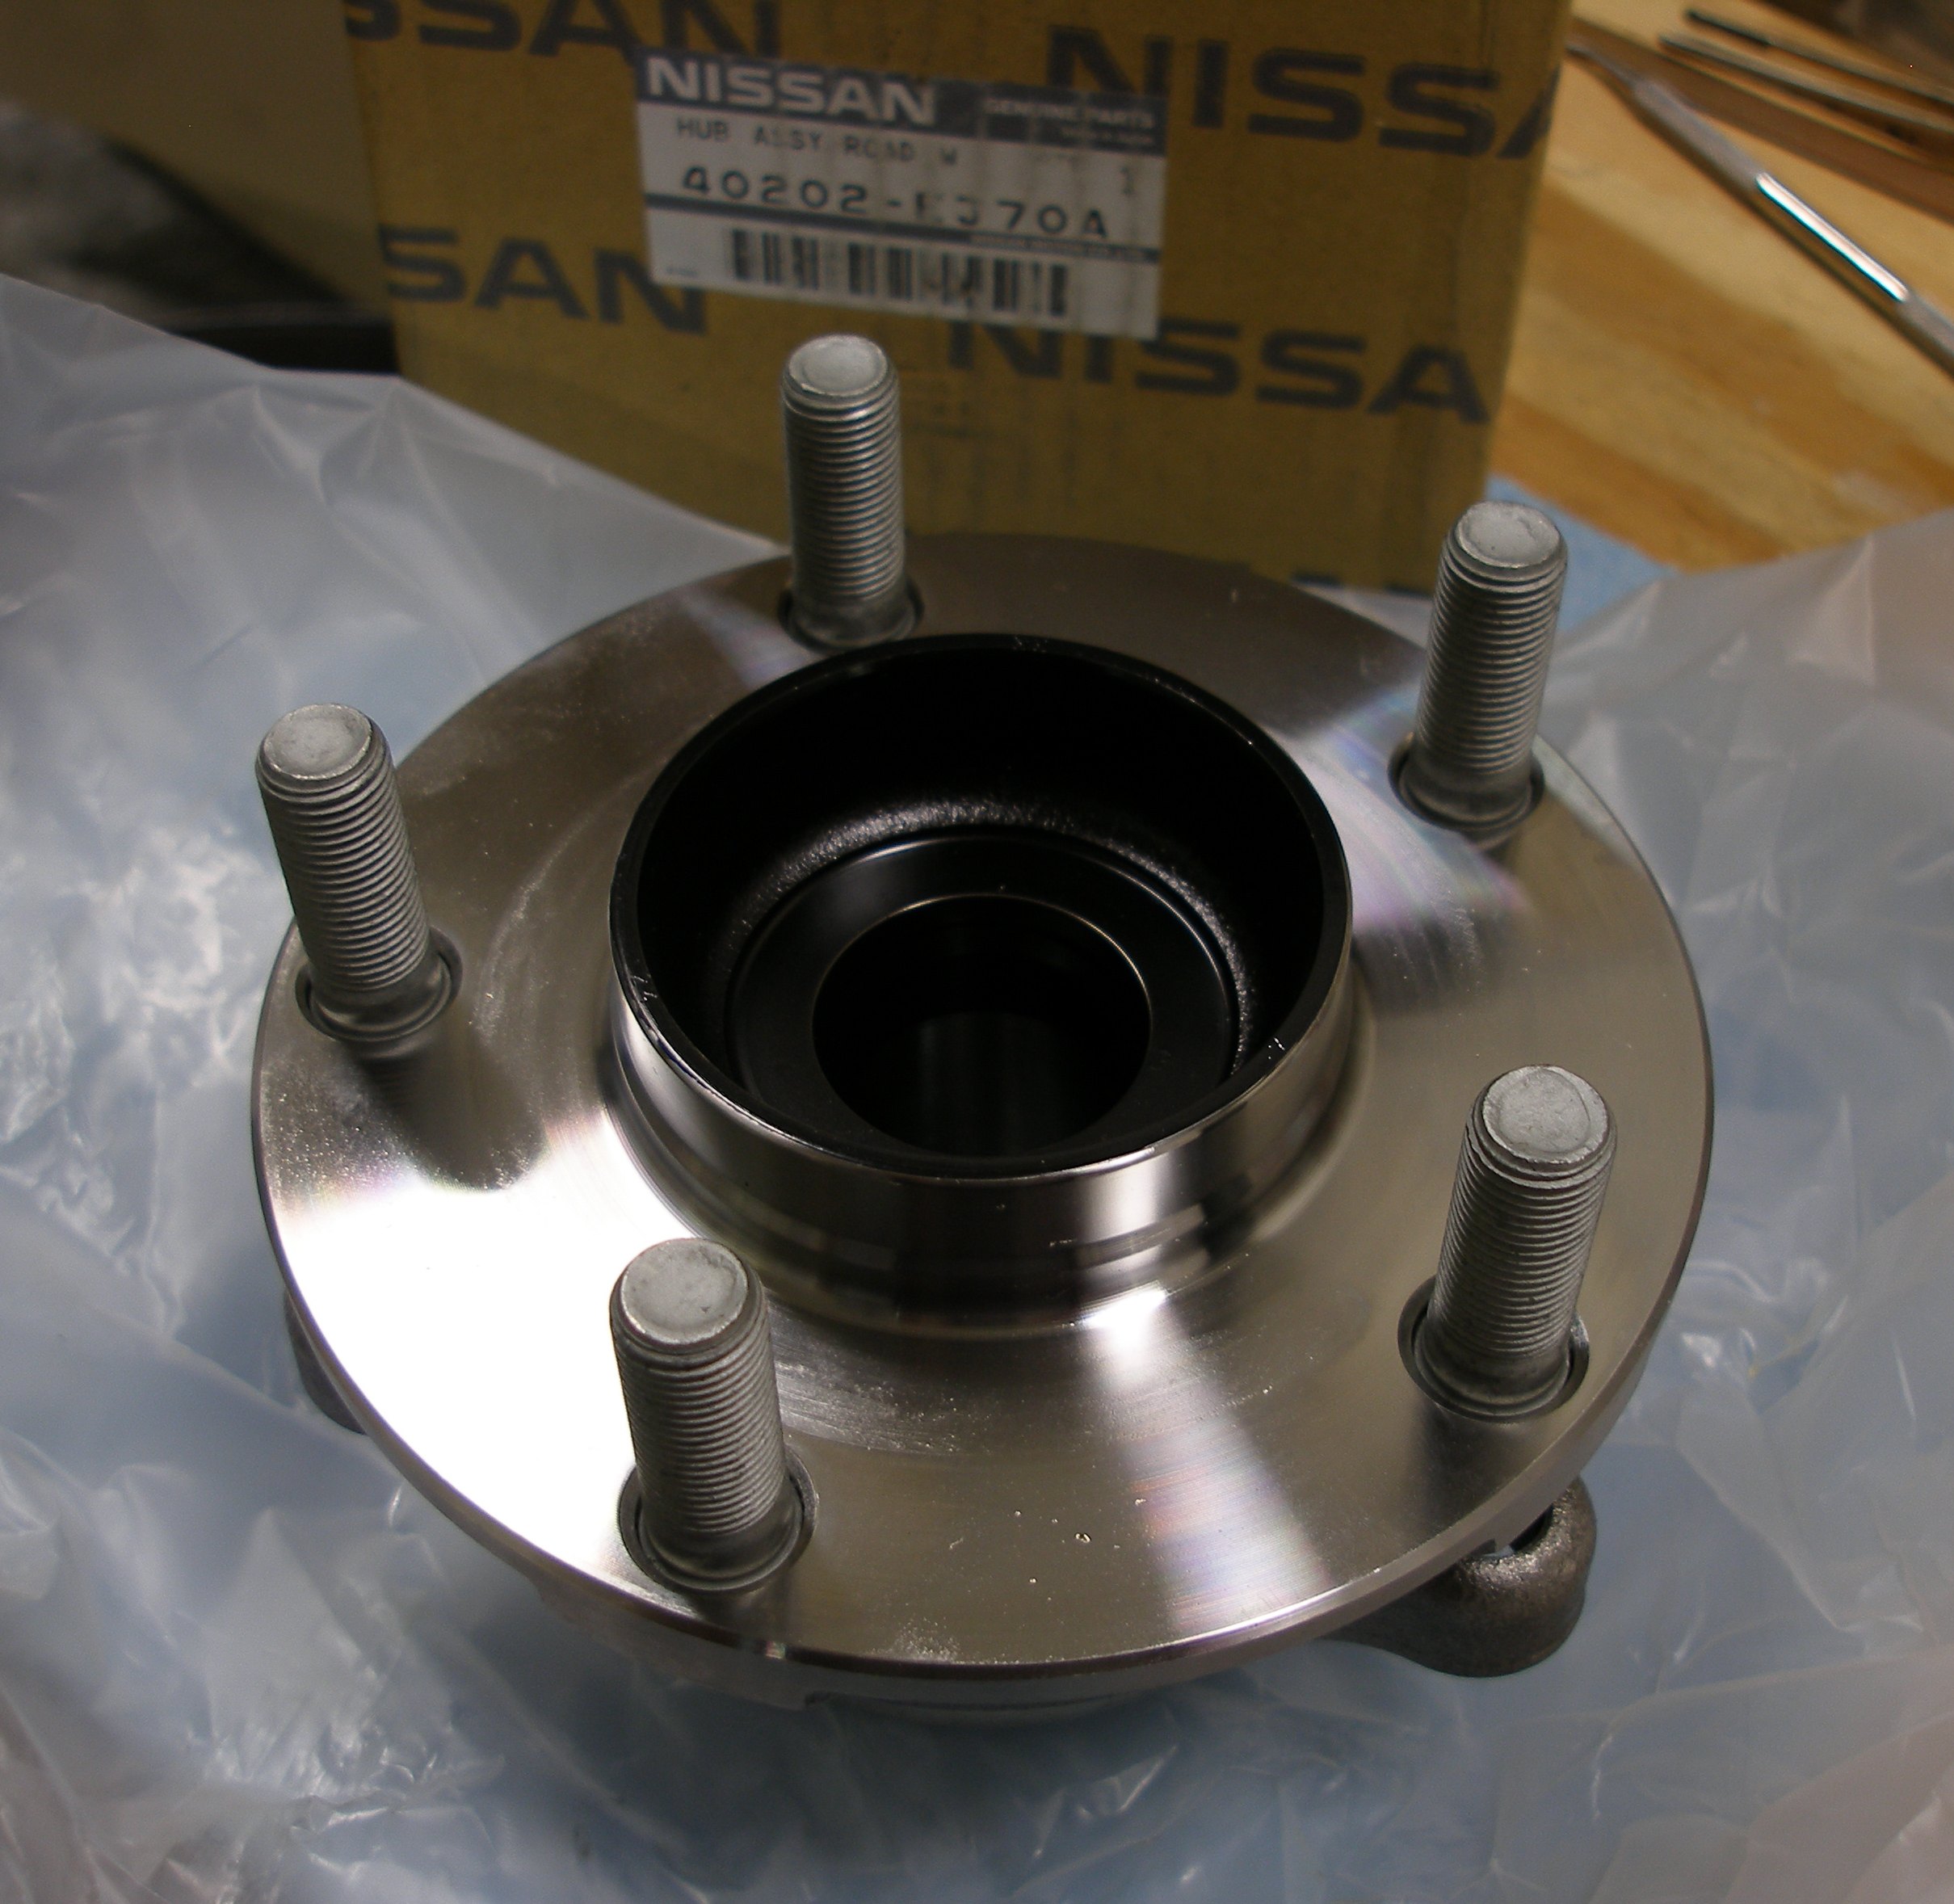
Nissan Part No. 40202-EJ70A
I paid $265.14 for the hub from the local dealer.
It might be able to be purchased elsewhere for about $162, but I went with the dealer.
[click on any image for larger]
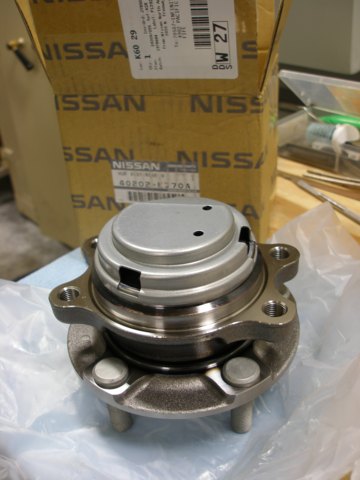

This looks pretty sealed up. I'm going to disassemble the old one when the job's done -- one way or another.
Nissan Part No. 40202-EJ70A
I paid $265.14 for the hub from the local dealer.
It might be able to be purchased elsewhere for about $162, but I went with the dealer.
[click on any image for larger]

This looks pretty sealed up. I'm going to disassemble the old one when the job's done -- one way or another.
Last edited by asavage on Mon Sep 05, 2011 8:53 pm, edited 1 time in total.
-
cruzad3r
- Posts: 1340
- Joined: Fri Mar 05, 2010 6:34 pm
- Car: 2006 Infiniti M35x fully loaded
- Location: CT
Re: How do you diagnose wheel bearing noise?
if you can document the repair process and post them as a DIY, that would be awesome. i hope we can have a sticky with all the DYI pertaining to M35/m45.
-
antzrus
- Posts: 1824
- Joined: Tue Feb 19, 2008 10:20 am
- Car: '06 M35x Premium/Obsidian/Bourbon/
Rosewood/XM/Tint/
ClearBra/SteelSkidPlate/Genuine CoCo Mats/Michelin CrossClimate2/Nav Hack/M-1 - Location: Wenatchee, Washington USA
Re: How do you diagnose wheel bearing noise?
I thought that the loud noise (like an F-1 race car) was my tires. But I just took it in to my local mechanic and he immediately told me it was my front wheel bearings. He replaced both front units for about $950 and got the machine back the next day. Yeah, a lot, but I especially like the fellow and he's fast. Oh yeah, I had 55k on the odometer.
-
asavage
- Posts: 33
- Joined: Tue Apr 20, 2010 1:01 pm
- Car: 2006 M35 Sport RWD
- Location: Duvall, Wash.
- Contact:
Re: How do you diagnose wheel bearing noise?
I will certainly take pictures. Reading the FSM, it does not look at all complex to replace the front hubs on the RWD version.cruzad3r wrote:if you can document the repair process and post them as a DIY . . .
Re: How do you diagnose wheel bearing noise?
Hi, could not log in with old username. This post is a few months old, so an update. I replaced the tires with still a lot of tread left on them, really a waste of money as I could have gotten problably 10kmi more out of them. One of the old tires was cupped and making noise. However, replacing the tires made the tire noise go down but the "wrug, wrug, wrug" sound is still present and it gets worse after a long drive and can be heard when driving slowly almost like a brake pads worn down to metal or a caliper binding up. It is at the dealer right now getting the cruise control fixed, drivers seat rail, and bluetooth fixed under warranty and they are rotating and balancing my tires for me to diagnose the noise. I have been complaining about this bearing noise for the last 18kmi and they keep putting it on the tires, they have yet too replace the bearings, now the noise is present with the new tires so I am sure that it is not the tires. The alignment was done at the dealer when the new tires went on 5kmi ago. I am driving a G37 right now which is quieter road noise wise. The new tires are vertually perfect just a hint of cupping right now, I hope the bad bearing/s are not causing the tires to wear unevenly.
-
asavage
- Posts: 33
- Joined: Tue Apr 20, 2010 1:01 pm
- Car: 2006 M35 Sport RWD
- Location: Duvall, Wash.
- Contact:
Replacing the front wheel hub
Shown: 2006 M35 Sport 2WD, right wheel.
Partial list of tools/supplies required:
A helper is recommended, as the steering wheel must be turned from one lock to the other several times, and it's very nice to have someone with clean hands doing this
 Warn your helper to never touch the brake pedal! Read on for an explanation . . .
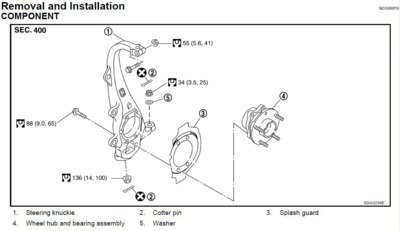
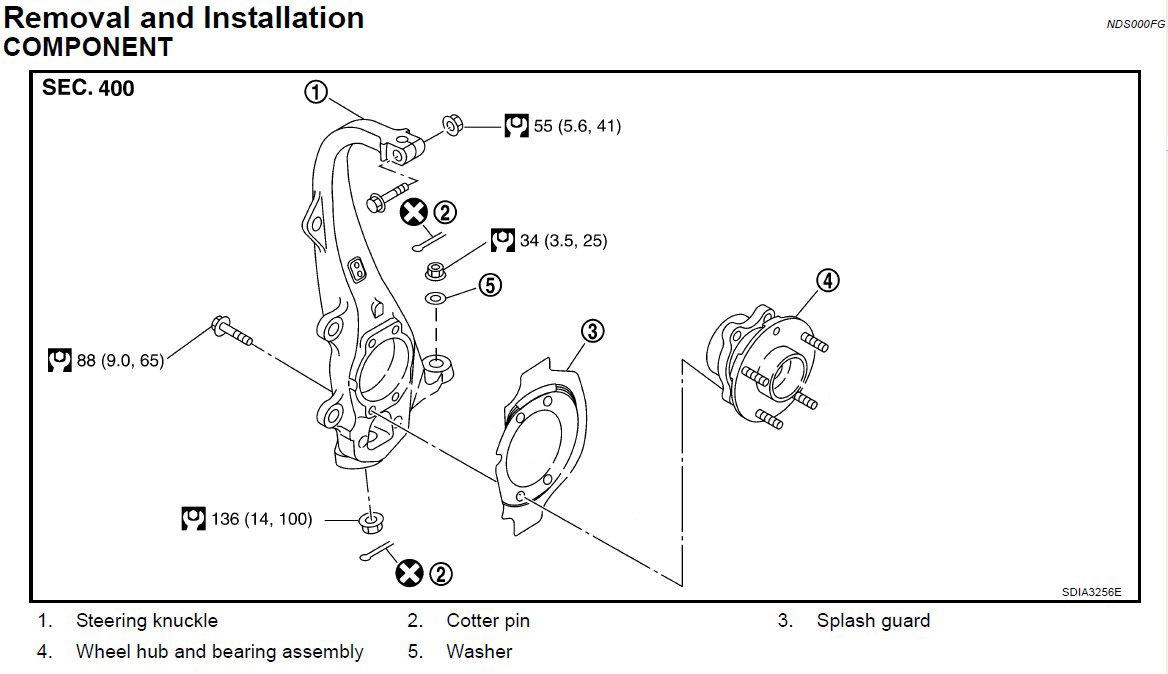
2WD exploded view of steering knuckle & hub. From the online FSM, page 5.
If your vehicle is AWD, you will have to remove one more nut (in the centre of the hub, the end of the axle) and one more step (press axle back out of hub). See the FSM.
Loosen lug nuts
Begin by setting the park brake, loosening lug nuts (21mm)
Raise & block the vehicle, remove wheel
Check for proper lift and block location (see FSM General Information, pg 43 but I used the engine subframe-to-body mount point instead), then remove the wheel.
Remove brake caliper
Have helper turn the wheels so the front of the wheel you're working with is "outward"; this provides access to the brake caliper bracket bolts. Remove two bolts (22mm). An air impact wrench is shown, but a breaker bar works just as well.

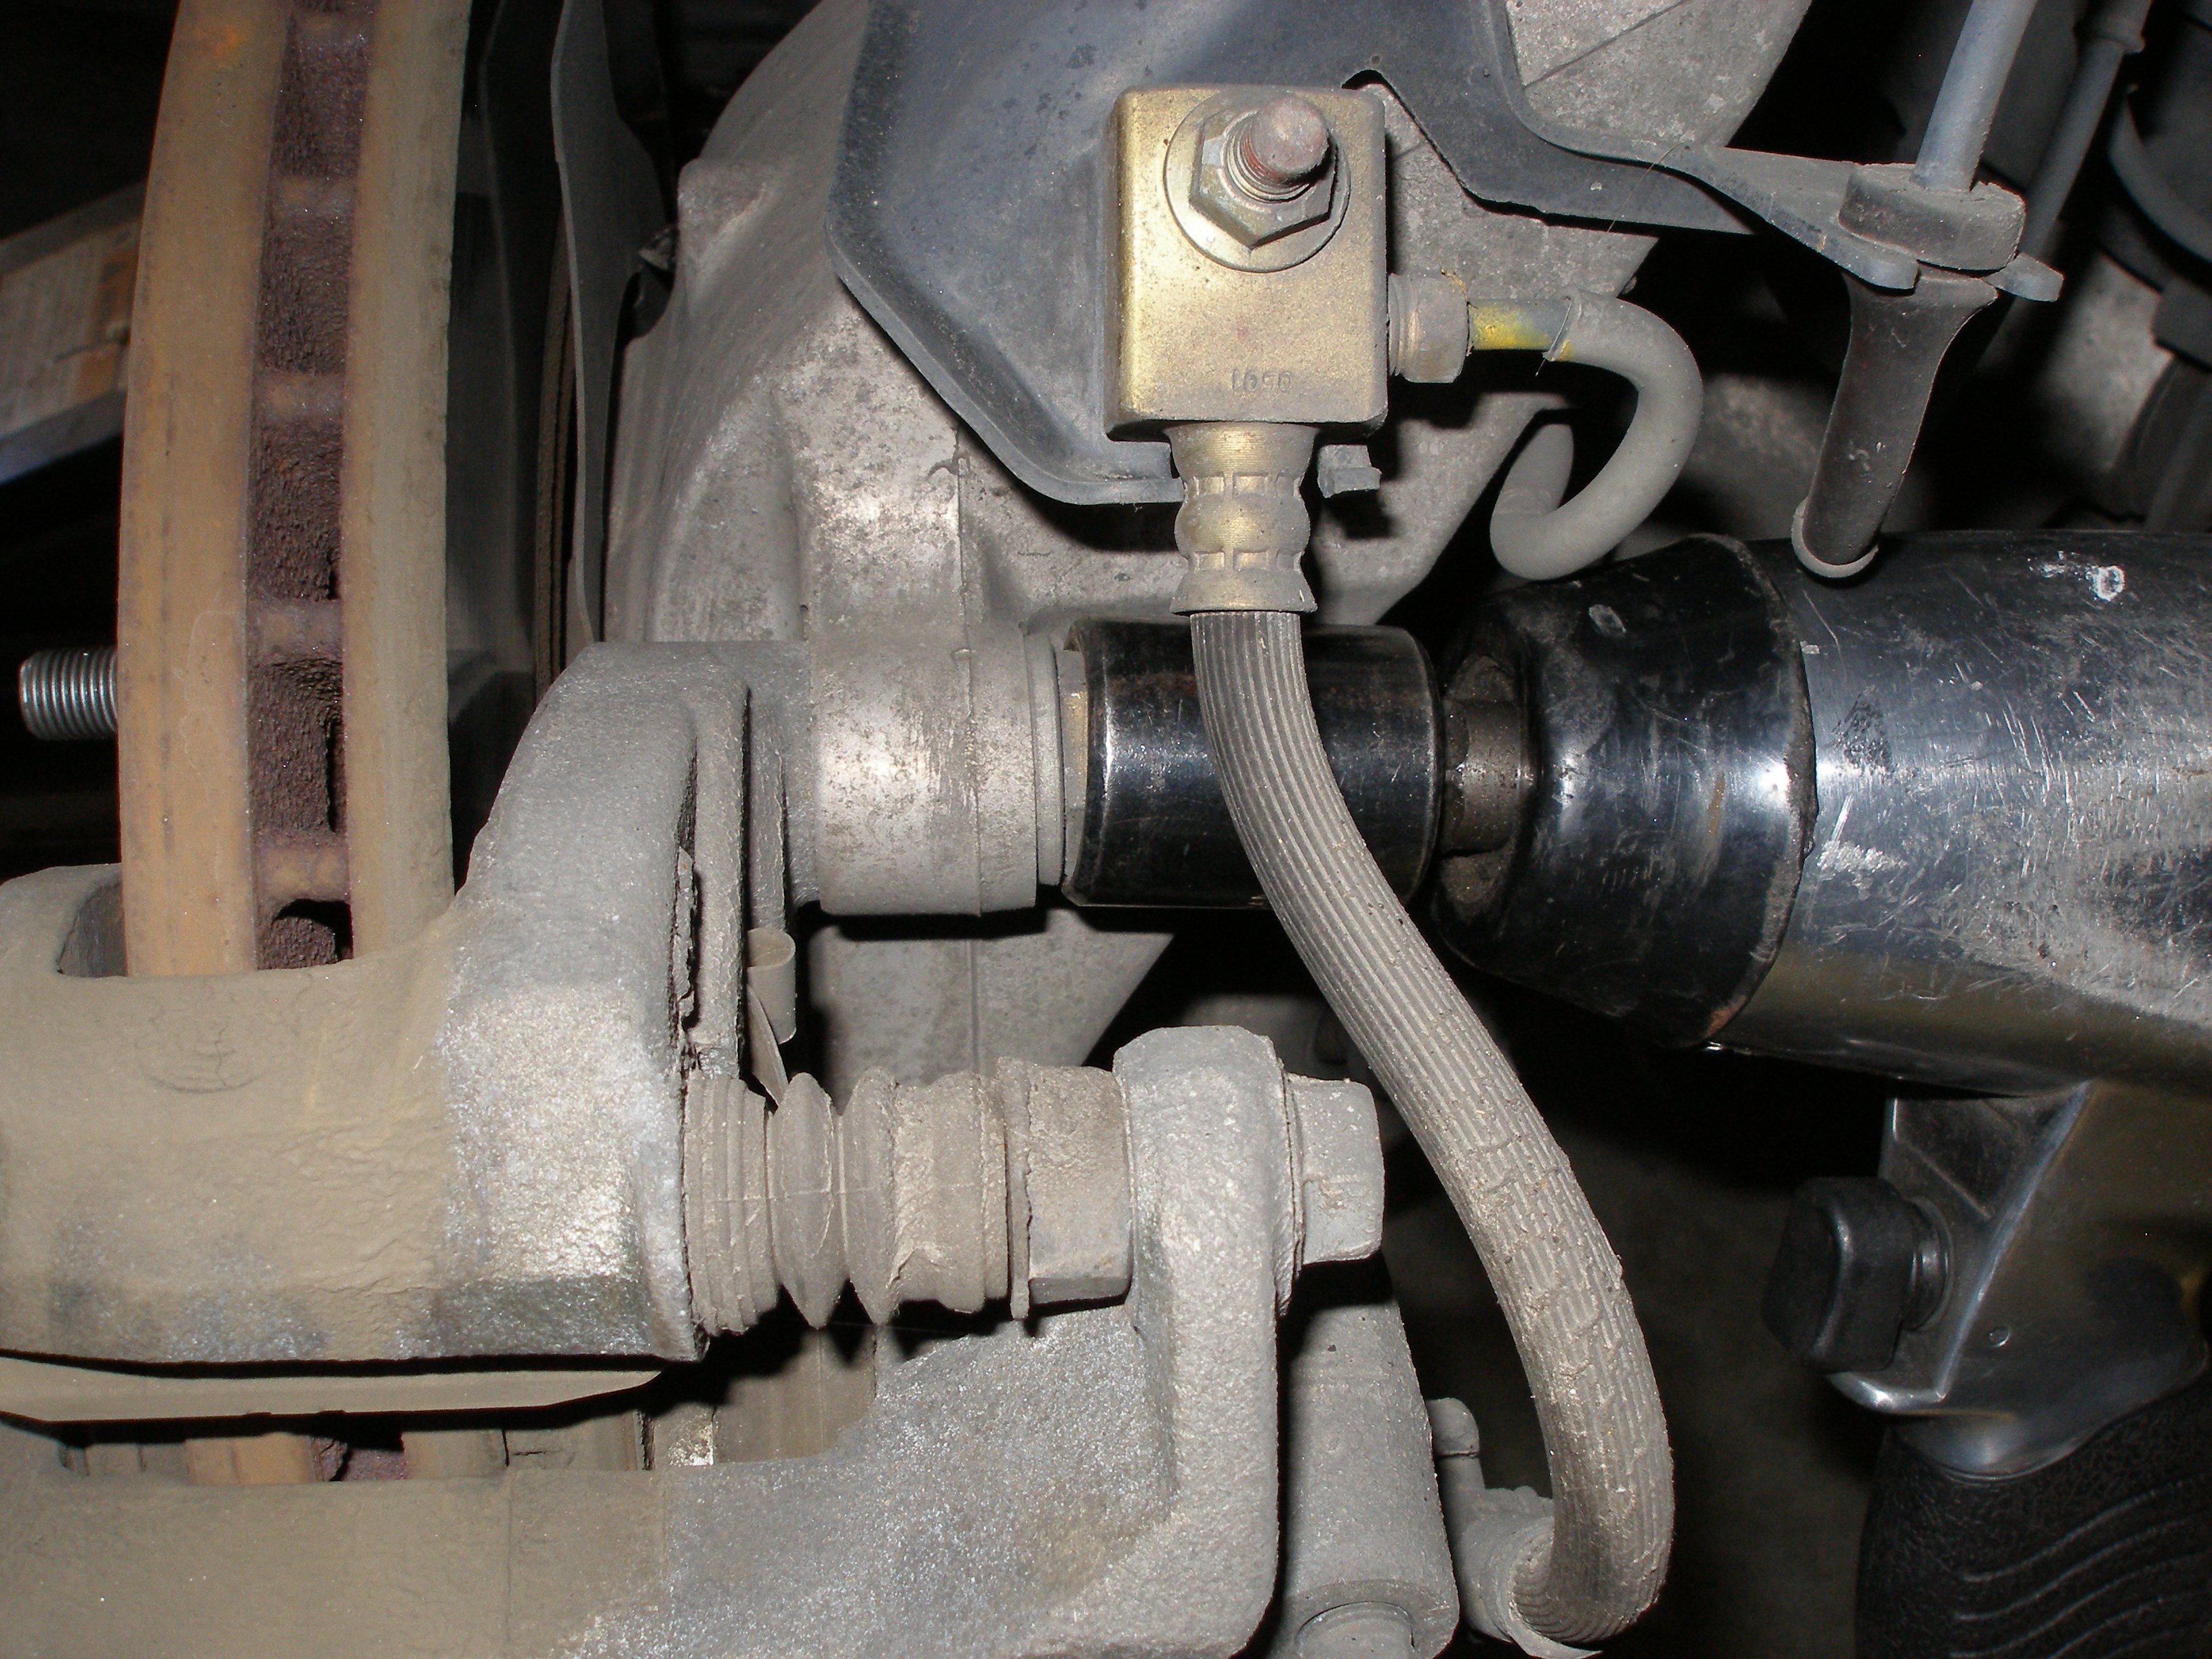
Remove the caliper
The FSM suggests unbolting the brake hose bracket. I didn't see that that would be particularly helpful. The caliper should not be allowed to "hang" on the brake hose -- that can damage the hose. Instead, either set the caliper on a suitable prop (I used a square plastic bucket), or hang the caliper from the knuckle using wire.
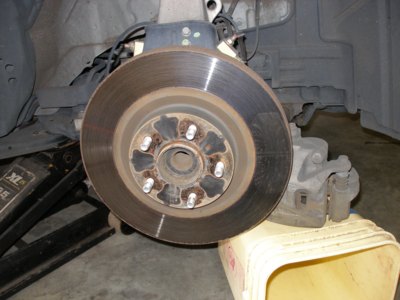
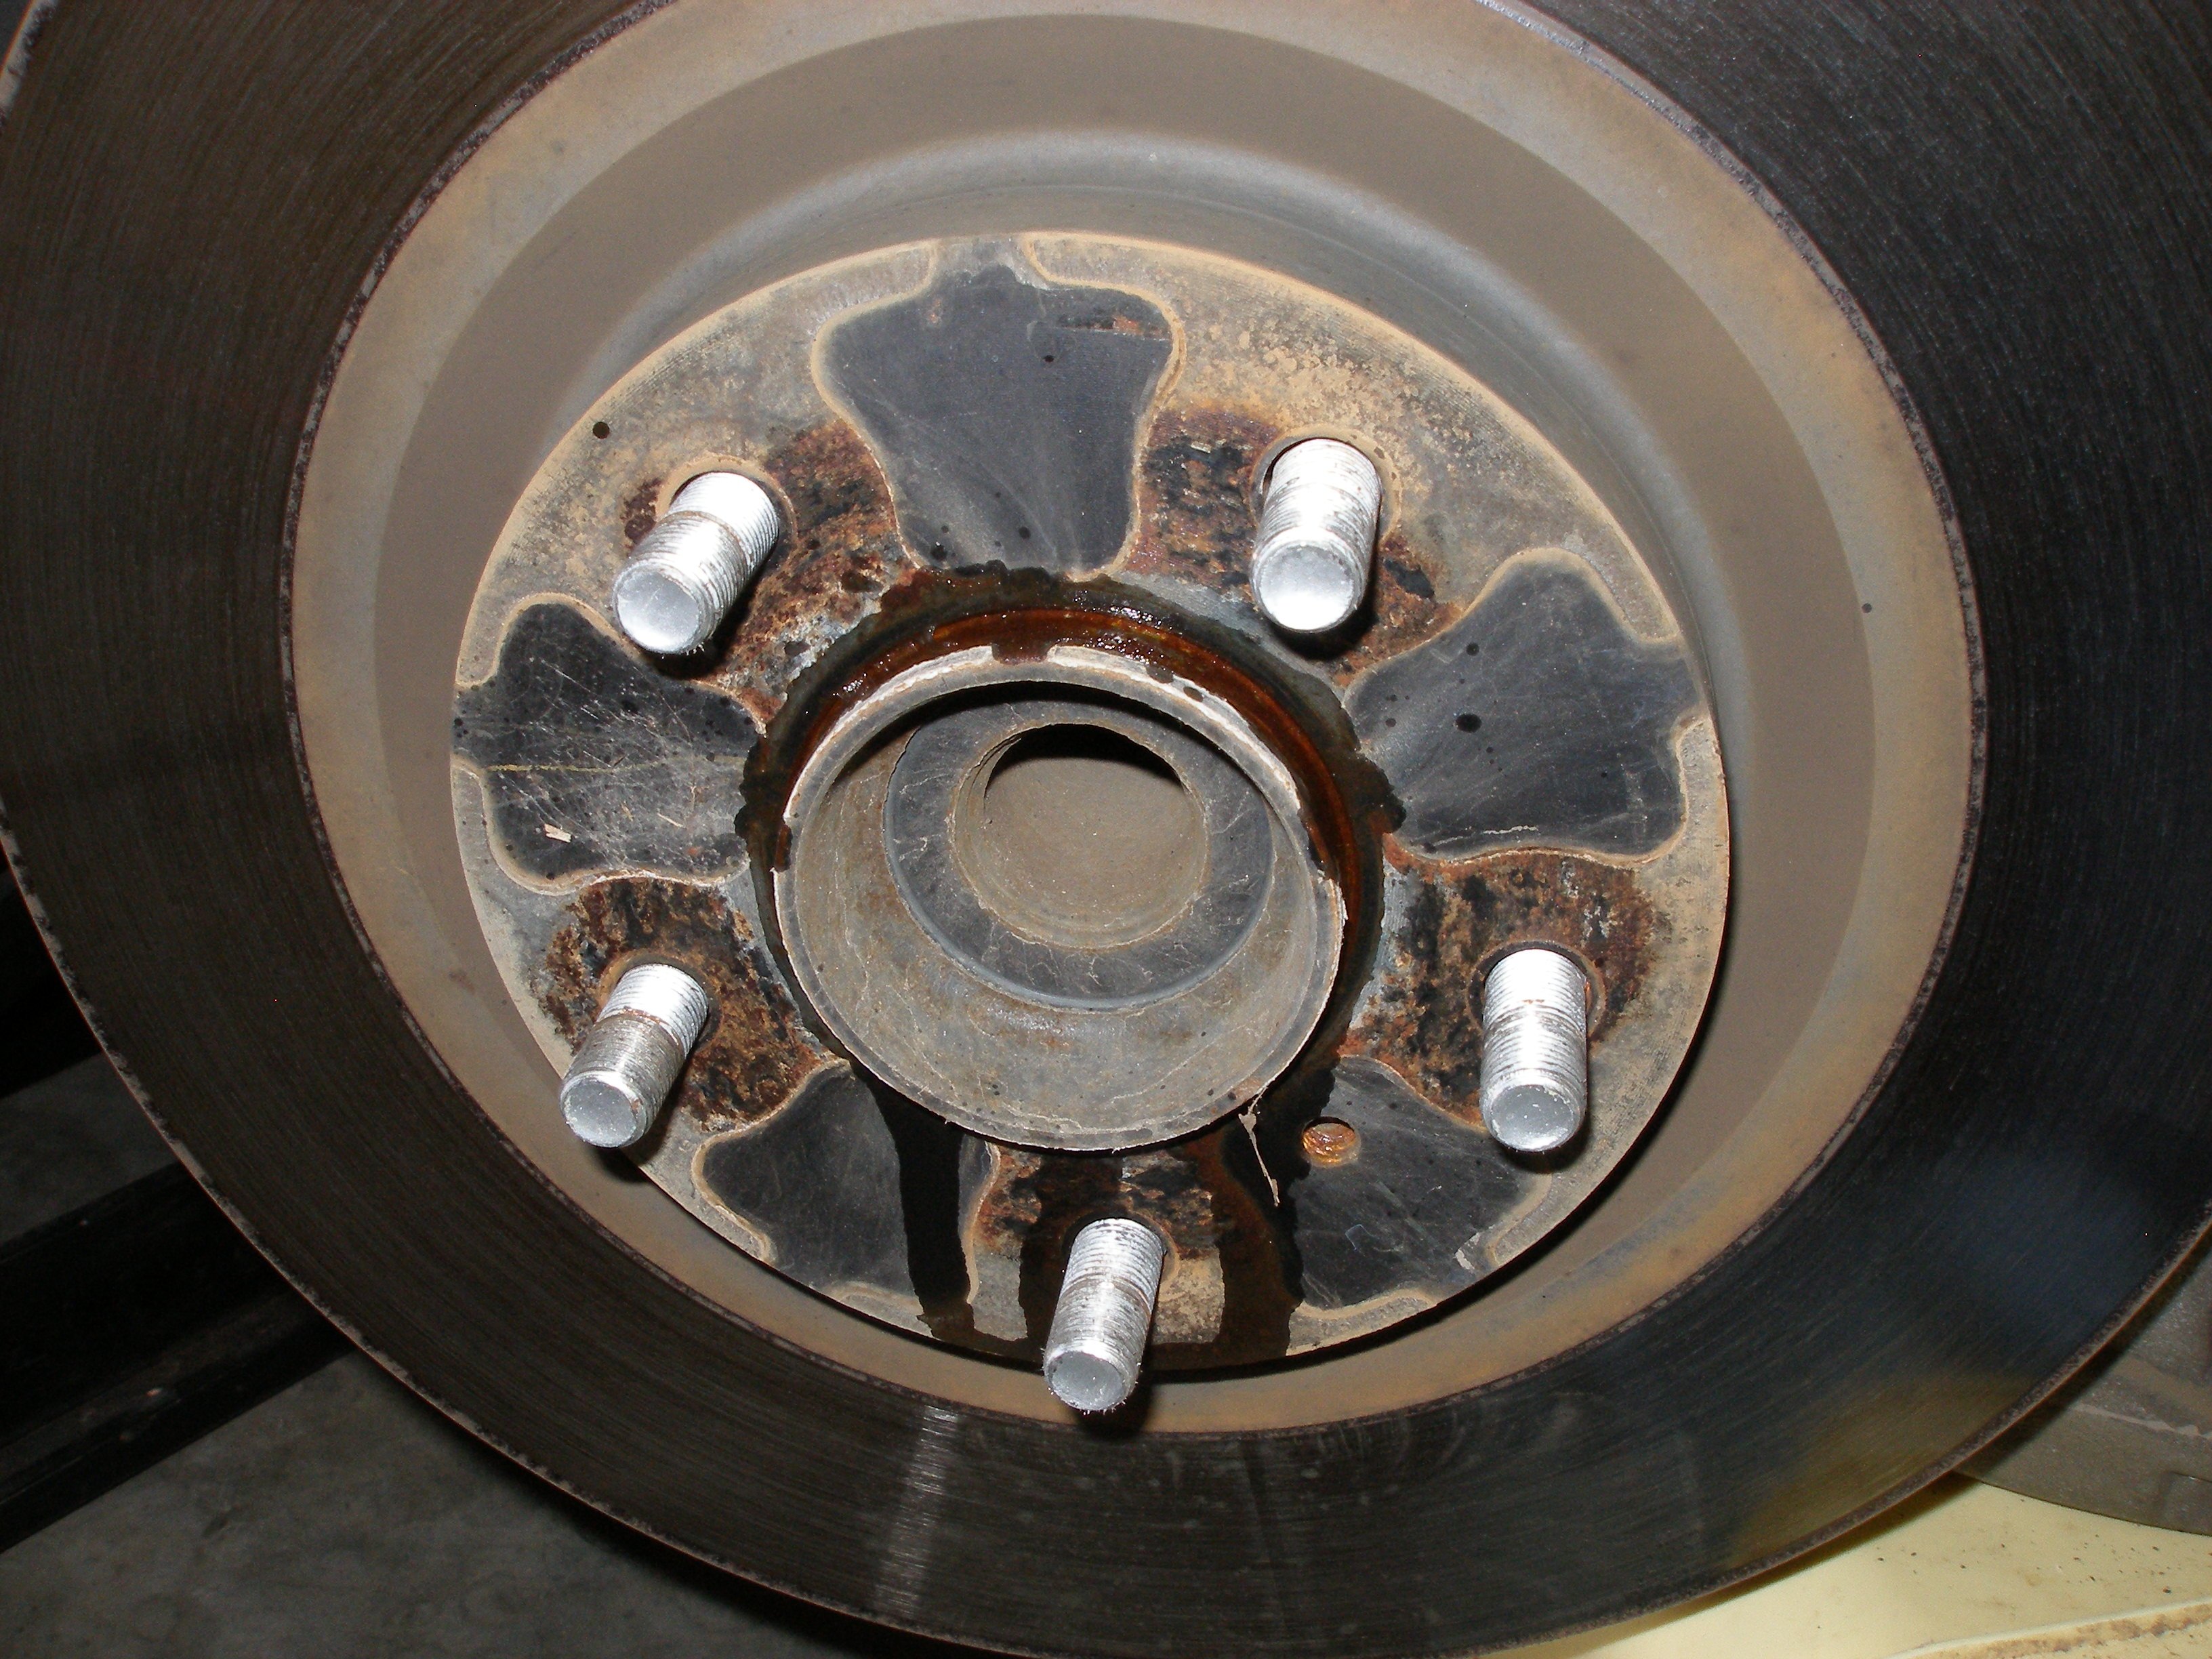
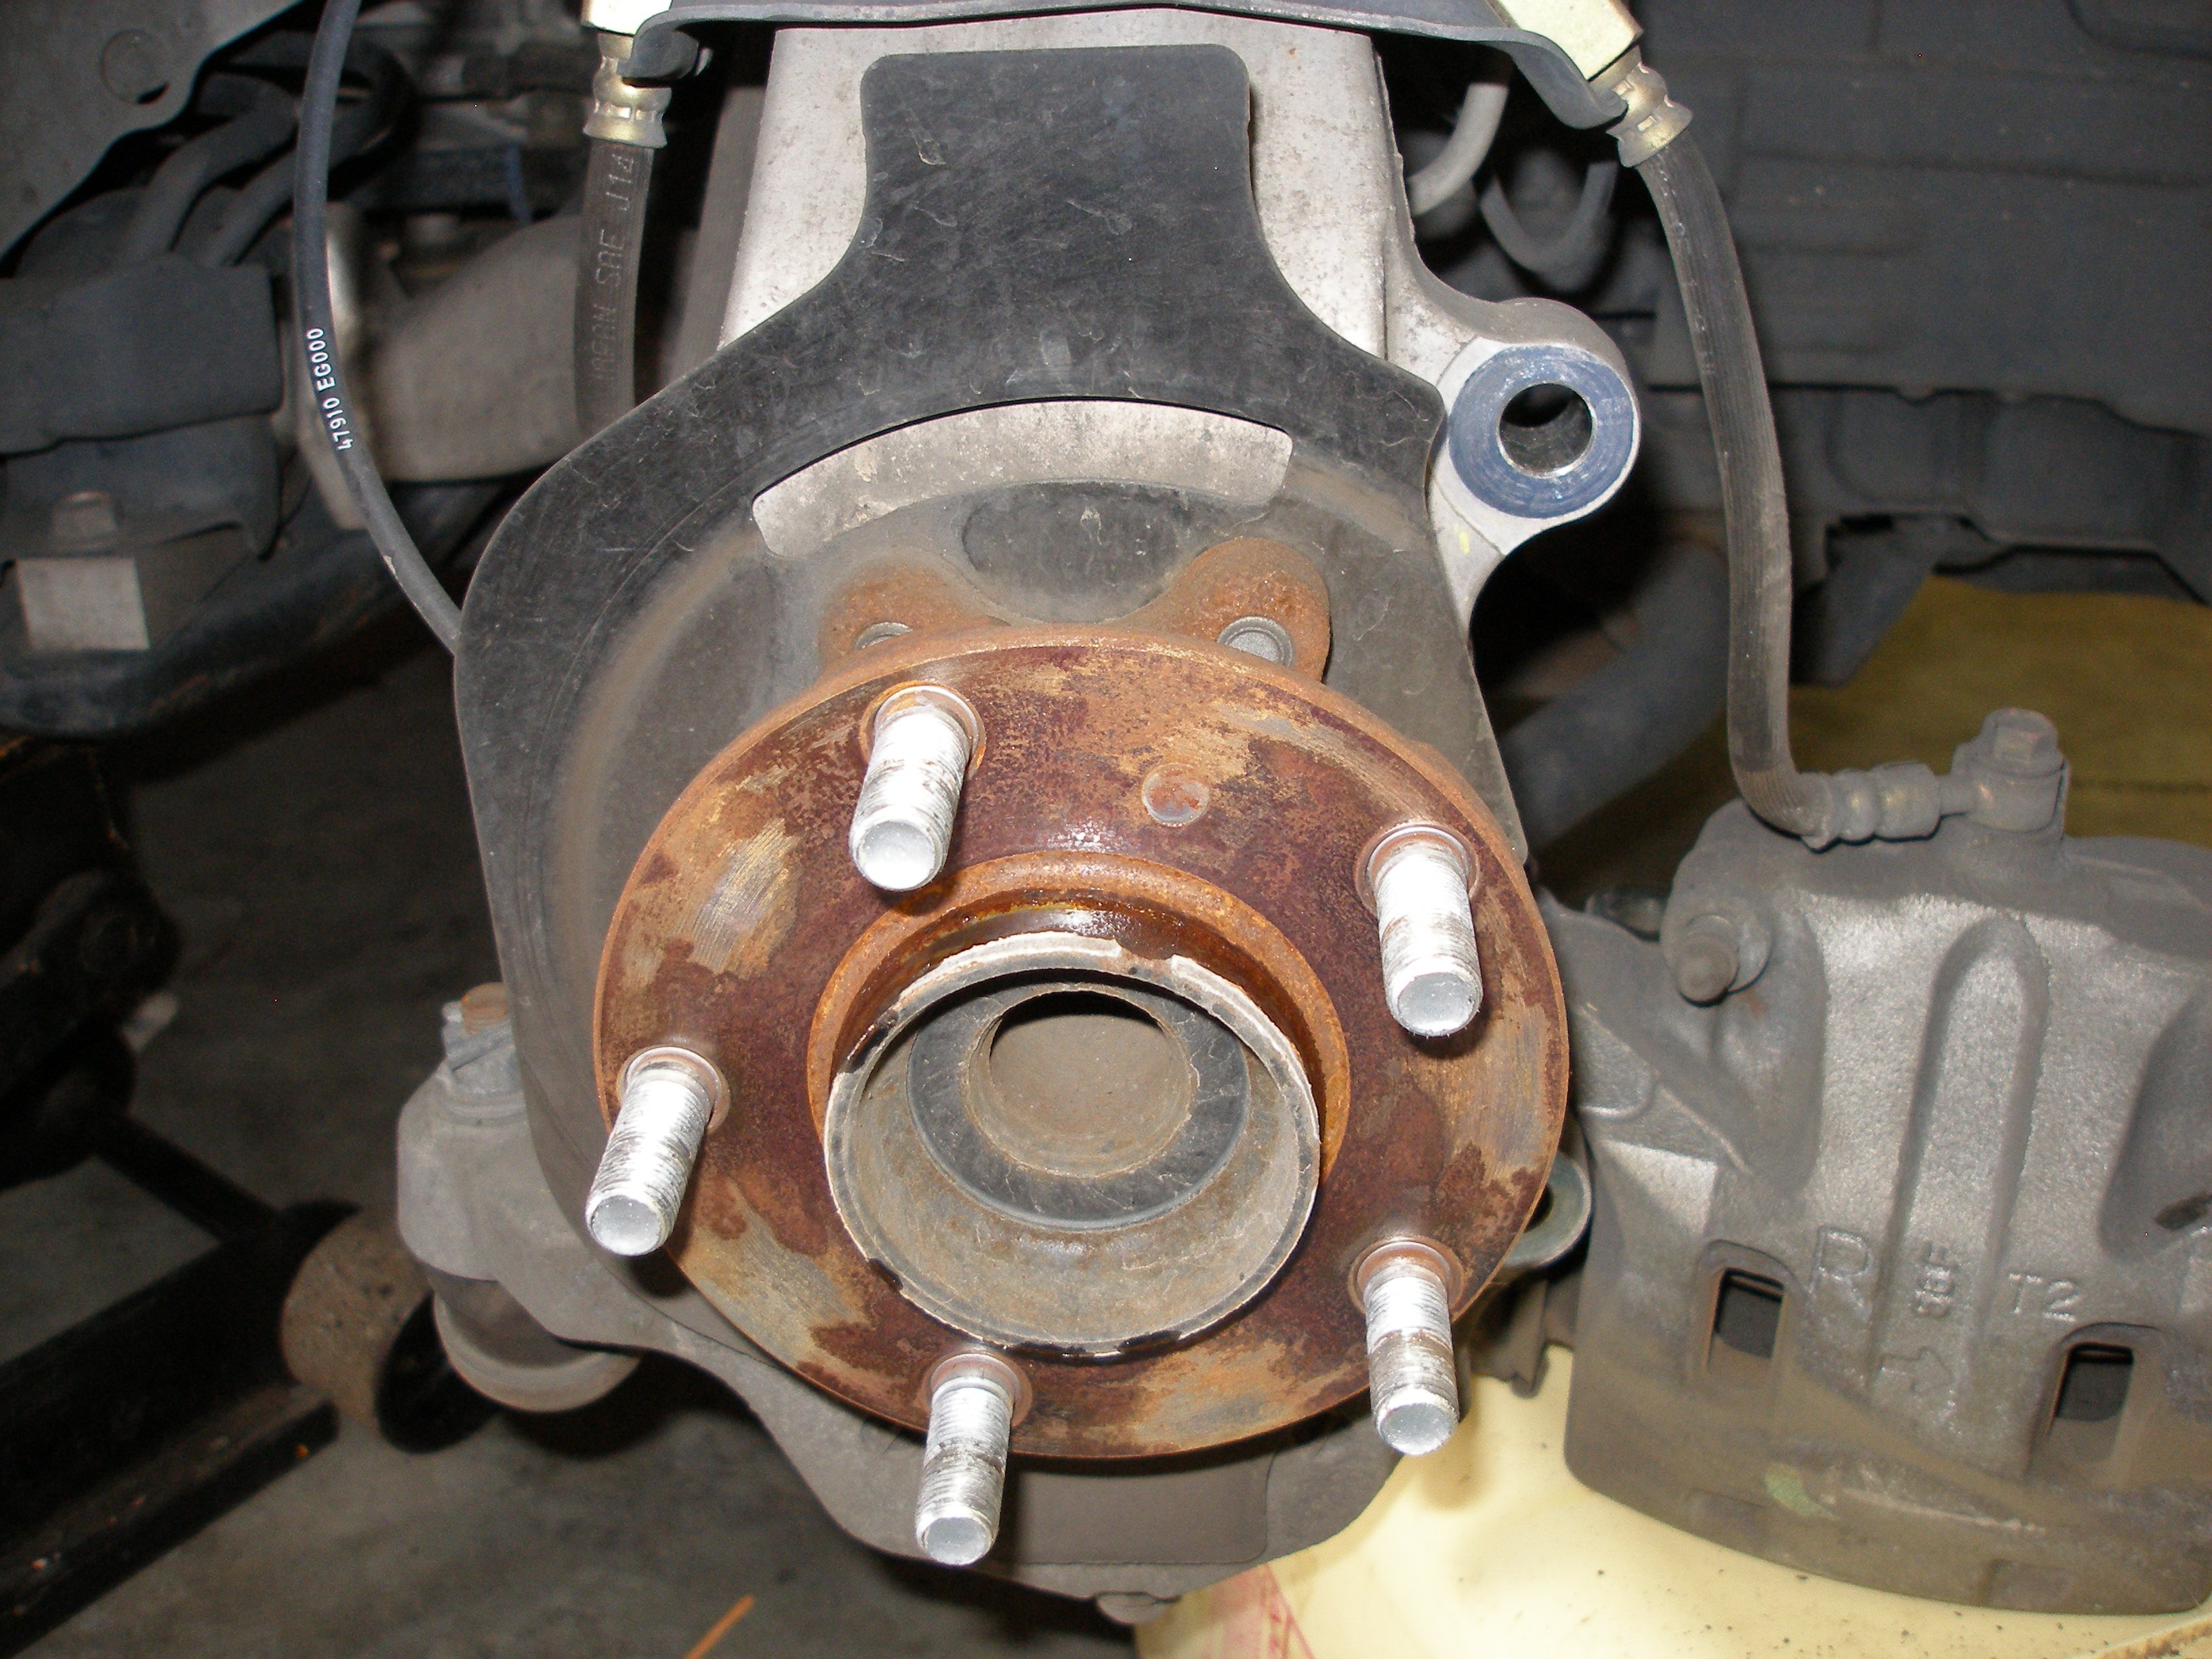
Once the caliper is removed from the knuckle, you will be facing the bare disk on the hub.
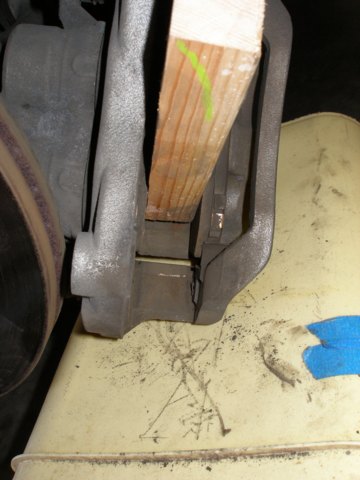
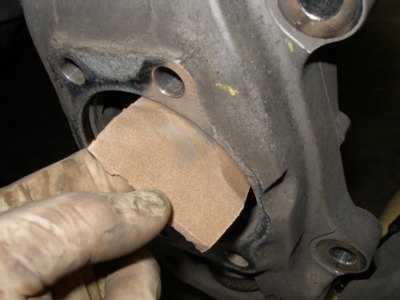
Safeguard the caliper
Before you do anything else, safeguard your caliper by placing a block of wood between the brake pads. Why? If your helper presses the brake pedal with the caliper removed from the disk, one of the caliper pistons may exit the caliper housing, causing much grief, doubling the cost of the job and quadrupling the job completion time. You will want wood about 1-1/8" thick.
Remove disk
Grab the disk and pull. If you're lucky, the disk will slide right off the studs.
If you're like most of us, it won't budge. Use your favourite penetrating oil here, but don't get carried away; use only enough to saturate the hub. Any oil that migrates to the disk's outer edge will have to be removed before reassembly.
Then, use a scrap piece of wood and a hammer to persuade the disk to break free of the hub. Place the wood on the shiny bit of the disk you see, where the outside pad contacts the disk. Whack the wood with a hammer. Yes, toward the engine. The disk will rock, the edge of the disk you are not whacking will tilt outward. Don't try to whack the backside of the disk, you'll only bend the shield and such.

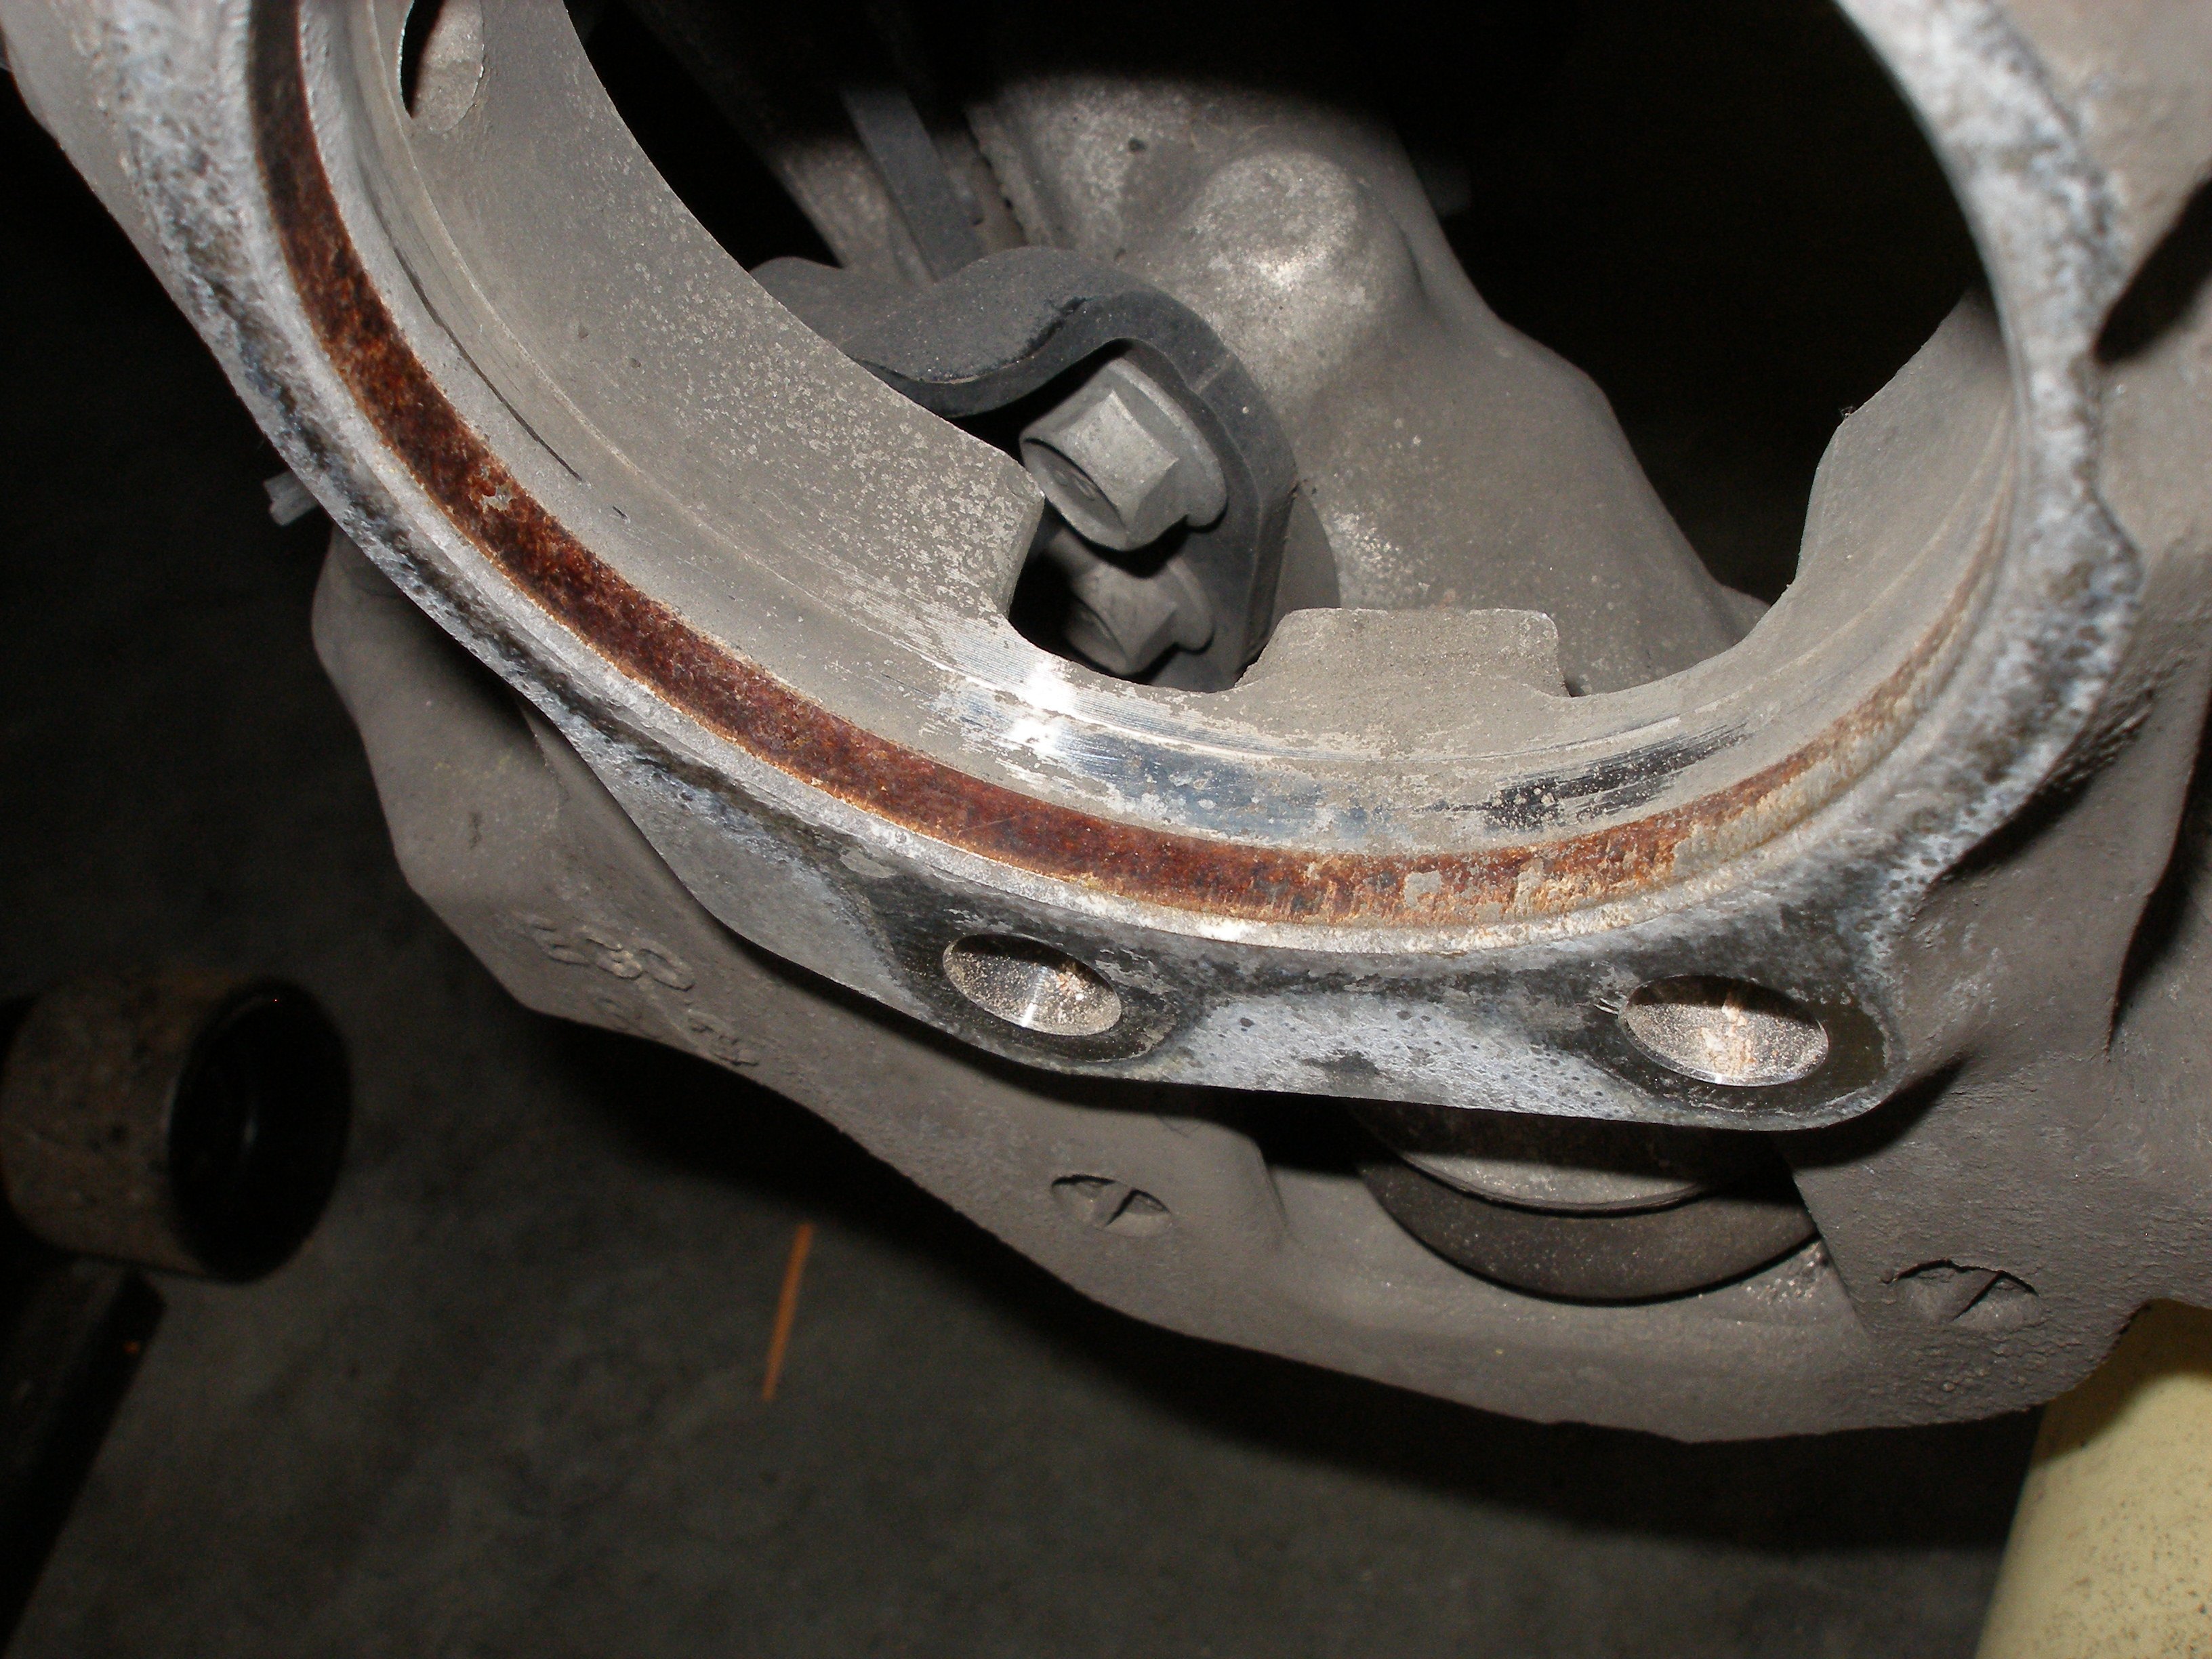
View with the disk removed.

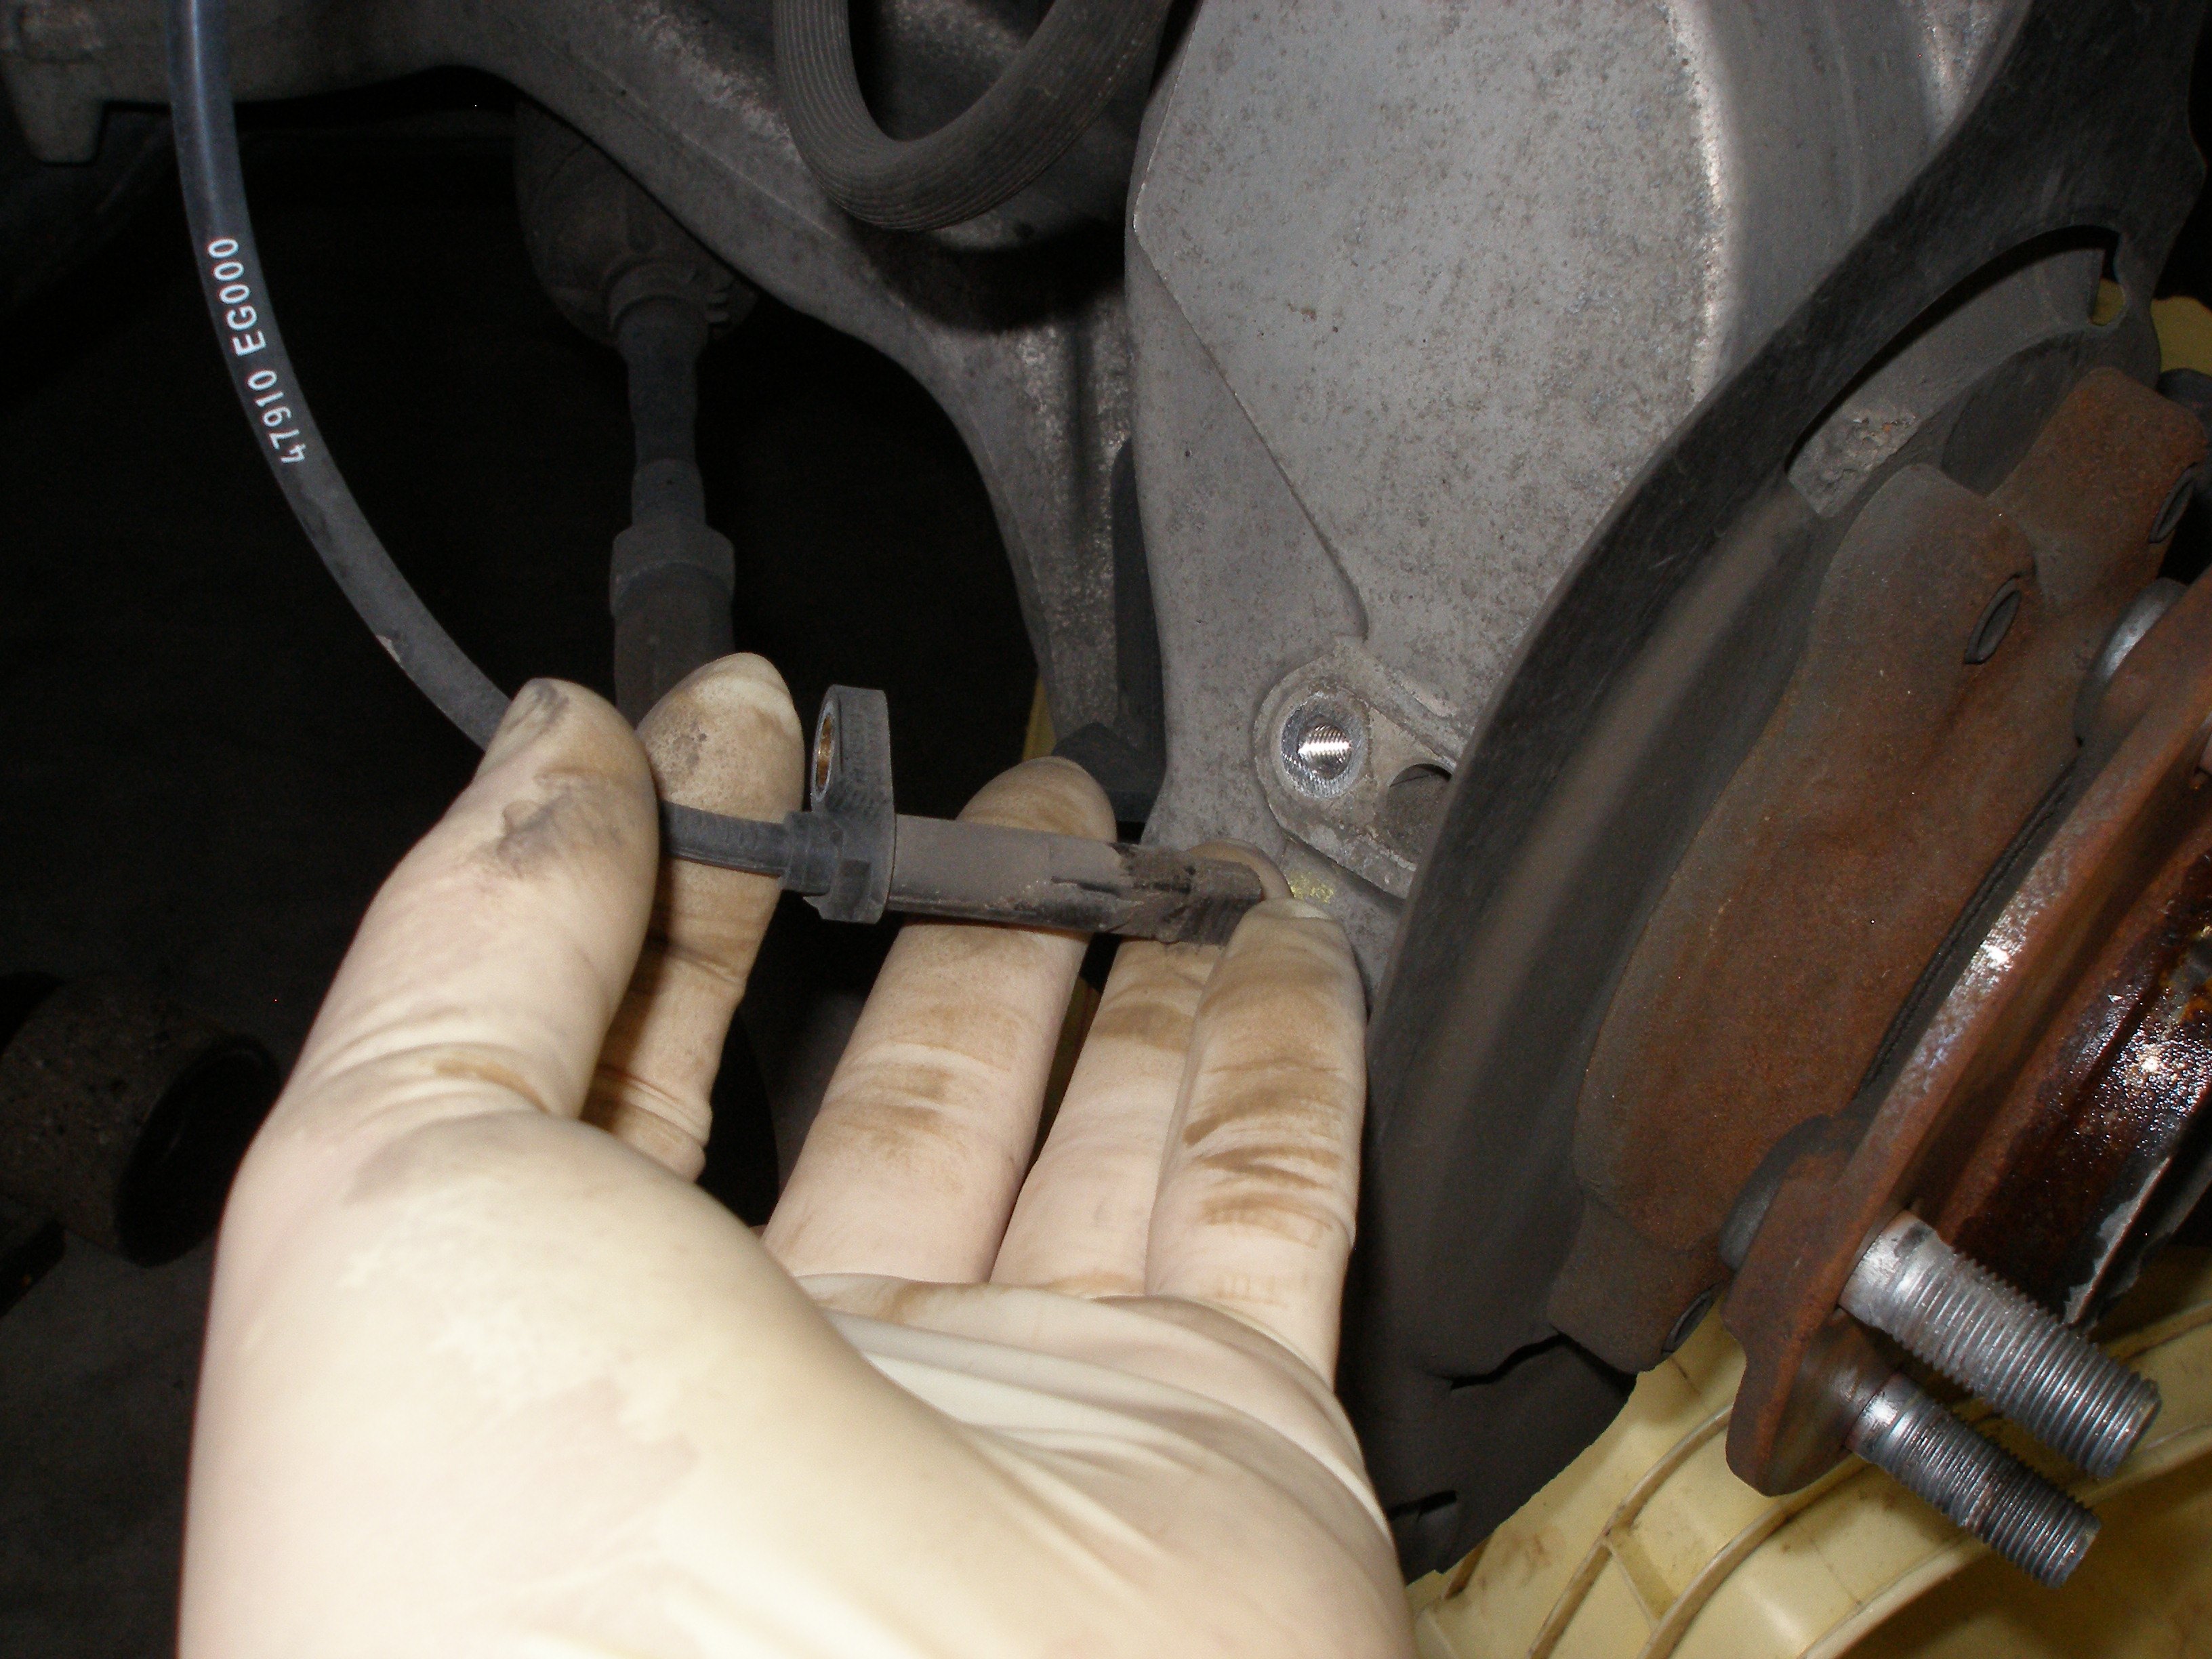
Remove wheel speed sensor
While you move your caliper prop (if using a prop), have your helper turn the wheels the opposite direction fully, giving access to the wheel speed sensor.
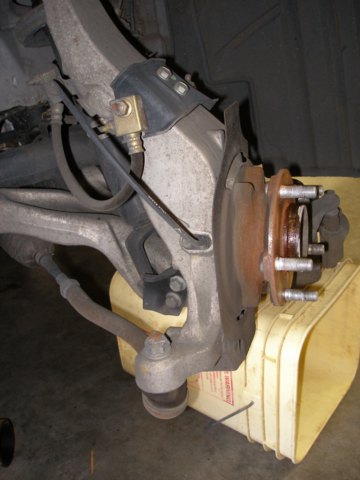
Remove the 10mm-head bolt, and attempt to withdraw the sensor from the knuckle.
The FSM warns: Do not pull on sensor wire, or sensor will be damaged. Penetrating oil might be necessary here too; ours did not.

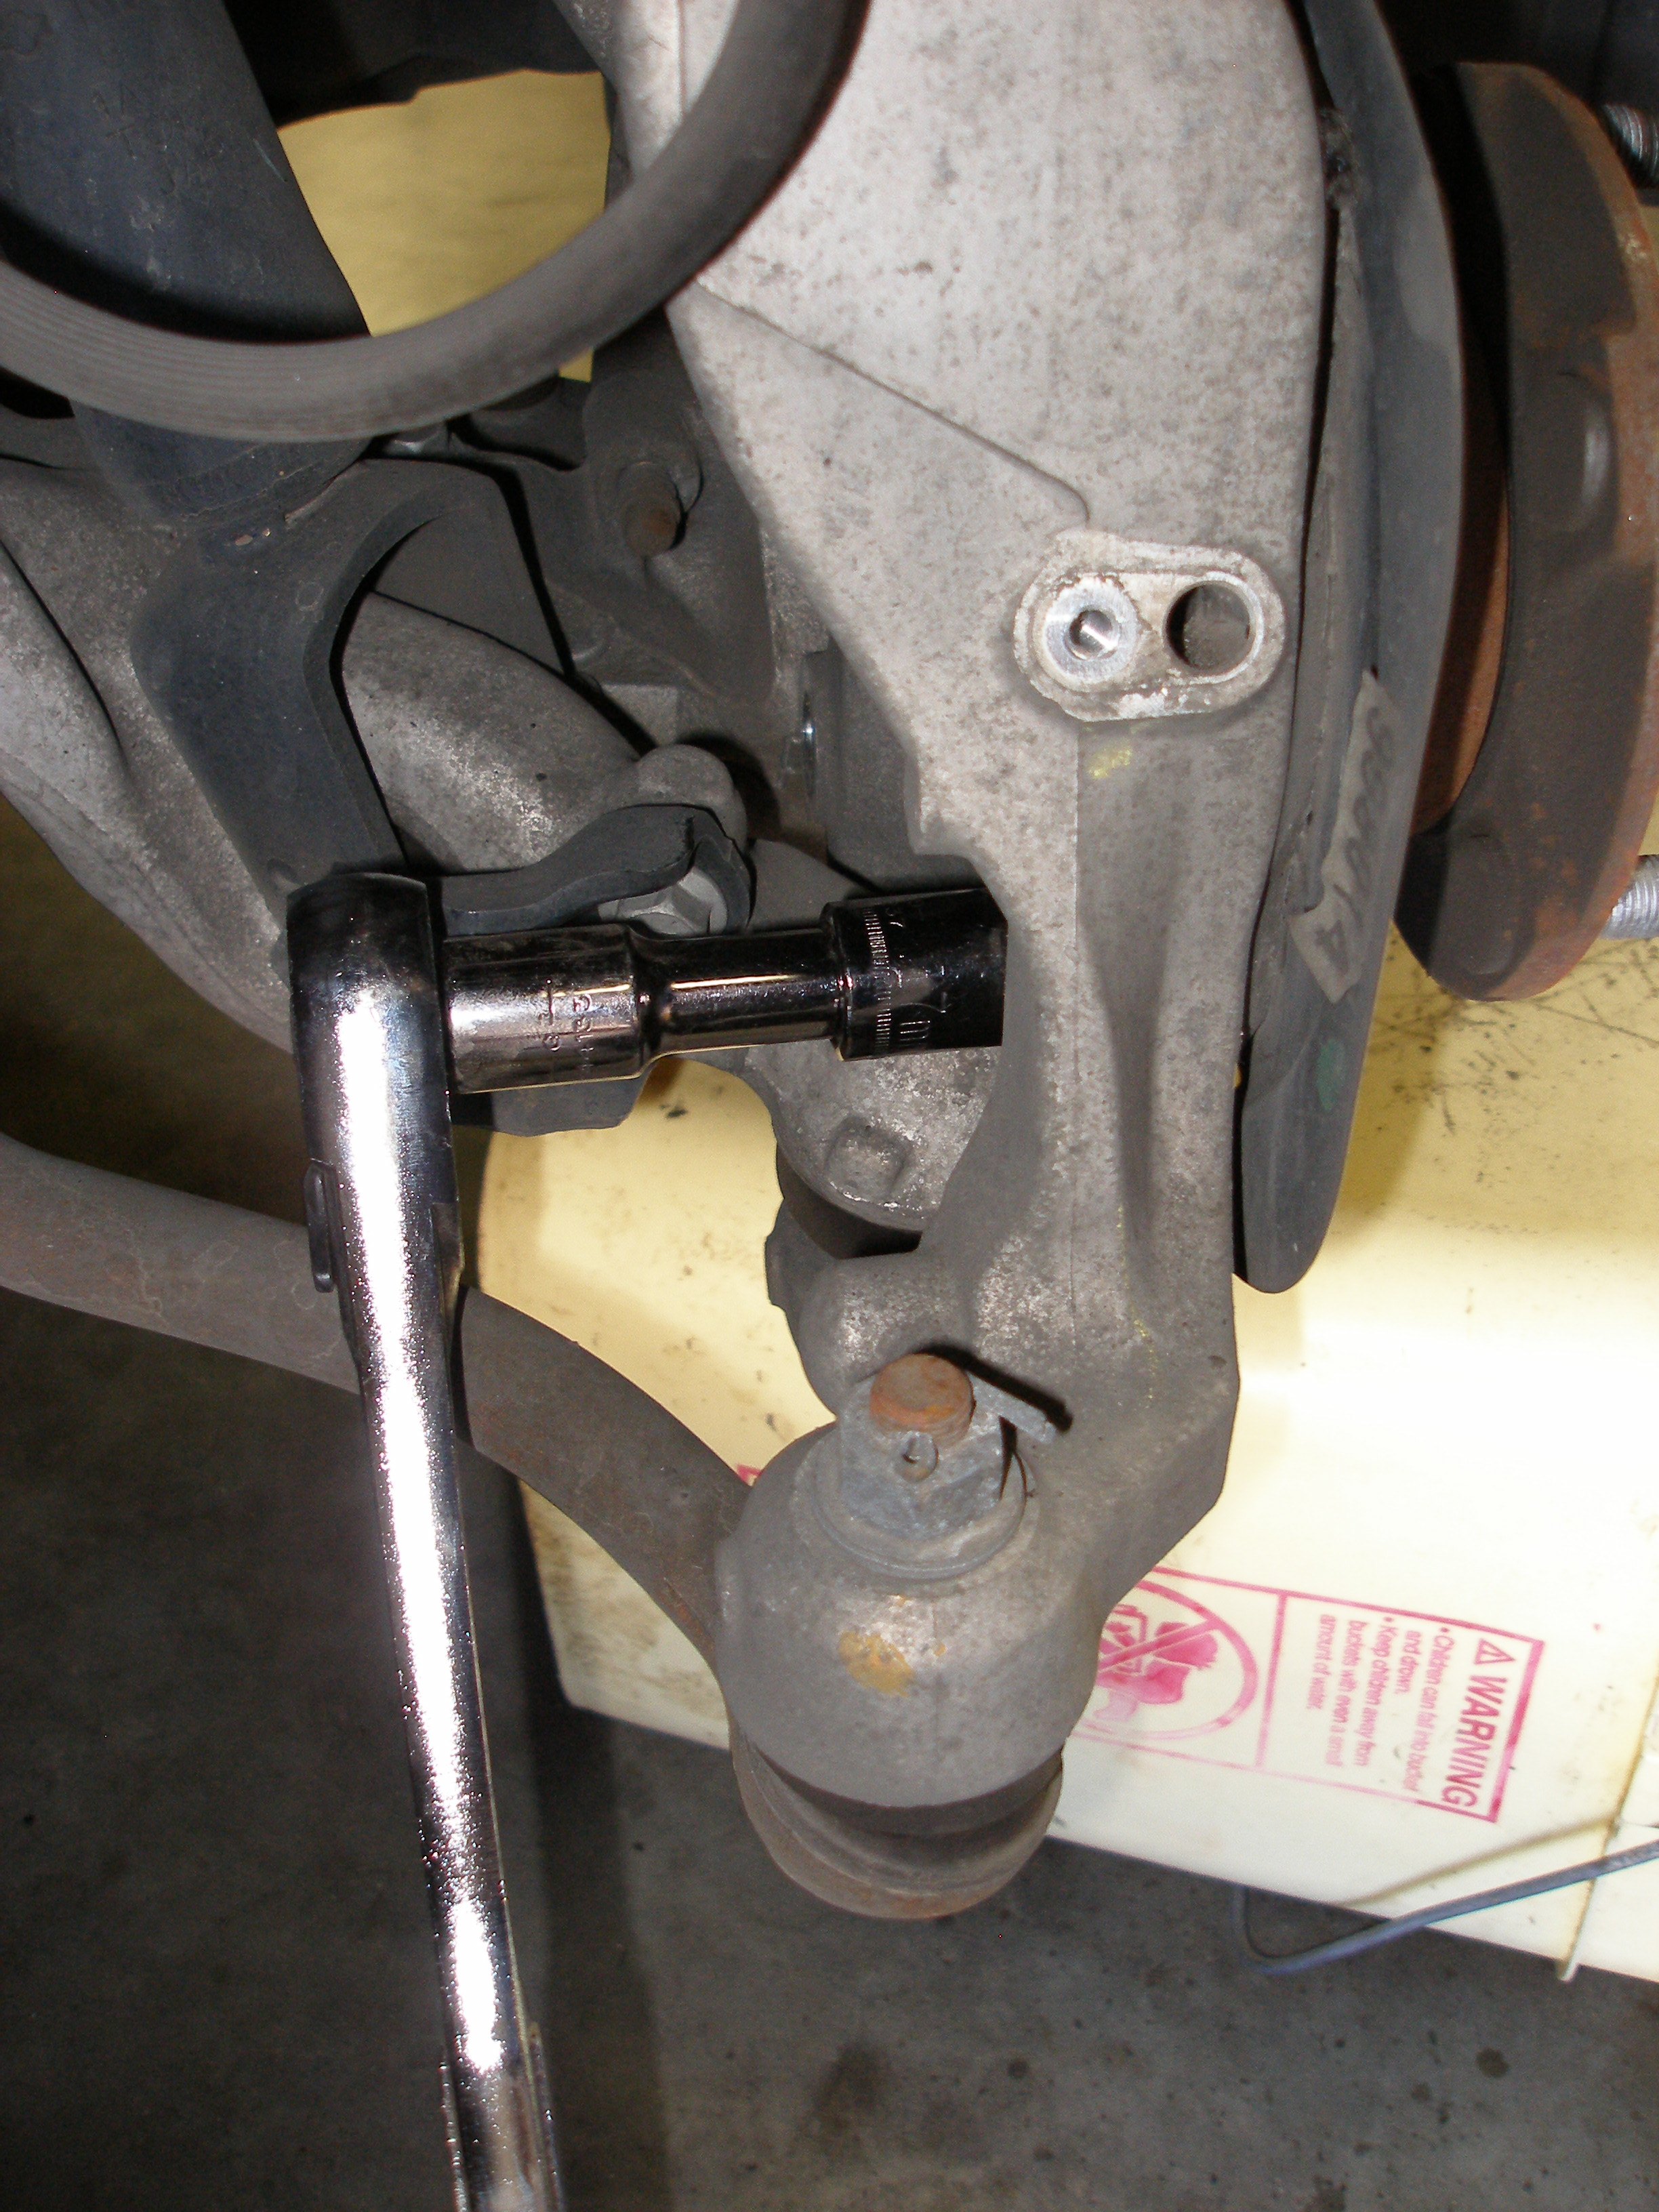
Remove wheel hub bolts
With the sensor out of the way, the two rearmost hub retaining bolts can be removed (17mm socket).

Have your helper once again turn the wheels the opposite direction fully, to obtain access to the forward two hub retaining bolts.
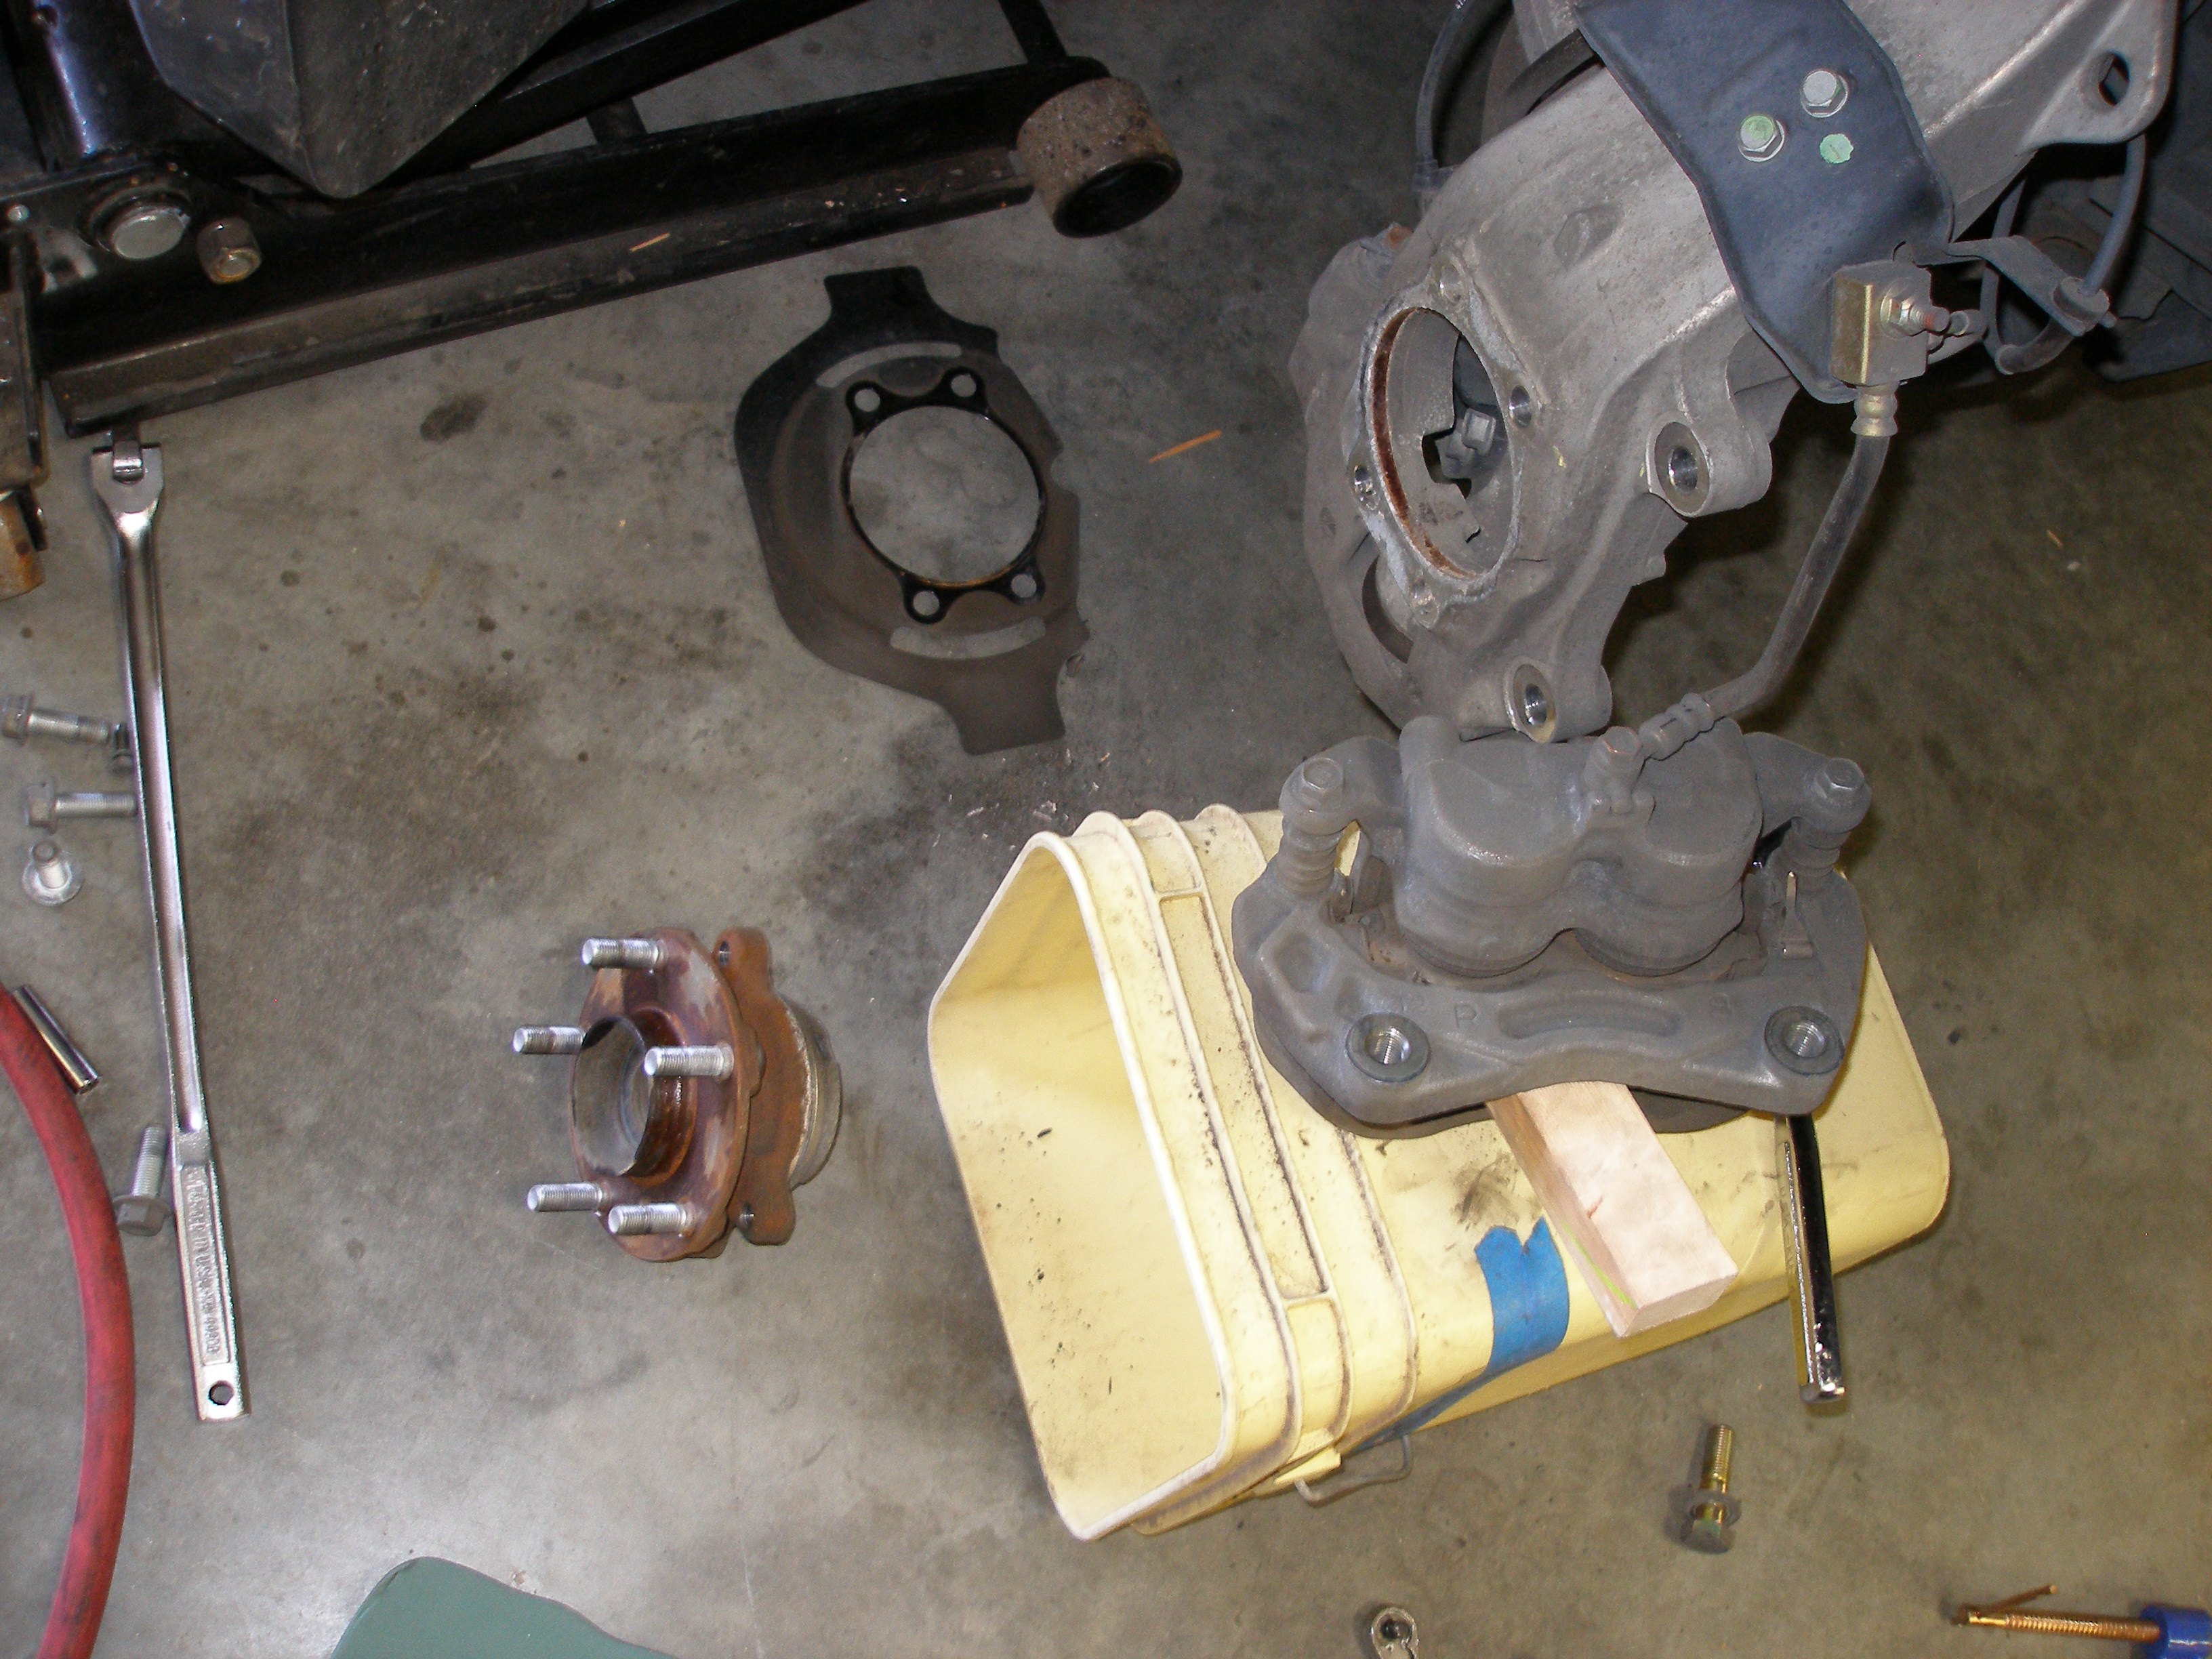
Once all four hub retaining bolts have been removed, use the hammer on the hub flange's backside to persuade the hub to dismount from the knuckle. Again, penetrating oil may be helpful here. There's no need to be gentle, the hub is not going to be used again.
View with hub removed. the shield falls off when the hub does.
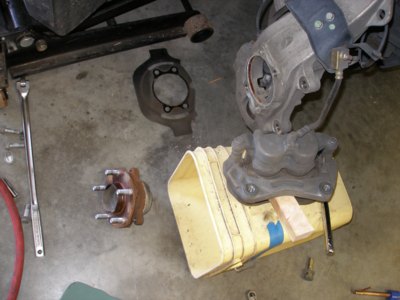
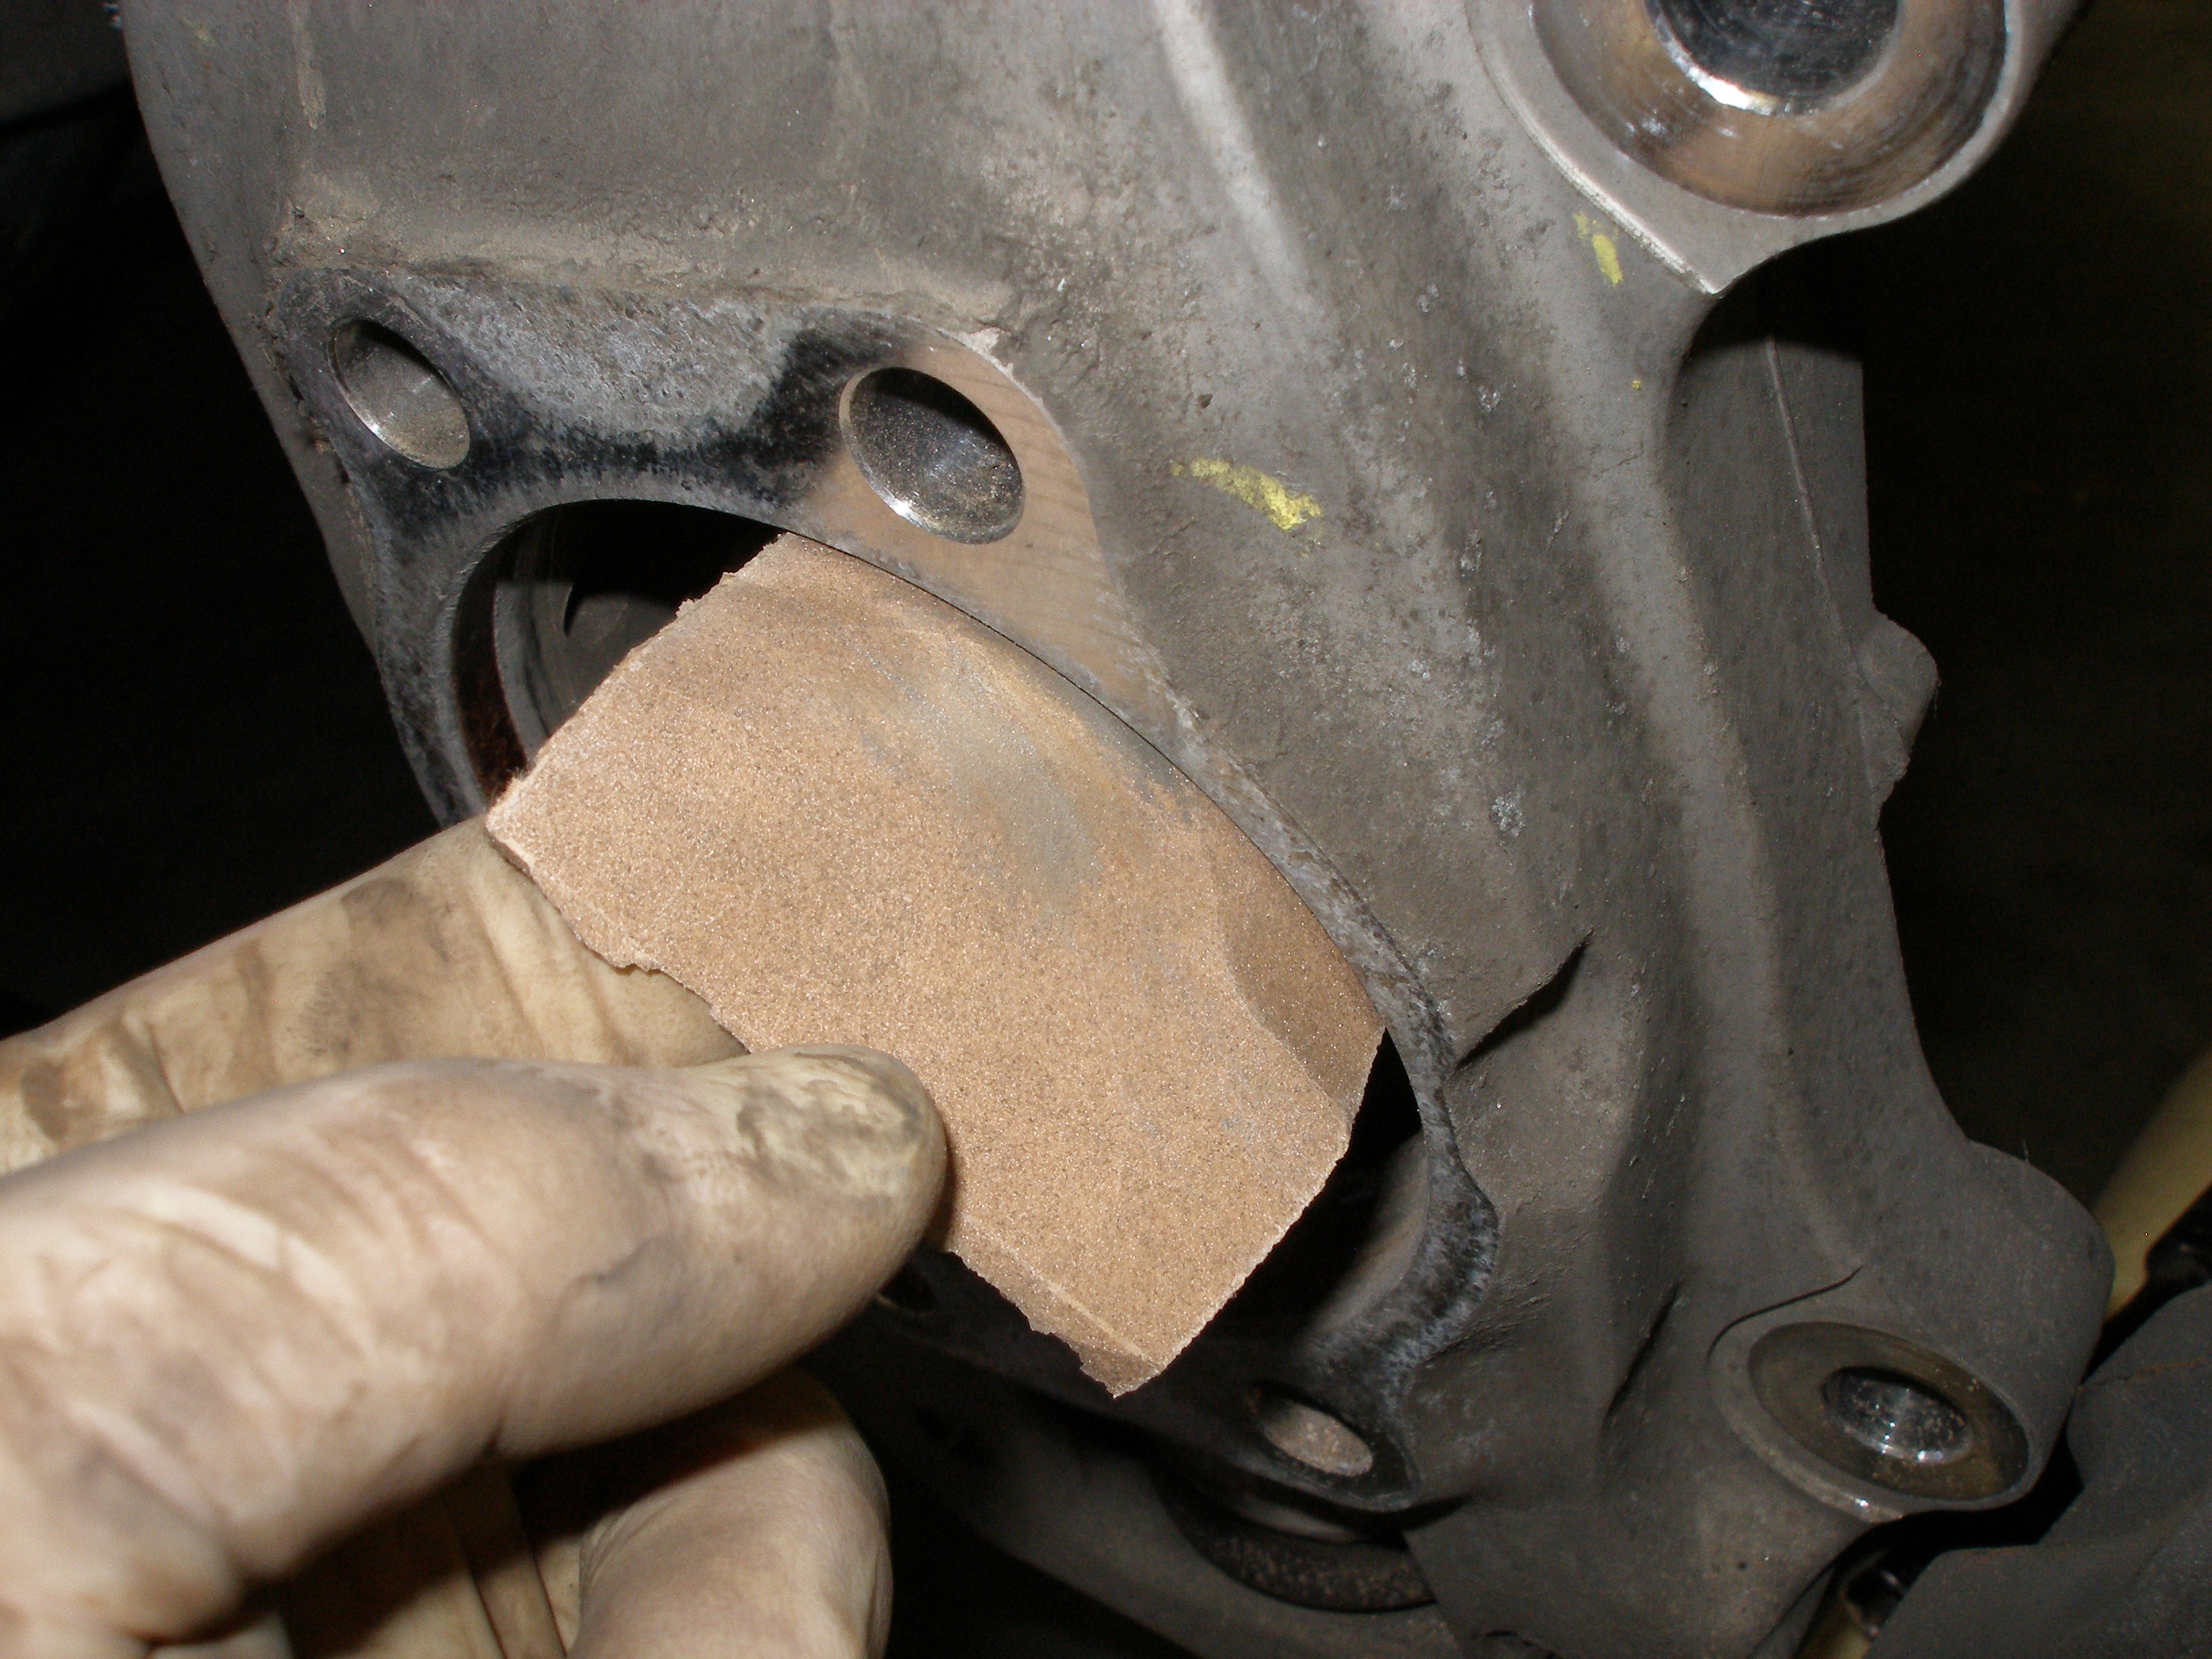
Prepare hub bore
Before mounting the new hub, clean up the bore of corrosion and crud.

Reassembly
As all the best repair manuals say (including the FSM for this job), "to reassemble, reverse above procedure."
Use anti-seize sparingly in the hub-to-knuckle bore;
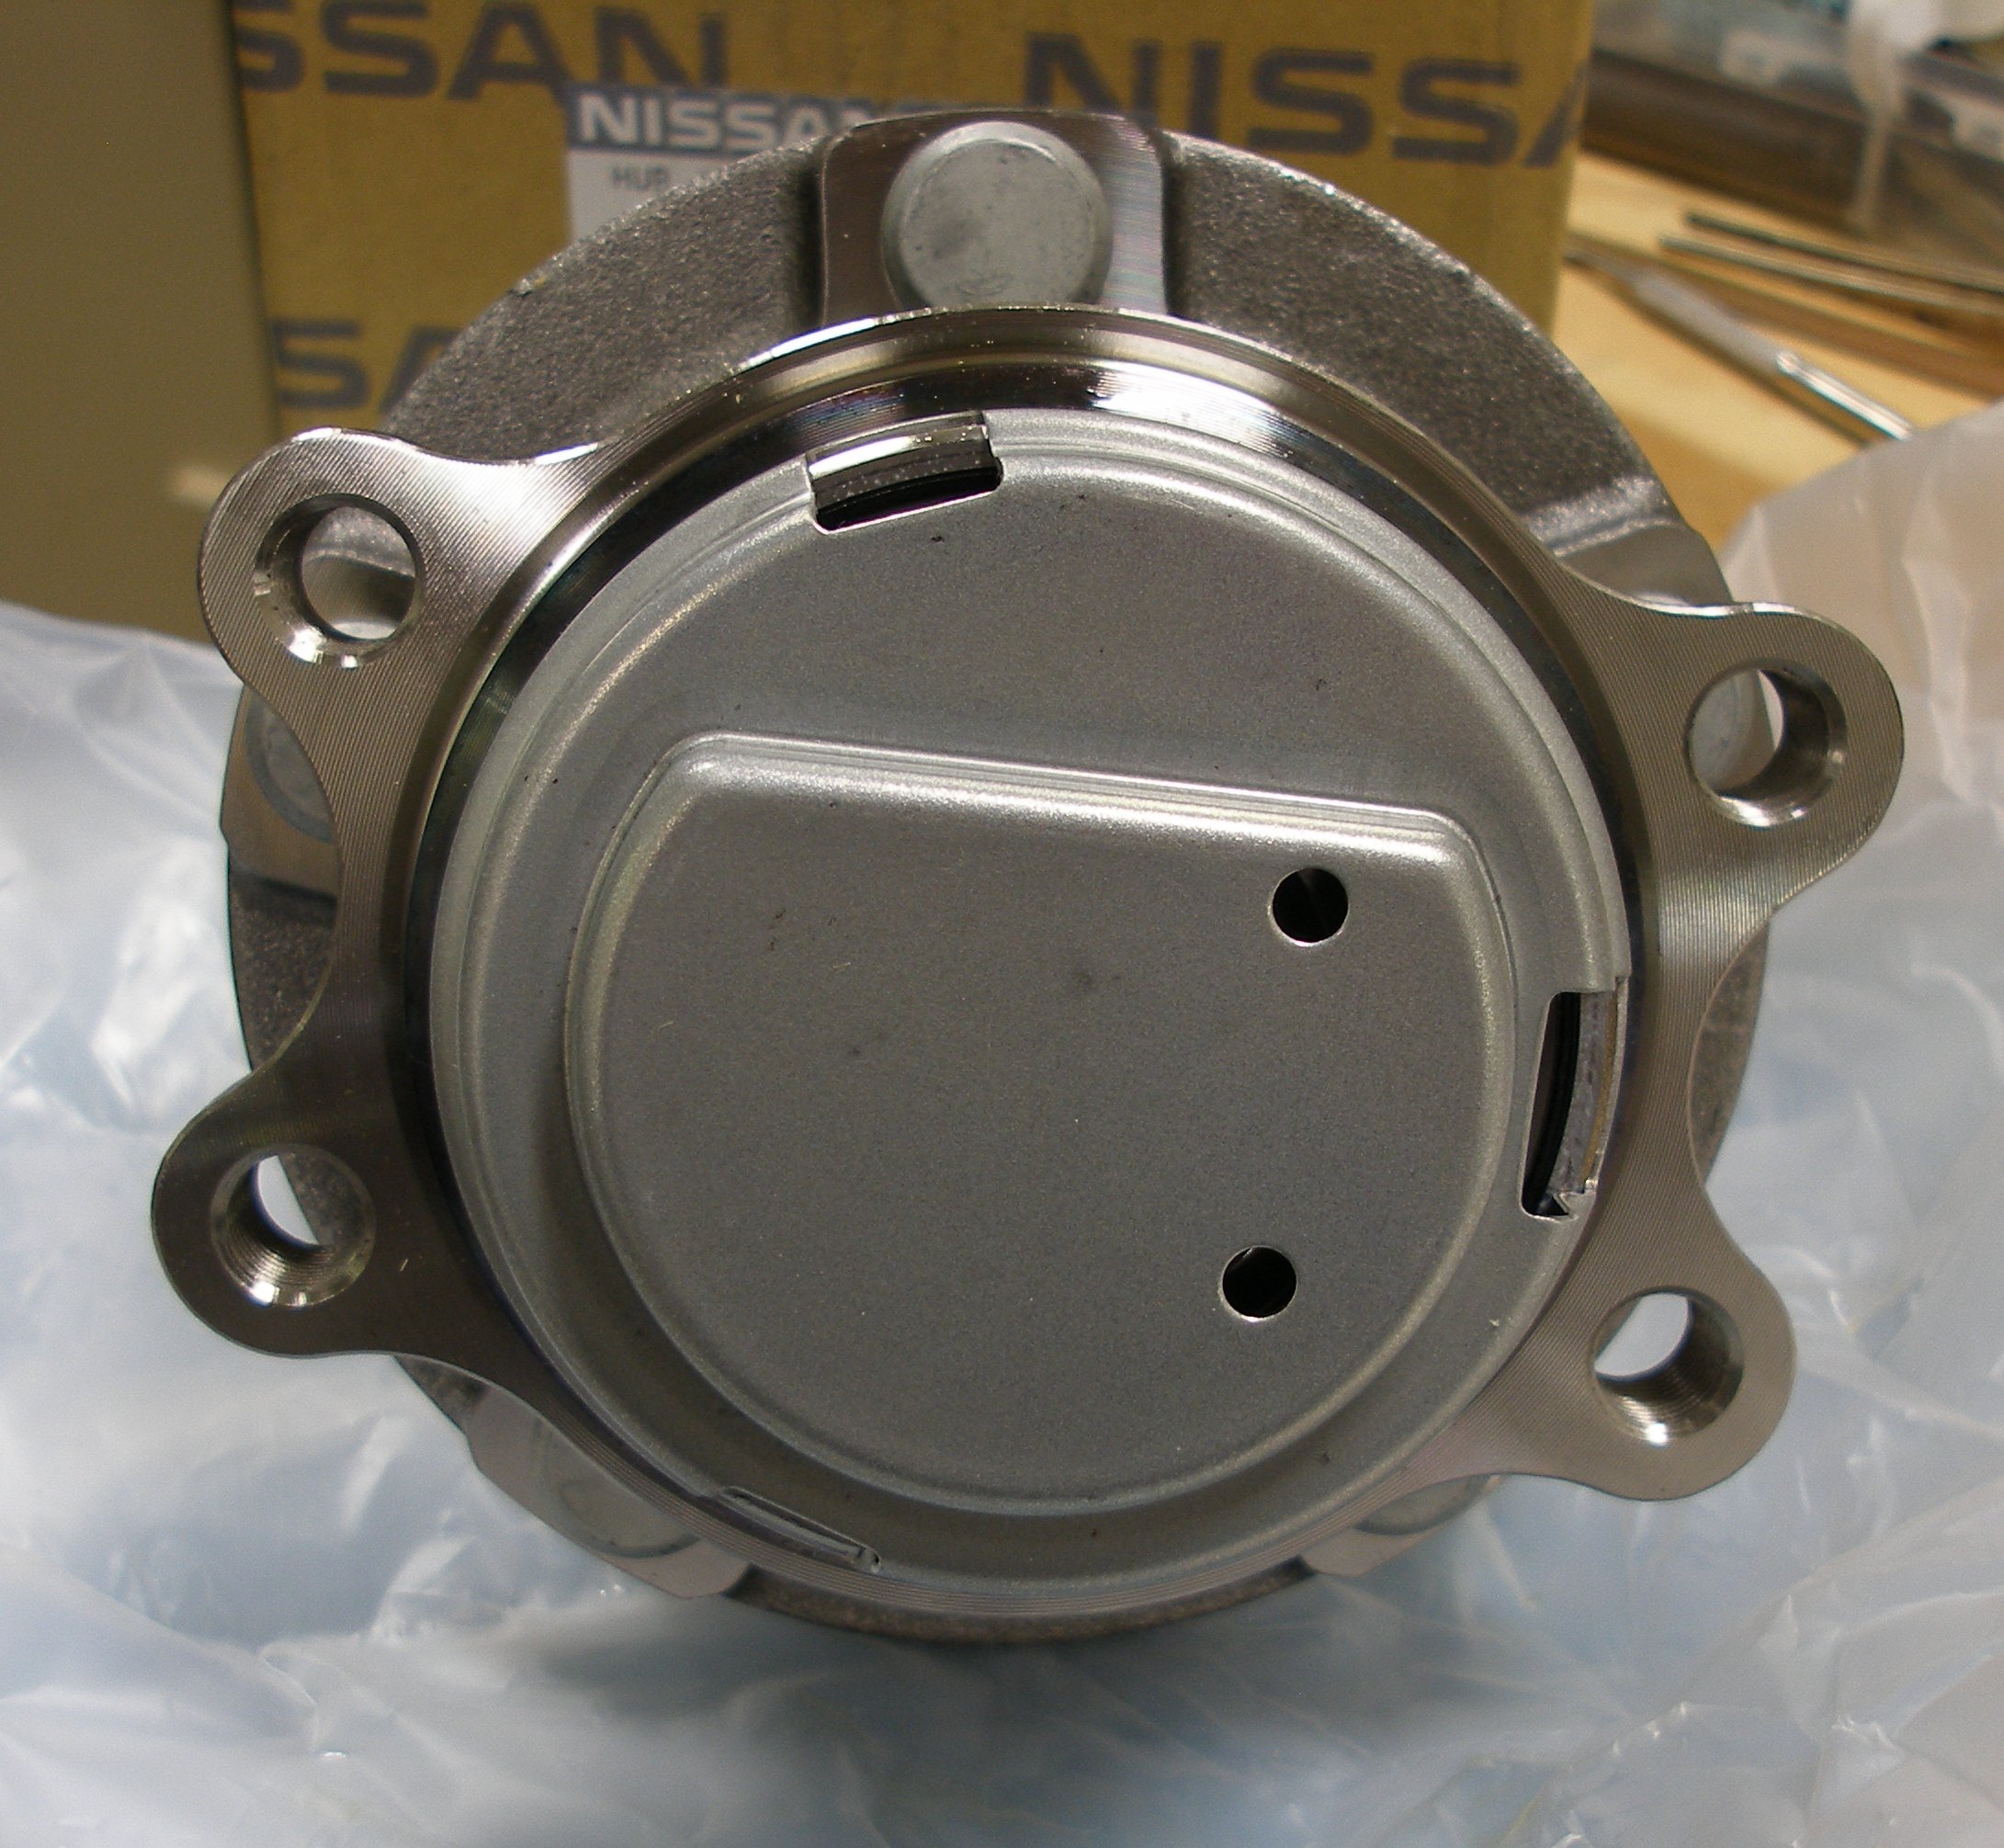
When positioning the new hub to the knuckle's bore, take note of the wheel speed sensor access slots at the back of the hub. It appears than one can mount the hub to the knuckle right or wrong -- the FSM is silent on this issue, and I didn't check myself. If mounted wrong, the wheel speed sensor may not insert fully into the hub. Best to look for sensor hole/slot alignment before bolting the hub up.
Use anti-seize sparingly where the disk centers on the hub;
I also use anti-seize on all the threaded fasteners upon reassembly.
Torque values
Torque the hub-to-knuckle bolts to 65 ft-lbs.
Torque the caliper bracket-to-knuckle bolts to 98 ft-lbs.
Wheel lug nuts: 80 ft-lbs.
========================================================================
Ours went smoothly; I changed out our hub in approximately 45 minutes, including snapping the pics and cleanup. Writing this article took about three times as long
If you find errors, bring them to my attention and I'll attempt to edit this article.
Partial list of tools/supplies required:
- Socket, 10mm x 3/8" drive (for speed sensor)
- Socket, 17mm x 1/2" drive (for hub mounting bolts)
- Socket, 21mm x 1/2" drive (for lug nuts; can substitute lug wrench)
- Socket, 22mm x 1/2 drive (for caliper bracket bolts)
- Anti-seize for reassembly
- Sandpaper or equivalent
- Mechanic's wire or a box (to support caliper when dismounted from knuckle)
- Penetrant (for disk/hub interface)
- Wood/stick, 1-1/8" x 4" approx.
- Scrap wood chunk for disk removal
- Hammer
A helper is recommended, as the steering wheel must be turned from one lock to the other several times, and it's very nice to have someone with clean hands doing this
Warn your helper to never touch the brake pedal! Read on for an explanation . . . 2WD exploded view of steering knuckle & hub. From the online FSM, page 5.
If your vehicle is AWD, you will have to remove one more nut (in the centre of the hub, the end of the axle) and one more step (press axle back out of hub). See the FSM.
Loosen lug nuts
Begin by setting the park brake, loosening lug nuts (21mm)

Raise & block the vehicle, remove wheel
Check for proper lift and block location (see FSM General Information, pg 43 but I used the engine subframe-to-body mount point instead), then remove the wheel.
Remove brake caliper
Have helper turn the wheels so the front of the wheel you're working with is "outward"; this provides access to the brake caliper bracket bolts. Remove two bolts (22mm). An air impact wrench is shown, but a breaker bar works just as well.
Remove the caliper
The FSM suggests unbolting the brake hose bracket. I didn't see that that would be particularly helpful. The caliper should not be allowed to "hang" on the brake hose -- that can damage the hose. Instead, either set the caliper on a suitable prop (I used a square plastic bucket), or hang the caliper from the knuckle using wire.
Once the caliper is removed from the knuckle, you will be facing the bare disk on the hub.

Safeguard the caliper
Before you do anything else, safeguard your caliper by placing a block of wood between the brake pads. Why? If your helper presses the brake pedal with the caliper removed from the disk, one of the caliper pistons may exit the caliper housing, causing much grief, doubling the cost of the job and quadrupling the job completion time. You will want wood about 1-1/8" thick.

Remove disk
Grab the disk and pull. If you're lucky, the disk will slide right off the studs.
If you're like most of us, it won't budge. Use your favourite penetrating oil here, but don't get carried away; use only enough to saturate the hub. Any oil that migrates to the disk's outer edge will have to be removed before reassembly.
Then, use a scrap piece of wood and a hammer to persuade the disk to break free of the hub. Place the wood on the shiny bit of the disk you see, where the outside pad contacts the disk. Whack the wood with a hammer. Yes, toward the engine. The disk will rock, the edge of the disk you are not whacking will tilt outward. Don't try to whack the backside of the disk, you'll only bend the shield and such.
View with the disk removed.
Remove wheel speed sensor
While you move your caliper prop (if using a prop), have your helper turn the wheels the opposite direction fully, giving access to the wheel speed sensor.

Remove the 10mm-head bolt, and attempt to withdraw the sensor from the knuckle.
The FSM warns: Do not pull on sensor wire, or sensor will be damaged. Penetrating oil might be necessary here too; ours did not.
Remove wheel hub bolts
With the sensor out of the way, the two rearmost hub retaining bolts can be removed (17mm socket).
Have your helper once again turn the wheels the opposite direction fully, to obtain access to the forward two hub retaining bolts.
Once all four hub retaining bolts have been removed, use the hammer on the hub flange's backside to persuade the hub to dismount from the knuckle. Again, penetrating oil may be helpful here. There's no need to be gentle, the hub is not going to be used again.
View with hub removed. the shield falls off when the hub does.
Prepare hub bore
Before mounting the new hub, clean up the bore of corrosion and crud.
Reassembly
As all the best repair manuals say (including the FSM for this job), "to reassemble, reverse above procedure."
Use anti-seize sparingly in the hub-to-knuckle bore;
When positioning the new hub to the knuckle's bore, take note of the wheel speed sensor access slots at the back of the hub. It appears than one can mount the hub to the knuckle right or wrong -- the FSM is silent on this issue, and I didn't check myself. If mounted wrong, the wheel speed sensor may not insert fully into the hub. Best to look for sensor hole/slot alignment before bolting the hub up.
Use anti-seize sparingly where the disk centers on the hub;
I also use anti-seize on all the threaded fasteners upon reassembly.
Torque values
Torque the hub-to-knuckle bolts to 65 ft-lbs.
Torque the caliper bracket-to-knuckle bolts to 98 ft-lbs.
Wheel lug nuts: 80 ft-lbs.
========================================================================
Ours went smoothly; I changed out our hub in approximately 45 minutes, including snapping the pics and cleanup. Writing this article took about three times as long
If you find errors, bring them to my attention and I'll attempt to edit this article.
-
cruzad3r
- Posts: 1340
- Joined: Fri Mar 05, 2010 6:34 pm
- Car: 2006 Infiniti M35x fully loaded
- Location: CT
AWESOME DIY tutorial - please add to FAQ thread
Great job man, thanks for putting this together. i absolutely agreed on the writing up the tutorial part as it's much longer compare to actual doing the work.
-
asavage
- Posts: 33
- Joined: Tue Apr 20, 2010 1:01 pm
- Car: 2006 M35 Sport RWD
- Location: Duvall, Wash.
- Contact:
Re: How do you diagnose wheel bearing noise?
Thanks for your kind words, cruzad3r. (Wish ours was an 'X', but when my partner bought it, he lived in Sacramento, and AWD wasn't a priority. Now, we live at the top of a long, steep hill and I bought a beater AWD van for the 3 weeks/year that we really need AWD to get in/out of our neighborhood).
Funny, I was just thinking two hours ago that I should post an update.
Update: changing the hub did not change the noise that I was attempting to cure.
A year later, we replaced the front tires only, and the noise disappeared with the old tires.
Funny, I was just thinking two hours ago that I should post an update.
Update: changing the hub did not change the noise that I was attempting to cure.
A year later, we replaced the front tires only, and the noise disappeared with the old tires.
-
jnorris007
- Posts: 1
- Joined: Sat Oct 06, 2012 11:56 am
- Car: 2006 Infiniti M35 Sport
Re: How do you diagnose wheel bearing noise?
asavage, thank you for the detailed pics and instructions! They were awesome! I had a whoop, whoop, whoop noise getting louder by the day. When turning you could really hear it. Changed the front hub.. no more noise. Cool.

Re: How do you diagnose wheel bearing noise?
asavage, Thank you, for your posting on this issue. Your DIY helped me out alot, I did both my 06 M35X front hubs this past weekend. The roaring\grinding sound is completely gone now. It's so quiet, that I enjoy my car so much more now.
-
Ilya

- Moderator
- Posts: 9205
- Joined: Fri Apr 23, 2010 11:20 pm
- Car: 2011 M56x but I spend a lot of time on my 2015 Kawasaki Vulcan S. Former owner of a 2007 M35x. Also take care of my wife's 2016 QX60.
- Location: Charlotte, NC
- Contact:
Re: How do you diagnose wheel bearing noise?
Thanks for bringing this thread to my attention. Adding to the FAQ.
I may have a bearing issue as well, so this is especially useful for me.
I may have a bearing issue as well, so this is especially useful for me.
-
lovemycarM35
- Posts: 398
- Joined: Sun Nov 14, 2010 6:19 am
- Car: 2014 Lexus GS 350
With F-Sport Package
Nebula Gray
19" wheels
12.3 inch display
Navigation
Re: How do you diagnose wheel bearing noise?
I just had the dealer replace my right front bearing and hud under my extended warrenty they also replaced the stearing rack they claim was leaking
-
yomoms16
- Posts: 50
- Joined: Tue Feb 19, 2013 6:16 pm
- Car: infinity m35 x
- Location: East orange ..new jersey
Re: How do you diagnose wheel bearing noise?
works out to about $150 per hub from discountinfinitiparts.com. after shipping. just had to buy 2
Re: How do you diagnose wheel bearing noise?
Just purchased. About $150 for both before shipping.
Great writeup!
Great writeup!
-
Ilya
- Moderator
- Posts: 9205
- Joined: Fri Apr 23, 2010 11:20 pm
- Car: 2011 M56x but I spend a lot of time on my 2015 Kawasaki Vulcan S. Former owner of a 2007 M35x. Also take care of my wife's 2016 QX60.
- Location: Charlotte, NC
- Contact:
Re: How do you diagnose wheel bearing noise?
Where did you get yours? I see them for $150/each.Double E wrote:Just purchased. About $150 for both before shipping.
Great writeup!
Re: How do you diagnose wheel bearing noise?
Here is what my order looked like: (It's actually a dealer in Georgia that has a hard-on for selling parts on-line.
Thanks for contacting Discount Infiniti parts. discountinfinitiparts.com
Items Ordered:
Item: front suspension, brake components, hub & bearing Left
Price: $67.99
Qty: 1
Total (before taxes or discounts): $67.99
Item: front suspension, brake components, hub & bearing Right
Price: $67.99
Qty: 1
Total (before taxes or discounts): $67.99
-----------------------------
Items Total: $135.98
Shipping Method: FedEx Ground (CANNOT BE USED FOR BUMPER COVERS)
Shipping: $19.35
_________
Order Total: $155.33
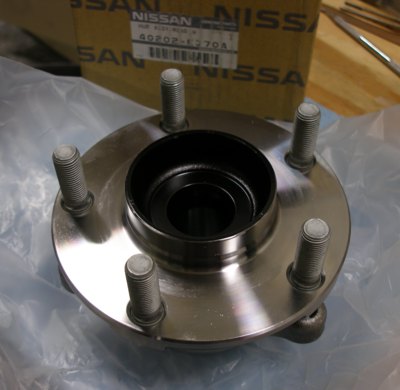
What actually came in the mail is the two items in the images at the top of this thread but the little protective caps were not on fore some reason. Perhaps a Y34 thing, I don't know.
Thanks for contacting Discount Infiniti parts. discountinfinitiparts.com
Items Ordered:
Item: front suspension, brake components, hub & bearing Left
Price: $67.99
Qty: 1
Total (before taxes or discounts): $67.99
Item: front suspension, brake components, hub & bearing Right
Price: $67.99
Qty: 1
Total (before taxes or discounts): $67.99
-----------------------------
Items Total: $135.98
Shipping Method: FedEx Ground (CANNOT BE USED FOR BUMPER COVERS)
Shipping: $19.35
_________
Order Total: $155.33
What actually came in the mail is the two items in the images at the top of this thread but the little protective caps were not on fore some reason. Perhaps a Y34 thing, I don't know.
Re: How do you diagnose wheel bearing noise?
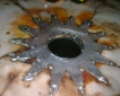
Hold on...
I got mine and noticed that it did not come with the bearing, race or double lip seal installed.....of course that was after I disassembled the original one. Crap!!!! I'm also seeing some significant differences. The cap I mentioned above that was not installed...was because the hubs are different on the Y34 and is probably why mine cost less.
now I gotta figure out how to get the bearings and then install them into mine....
Re: How do you diagnose wheel bearing noise?
Update: I contacted the vendor, they made it right and are shipping the bearings & race for each side right away. Just have to figure out how to assemble/press the race in.
Taking a few extra days but things happen, right?
Taking a few extra days but things happen, right?
-
CPJ LB

- Posts: 1026
- Joined: Sat Aug 28, 2010 4:06 pm
- Car: 12 G37X Sedan- stealthy modded
14 Altima 2.5
08 Tahoe
06 M35 S (gone)
14 Versa 4dr (gone) - Location: CA 2 CT
Re: How do you diagnose wheel bearing noise?
just finished having the two front hub/bearings installed...fyi guys, I picked my set up this morning from OC Infiniti. You can find their ebay site online. price is $147 each. since they are close to my house, I just drove down and picked them up...
My car has approx 127K so I thought it was a good time to swap out the old bearings....haven't jumped on the fwy yet to feel or hear the difference. But so far, smooth ride going down regular streets...
My car has approx 127K so I thought it was a good time to swap out the old bearings....haven't jumped on the fwy yet to feel or hear the difference. But so far, smooth ride going down regular streets...
-
Ilya
- Moderator
- Posts: 9205
- Joined: Fri Apr 23, 2010 11:20 pm
- Car: 2011 M56x but I spend a lot of time on my 2015 Kawasaki Vulcan S. Former owner of a 2007 M35x. Also take care of my wife's 2016 QX60.
- Location: Charlotte, NC
- Contact:
Re: How do you diagnose wheel bearing noise?
Do I need the Hub Assy AND Bearing?
That site (DiscountInfiniti) shows the Hub Assy being $134/side for my car...do I need to get anything else? Or is that the whole unit ready to go? Also, since it's the whole assembly, do I need to worry about pressing anything in?
EDIT: NVM got my answer.
I got part number 40202-EJ70B (EJ70A is for non-AWD). Picking up one hub assembly today from my local dealer for $191. One online place had it for $134 and another for $165 so I got the dealer down from $230 to $191...I need it by the weekend as I'm takin a drive to Canada (London, ON) so I can't afford to wait for it to get shipped, etc.
Re: How do you diagnose wheel bearing noise?
I'm having an independant shop press the bearings into the hubs. They said $100 ...and Pep Boys wanted $80 but PB's press was broken.
I'm hopin that the independent shop will just charge actual time as it shouldn't take more than 30 mins for both...
I'm hopin that the independent shop will just charge actual time as it shouldn't take more than 30 mins for both...
Re: How do you diagnose wheel bearing noise?
Put both sides in last night. Easy to do once the bearings got pressed in. So far so good on the first test drive. The roar is gone but I'm also going to get an alignment to be sure all is good & straight.
The old driver's side bearing had a lot of rusty looking build up in it and was probably the worst of the 2. The passenger side seemed OK but it had some odd wear patterns in the outer bearing race.
The old driver's side bearing had a lot of rusty looking build up in it and was probably the worst of the 2. The passenger side seemed OK but it had some odd wear patterns in the outer bearing race.
-
Ilya
- Moderator
- Posts: 9205
- Joined: Fri Apr 23, 2010 11:20 pm
- Car: 2011 M56x but I spend a lot of time on my 2015 Kawasaki Vulcan S. Former owner of a 2007 M35x. Also take care of my wife's 2016 QX60.
- Location: Charlotte, NC
- Contact:
Re: How do you diagnose wheel bearing noise?
Just a clarification for anyone who finds this thread on Google.
The Y50 M (06+) does not need the bearings pressed if you get the parts listed below:
40202-EJ70A (Non-AWD)
40202-EJ70B (AWD)
The older M's (Y34) may be the same part number, but they aren't an all-in-one assembly and require pressing.
I'm finishing mine today (took it apart on Monday but stripped two of the rear bolts so had to order new ones from Infiniti - I have a tendency to do that ). Will get a good test this weekend when I go to Canada.
EDIT: New bolts just arrived. Part number 081B4-2355M in case anyone ever needs em or is wondering. This is for the Y50.
The Y50 M (06+) does not need the bearings pressed if you get the parts listed below:
40202-EJ70A (Non-AWD)
40202-EJ70B (AWD)
The older M's (Y34) may be the same part number, but they aren't an all-in-one assembly and require pressing.
I'm finishing mine today (took it apart on Monday but stripped two of the rear bolts so had to order new ones from Infiniti - I have a tendency to do that
EDIT: New bolts just arrived. Part number 081B4-2355M in case anyone ever needs em or is wondering. This is for the Y50.
Re: How do you diagnose wheel bearing noise?
I would like to thank everyone in this thread for your help. With you all help, I fixed my friends 2007 Infiniti M35 2wd with 105,000 miles this weekend for $165.00. The job took me about 2 hours and wasn't that difficult. My local dealership in Mobile, AL. wanted $550.00 to do this job per side.
The part was ordered from OC Infiniti on eBay INFINITI M35 M45 OEM FACTORY FRONT WHEEL HUB & BEARING - FUGA Y50 2WD - RWD. The 2007 M35 2wd required no bearing pressing. The hub comes with bearings already pressed in. I wanted OEM or Timken bearings, not any China made crap from the local parts house. Also the local parts house wanted $180.00 to $190.00 for their brand hubs, which was more expensive than the OEM part from eBay.
This are the steps that I used to determine if it was a wheel bearing and then which wheel bearing was making the roaring noise:
1.) Drive the car on multiple surface roads. The sound remained close to the same on each road.
2.) The sound remained the same if the engine was pulling, cruising or coasting.
3.) Traveling around 45 mph, I could slightly turn the steering wheel to the right would change the frequency of the noise. (Read on line that this meant the driver's side (left) wheel bearing was probably bad).
4.) Jacked the front driver's side (left) and absolutely no play in the tire but, when I spin the tire you could hear a faint noise. I wasn't sure if it was the wheel bearing or brake drag.
5.) Jacked the passenger's side up and no play and no noise.
6.) So I went back to the driver's side and the driver's side was the correct one to fix.
I hope this will help someone in the future and appreciate everyone's help with my problem!
Re: How do you diagnose wheel bearing noise?
Thanks to asavage for the excellent DIY instructions. Did mine yesterday and the bearing noise is gone!
-
hsingh2088
- Posts: 70
- Joined: Tue Jan 29, 2013 9:20 pm
- Car: 2006 Infiniti M35
Re: How do you diagnose wheel bearing noise?
Hey guys, I seem to have the same problem except it's on the LF of my car. The noise seems to be getting worse and worse so I need to swap it out before anything catastrophic happens.
Had a question though, does part number 40202-EJ70A also apply to LF? The online sales channel for Infiniti is selling it for $160. Is this the right part? http://www.infinitipartsusa.com/Infinit ... ej70a-.htm
Thanks!
Had a question though, does part number 40202-EJ70A also apply to LF? The online sales channel for Infiniti is selling it for $160. Is this the right part? http://www.infinitipartsusa.com/Infinit ... ej70a-.htm
Thanks!