Alright guys it was sunny today so i decided to do part of the process today so here it is blackening the headlight.
Just a little info if your going to do this its a time consuming process. If you dont have the guts to do this then i recommend you not.
Gather your tools. A Flat head screwdriver, a star screwdriver, a 10 inch socket and ratchet. A high gloss high temp black paint, primer, and i used black silcon (i used black gasket silcon), masking tape.
First off you will need to take off the bumper. 8 clips at the top, 6 screws at the bottom, and a few clips underneath as well. Follow this.http://www.nicoclub.com/articles.php?id=293385
once you have done this you should end up with the head lights now
STart Removing the bolts with the 10 in socket and ratchet and use the star screwdriver for the screws theres 3 but i only had the picture at 2 sorry guys but the 3rd is right around there can't miss it.
you remove the headlight and wire off the holding clip and all the bulbs and remove the 2 star screws at the back of the headlight housing
After your done with that your going to want to set the oven preheat at 350 which i did make sure you have a sort of pan and foil wrap underneath on the parts on which it leans on so those dont melt. when the oven is finished preheating put it in for about 6 minutes.
While your waiting make yourself a sandwich lmao
.. make sure you have ur space provided to pry open the headlight which you must immediately after taking out make sure your wearing some sort of gloves to protect from the heat its hot .
Keep prying it open untill its fully opened at which you'll end up at this point
Now you'll remove the 2 star screws on the inside you'll see them and you'll separate the pieces to end up with this remove the big orange thing you didnt want
Begin sanding down the chrome pieces i used a 320 fine sand paper to sand it down a little bit and mask the areas in which you dont want painted and have your primer ready in the paintin area although some people painted the chrome section off the yellow turnsignal area i left it chrome to distinguish it from the rest
Now you begin to primer and paint i used 2 coats of primer and 2 coats of paint about 15 minutes in between coats of primer and bout i left about 25 on the paint between the coats .
and final product of paint
Now removing the masking tape and put the pieces back together put the black piece connected with the headlight face then the small chrome piece screwed on behind it clean out the dried clean from the back of the housing so you can re insert the front with the back piece
Your going to want to bake the back piece of the housing in the oven again for 6 minutes .. again once done with this makesure you have ur silicon in hand and ready to put it together begin putting it together now it should put it silcon the edges of housing insert the 2 pieces together and mold back the black edges together and apply a thin strip of silcon between.Sorry i dont have pictures of this process it was only me working and tryin to take pictures and doing this part is a hassle, didnt want to risk rebaking it.
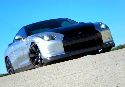
let it dry for a few hours reconnect the headlight, lights etc, bumper and the end result will be
Will update pictures hopefully tomorrow
Modified by kanejuice at 6:25 PM 4/29/2008
Modified by kanejuice at 2:44 PM 4/30/2008
Blacked Out Headlight
Re: Blacked Out Headlight (kanejuice)
nice .......... if only the pictures were a bit bigger ... this is how i wanted my headlights to look
-
kanejuice

- Posts: 138
- Joined: Tue Jan 22, 2008 2:24 pm
- Car: 2008 Altima Coupe 2.5s - CVT - Radiant Silver
Re: Blacked Out Headlight (johnny_d)
ask and you shall receive doubled the picture size
Re: Blacked Out Headlight (kanejuice)
AWESOME!!!
Re: Blacked Out Headlight (mcheddadi)
this looks really good. would there be any problems with hids?
Re: Blacked Out Headlight (loufoooo)
no, why would there be?
-
beeristasty

- Posts: 633
- Joined: Sat Apr 05, 2008 10:05 pm
- Car: 07 Altima 3.5 SE
Re: Blacked Out Headlight (kanejuice)
Very nice!
I was actually planning on doing the same thing with my sedan's tail lights b/c those altezzas are just awful.
I was actually planning on doing the same thing with my sedan's tail lights b/c those altezzas are just awful.
Re: Blacked Out Headlight (kanejuice)
Of course you write this up AFTER I send my lights to lightwurkz....
I love the look, just wish I had tried it myself...
I love the look, just wish I had tried it myself...
-
rjdmmfl1

- Posts: 5111
- Joined: Tue Sep 25, 2007 8:52 pm
- Car: 2008 Altima Coupe, Radiant Silver, 3.5SE, Premium Package, VDC
Re: Blacked Out Headlight (kanejuice)
Kanejuice, good looks homie! I'm still a lil hesitant about doing this with the HID headlamps... at ~$900 a piece, I think I'd be real pissed if I messed them up!
Re: Blacked Out Headlight (rjdmmfl1)
show us some pics with the parking lights on so we can see what it looks like without the orange piece
-
Blue Batmobile
- Vendor
- Posts: 750
- Joined: Mon Aug 13, 2007 2:25 pm
- Car: 1997 NSX
- Contact:
-
LongBeachCoupe

- Posts: 9482
- Joined: Thu Aug 23, 2007 1:43 pm
- Car: 08 Altima Coupe (RIP Hurricane Sandy)
2005 Lexus RX
Re: Blacked Out Headlight (rjdmmfl1)
the value isnt 900.... Just like the value on the windgard wasnt 90..... Lets say this... if you cracked em open and made them look perfect... but the ballast was broken for your HID's.... its a 85 dollar solution... mind you its not "factory" but then again, what IS factory in your car?
With your knowledge and expertice (a scientist shouldnt have a problem doing this IMHO)... I say jump in
With your knowledge and expertice (a scientist shouldnt have a problem doing this IMHO)... I say jump in
-
SniperJoe

- Posts: 301
- Joined: Mon Mar 24, 2008 1:11 pm
- Car: 2008 Nissan Altima Coupe 3.5 SE CVT, Premium, Tech, VDC.
Re: Blacked Out Headlight (kanejuice)
Very well done .... thanks for all the pics as well.
-
Mr.Coupe
- Posts: 1300
- Joined: Thu Jul 05, 2007 4:51 pm
- Car: 08 Altima Coupe 3.5 BOOSTED
- Location: SoCal
Re: Blacked Out Headlight (kanejuice)
WOW... Great writeup dude. I might just do this to my car soon. Freaken great job dude.
Ricky C.
Ricky C.
-
theoctopussi

- Posts: 608
- Joined: Wed Oct 24, 2007 6:07 pm
- Car: 2008 Altima Coupe 2.5 6MT
- Contact:
Re: Blacked Out Headlight (kanejuice)
I tried this last night and my clips melted, so I stopped, just put my HIDs on and said **** it... how'd you keep the clips from melting?
-
kanejuice
- Posts: 138
- Joined: Tue Jan 22, 2008 2:24 pm
- Car: 2008 Altima Coupe 2.5s - CVT - Radiant Silver
Re: Blacked Out Headlight (theoctopussi)
which clips ? "After your done with that your going to want to set the oven preheat at 350 which i did make sure you have a sort of pan and foil wrap underneath on the parts on which it leans on so those dont melt. "did u cover them with foil wrap?
-
SHIFT_COUPE

- Posts: 3887
- Joined: Fri Aug 03, 2007 3:36 am
- Car: 2014 Infiniti Q50 AWD
- Location: Bethel, CT
- Contact:
-
SHIFT_COUPE
- Posts: 3887
- Joined: Fri Aug 03, 2007 3:36 am
- Car: 2014 Infiniti Q50 AWD
- Location: Bethel, CT
- Contact:
Re: (SHIFT_COUPE)
Moo moo farm
Modified by mcheddadi at 11:20 PM 5/7/2008
Modified by mcheddadi at 11:20 PM 5/7/2008
-
theoctopussi
- Posts: 608
- Joined: Wed Oct 24, 2007 6:07 pm
- Car: 2008 Altima Coupe 2.5 6MT
- Contact:
Re: Blacked Out Headlight (kanejuice)
as I was pryin the housin apart the clips just smooshed to one side - so I said **** it let me stop now. lol
-
rjdmmfl1
- Posts: 5111
- Joined: Tue Sep 25, 2007 8:52 pm
- Car: 2008 Altima Coupe, Radiant Silver, 3.5SE, Premium Package, VDC
Re: Blacked Out Headlight (theoctopussi)
\theoctopussi wrote:as I was pryin the housin apart the clips just smooshed to one side - so I said **** it let me stop now. lol
that's exactly what I was afraid of!! something like that!
-
kanejuice
- Posts: 138
- Joined: Tue Jan 22, 2008 2:24 pm
- Car: 2008 Altima Coupe 2.5s - CVT - Radiant Silver
Re: Blacked Out Headlight (theoctopussi)
ew that shks it smooshed really sounds like those clips were exposed to the heat directly, when i did mines my clips were solid

Re: Blacked Out Headlight (kanejuice)
nicely done. great write-up.
-
dangeris

- Posts: 5139
- Joined: Wed Sep 19, 2007 6:18 pm
- Car: 08 Code Red 3.5
08 BMW 328xi Coupe
90 300ZX 2+0 NA - Location: Lansdale PA
- Contact:
Re: Blacked Out Headlight (kuhan)
Great write up KaneJuice!
But Good God Man, Learn to use proper English with proper punctuation. Reading your write up was like listening to my 5 yr old trying to read. Not that I'm not grateful for your write up, I am! It was just hard to follow.
I'm going to do this mod this memorial day weekend. How long did the whole process take you? Start to finish?
You mentioned that you preheated your over to 350 degrees and when Octopussi tried it, his clips melted. Would it be safer to preheat the oven to 250-300 just to be safe and cover the clips with foil? Just don't want to regret taking on this mod so I'm trying to gather as much info as possible before starting.
I'm also going to do an LED mod while I'm in there so we'll see how this works out!
-
Rolling Estonian

- Posts: 680
- Joined: Wed Apr 02, 2008 11:47 am
- Car: 2008 Altima Coupe 2.5
Re: Blacked Out Headlight (dangeris)
Sorry could not resistdangeris wrote:Great write up KaneJuice!
But Good God Man, Learn to use proper English with proper punctuation. Reading your write up was like listening to my 5 yr old trying to read. Not that I'm not grateful for your write up, I am! It was just hard to follow.
...You mentioned that you preheated your over(sp) to 350 degrees ...
-
dangeris
- Posts: 5139
- Joined: Wed Sep 19, 2007 6:18 pm
- Car: 08 Code Red 3.5
08 BMW 328xi Coupe
90 300ZX 2+0 NA - Location: Lansdale PA
- Contact:
Re: Blacked Out Headlight (Rolling Estonian)
lol..do you at least agree with me Rolling Estonian?
Rolling Estonian wrote:
Sorry could not resist
-
Rolling Estonian
- Posts: 680
- Joined: Wed Apr 02, 2008 11:47 am
- Car: 2008 Altima Coupe 2.5
Re: Blacked Out Headlight (dangeris)
You're right Dangeris. Awesome information, but it would be easier to read with punctuation.
...ok now I feel like my dad.
can I get a , that's not the point stop jackin' the thread.
...ok now I feel like my dad.
can I get a , that's not the point stop jackin' the thread.
-
kanejuice
- Posts: 138
- Joined: Tue Jan 22, 2008 2:24 pm
- Car: 2008 Altima Coupe 2.5s - CVT - Radiant Silver
Re: Blacked Out Headlight (dangeris)
Lmao.. Sorrry I was just being lazy But anyways... you can set the preheat a little lower if you wish. It would be safer than 350. Make sure the clip area does not touch any area in the oven, so it doesnt smoosh and you should be set. The whole process serioulsy took about 8 hours because I waited a while to paint the pieces. Just make sure you Pry open the headlight quickly before the rubber hardens. good luck let the force be with you
-
LongBeachCoupe
- Posts: 9482
- Joined: Thu Aug 23, 2007 1:43 pm
- Car: 08 Altima Coupe (RIP Hurricane Sandy)
2005 Lexus RX
kane.. check out this thread...For a flat black they charge 150glossy or color match 200..2 tone 275
http://forums.altimas.org/zerothread/339273
Their turnaround is superfast as they do them the day they arrive or the day after and then ship back or local pickup..
They also offer guarantee on leaks and whatnot...
Based on your experience doing this install yourself, do you think it is worth giving a shot on your own?
(ie:i know i can clean my own toilets, but i still pay someone else to do it)
or is it worth it to send it out..?