The 20 was loosing compression quickly and hadn't ever ran right since i rebuilt it; constantly ate oil and had pretty bad blowby from the begining...i think the machine shop set the rings up on the 'loose side' and it probably didnt help that I set up large injectors on a fresh block, live and learn.
I had intially thought about puting a VH45 into the s14 as i was very impressed with the engines capability in the s13 coupe i built around this time last year or so...however a good friend of mine talked me out of it and insisted i stay rb series and sudgested rb30.
I looked into it and found that the r32 rb25de head would allow me to bolt on all of my old rb20 go fast bits would bolt/drop into it without any modifications to the head which is great as buying new parts would have made the build VERY expensive.
This is not really a how to as if you're interested in it there is a HUGE (300+ page) thread on skylines australia and a few individuals have compressed all pertinent information down into a single pdf; go there to find it.
I have just finished running the engine in thru its intiall break in period, about 260mi on the engine now and it pulls great idle vac. and idles buttery smooth, its strong idle is very much like my jag's idle with only a 30rpm fluctuation.
Most of the fuel mapping is complete, just waiting to get some dyno time so I can dial in the ignition timing and make some real power!
Mod list for the engine:
r32 rb25de head - fully decarbonized and chem dipped, rebuilt to spec
holden/nissan rb30e s2 block - oil, coolant, and return lines already tapped
SPOOL imports external head drain
N1 oil pump
N1 water pump
RawBrokerage crank collar
Tomei oil restrictors (x2)
Tomei rb20 valve springs - off of my 20
Tomei pro cams 260/8.9mm - off of my 20
Ross metal jacket ballancer - off of my 20
Greddy cam gears (in/exh) - off of my 20
RIPS intake manifold - off of my 20
HKS exhaust manifold - - off of my 20
GT3076R converted to HKS 3037s spec w atp twin entry housing - off of my 20
Greddy 720cc injectors - off of my 20
Z32 maf - off of my 20
ARP exhaust manifold studs - off of my 20
ARP head studs
ARP rod bolts - use sr20 bolts!
OEM rings - you have no idea how hard these are to find!
ACL main/rod bearings - stocked stateside!
Lightweight flywheel
Spec z32 na stage 3+ clutch
new nissan wristpin snap rings
new nissan tensioner studs - a MUST, do not use old hardware unless you like snappage!
gates vw/audi timing belt p/n T291 - proper 152 tooth belt, gates makes good stuff.
new freeze plugs
And to the part everyone wants to see...pictures!
I came by the blocks from a fellow who was exporting them to the us, the same friend that talked me into the 30 also decided to build one since it would trump his rb26 build that he had in the works.
Engines after unwrapping and unstrapping:

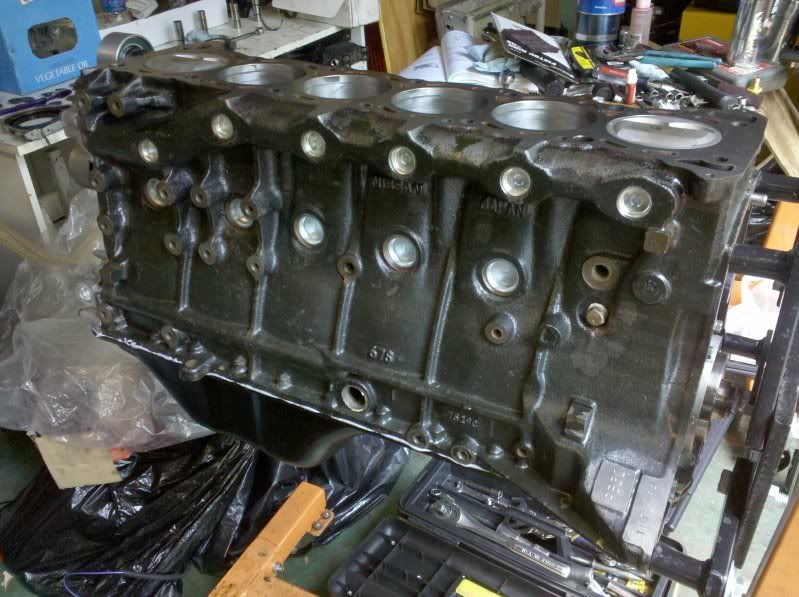
first order of buisness was to tear down my block in order to prep it to be sent to the machine shop for a good hot tanking, hone and mods to the block for the secondary tensioner.

engines looked to be in good nic for the most part as they spun over smoothly with no binding but my block had signs of water sitting on the pistons for a bit, luckily it was mostly superficial and the hone cleaned it up.
Pistons however were gross, both engines had very dirty pistons with obvious signs of blowby...either a bad break in or just worn to hell rings it honestly looked like a combination of both.

Pistons and rods seperated, heat gun works wonders here!

Several soakings in carb dip over the course of a few days resulted in pistons that were almost brand new looking with minimal wear on the skirts, most of the blowby was superficial but it was very hard to disolve the varnish...a toothbrush and pipe cleaners was the only way to go here!

since i have little faith in nissan rod bolts being reused, yet alone unknown mileage as well as age it was deicided to fit arp rod bolts...however no one likes to give out info on what fits so i ended up buying several sets of rod bolts as my inital call to arp was about as much good as shouting at a brick wall...here is a shot of the big end of the rod with one rod bolt removed and a vg30e rod bolt next to it.
the vg30e rod bolt is much too short and does not have enough protrustion to locate the cap, do not use these.
the later vg30de bolts are too LONG and must be cut down to clear the crank, however cutting a bolt is not advised as it affects the fasteners overall clamping strength.
the bolts you want are off the shelf sr20 bolts, unfortunately this means you have to buy two packs of bolts...oh well, name of the game.

Bottom end assembly was done by myself and a friend, being the first time I've assembled a bottom end I made sure that we were very careful in assembly, all steps were performed as per the FSM; a learning experience to say the least.
All bearing surfaces were plastigauged and found to be within spec, if i continue assembling engines for myself and customers I plan on a proper mic set and bore gauge.
Main bearings laid in their respective grooves after cleaning the bearing surfaces and faces of any dust.

plastigauge on the crank, flash washed it out unfortunately.

Bottom end assembled with copious ammounts of assembly lube, too much is better than too little!

Block as it sits awaiting piston/rod assemblies:

front shot of the block showing the secondary tensioner relocation as well as mounted water and oil pumps

unfortunately I dont have any pictures of us fitting the rings to the pistons as just about everything was coated in oil (tools, block, hands) and I was unable to snap pictures of the procedure, but its really not hard...again paying attention to the fsm and the marking/direction of the rings all slid in smoothly.
ring gaps were checked but unfortunately no reference values were available, so we checked for uniformity and there was close to no discrenable variance in the ring gaps between cylinders; this block had the same grade pistons 1-6.
We did all assembly rings using 30wt non detergent oil to lube the bores up, wrist pins were slid in using 30wt and the rings lubricated with a quick shot of wd40.
piston/rod assemblies fully assembled, box was clean and free of dirt and grit.

close up of the installed rings, oil ring was the hardest to set up.

Overhead shot of the pistons installed in the block, torque specs were checked 3 times on mains and rods to ensure nothing was loose.

side shot of the assembled short block, notice brand new freeze plugs
Something I feel should be mentioned as its not well covered in the pdf on SAU nor on SAU's forums (as not many people have swapped 30s into s chassis cars)...the oil pan.
The rb30 oilpan fits in an s chassis car if you dont care about the front sway bar and remove it, thus you MUST use the skyline oilpan as it has a cutout for the sway bar to clear properly...dont ask me how i found this out but it was irritating to have the engine in car only to pull it.
if you have an EARLY rb20 then the pan will bolt right on no worries, however if you have a late rb20/ rb25 pan then the rear baffles must be removed to prevent crank fouling due to the longer stroke.
rb30 pan:

rb20/25 pan:

The r32 rb25de motorset was dirty, previous owner must not have cared for it much as the head was dirty and kinda sludgy...luckily everything from the head was removed and binned except the valves and was cleaned thoughorly.
Head was SPOTLESS after i got it back from my machinist and this is how the ports and combustion chambers looked:

One point of interest is the powersteering bracket, the rb30 has provisions for the ps pump bracket on the block unlike the 25/26/20 which bolts to the block and the head, to fix this the top lug must be ground down flush with the other mount points on the block.
The work is quickly accomplished with an angle grinder but you have to be careful and not remove too much material else it will not sit flush with the block!

Bolting the head onto the block is just like doing a head job on any other rb engine except the deck higth is a hair over an inch taller (around 38mm) so setting up the timing belt can be tricky, using the tooth count method to ensure the cams are set correctly is much perfered over the 'line the lines up' method as the gates timing belt does not have the proper marks to set timing...one must set the crank to tdc perfect via the mark on the crank timing sprocket and oil pump or with a degree wheel, both will work.
I found it helpful to mark the timing belt using the rb20's timing belt as it had marks for the cam gears with the proper tooth spacing on it, again check fsm for this info.
It should be noted that when doing any cam related work that an engine that has had either its head or block decked (or both) that adjustable timing gears should be installed and degreed to cam mfg. specs, there is lots of power to be had with correct cam timing and it saves the hassle of 'playing with the cams' on the dyno as more often than not the results found on the dyno are the correct values for properly degreed cams.
Companies dont put money into cam development without finding optimum values...best to roll with it!
FWIW my cams required .5* retard intake and 2* advance exhaust, your mileage may vary.
Timing belt run and...timed:

Exhaust manifold bolted in, do note that the water galley 'ridges' interfere with the exhaust manifold and both block and manifold require clearancing for proper fitment, this is best done before the block is machined as it creates alot of abrasive dust.

For anyone running an r series xmember you'll find that hood clearance goes out the window if you're using stock mounts, with the engine sitting on stock mounts it sat proud of the fenders by a good inch and change due to the increased deck hight.
Here are some pics of the engine sitting on the engine mounts and bolted to the crossmember.


This was rectified by making my own engine mounts out of some hockey pucks and plate steel i had left over from my vh project car, you have no idea how hard it is to find hockey pucks in the south...had to go to a skating rink to get these!
Mounts are a thru bolt design with bushings on the ends to prevent overstressing of the bolt and alow flex in the system, however these mounts are just about as solid as you get without using metal blocks!

the custom engine mounts along with a modified xmember (2 holes drilled) allowed for the engine to just barely squeeze under the hood, a very small portion of hood skeleton had to be trimmed but the liner was left uncut and is virtually undetectable.


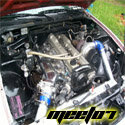
For all intents and purposes it looks a whole lot like my orginal 20 setup as pictured as all plumbing was reused, only difference is the head sits taller and the valve cover breathers have been tapped and replaced with lower profile right angle hose barbs.

Driving this car is a totally different experience, turbo comes on full song (14psi) at 3krpm in 5th gear and response is AMAZING, boost is modulated by the gas pedal.
Power delivery is nice and smooth with excelent street manners, timing is set very conservative for the CR of the engine (approx 8.3:1) and I am just waiting for some dyno time to dial in the timing map...with any luck i'll see close to 400whp on 14ish psi of boost!
And thats all I have for now, I'll grab a pic of the engine mount in the am.
As always any questions, just ask!