First off, the big question: This swap cost about $400 - 500 for everything (parts, oil, lube, special tools, wire) if you do it yourself
In this writeup, two different cars were having the conversion done simultaneously. One is Matt’s ’98 starfire blue S14, the other is my ’97 cobalt green S14. The procedure was basically the same for both cars, and some pictures may jump from one car to the other. The procedure is the same for OBDI cars except OBDI cars to not require the a Crank Angle Sensor. The parts necessary for the swaps were obtained from 2 separate OBDII ’96 S14s. OBDI transmissions could have been used, but a mount would have to be drilled for the CAS, and we didn’t want to worry about that. The conversions were carried out in my 2 ½ car garage using jack stands and basic tools. I will try to provide as many pictures as possible.
WARNING:
Before you start I suggest you read this entire writeup, and search for others - you will want all the info you can get. Also, plan on this taking longer than you think - some bolts are extremely hard to get to or break loose - and the transmissions are heavy and hard to stab in. You will need patience. Do not sacrifice safety for getting it done quickly. Although a 240sx only weighs 2800 lbs, it only takes 15 lbs of pressure applied correctly to break the human skull.
Difficulty: ****
Time: 8-12 hours
Cost: $400-$500
Tools:
Wrench Set (ratcheting wrenches come in handy, so do obstruction wrenches)
Socket Set (with plenty of extensions and universals)
Breaker Bars
Torque Wrench
Vice Grips
Jack stands
Floor Jacks
Scissor Jacks (to help support stuff under the car – you don’t have to fit the big bar under also)
Pilot Bearing puller (can be rented at Autozone)
Slide Hammer for Pilot Bearing Puller (can be rented at Autozone)
Loctite
RTV Gasket Maker
Propane Torch to break loose flywheel bolts (can be bought at Autozone)
Wire Strippers
Wire Cutters
Wire Connectors
16 gauge wire (A few different colors - may be able to reuse what you take out of the car)
Wire Connectors
A few friends
Factory Service Manual (can be downloaded off NICOclub.com)
PB Blaster
Gear Oil 75W90
Brake fluid or clutch fluid (same thing)
Dremel with cutting bits
Power drill with metal cutting bits and circle cutting bits
Carb Cleaner (to clean off flywheel)
Materials:
5-speed transmission from an S14 (you could try an s13 if you want)
5-speed Drive shaft front and rear sections (this may differ if you have ABS/LSD)
Flywheel (new or resurfaced)
M/T flywheel bolts (A/T bolts are too short)
Clutch Kit (Clutch, Throwout bearing, Pressure Plate, alignment tool)
Shifter assembly (plate, lower rubber boot, upper leather boot, finisher plate)
5-speed Cross member
Clutch Master cylinder
Clutch Slave cylinder
Clutch hardlines
Clutch rubber line and dampener line (which you may want to remove anyways)
Clutch pedal assembly
5-Speed Brake pedal assembly or a cut brake pedal
Bellhousing bolts for a 5 speed bellhousing (some of the A/T bolts can be reused)
Bolts to hold Pressure Plate to Flywheel (same thread as bolts that hold shifter to transmission, but a tad shorter)
Procedure:
1. Put the car up on jack stands as high as you can get it (you will need to slide the transmission out the bottom), make sure it is not going anywhere – it will be shaken a bit. Also we found it best to take off the front wheels to give you a little more room to work in. Drain your transmission fluid from the draining bolt.

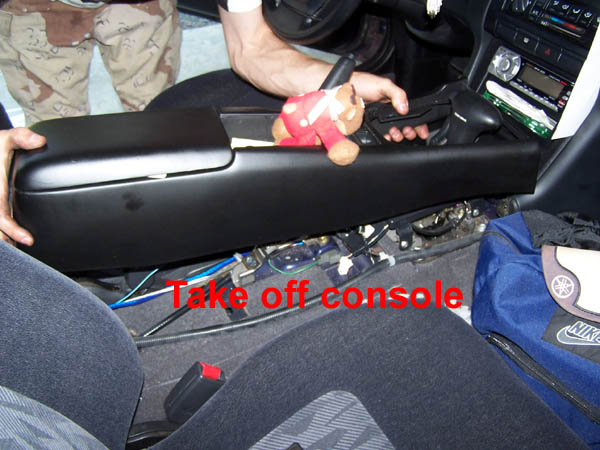
2. Remove the finisher plate from your center console. Remove the console from the car – only a few bolts and it will lift off.
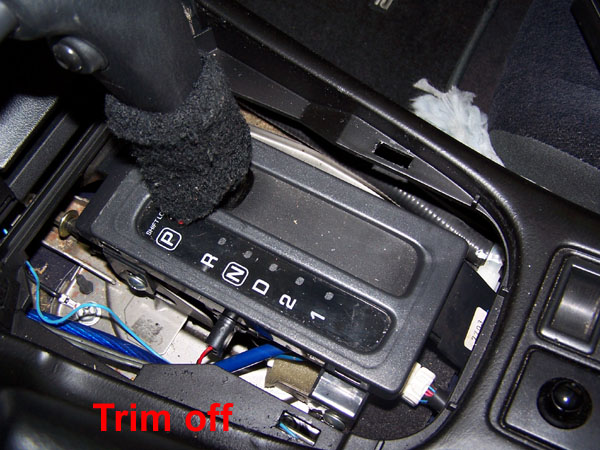
3. Remove the 2 harnesses that come out of your carpet and connect to the a/t shifter.
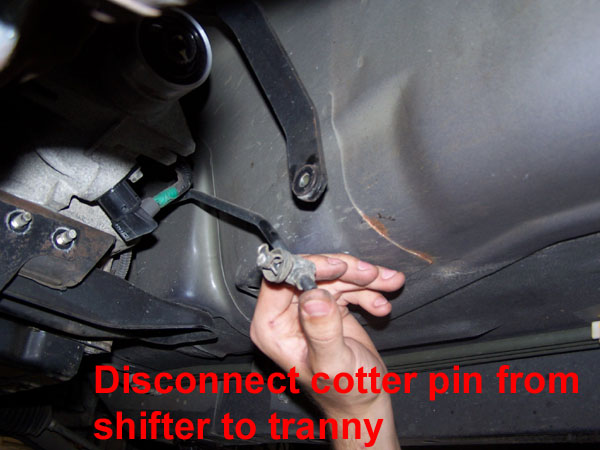
4. Remove the Cotter pin holding the A/T shifter to the A/T transmission
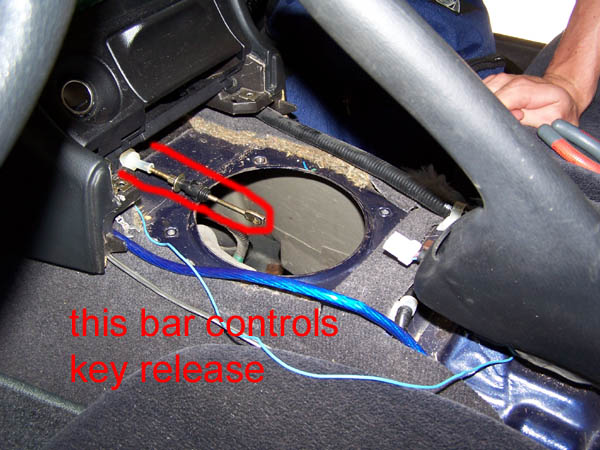
5. Remove the shifter and all the stuff that comes with it. You will now see the ground through your center console.
5 1/2. remove the shifter cable that goes to the ignition, it controls the key release
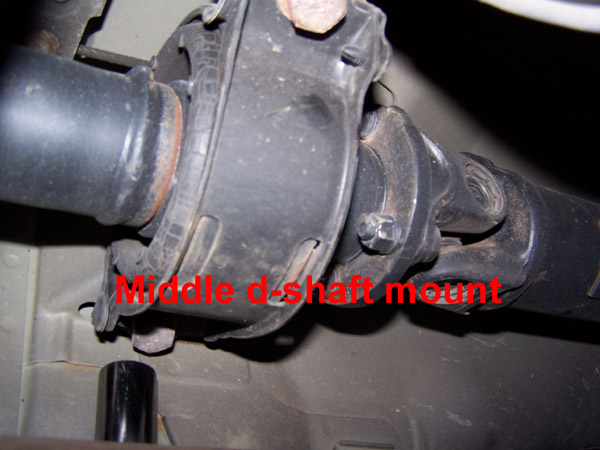
6. Next, take out the driveshaft. On the differential side there will be 4 bolts that hold the drive shaft to the diff. Remove these bolts, you will want your parking brake on to keep the driveshaft from spinning. To get to the upper bolts, take off your parking brake and your drive shaft will spin, then reapply the parking brake (not too hard there guys). Let the back side of the driveshaft lay on the floor. Also remove the small d-shaft support a thick wire X-member that keeps the drive shaft from whipping around if it breaks. Next, remove the bracket that holds the middle of the driveshaft up, and slide out your drive shaft.

7. Next, remove the dust plates from the transmission bellhousing, they are at the very front of the transmission.
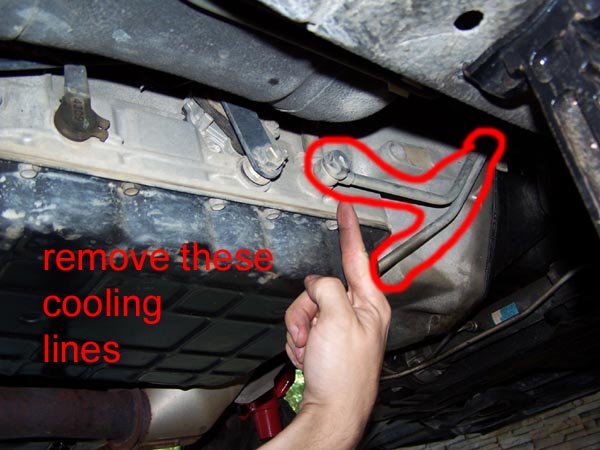
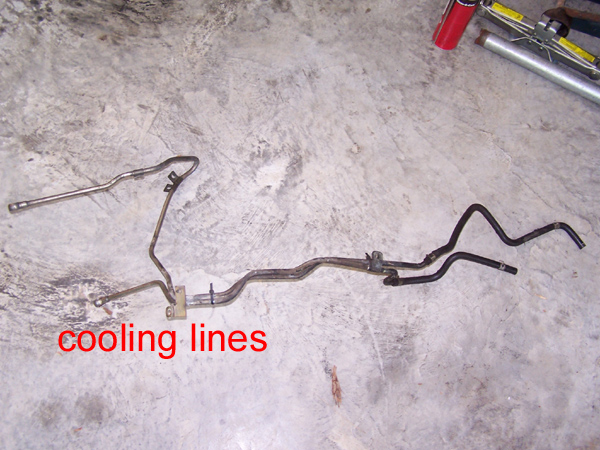
8. There are some A/T cooling hardlines that run all over the automatic transmission, and two that run to the radiator. Disconnect these hardlines and pull them out. Don’t be afraid to bend them – you won’t ever use them again. Get them out of your engine bay.
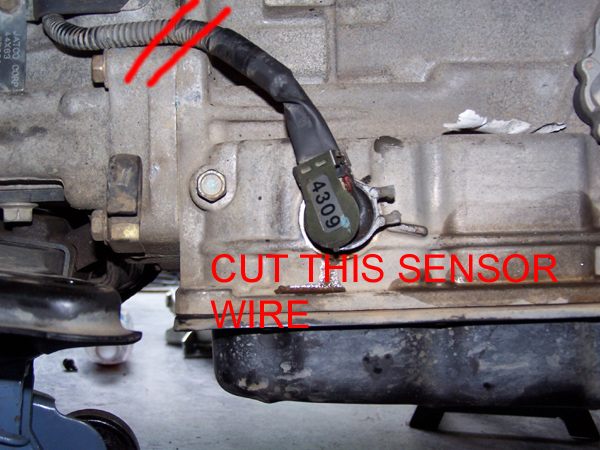
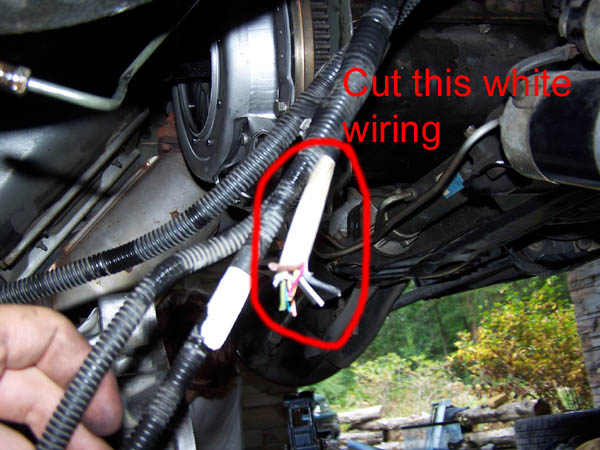
9. Disconnect all the sensors you can from you transmission, and the back O2 sensor on your exhaust. Two of the sensors can be cut.
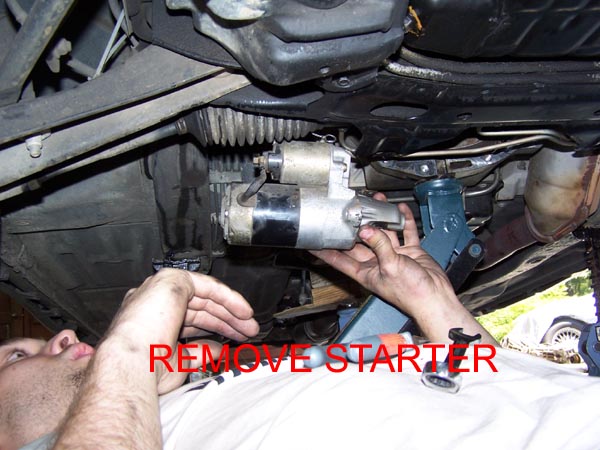
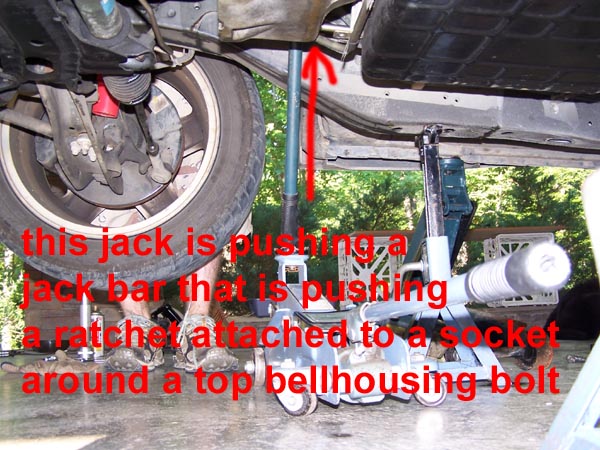
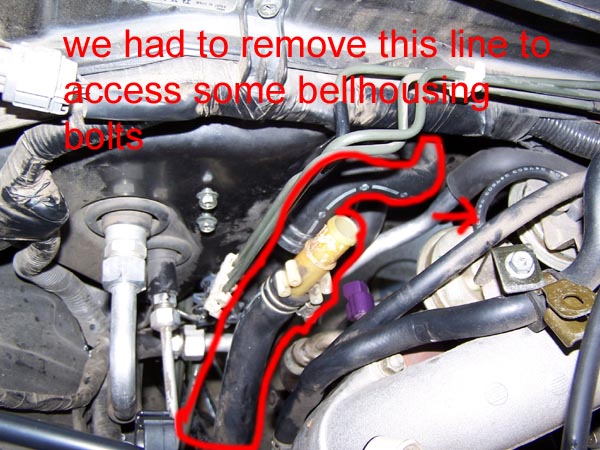
10. Now for one of the time consuming parts (this took us most of a day). You will have to weave your hands in everywhere to find and remove the bellhousing bolts holding the transmission bellhousing onto your engine. We used a ratcheting wrench on the top bolts, with a breaker bar and a jack running from underneath the car to the wrench on top of the engine. For some of the other bolts we used a socket (with swivels), and for still other bolts we used obstruction wrenches. One of the top ones has a recirculation pipe bracket attached to it, the pipe runs down to the transmission – disconnect it and remove the bolt. Two of the bellhousing bolts run through the starter, disconnect the starter before you take out these bolts then remove the starter.We found that the best way to access the two top bellhousing bolts was thru the passenger side of the engine bay, behind the engine block - we found it necessary to move some lines and disconnect a heater hose.
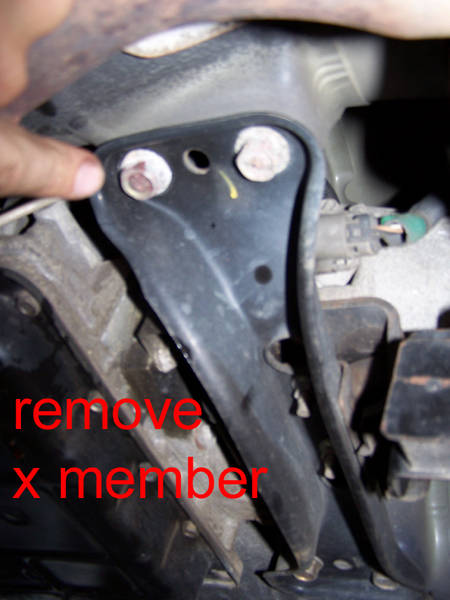
11. Next, remove the bolts holding the transmission to the cross member, then jack up the back of the transmission and remove off the cross member. At the same time, get as many jacks as you can under the transmission – in a few steps it will come off.Also, there is an exhaust bracket on the transmission you must remove.

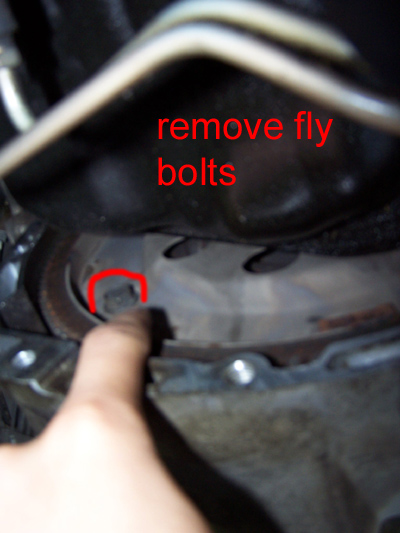
12. Where you took the dust plates off of the bellhousing earlier, you should be able to look back into the transmission and see some bolts holding the torque converter onto the flywheel – undo these 4 bolts. To get to the top ones, get a 27mm socket and turn the crank pulley.
Note: the flywheel gets hard to turn when the engine starts a compression stroke.
13. After the torque converter is unbolted, the transmission will come loose (if not, you can kick it from the front some) – it will pop off and weighs about 250 – 300 lbs. ( a good bit more than the 5 speed – which means that this is a weight reduction!) Get some of your friends to help with this part. Slowly lower the transmission part way down and disconnect any of the wiring that you did not get before. Then slowly lower the transmission the rest of the way – you don’t want it to fall to one side and knock out a jack stand

14. This next step is very frustrating. The automatic flywheel is held on by 6 bolts torqued down to about 120 ft/lbs, and your flywheel will try to turn when you try to break these bolts. Brace your flywheel from moving as best you can. We actually wedged in a jack bar to keep the flywheel from spinning, and put 2 sockets and breaker bars on the flywheel (one braced against the ground tightening to keep the flywheel from spinning, and another to break the flywheel bolts). If you have a propane torch, heat these mofo-bolts up and that should help you break them loose some more. If you (unlike us) have an impact wrench this may come in handy.

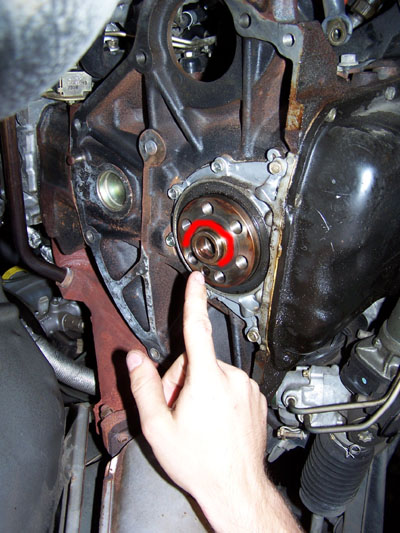
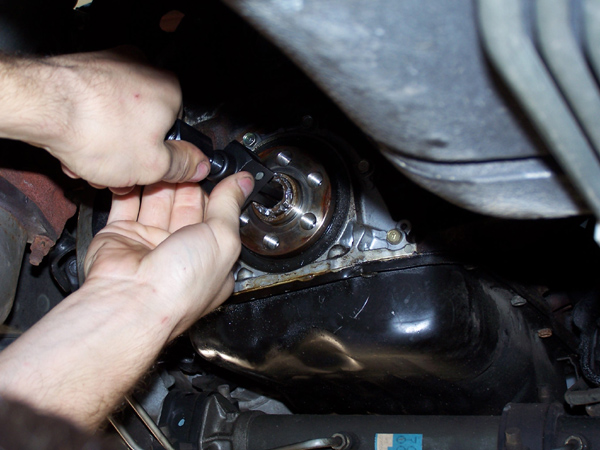
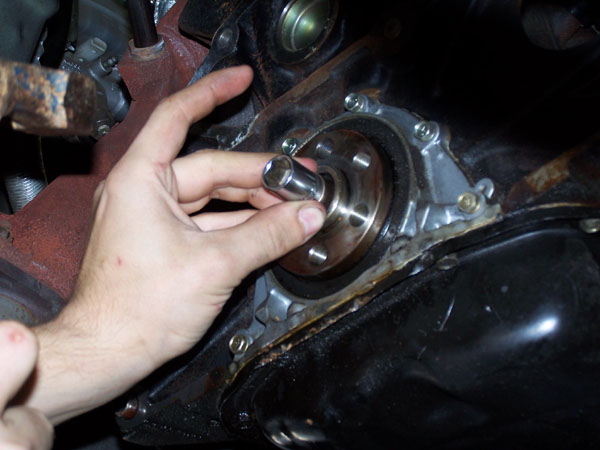
15. Once the flywheel comes off, you should see a bushing sticking out about a ¼ inch out of the crankshaft. This is the A/T adapter bearing –and you don’t want an A/T. To remove the bushing either chisel it out with an air chisel, or dremel (which will take about 30 minutes to an hour) or go rent a pilot bushing remover tool and slide hammer from autozone and use it (which will take about 20 seconds).
note: on my car, the A/T adapter bearing would not budge, and even broke the bearing puller tool.Three hours later with a dremel and lots of broken bits we got the darn bearing out.
Procedure – Manual Install
I did not include what needs to be lubed, so check your FSM for where to put on lithium grease - some parts of the transmission need it, and some (like the clutch disc) will not work if they get greasy.
1. Now you are about halfway done. Sand inside your crankshaft with some 800 grit sandpaper, this will help the pilot bushing slide in if there is rust buildup.Then clean out inside there really well. Take a hammer and a 12mm socket and hammer your pilot bushing into your crankshaft. Once it gets slid in all the way it should not go any further (but it does go pretty far into the crankshaft).Then, push on your manual transmission gasket (it should align itself on some dowels)
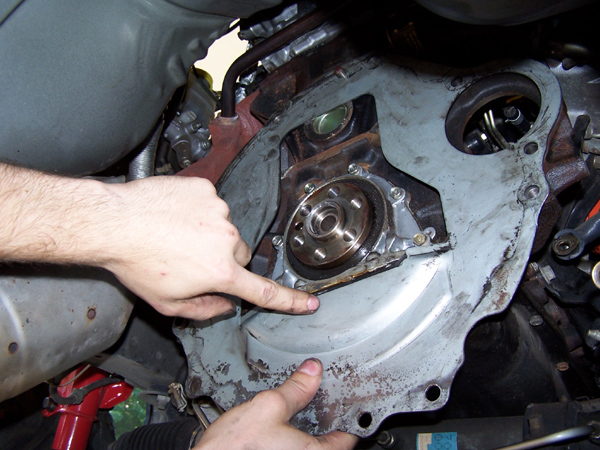
2. Slide the new flywheel on (there are 2 little holes that line up (on one the
flywheel and one on the crankshaft), but nothing actually goes thru them – but we still lined them up) Put back in the flywheel bolts, and torque them down to 100ft/lbs in a crisscross pattern. Get them on there tight because you don’t want your flywheel to come loose and have to do all the above all over.Clean off your flywheel by spraying it with some carb cleaner or something similar.

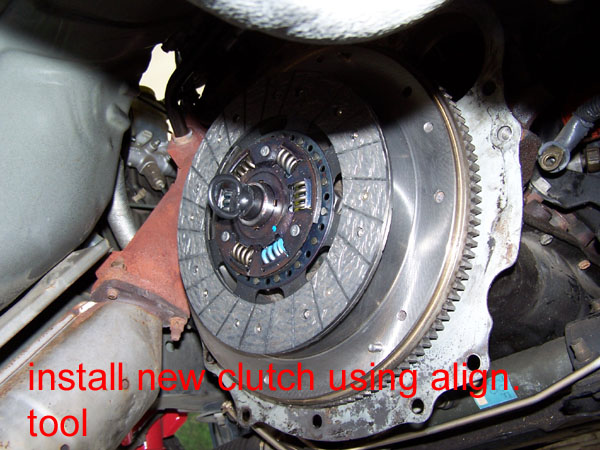
3. Next, use the alignment tool and affix your clutch disc over the flywheel. Keep the alignment tool in the clutch and the crankshaft – you will take it off later. Make sure you have the correct side of the clutch facing the flywheel – it should have stamped on it “flywheel side, or transmission side”. If not, I believe the side of the clutch that the springs sit further out on goes towards the back of the car.
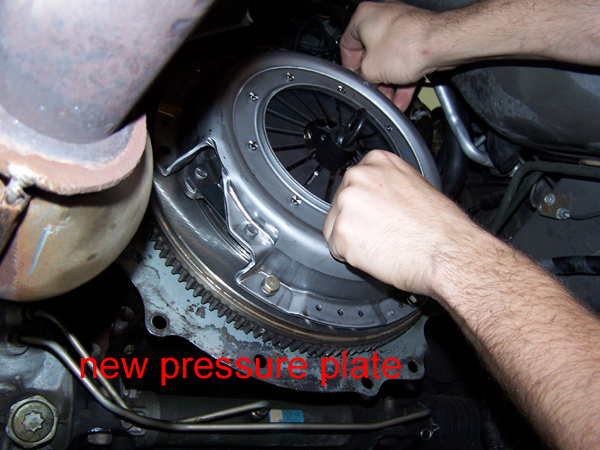
4. Now put on the pressure plate. Keep the alignment tool in the clutch and slide the pressure plate over the clutch. Bolt down the pressure plate to the flywheel – there are some dowels on the flywheel that fit into the pressure plate. Everything will be pretty tightly bound together but don’t worry – it needs to be tight so the clutch plate will stay aligned. Now you can take the clutch alignment tool out.
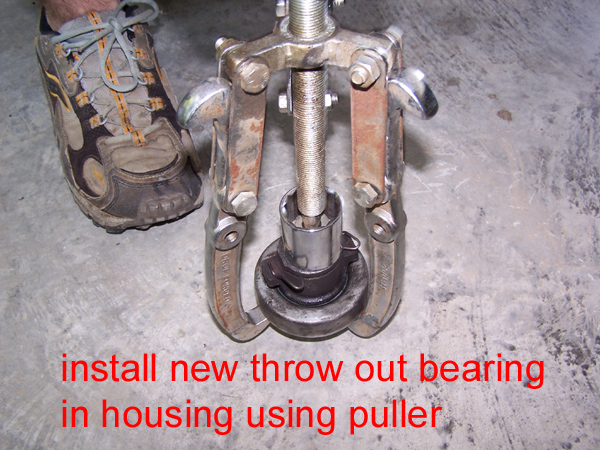
5. Take the throwout bearing off of your 5 speed transmission if it has one on there and replace it with a new one if you have it (it will come in a clutch kit). To change it you may need a wheel puller and a hammer to get it back together.

5 ½. Take the shifter off the 5 speed transmission if you haven’t already.
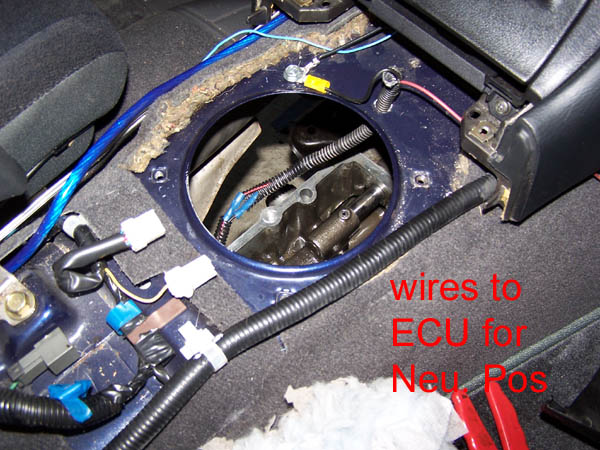
6. Next, it is time to pre-wire your 5 speed transmission. Please refer to the “wiring section” of this writeup to do this. You will want to wire in most of the sensors before you install the 5 speed into the car. The one sensor on top front of the transmission (CAS?) you must leave out otherwise it will catch on the flywheel and break into lots of pieces, or rub on top of the transmission bay - make sure you put it back in later, otherwise your car will not work.
7. This is the hardest step to do. You now get to stab your 5 speed gearbox into the clutch/pilot bushing. This step took us a good 6 hours and multiple attempts. Some people say that the transmission must be rotated while jacking it up so the starter hump points down, the rotated into place once it is mated to the transmission, we did not do this and still got it into place. We finally got it to work by: Putting one jack in the middle of the 5 speed (at its center of gravity on a flat spot) and another jack at the very back of the transmission. This allows you to wag the transmission side to side and up and down. Next loosen the engine mounts that hold the mount to the body – not the engine to the mount, with these loose, jack up the front of the engine so you have a better approach angle with the transmission. Remove the exhaust piping that runs from the header to the cat so you can have more room to slide the transmission in there, you may want to have a rubber mallet to hammer the back of the transmission in. Jack the transmission up and slide stab/wrestle/hammer/cuss the transmission to slide onto the pilot bearing/clutch. Easier said then done. We had to keep going up and down with the transmission. Also, once it is in if it is not perfect, it will not fit on all the way – you may want to try spinning the flywheel to help line everything up. Do not let the transmission shaft handle a whole lot of weight otherwise it will bend the shaft or break your clutch.We found the clutch part out the hard way. Bolt in all the bellhousing bolts and put on the starter. Then, slowly raise the back of the transmission while you lower the front of the engine and reattach the cross member and bolt the cross member back in to hold the back of the transmission up. You should now be able to take all the jacks out from under the transmission and put back in all sensors and vac. lines.
8. Now it’s time to install the clutch and brake pedals. First do the brake pedal otherwise the clutch pedal will get in the way. Remove the bolts holding that white A/T box thing and move it to the side. There are 4 bolts holding the brake assembly to the firewall, and one holding the brake assembly up under the dash. Remove all of these, and the two sensors on the brake pedal, and the cotter pin holding the brake pedal to the booster. Now with some wrestling, the brake assembly will slide out and there is no need to drop the steering column. Now install your new brake pedal and put the sensors back in. One sensor is for the brake lights, the other I believe is for cruise control. If you only have one bung in your new pedal I believe the cruise control sensor can be mounted on the cluth pedal.
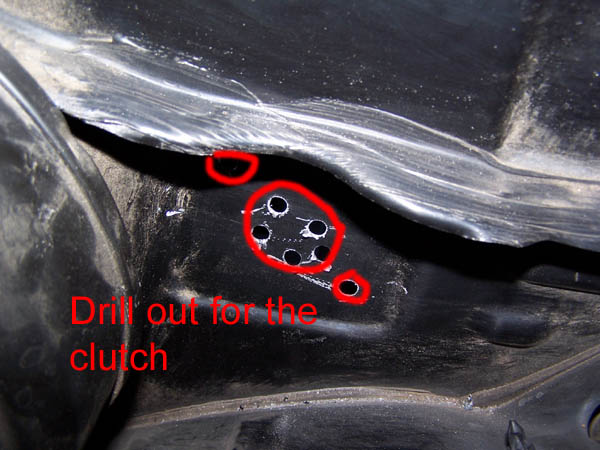
9. Once the brake pedal is in it is time to install the clutch pedal. Luckily, Nissan left a guide under the dash that tells you where to drill. Drill out the two bolt holes and the larger center whole with a circle cutter drill bit and touch it up with a dremel. Slide your clutch assembly up there and bolt it in, attach the clutch master cylinder on the other side and cotter pin them together.
10. Run the clutch hardline from the clutch master cylinder to the clutch slave cylinder and by now you should have bolted the slave cylinder on the engine. At this time you can also eliminate the clutch dampening system by bypassing the large diameter hardline loop, and going directly from the hardline coming out of the master cylinder to the rubber line coming out of the slave cylinder. This will give your clutch pedal a better feel and less stuff for you to worry about.
11. Reinstall the drive shaft, then fill the transmission up with gear oil (2.4 quarts max) from where the shifter sits, and then reinstall the shifter. Two of the shifter bolts you will have to be under the car to get to.
12. Bleed your clutch lines and adjust your clutch pedal to where you want it.
13. Re-install the shifter rubber boot, the center console, and the shifter finisher plate and leather boot.
14. Lower your car onto the ground (we ended up with our car teeter-tottering on 2 jack stands which was kind of funny and dangerous at the same time)
15. Start your car and see what happens.
16. We got a CEL when using the Auto ECU, but I have heard you can wire the CEL light to the airbag or something to only light up when you start the car, or just put a resistor in the CEL circuit.
17. Drive it around the block, and take it easy until your clutch is broken in (about 500 miles)
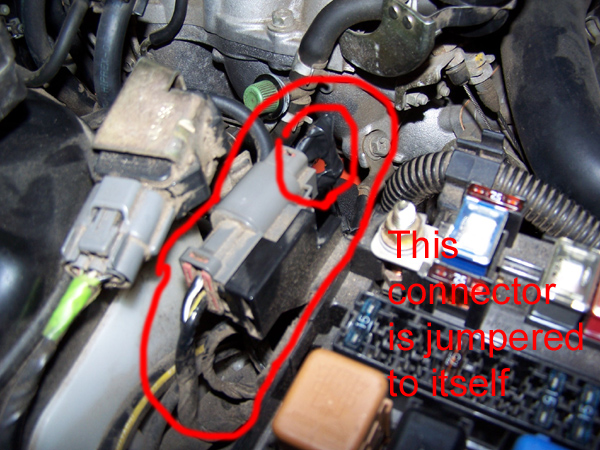
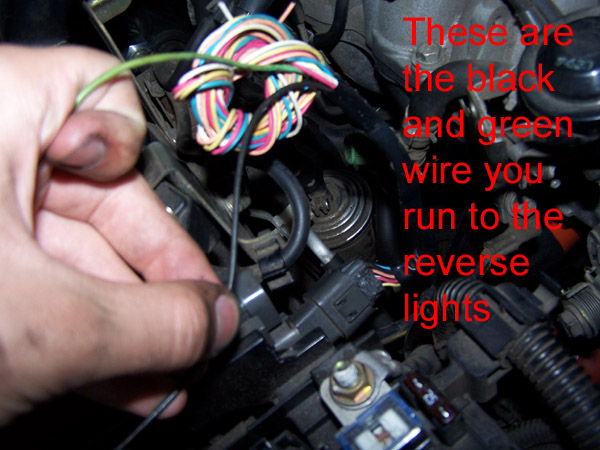
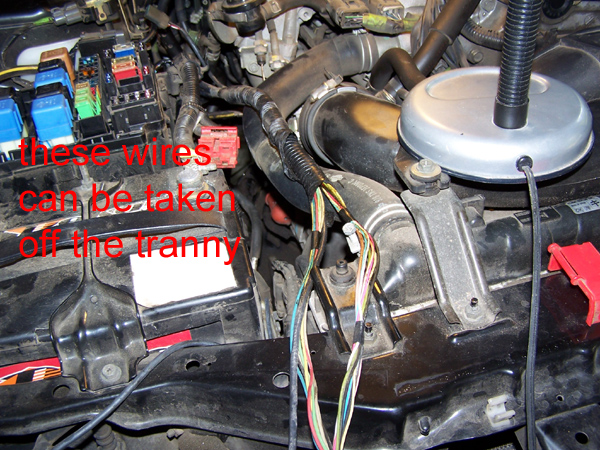
Wiring
Visit: http://www.ka24development.com....html for wiring instructions. Any other sensors that were on the auto, but not on the 5 speed can be cut off and discarded - I believe there were 2 or 3 of them on the passenger side of the bellhousing.
Results:
The car ran fine, the transmission is very loud when the interior pieces are not installed, and you will get a CEL. But now you get to shift your car yourself. 5th gear on Matt's car will grind if you do not shift just right (the transmission is used, so some quirks are to be expected). Also we have not figured out how to get cruise control working - so that shouldn't be too hard. My car is not 100% swapped yet, but due to some previous-owner installed car alarm, I can't get my radio to work.
The car is throwing the following codes:
0804a/t diagnosis communication, I believe I just need to plug my small ecu thing back up on the drivers side
1108 shift solenoid
1201 shift solenoid
1203 overrun switch
1204 tc clutch solenoid, i believe this is the switch on the top of my fender in the engine bay, i should be able to put a resistor and fix that code
1205 line pressure
1208 fluid temperature
ECU Swapping:
In order to get rid of the CEL (which would have prevented the car from passing OBDII testing when the car is inspected), a Manual ECU was used. Once the new ECU was installed, there was no CEL and no more rough starts - the car behaves exactly the same as a stick shift that came out of the factory. The Manual ECU can be used with the automatic transmission wiring harness.
If your car is a '95 the new ECU must be from a '95 (maybe 96?)
If your car is a '96 the new ECU must be from a '96 (maybe 95?)
If your car is a 97-98, the new ECU must be from a 97-98, or you can re-pin a 95-96 ECU to work in a 97-98 240sx (which is what we did on Matt's car). In order to re-pin it, follow the link here:
JWT Wiring pdf
Once it is re-pinned, you may need to buy a new rear O2 sensor in order to clear all CELS (that is mentioned in the link)


