XxS13LifexX's s13 Hatch 1jz vvti Build Thread

General discussion forum about the 240sx, and a great place to introduce yourself to the board!
XxS13LifexX
Posts: 15
Joined: Sun Sep 14, 2014 10:49 am
Car: 1990 Nissan 240sx SE Hatchback

Post

Hey all,

I'm still pretty new here in terms of posts, but I have been searching the forums for a few years now. I figured it was time to finally get involved a bit more so I decided to share my current project and I hope to be able to provide information people may be able to use in the future. So without further ado, the breakdown (see second post to get to the good stuff):

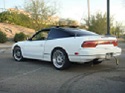
I've owned my s13 Hatch for about 1.5 years now and have slowly put upgrades in to her just to make her a bit more fun to drive. Here is a pic about a week after I got her:

Image

She had about 63,000 miles on her when I got her, and was basically a one owner car (the second owner had it for about 6 months but barely drove it).

Unfortunately she is still automatic but this will change with my swap in progress.

Here is a picture of how she sits now:

Image

Image

Breakdown of current setup:

300lph Deatschwerks Fuel pump
Bwd oem replacement injectors
Stance Coil overs
Brembo brake disc's
Stainless braided brake lines
Generic 17" wheels
All bushings replaced with energy suspension kit
Megan Racing cat back exhaust/magnaflow high flow cat
R32 drivers seat
All speakers replaced
HID headlights

The car is great as is and the motor has plenty of life left in her, but it just wasn't quite enough. So a few months ago, I decided to purchase a 1jz vvti motor from a jzs171 Toyota Crown. The vvti 1jz is rated at 280hp @ 6200rpm and 280 ft. Lbs. Of torque at 2400 rpm. The low end torque is what interested me most about this motor and i am excited to see how it feels.

Image

I've slowly been building this motor up over the past few months and ended up doing more to it than i originally planned, but it's for the best. The next few posts will show what's been done so far to the motor.
Last edited by XxS13LifexX on Sat Nov 01, 2014 11:20 am, edited 1 time in total.


XxS13LifexX
Posts: 15
Joined: Sun Sep 14, 2014 10:49 am
Car: 1990 Nissan 240sx SE Hatchback

Post

So as of now, here is what has been done to the Engine:

I've installed a thermal Intake Manifold runner to Block Gasket (purchased from Driftmotion):

Image

Torqued down the intake manifold per 1jz TSRM torque specs: 20 ft. lb.

Also installed 540cc Denso Top Feed injectors at the same time. Helpful hint for those upgrading 1jz vvti, the vvti model is top feed while the earlier model 1jz was side-feed. It actually made upgrade slightly easier as stock fuel rail is easier to use without having to purchase a new one.

Image

Now I've also purchased this tomei fuel pressure regulator that I plan to install very soon:

Image

I'm slightly torn on whether I want to upgrade to AN fittings that are sent with the regulator, or use the regular push on hosing that also comes with regulator. I'm thinking I am going to upgrade to black stainless -6AN Fittings/hosing.

I also went ahead and got the regular upgrades/refreshment parts out of the way such as 2JZ waterpump, timing belt, oil filter etc.

Image

Waterpump pulley torque spec (for future reference since I haven't tightened yet): 12 ft. lb.

I've upgraded to a 160Amp Alternator with direct connection for my wiring harness. Hopefully this will last longer than a year, but we will see.. I needed higher amperage for stereo and electric fans; plus it's just nice to have plenty of juice even if most won't be used. This was purchased from a guy on ebay that claims to be a "Supra Guy" and backs the alternator up with a 1 year warranty.

Image

I'm using Get Nuts Lab brackets to mount to Chassis. Still trying to decide what motor mounts to use.. May just get OEM mounts to keep vibrations down.

Passenger Side. Get Nuts Lab labels this bracket w/ "rear four bolt points" so I've mounted it to the farthest holes I could align with bracket. Should be accurate since it seems to be inline with drivers side..

Image

Drivers side:

Image

Torque specs to block per 2jz TSRM page EG - 121 (http://www.supracentral.com/foundation/ ... echanical/): 43 ft. lb.

I just installed my Tomei Arms 8280 Turbo Kit today. Still quite a bit mocking up to do with intercooler piping/intake piping, but it's mounted and looking good!

Image

Image

Image

For a general reference to a few torque specs:

Image

And here is a picture of the motor how it sets today:

Image

I have some CXRacing intercooler and intake piping kit on its way now. Should be here on Tuesday. Once I get that mocked up and fuel pressure regulator on, I should have the motor mostly dialed in and can focus on the transmission and ecu. My plan is to get a jza70 R154 and have it extended. I originally was going to go Chaser trans, but I didn't like how far back the shifter set... ECU will most likely be AEM V2, but still weighing my options.

User avatar
azs13
Posts: 11
Joined: Thu Feb 19, 2009 9:02 pm
Car: 1991 240sx hatch
2006 Mazdaspeed 6

Post

Looking great so far man. I'm kinda jealous of the vvti motor. I went non-vvti when I started my build a few years ago and sorta wish I wouldn't have.

XxS13LifexX
Posts: 15
Joined: Sun Sep 14, 2014 10:49 am
Car: 1990 Nissan 240sx SE Hatchback

Post

azs13 wrote:Looking great so far man. I'm kinda jealous of the vvti motor. I went non-vvti when I started my build a few years ago and sorta wish I wouldn't have.
Thanks bud! It's been a lot of fun building this motor and learning along the way.

No need to be jealous though. They both have there reasons for being a great motor and besides, vvti can be a little harder to find swap parts (wiring harness specifically) and also gets a little more expensive IMO.

User avatar
azs13
Posts: 11
Joined: Thu Feb 19, 2009 9:02 pm
Car: 1991 240sx hatch
2006 Mazdaspeed 6

Post

No doubt it would be harder to get wiring stuff I'm sure. I got my harness from tweaked performance and I was happy with it but I think it is going away soon. A good friend of mine helped me completely rewire my chassis and take out all the unnecessary crap. He is a wiring genius as far as I'm concerned and wants to build me a new engine harness.

XxS13LifexX
Posts: 15
Joined: Sun Sep 14, 2014 10:49 am
Car: 1990 Nissan 240sx SE Hatchback

Post

Little Update since it's been awhile:

I mounted up this FutureFab 1jz vvti Turbo Elbow:

Image

Fitment was great and the welds are very clean and look great! I'm really happy with this elbow because it comes with bungs already for wideband o2 sensor, regular o2 sensor bung, as well as a v-band flange for down pipe. Jon with FutureFab even contacted me and told me he'd send me a T-shirt for the purchase. Great crew and very happy with the purchase. Dyno will be coming in a few months with true results.

I've also recently purchased my AEM V2 ECU for 1jz vvti through Driftmotion. Other little things were purchased like gaskets etc. I'll update when these parts arrive and are installed.

Recently I also Installed the tomei FPR and made some braided Fuel lines for inlet etc. Still have some vacuum lines to mock up but happy with the piece so far. Will upload pics on next update.

I've been really busy designing a project that I will release details on later as well. Should be complete in a week or two.

Side note from Motor swap: My Polk Audio 4x6's in the rear blew recently so I decided to upgrade to 6 3/4" Kicker's and relocate them. So far, here is the progress:

Image

Image

I still have to find some suede to match my reupholstered doors and then these pieces will get upholstered. So far, I'm happy with the project and am excited to see how much better these sound in the location they will be..

XxS13LifexX
Posts: 15
Joined: Sun Sep 14, 2014 10:49 am
Car: 1990 Nissan 240sx SE Hatchback

Post

Installing Oil Filter Housing/Cooler Gasket on 1jz vvti:

I went ahead and changed out the Oil cooler to block gasket (Toyota pn# 90301-68005). Here is a quick run through:

Remove Oil lines by unclamping spring clamps and pulling off lines.

Loosen oil pressure switch. I just used some pliers... shouldn't be on too tight.

Loosen Oil Union Bolt that oil pressure switch screws into with 24mm Socket Head.

Pull off Oil Filter Housing from Block. Note that there is a stud that protrudes from block to align Housing. It is toward the top-right as you are looking directly at cooler.

Remove old Oil ring from block or housing; whichever it is stuck too.

wipe out galley for oil ring to set in.

Insert new gasket into Oil Filter Housing like so: * Be sure to oil new gasket when fitting.

Image

Add Thread Sealant to Oil Union Bolt. Smear Around threads to be sure it gets all the way around:

Image

Slip Union Bolt through Oil Filter Housing. You can do this step before adding sealant also to avoid getting gasket sealant on housing. Wipe any off if you do.

Align Oil Filter Housing on Block and begin threading in Union Bolt. Be sure the stud within block is properly aligned with Oil Filter Housing to avoid crossthreading. You may Have to jiggle Oil Filter Housing as it does have to angle up more than it may appear to get Union Bolt to begin threading in. Tighten Oil Union Bolt (per 2jz USDM TSRM) to 65 ft. lbs.

Image

Apply Thread sealant to Oil Pressure Switch. I am actually using a driftmotion adapter-to-AEM Oil Pressude Sender for this step, so I did not install the oil pressure switch to union bolt upon re-assembly. Torque whichever you are applying to 29 ft. lbs. (per 2jz USDM TSRM).

Image

Image

Re-connect the two Oil Lines above the Oil Cooler Housing. Also re-spring attach the clamps to these lines.

XxS13LifexX
Posts: 15
Joined: Sun Sep 14, 2014 10:49 am
Car: 1990 Nissan 240sx SE Hatchback

Post

I've also been messing with where to mount my Adjustable Fuel Pressure Regulator. I think I've finally decided to use a wiring harness mount just below my Throttle body to mount AFPR too. Here are some current pictures of the prepping progress:

Current Mount position:

Image

Outlet Fuel line-to-AFPR; Used a Russell Banjo Fitting (pn# 640923). Fuel Rail thread is 12mm x 1.25

Image

Still need to get a 180 degree 6an Fitting to attach to the Fuel Line:

Image

Attached 1/8" ID Vacuum Line. Also used Hose protectant:

Image

Still debating on a 90 Degree for Fuel return. Trying to find a 135 Degree 6an fitting for this one, but a 90 degree will work if need be...

Image

Soon I will be Replacing all of the Fuel return/Vaccum/Coolant passage metal tubing framework with rubber lines to try to clean up piping that blocks oil filter a little bit.

I've received my AEM V2 ECU from Driftmotion. This ECU Includes a patch harness that converts the plugs to jzx100 and similar wiring harnesses. Soon I will be ordering my complete s13 to jzx100 1jz vvti harness to plug into this ecu.

Image

That's it for now... I have a lot of gaskets etc. piled up waiting to be installed but I have to wait until I get all of the parts needed to do it all at once so for now, until next time!

Have a good one Guys.

XxS13LifexX
Posts: 15
Joined: Sun Sep 14, 2014 10:49 am
Car: 1990 Nissan 240sx SE Hatchback

Post

Alright, One more update for the night...

I've had these painted for a while, but decided to mock them up tonight just to get an idea of how they look. I've painted the CXRacing Intercooler piping with VHT Wrinkle Black. I'm still debating whether to do a light coat of regular black on the front-mount intercooler or not.. May just leave it polished.

Image

Image

I need to redo Throttle Body Side as the wrinkle didn't come out as pronounced as Turbo side unfortunately... Does anyone know if the Greddy BOV will fit this style of CXRacing BOV flange by chance? I'm really hoping it will all line up without modifications cause I don't plan on using the CXRacing BOV at all.

XxS13LifexX
Posts: 15
Joined: Sun Sep 14, 2014 10:49 am
Car: 1990 Nissan 240sx SE Hatchback

Post

Alright guys, it's been awhile but I'm back! The beginning of the year has been a crazy one for me, but I've still been trying to chip away at the swap. The other day, I finally got around to putting on my 1jz flywheel to prepare for the R154. I also replaced the rear main seal while I was in there "just in case".

Image

Image

The rear main seal is pretty straight forward, but it can be stuck in there pretty good. I used a flathead screwdriver to pull out the old seal which turned out to be a bad idea... I'd suggest a small pick with a bend to slide in on the crank side and try to leverage the seal out... The screwdriver took forever and you can risk scratching the surfaces if you aren't careful..

To install the seal, I used the flywheel/flexplate spacer and slowly tightened 4 bolts in a cross-pattern to pull in the seal. Eventually the plate will bottom out and you will need to just barely tap in the rear main seal just a bit farther so it will not rub the spacer/flywheel. I used a socket extension and tapped on the seal a little at a time while going around the ring.

Image

The flywheel was pretty straight forward. Tighten the bolts in a cross pattern just to snug. * BE SURE TO APPLY RED LOCTITE ON BOLTS BEFORE ASSEMBLING.* (I used ARP Bolts so I also wiped off the oil before applying loctite) Then I used a baseplate from my work as a bracket to tie off the wheel so it wont spin as I tighten. Unfortunately I can't recall what size bolts I used here, but the bottom one is the one from my engine stand that screws into the bellhousing mounting point, the top is a pressure plate bolt size.

Tighten the flywheel bolts to spec. I did about 73 ft. lbs. 2jz TFSM calls for 36 ft. lbs.; then 90 degrees.

That's it for now guys and gals. Much more coming soon, as work has begun to slow down and I can re-focus on the project at hand. Unfortunately I still have a few pricey objects to get (wiring harness and R154), but she's getting very close. I'd say the motor itself is about 95% complete!

Until next time.

User avatar
Silvia_Ks_90
Posts: 58
Joined: Sun Apr 18, 2010 10:24 am
Car: 1990 Silvia K's w/2JZ
2007 Subaru Legacy Spec. B Stage 2
Location: Calgary, AB

Post

Swap is looking good and thorough so far, a good lesson that things can be done in moderation to potentially make good power. We all somewhat start out this way..

You might want to consider doing some heat wrap or a heat shield though, keep some of the radiant in check after a few good pulls. And a short shifter will help with the enormous throws on the extended R154 setup.

Kyle

XxS13LifexX
Posts: 15
Joined: Sun Sep 14, 2014 10:49 am
Car: 1990 Nissan 240sx SE Hatchback

Post

Thanks for the tips Silvia Ks! I do have the OEM Heat Shield I'll probably end up putting back on once I'm all done with the exhaust side.. hopefully it'll be enough?

As far as short shifter, that was something I was considering as well.. would you recommend the Beech Performance short shifter? I've heard good things, but just wondering if there is anything better on the market.

It's funny you commented on my build thread cause I was literally just reading your thread before posting this update! Your thread was a great read and the car looks good my man!


Return to “240sx General Discussion”