XenonDepot plug-n-play HID kit install on 2008 EX35

Discussion of Infiniti's amazing (and underrated) sport-luxury crossovers, the EX35 and EX37. For 2014, the EX series will be renamed QX50, in line with Ininfiit's new naming conventions.
User avatar
NJGuy
Posts: 557
Joined: Fri Sep 23, 2011 10:05 am
Car: 2008 Infiniti EX35 Journey AWD

Post

While my wife loves our EX and the features it has to offer, she found that the stock halogen headlights to be inadequate and a shortcoming of the vehicle. I asked her if she wanted me to upgrade them, and she had no problem with me doing that. Both she and I were concerned about her evening drives home on unlit, rural roads. She was especially concerned about being able to see deer at night.

I first looked into upgrading the bulbs; however, it seemed like higher output H11 bulbs were kind of expensive for a slight bump in intensity, and they seemed have short lifespans. I didn't want to spend $30+ on bulbs that I would have to frequently replace.

I also looked into modding an H9 bulb to fit into the H11 socket. While it doesn't seem that the extra wattage would harm the wiring or housing, I was slightly concerned about how those components would fare over the long term with the extra power draw. As with the high output H11 bulbs, H9s also seem to have a short lifespan.

I thought that a plug-n-play HID kit would probably be the way to go; 35W 4300K. I narrowed it down to the Morimoto system from The Retrofit Source, and the XenonDepot system from KB Carstuff. I heard that both companies had good repuations. The two kits ended up being close in price, but I decided to go with the XenonDepot system because the company sponsors another forum I frequent.

It took me most of the day to perform the install. This time, I didn't forget to bring the camera to the garage to document the process.

I took this picture of the stock halogen lights on my garage wall. This picture was taken from inside the car. This was before I started the installation.
Image


Here is another shot of the stock halogen lights, taken from outside of the car.
Image


To get to the headlight assembly access area, I removed the fender liner on the driver's side. You'll see later on that I probably did not have to remove the entire thing. At the time, I didn't know exactly where I was going to mount the ballast. Also, I wanted to make sure I could see everything and have enough room to access everything if needed.
Image


The relay power wire wasn't quite long enough to reach across the front; if I routed the relay wire that way, there didn't appear to be a good place to mount the ballast around the front grill area. So I ran the wire behind the plastic trim by the firewall. The wire was just long enough to reach one of the spots where I thought the ballast could be mounted. I used some fishing tape to pull the relay power wire across the firewall area to reach the battery.
Image


There were two clips that I needed to remove in order to get the relay power wire and fuse behind the black trim. Here, I am pointing at the location where I removed one of them.
Image


This is where I ran the relay power wire. It seemed like a good spot for the wire to sit under. The hole to the left of the wire housed the second clip I had to remove in order to fit the relay power wire fuse. With the two clips removed, I was able to lift up the plastic trim enough to fit the relay fuse box underneath.
Image


Here is a shot of the rear of the low beam access. The big light gray circle is the low beam bulb access cover. The relay is the black box on the beam in the top center of the photo. I used a couple of zip ties to secure it to the white unused plastic retaining clip.
Image


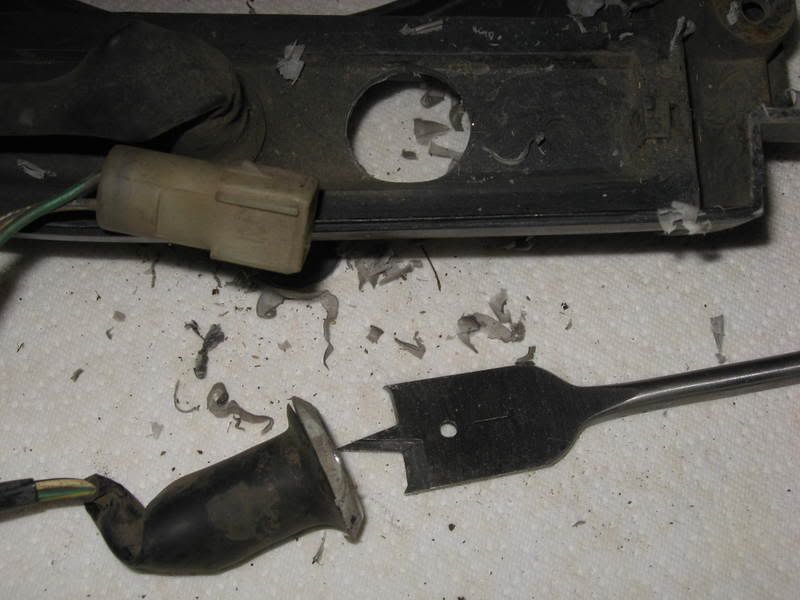
The low beam rear cap needed a hole so that the HID bulb and connector could fit through. I didn't have a drill bit that was big enough, so I had to improvise by cutting away more material with the drill (hence the not so round hole). I trimmed away the flash (excess plastic) with a utility knife.
Image


Halfway done. Here is a comparison shot of the HID beam and the halogen beam against the garage wall.
Image


These are the two spots on the driver side that I secured the relay power wire to. At the top of the photo, I used two zip ties installed perpendicular to each other to secure the wire to the clip retainer.
Image


I used a zip tie to bundle some excess wire length. A little to the left and down off center there is a small black box that is part of the ballast wiring. I secured it to the rail with the white zip ties. I grounded the relay at the grounding point behind the stock wiring (a little bit up and to the right off center).
Image


I mounted the ballast near the fender using the supplied 3M foam tape and a pair of zip ties around the plastic conduit on each side of the ballast. The strut top mount area is on the other side of the stock wiring.
Image


Here is another shot of the mounted ballast, secured excess wire, and black box from the ballast cable secured to the rail.
Image


This is a closeup of the relay mounted on the rail. If you look to the left, you can see the black box from the ballast cable and the wires running into the back of the low beam area.
Image


Another shot of the relay and the low beam rear cover. The bulb wiring has a rubber grommet that is intended to hold the wires in place and close up the headlight assembly.
Image


This is a picture of the passenger side stock low beam bulb with the rear cover removed.
Image


On the passenger side, I did not remove the entire fender liner. I just removed one screw and a few of the clips, and I moved it aside just enough to gain access.
Image


Here is a photo of what's under the hood. You can see the ballasts mounted on the right and left just outside of the top strut mount areas. (I know, the engine bay is a tad dirty) :) .
Image


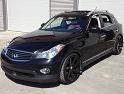
This picture shows how the HIDs appear from the inside of the car. All done.
Image


A couple of notes:
-Aside from trying to plan out how to mount things and run the wiring, removing and reinstalling the fender liner on the driver side probably took up most of my time.
-While I removed the front wheels, it might not be necessary. There should be enough space to work with if the wheels are turned all the way out with tires off the ground.
-I think spent at least 20 minutes trying to figure out how to remove the front grille. But when I saw that the wire length didn't allow for a good mounting point in the grille area, I decided to run the wires behind the engine. I'm used to having the battery up near the driver side headlight, but I guess it's near the passenger side windshield in most of these Infiniti's.
-I didn't take photos of how I connected the relay power wire to the battery. Originally, I wanted to attach the relay power wire terminal to the power block that is attached to the battery's positive terminal. However, the diameter of the relay wire's ring terminal was too small for the bolt on the power block. So I just hooked up the ring terminals directly to the bolt of the clamp on the battery's positive terminal. I cut away a small opening in the red plastic cover of the battery terminal to make some space for the relay power wires.
-The passenger side has a little bit less room to work with because the filler neck of the washer fluid reservior is there.
-I had a bunch of zip ties on hand, but they were white (the kit came with only 4 black zip ties). However, I didn't have the time or see the need to run out and buy black ones.
-Being that I had limited time to work on the car and didn't find any detailed procedures on installing this kit, I would have done a few things differently. Besides the issue with the fender liner, I would have bought the proper size hole cutter for my drill. I also put some tape around where the rubber grommet and bulb socket cover interface. I'll probably remove the tape later and replace it with some silicone sealant.
-I performed the install during daylight hours, so I didn't take before and after pictures of the car outside in the dark.

While I couldn't see the difference right away because I didn't drive the car in the dark for a while, my wife noticed a significant improvement. She was very happy with the increased light output.

I installed this mod in January, so I may have forgotten or left out some details. This is probably my first time installing an aftermarket modification myself, as most of the automotive work I've done was related to maintenance or simple repair. This was a learning experience for me, and I'm open to comments on how I could have done things a bit differently. I'm also willing to answer questions.


User avatar
bigbenex35
Posts: 64
Joined: Fri Apr 12, 2013 4:59 am
Car: Ex35
Location: Ottawa, Canada

Post

Nice write up!!

It makes a huge difference!!! :bigthumb:

User avatar
XIS
Posts: 865
Joined: Wed Aug 24, 2011 11:00 am
Car: 08 EX35 RWD
17 QX30 Sport
Location: The Desert

Post

very nice write up. I upgraded mine to Morimoto 35W 4300 and yes, the improvement over stock halogen is VERY significant. I LOVE mine.

antoha2009
Posts: 5
Joined: Mon Apr 15, 2013 11:11 am
Car: NOW: 2010 G37X anniversary ed gray
before:
1) 2008 EX35 awd jorney, teh pkg, nav, top view cam blk 2) 2007 VW Jetta 2.5 slv
2004 Acura TSX blk, 2003 BMW X5 4.6 is, blk, 2001 Dodge Indrepid

Post

hello everyone! :chuckle: happy owner of 2008 EX35 AWD for 3 weeks :woot: , i have most packages that i can imagine, but hid lights. my last 2 cars had them, so im use to them. Im really surprised how bad stock low and high beams on the car like that. i did my research before purchase and was debating between ex and g. test drove many G35x and all of them had bixenon, i assumed that on EX is standard as well. looks like only 2 of them in the market that are match combination $$$ and quality morimotos from TRS and those xenon depot. please let me know if both of you guys ran cambus? and XIS did you drill hole in the cover as well. can i squize my hands under the hood without taking fender cover?
Thanks.

User avatar
NJGuy
Posts: 557
Joined: Fri Sep 23, 2011 10:05 am
Car: 2008 Infiniti EX35 Journey AWD

Post

antoha2009 wrote: test drove many G35x and all of them had bixenon, i assumed that on EX is standard as well. looks like only 2 of them in the market that are match combination $$$ and quality morimotos from TRS and those xenon depot. please let me know if both of you guys ran cambus? and XIS did you drill hole in the cover as well. can i squize my hands under the hood without taking fender cover?
Thanks.
I found a few old threads that may answer some of your questions. One of them documents the installation process, but the images no longer show up for me.

hid-aftermarket-headlights-t568172.html
post5923429.html
hid-installed-on-my-new-ex-t387954.html

If you want the quick answers, they are:
1. You do not need a canbus module for the EX.
2. Not sure if XIS drilled a hole in the cover, but I believe there is an alternate way to run the bulb wires out of the headlight housing. I read somewhere here on this forum that there is an opening where the stock headlight wiring enters the housing (maybe somewhere near the bottom). I think there were a couple of EX owners who may have run the wires through there. If I had more time, I may have considered doing it that way instead of drilling the hole.
3. Well, if you have baby sized hands and extremely thin and bendable forearms, then sure, you can squeeze your hands in the spots behind the headlight under the hood. Otherwise, I HIGHLY recommend that you remove the wheels and undo at least the top 1/3rd of the fender liner. Believe me, it will make things MUCH easier to access. If you look for and find the gray access cover for the low beam bulb from under the hood, you'll see why I'm saying this.

Also, I'm not sure whether or not you know this, but I'm pretty sure that a bi-xenon kit will not be plug-n-play for your EX. If you want a plug-n-play kit, you'll have to get one with the H11 bulb fitment.

User avatar
XIS
Posts: 865
Joined: Wed Aug 24, 2011 11:00 am
Car: 08 EX35 RWD
17 QX30 Sport
Location: The Desert

Post

I used the heavy duty wiring harness and yes, I drilled a hole in the back of the cover, used the rubber grommet and pushed the wires through. Nice weatherproof seal. Drilling the hole was very easy with one of these bits... (not my photo, just something off google)

Image

I didn't remove my wheels, just turned them out all the way and bent back the plastic liner.

antoha2009
Posts: 5
Joined: Mon Apr 15, 2013 11:11 am
Car: NOW: 2010 G37X anniversary ed gray
before:
1) 2008 EX35 awd jorney, teh pkg, nav, top view cam blk 2) 2007 VW Jetta 2.5 slv
2004 Acura TSX blk, 2003 BMW X5 4.6 is, blk, 2001 Dodge Indrepid

Post

NJGuy wrote:
antoha2009 wrote: test drove many G35x and all of them had bixenon, i assumed that on EX is standard as well. looks like only 2 of them in the market that are match combination $$$ and quality morimotos from TRS and those xenon depot. please let me know if both of you guys ran cambus? and XIS did you drill hole in the cover as well. can i squize my hands under the hood without taking fender cover?
Thanks.
I found a few old threads that may answer some of your questions. One of them documents the installation process, but the images no longer show up for me.

hid-aftermarket-headlights-t568172.html
post5923429.html
hid-installed-on-my-new-ex-t387954.html

If you want the quick answers, they are:
1. You do not need a canbus module for the EX.
2. Not sure if XIS drilled a hole in the cover, but I believe there is an alternate way to run the bulb wires out of the headlight housing. I read somewhere here on this forum that there is an opening where the stock headlight wiring enters the housing (maybe somewhere near the bottom). I think there were a couple of EX owners who may have run the wires through there. If I had more time, I may have considered doing it that way instead of drilling the hole.
3. Well, if you have baby sized hands and extremely thin and bendable forearms, then sure, you can squeeze your hands in the spots behind the headlight under the hood. Otherwise, I HIGHLY recommend that you remove the wheels and undo at least the top 1/3rd of the fender liner. Believe me, it will make things MUCH easier to access. If you look for and find the gray access cover for the low beam bulb from under the hood, you'll see why I'm saying this.

Also, I'm not sure whether or not you know this, but I'm pretty sure that a bi-xenon kit will not be plug-n-play for your EX. If you want a plug-n-play kit, you'll have to get one with the H11 bulb fitment.
Thanks for links, and fast response. I looked under my hood and looks like my "baby hands" gonna fit there :yesnod . Today i replaced interior lights for led, exept trunk and foot lights, im going to order those today. im thinkig about replacing parking lights in head light. they are easy to replace and i belive its huge visual improving :dblthumb:
How long does it take to warm up for full temp on your xenon? I looked up some videos on youtube and look like morimoto could take up to 15 sec. I belive thats what i need for my low beams? http://www.theretrofitsource.com/produc ... ts_id=3955 Im not looking to upgrade high beams for right now.

User avatar
XIS
Posts: 865
Joined: Wed Aug 24, 2011 11:00 am
Car: 08 EX35 RWD
17 QX30 Sport
Location: The Desert

Post

I replaced all those LED lights too (map/courtesy/the ones on the front doors, hatch and inside hatch too. Also the ones by the driver and passenger's feet and also the running lights. HUGE improvement that took 15 minutes.

My morimotos take 5-10 seconds to warm up, but they look cool as hell while they are warming up too!
;)

antoha2009
Posts: 5
Joined: Mon Apr 15, 2013 11:11 am
Car: NOW: 2010 G37X anniversary ed gray
before:
1) 2008 EX35 awd jorney, teh pkg, nav, top view cam blk 2) 2007 VW Jetta 2.5 slv
2004 Acura TSX blk, 2003 BMW X5 4.6 is, blk, 2001 Dodge Indrepid

Post

XIS wrote:I replaced all those LED lights too (map/courtesy/the ones on the front doors, hatch and inside hatch too. Also the ones by the driver and passenger's feet and also the running lights. HUGE improvement that took 15 minutes.

My morimotos take 5-10 seconds to warm up, but they look cool as hell while they are warming up too!
;)

Cool, thats my plan so far. They are not blue while warming? I just hate this look of blue headlights, like a teenager. I just bought some more leds to change them all. Is this a right kit for low beams? http://www.theretrofitsource.com/produc ... ts_id=3955
Im planing on geting it, and install on the nice and sunny day. Do i need anything else for it?
THX

User avatar
NJGuy
Posts: 557
Joined: Fri Sep 23, 2011 10:05 am
Car: 2008 Infiniti EX35 Journey AWD

Post

antoha2009 wrote: How long does it take to warm up for full temp on your xenon? I looked up some videos on youtube and look like morimoto could take up to 15 sec. I belive thats what i need for my low beams? http://www.theretrofitsource.com/produc ... ts_id=3955 Im not looking to upgrade high beams for right now.
I don't spend nearly as much time behind the wheel of the EX as my wife does; but I'd estimate that my HID's take no more than 10 seconds to warm up to full temp.

And yes, the link you provided is for the correct kit. Since the Morimoto kit is slightly different than the XenonDepot kit, the wiring runs and ballast mounting points will likely be different than the methods I used. If you go with the Morimotos, check out XIS's photos of his install here: what-did-you-buy-your-ex-this-week-t541 ... l#p6340751

ex35
Posts: 32
Joined: Sun Mar 13, 2016 9:53 pm

Post

can we use canbus? if so, does that make for a simpler install since no need to direct connect to the battery?

sherwooa
Posts: 73
Joined: Thu Jan 12, 2017 1:47 pm
Car: 2012 BMW E92 M3
2004 G35 Coupe 6MT (sold)
2008 EX35 AWD Journey
2011 Nissan Murano SL

Post

Folks, I would be careful about retrofitting HID bulbs/ballasts into the halogen projector assemblies as they are not designed for HID bulbs, nor will they produce the same safe lighting pattern, and it may not be legal as well. Not that you'll be pulled over for it, but realize the EX with HID's has very different headlamp assemblies than the EX with halogen assemblies.

For a good read on why a simple HID kit swap is not such a great idea, Google "Daniel Stern Lighting Converting to HID" and read the first link that comes up (I'm not allowed to post URL's, yet, apparently).

ex35
Posts: 32
Joined: Sun Mar 13, 2016 9:53 pm

Post

sherwooa wrote:Folks, I would be careful about retrofitting HID bulbs/ballasts into the halogen projector assemblies as they are not designed for HID bulbs, nor will they produce the same safe lighting pattern, and it may not be legal as well. Not that you'll be pulled over for it, but realize the EX with HID's has very different headlamp assemblies than the EX with halogen assemblies.

For a good read on why a simple HID kit swap is not such a great idea, Google "Daniel Stern Lighting Converting to HID" and read the first link that comes up (I'm not allowed to post URL's, yet, apparently).
I read his article but some of his arguments against HID conversions just don't seem to ring true anymore. Especially his point that since the projectors were designed for halogens, the light beam won't be as effective w/ a HID. I call BS on this claim since the EX's halogen lights are piss poor at putting any light down the road. Anything would be an improvement. As for safety, has anyone experienced damage using the HID conversions w/ the EX factory projectors?

sherwooa
Posts: 73
Joined: Thu Jan 12, 2017 1:47 pm
Car: 2012 BMW E92 M3
2004 G35 Coupe 6MT (sold)
2008 EX35 AWD Journey
2011 Nissan Murano SL

Post

ex35 wrote:
sherwooa wrote:Folks, I would be careful about retrofitting HID bulbs/ballasts into the halogen projector assemblies as they are not designed for HID bulbs, nor will they produce the same safe lighting pattern, and it may not be legal as well. Not that you'll be pulled over for it, but realize the EX with HID's has very different headlamp assemblies than the EX with halogen assemblies.

For a good read on why a simple HID kit swap is not such a great idea, Google "Daniel Stern Lighting Converting to HID" and read the first link that comes up (I'm not allowed to post URL's, yet, apparently).
I read his article but some of his arguments against HID conversions just don't seem to ring true anymore. Especially his point that since the projectors were designed for halogens, the light beam won't be as effective w/ a HID. I call BS on this claim since the EX's halogen lights are piss poor at putting any light down the road. Anything would be an improvement. As for safety, has anyone experienced damage using the HID conversions w/ the EX factory projectors?
Why don't they ring true? The point is that halogen bulbs and HID bulbs are very different in terms of size, shape, light pattern, etc. and the projectors in halogen assemblies are designed very differently from those in HID assemblies to take that into account. The "improvement" you perceive is not necessarily an actual, measurable improvement in light output or pattern. Though it may "look brighter" or have a sharper cutoff, it doesn't mean it is actually a performance improvement. This section of the article is particularly relevant:

"The most dangerous part of the attempt to "retrofit" Xenon headlamps is that sometimes you get a deceptive and illusory "improvement" in the performance of the headlamp. The performance of the headlamp is perceived to be "better" because of the much higher level of foreground lighting (on the road immediately in front of the car). However, the beam patterns produced by this kind of "conversion" virtually always give less distance light, and often an alarming lack of light where there's meant to be a relative maximum in light intensity. The result is the illusion that you can see better than you actually can, and that's not safe.

It's tricky to judge headlamp beam performance without a lot of knowledge, a lot of training and a lot of special equipment, because subjective perceptions are very misleading. Having a lot of strong light in the foreground, that is on the road close to the car and out to the sides, is very comforting and reliably produces a strong impression of "good headlights". The problem is that not only is foreground lighting of decidedly secondary importance when travelling much above 30 mph, but having a very strong pool of light close to the car causes your pupils to close down, worsening your distance vision...all the while giving you this false sense of security. This is to say nothing of the massive amounts of glare to other road users and backdazzle to you, the driver, that results from these "retrofits".


Anyway, it's certainly your choice but I would be wary of going with a retrofit w/o replacing the entire assembly.


Return to “Infiniti EX35 / EX37 and QX50 / QX55 Forum”