WC's never ending s13 project
-
White Comet

- Posts: 19033
- Joined: Thu Jun 15, 2006 7:22 am
- Car: fc, s13 and mazda6, Sierra
- Location: lancaster, pa
Re: (S3t0_S13)
alright, to appease the masses i will update this afternoon between my classes. can u all wait til then?
-
White Comet
- Posts: 19033
- Joined: Thu Jun 15, 2006 7:22 am
- Car: fc, s13 and mazda6, Sierra
- Location: lancaster, pa
Re: (White Comet)
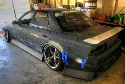
alright, im finally updating, and a lot has happened since the last update so this might be a long one. i finished the shaving of the lower body line and it came out ok for someone who has never done body work before but i'll touch it up b4 it goes in for a pro paint job. i wont go into details of how to fill the lower body line because i plan on making a DIY thread. in a nutshell i just took a paint stripper disk on a drill and went all the way down to the metal giving myself plenty of room above and under the line to blend it into the rest of the car. i used the filler in coats first using painters tape on the top and bottom and then filled it in til in was nearly flush i then took the tape off and blended it in to the body. after that it was just sand till even.heres before any body work was startedusing tape around the linethen just fill and sand everythingafter every thing's sanded i just sprayed and little primer on to see if it was even or not and went from therefrom there i began sanding and and primering the whole car. a thin coat of primer is really helpful in finding imperfectionsas u can see i used filler to help merge the side skirt to the door jamb, looks 10 times better than beforethe front bumper was pretty rough and took a good bit of sanding, but what do u expect it only cost me $100a lot of the prep work was done in one day, from morning til dark. my wife wanted to see it get rapped up so she helped the whole dayhere she is supporting the family businessshe even made a check list of what we should accomplishand my other helpereven though i already purchased the materials to paint my car daytona blue, with winter coming up i didnt want to drive a car w/ a new bad job in such harsh conditions. so i decided to go w/ a temp fix of spray painting it. i decided to go w/ a semi gloss black and to make it look good i did the door jambs, hatch jamb and gas flap area. after sanding from 220 grit to 320 grit to 600 grit (like i did with the whole car) i primered the jambs w/ 2 light coats of primer and then 4 coats of the blackfinished productand then dusting from sandingdidderson did an excellent job of filling the hole where the washer squirter was. cam out perfect, u cant even tell it ever had onenext i pressure washed the car to remove all dust and wiped it down w/ paint thinnerbefore i actually gave it paint thought i removed some pieces to paint separately. the wiper arms, the metal strip at the base of the windshield, the plastic screens under the hood, head light covers, tail light lower panel etci removed the weather stripping that was secured to the screens and filled in the holes with silicone, then painted it (over spray of neon green from 2 owners ago )while drying the lower tail light panel for the kouki tail lights was run over be my dad's dump truck so i sprayed the US panel and used a hammer to make it fit the new came in i just havent had a chance to paint it yetkinda pissed cuz it was a little tweaked when it arrived but oh well (dhl sucks)box was pretty messed up when it arrivedhers teh old one after the truck owned itunderneath the screens it was filthy and slightly rusted, i urge all s13 owners to pull those screens and rust proof before it gets badthis is after i cleaned it pretty well, much worse when i first looked ini sanded it down nicely and used anti rust primer and blackdid the job nicelywith that fixed up i went on to the painting of the whole car (side note- the rust fixing and painting came before final sanding, pressure washing and rubbing down w/ alcohol)after being cleaned up my wife and i masked everything offmy mad taping skillzthen i starting to primer. i used 3 cans of filler primerit got dark but these are the shots as i was primering, i finished primer the next morning and started to spray the blackfinally putting on the color, 11 cans total for 4 coats w/ no cleari pulled it into the garage to let the paint get nice and driedi'll get some better pics later but these are the pics as it sits right nowheres one of my brother's camaroim not sure if i still wanna go blue or not. i might go w/ pro painted satin black but im not sure. i i do stay black i'll smoke the front marker lights like the rear ones.
in some non body related updates, i installed a c pillar bar which looks and works nicelyi picked up a momo wheels on ebay for $30 and got a hub from frsport.com i just need to get the horn cap for itsolenoid for the greddy profec b spec 2and the actual unit for itcircuit sport oil catch cani also have a Q45 mafs to install soontonight i'm doing my doors and glovebox in vinyl and installing them. i've had a slight wire tuck done and plan to get more wires tucked soon ( thanks mrgreeneyes ) the interior still needs cleaned up a little and i'll take more pics when im done. i've got a headunit put in real quick but i'll take pics after a clean install. i also have boston acoustic component speakers and more coming up w/ audio. the most recent things completeed on teh car was installation of a cusco front strut bar and energy suspension bushings for it, and i re undercoated the entire bottom of the car. stay tuned for more updates (hopefully they'll be more frequent ) heres the guy that made this all happen (with the help of my supporting players).......MEthis thread was made possible by the letter....S and the number ....13
in some non body related updates, i installed a c pillar bar which looks and works nicelyi picked up a momo wheels on ebay for $30 and got a hub from frsport.com i just need to get the horn cap for itsolenoid for the greddy profec b spec 2and the actual unit for itcircuit sport oil catch cani also have a Q45 mafs to install soontonight i'm doing my doors and glovebox in vinyl and installing them. i've had a slight wire tuck done and plan to get more wires tucked soon ( thanks mrgreeneyes ) the interior still needs cleaned up a little and i'll take more pics when im done. i've got a headunit put in real quick but i'll take pics after a clean install. i also have boston acoustic component speakers and more coming up w/ audio. the most recent things completeed on teh car was installation of a cusco front strut bar and energy suspension bushings for it, and i re undercoated the entire bottom of the car. stay tuned for more updates (hopefully they'll be more frequent ) heres the guy that made this all happen (with the help of my supporting players).......MEthis thread was made possible by the letter....S and the number ....13
-
1unar3clipse

- Posts: 1543
- Joined: Thu Nov 23, 2006 6:22 pm
- Car: 93 240sx HB, 01 Dodge Dakota SLT
Re: (White Comet)
holy ****!Mega update!!
why is your car so dope Comet?
why is your car so dope Comet?

Re: (White Comet)
Lmao Very Nice...In Towards The End I Was Like Why The F*** Dose It Look Like A Camaro!?!?!
-
White Comet
- Posts: 19033
- Joined: Thu Jun 15, 2006 7:22 am
- Car: fc, s13 and mazda6, Sierra
- Location: lancaster, pa
Re: (Dittoz7)
yeah this update was a whole page thanks for the comments guys, lunar ur car can be this dope easily, just follow the steps in this thread ans then my car will have a twin
-
1unar3clipse
- Posts: 1543
- Joined: Thu Nov 23, 2006 6:22 pm
- Car: 93 240sx HB, 01 Dodge Dakota SLT
Re: (White Comet)
I hate to say it but.... I really like yours black.What shade blue were you originally thinking?
-
idahotuner
- Posts: 10583
- Joined: Thu Jun 28, 2007 7:11 am
- Car: 2012 Dodge Ram 2500 6.7 Cummins
93 Nissan Sileighty
93 Honda Civic hatch
2011 Polaris Ranger - Contact:
Re: (White Comet)
it looks nice i think i might do the same thing to make the body smoother.how long did all that bondo and stuff take you to do. i need to get started on mine.
-
TKE SigO 258
- Posts: 1139
- Joined: Thu Apr 12, 2007 2:45 pm
Re: (1unar3clipse)
Thanks for the update Jeff!
(do you happen to still have your old hood?)
(do you happen to still have your old hood?)
-
White Comet
- Posts: 19033
- Joined: Thu Jun 15, 2006 7:22 am
- Car: fc, s13 and mazda6, Sierra
- Location: lancaster, pa
Re: (1unar3clipse)
yeah black looks real good, its just a hard color to keep clean. the blue im thinking about is daytona blue from teh 350z1unar3clipse wrote:I hate to say it but.... I really like yours black.What shade blue were you originally thinking?
i took a while and its still not perfect. it looks to empty w/o areo but as long as u have some type of aero for it it looks better w/o the line imo. i worked on it little at a time, it might take a few days to fill the line, but then u gotta sand, primer paint, etc. the whole process of this last update took me 2 weeks working every day, would have gone quicker but it rained and then i was sick from working in the rainidahotuner wrote:it looks nice i think i might do the same thing to make the body smoother.how long did all that bondo and stuff take you to do. i need to get started on mine.
thanks! the old cf hood? i gave it to didderson, he's trying to fix it up, i have no background of fiberglassing or cf work but he knows what hes doingTKE SigO 258 wrote:Thanks for the update Jeff!
(do you happen to still have your old hood?)
-
idahotuner
- Posts: 10583
- Joined: Thu Jun 28, 2007 7:11 am
- Car: 2012 Dodge Ram 2500 6.7 Cummins
93 Nissan Sileighty
93 Honda Civic hatch
2011 Polaris Ranger - Contact:
Re: (White Comet)
yea when my dad and i did my integra we got it perfectly smooth, better then fro mthe factory, lol
i was jsut wondering cause when you see a bunch of pics i na row liek that it made me assume you did it all in two days
i was jsut wondering cause when you see a bunch of pics i na row liek that it made me assume you did it all in two days
-
cmoody2006

- Posts: 2061
- Joined: Wed Jan 31, 2007 7:13 pm
- Car: 1993 Nissan 240sx vert
Re: (TKE SigO 258)
Looks good man. Keep the pic's coming
-
White Comet
- Posts: 19033
- Joined: Thu Jun 15, 2006 7:22 am
- Car: fc, s13 and mazda6, Sierra
- Location: lancaster, pa
Re: (idahotuner)
a lot of the filler work was done in just a few days. the checklist my wife made was accomplished in one dayidahotuner wrote:yea when my dad and i did my integra we got it perfectly smooth, better then fro mthe factory, lol
i was jsut wondering cause when you see a bunch of pics i na row liek that it made me assume you did it all in two days
thanks, i'll take some better pics sooncmoody2006 wrote:Looks good man. Keep the pic's coming
i forgot to mention i have not yet painted the type x wing, i'll be doing that this weeks most likely
-
Drift Motion
- Posts: 336
- Joined: Wed May 17, 2006 7:17 pm
- Car: 91 RMS13
Re: (Drift Motion)
I Say Make It Blue Again...The Original Blue You Had
-
White Comet
- Posts: 19033
- Joined: Thu Jun 15, 2006 7:22 am
- Car: fc, s13 and mazda6, Sierra
- Location: lancaster, pa
Re: (Drift Motion)
i can take a close upp of the paint, but i havent had time to sand it yet. some spots arent perfect cuz i was painting outside in the windDrift Motion wrote:did you do any sanding after you did the 4 coat of black?
any close up pic of the paint?
the original blue was too light, the only blue i'll consider is the daytona but im still not sureDittoz7 wrote:I Say Make It Blue Again...The Original Blue You Had
-
White Comet
- Posts: 19033
- Joined: Thu Jun 15, 2006 7:22 am
- Car: fc, s13 and mazda6, Sierra
- Location: lancaster, pa
Re: (White Comet)
just a little bit of an update. i'm trying to get some of the interior pieced back in but i want to clean everything up and add a little bit of a custom flare. i have pics but wont post them yet since i wanna wait til my project is finished to unveil my masterpiece . since the car is back on the road and working on it isnt as hectic, i took a little time to clean up my work areastill things laying around but thats cuz a lot has to go on the cari had an emblem i grabbed from a junkyard and some double sided tape so i cut the tape to fit and dressed up my tool chest a littleit rained a good bit recently and after i clean the car up i'll get some better pics of it. my wife and i recently purchased a laptop for here and she decided i could spend as much as she spent on the laptop on myself. i havent reached my limit yet and i dont wanna reveal what i got but the brand names are xspower, nismo, and apexi. pics when they arrive. i'll get some pics up tomorrow as i hope to finish my aforementioned interior project. heres a little teaser pic of what im working on im sure u'll like itin the next few weeks i shoudl make a lot of headway and upgrades, so stick around

Re: (White Comet)
looking good man now what i was wondering are you keeping them wheels or you going to get new ones with some better offsets?
Re: (keith0486)
i love your dog, oh and the car is cool too. but no really it came out awesome. just needs some new wheels.

Re: (White Comet)
i actually really really like those seats... where did u get them, and how much?... they would look sick with my interior in my s13... more info please
-
White Comet
- Posts: 19033
- Joined: Thu Jun 15, 2006 7:22 am
- Car: fc, s13 and mazda6, Sierra
- Location: lancaster, pa
Re: (niemczykj)
tanks for the comments. the seats were purchased off of ebay a while ago, i havent seen nay like these before or after so they might be hard to find. as for the wheels, check out my sig. im trying to sell them immediately for rota grids
-
White Comet
- Posts: 19033
- Joined: Thu Jun 15, 2006 7:22 am
- Car: fc, s13 and mazda6, Sierra
- Location: lancaster, pa
Re: (White Comet)
already a little bit more of an update. last time i mentioned ordering a lot of parts. some of them still need to come in but so far i got an xs power turbo manifold, steel braided brake lines and Q45 front rotors. i dont have any pics of the manifold yet but heres the brake stuffsorry for some of the blurry pics the camera likes to be gay sometimes (probably cuz its pink) i dont have any more pics, but i'll try to get some soon. heres a quick brake down of the other little projects.
security- just picked up an alarm and that'll go in soon
brakes- obviously you can see i'm upgrading to Q45 brakes. im using all new or remanned parts instead of dealing w/ used brake stuff. new rotors and steel braided lines are here, just waiting on remanned calipers and new pads
sound- i havent taken pics yet but i have 6.5" boston acoustic components speakers in the door. they were free but the one is a blown so i'll be getting new ones. i'm also going to be mounting 6.5" where the verts have em at the back seat. im also in the process of a zune docking station nicely mounted in teh car so that'll be coming real soon
interior- the glovebox still isnt finished but i just picked up a staple gun to staple the fabric when i wrap it around the back of the box. i replaced the gray carpet on the doors w/ the same material as the gove box. it still needs a little trimming but i'll finish it tomorrow. also need to put soem of the interior back in and clean it up a little
exterior- still need to weld up that spare hatch and mount my wing. im getting tinted door glass so im gonna tint the rest of it too.
suspension- cusco coilovers and cusco rear strut bar are in the mail. i need to get the energy suspension bushing kit, cusco front sway bar, and cusco front strut bar.
a few other things as well coming up but this'll be enough to keep me busy for a little. hope to have more updates and pics soon
-
cmoody2006
- Posts: 2061
- Joined: Wed Jan 31, 2007 7:13 pm
- Car: 1993 Nissan 240sx vert
Re: (White Comet)
That beast is gonna stop on a dime
-
idahotuner
- Posts: 10583
- Joined: Thu Jun 28, 2007 7:11 am
- Car: 2012 Dodge Ram 2500 6.7 Cummins
93 Nissan Sileighty
93 Honda Civic hatch
2011 Polaris Ranger - Contact:
Re: (cmoody2006)
i cant wait tell i get my car body work done, good news is , i will be able to buy my clutch and fly wheel this month.
-
cmoody2006
- Posts: 2061
- Joined: Wed Jan 31, 2007 7:13 pm
- Car: 1993 Nissan 240sx vert
Re: (idahotuner)
What clutch/flywheel are you going with? Anyone know if you can use a ka24e clutch with a ka24de motor and transmission? I'm about to got to bed and i don't feel like searching sorry.
-
MoldyOldy240

- Posts: 600
- Joined: Thu Jun 08, 2006 3:51 pm
- Car: 1991 240sx 295K w/ original engine.
- Contact:
Re: (S13Teddy)
I am in awe right now.
You have done so much work on your car, and are being extremely detailed about it. I can't wait till you finish this, but then again, I feel watching it unfold is the best part lol.
Keep up the awesome work
You have done so much work on your car, and are being extremely detailed about it. I can't wait till you finish this, but then again, I feel watching it unfold is the best part lol.
Keep up the awesome work
-
White Comet
- Posts: 19033
- Joined: Thu Jun 15, 2006 7:22 am
- Car: fc, s13 and mazda6, Sierra
- Location: lancaster, pa
Re: (MoldyOldy240)
^ thanks for the compliments i appreciate it. i try to do my best
thank you. im sure it probably takes up more bandwidth then one person shoudl use. im sure u'll sew it in person one day. after school and after the car has more done i plan on taking it cross country out to caliS13Teddy wrote:Wow Jeff. This thread must make up half of the site's bandwidth!
But seriously, your car is coming along super nice man. I can't wait to see it finished, maybe in person one day...
all ka trannies and clutches are the same (89-98)cmoody2006 wrote:What clutch/flywheel are you going with? Anyone know if you can use a ka24e clutch with a ka24de motor and transmission? I'm about to got to bed and i don't feel like searching sorry.
i too am anxious to see urs after body work, i know ur getting an act clutch but what flywheel?idahotuner wrote:i cant wait tell i get my car body work done, good news is , i will be able to buy my clutch and fly wheel this month.
i hope so. my friend just did this and said its amazing so i cant wait to get em oncmoody2006 wrote:That beast is gonna stop on a dime
Re: (White Comet)
wow damn damm da,m! for a rattle can thatlooks good lol
-
amolao
- Posts: 3777
- Joined: Tue Nov 25, 2003 10:53 am
- Car: 1989 Hatchback (the first one...) w/ Autech sr20de S15
- Contact:
Re: (xckid)
I can't believe the amish folks let you do all that work in your car so close to their fields.....
Not a big fan of filling body line and moulding such nice OEM aero, but that's a lot of work for you and your wife, and I commend you both for that. I think you should go for the professional paint job you originally had planned. Blue will look good...
Not a big fan of filling body line and moulding such nice OEM aero, but that's a lot of work for you and your wife, and I commend you both for that. I think you should go for the professional paint job you originally had planned. Blue will look good...
-
White Comet
- Posts: 19033
- Joined: Thu Jun 15, 2006 7:22 am
- Car: fc, s13 and mazda6, Sierra
- Location: lancaster, pa
Re: (amolao)
yeah i still havent made up my mind on the color. i like the look of the filled body line, but actually the kit is not molded on. the amish cant really say anything about working on my car. its on private property and the fields they work in are own by my grandfather and rented to them. the road is actually named after my family