I should be getting my smoked tail light overlays tomorrow and wanted some insight on the installation other than having patience
Those who have installed these themselves, care to share any recommendations?
Thanks!

Thanks! I'm hoping that the template that i ordered has some cuts in them. Worse case, i will do that.coupecrazy1232 wrote:No clue on the pics but the big thing is patience like you said...have another person there to help is a big thing as well, heat gun and stretch! good luck lol its kind of tricky at first, i had to cut relieve cuts to make it easier!
http://www.rvinyl.com/coupecrazy1232 wrote:where did u get them from??
Thanks for the info!! I'll just need to invest in a heat gun then.Blackmobile wrote:doesn't look like they have any cuts in them. it's actually better if you don't have cuts in them, getting them to fit as 1 piece looks better, but it's really hard. the shape of our tails aren't a good shape for overlays but they can be done with some persistance and patience. mine are done as 1 piece with no relief cuts. if you notice, on their site they say that the AC tail light overlays are 5/5 difficulty level.
def use a heat gun, a hair dryer will work but not as well, also get a spray bottle with water and a tiny bit of soap, get some sort of squeegee or a credit card wrapped in a towel, and an extra set of hands. i'd give it about an hour per light to get a decent result.
Patience would be the issue lolDiamondWVU wrote:I just used a hair dryer and it worked just as well. I tried to it myself one time and it's so much harder than if you have a friend help. Be patient and don't get too mad at it. haha Good luck!
Post here with the specific DIY and they'll get the pictures back up.D-Roll wrote:Anyone know why the pics do not display in the "How to install tail light overlay" thread in this forum?
downedzephyr wrote:Post here with the specific DIY and they'll get the pictures back up.D-Roll wrote:Anyone know why the pics do not display in the "How to install tail light overlay" thread in this forum?
pics-in-tech-articles-t514703.html


Thanks! No relief cuts madeBlackmobile wrote:very nice, did you have to make any relief cuts?
DiamondWVU wrote:Looks nice man. Good job.

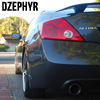
Is this the 30% or 60% coverage? This is EXACTLY what I want mine to look like, still able to see through yet toned down just enough to not be hideous. I have the smoke set with black sealant, this is making me think they will be perfect.D-Roll wrote:
Thanks bro! Well on Rvinyl.com, it's the dark smoke tint film.DJBeasy wrote:Is this the 30% or 60% coverage? This is EXACTLY what I want mine to look like, still able to see through yet toned down just enough to not be hideous. I have the smoke set with black sealant, this is making me think they will be perfect.D-Roll wrote:
Nice job on the install.
Np! I'll take some tonight when i can with and without the park lights on.DJBeasy wrote:Yeah thats equivalent to 60% Oracal I think.
Night shots please?
Here ya go! The pics are crappy thanks to the rain here.DJBeasy wrote:Night shots please?


Yep just the park lights on.DJBeasy wrote:Thats just the running light, no brake applied?
Eric Noa wrote:How dark is their Blackout tint? Anyone has it installed?
Thanks! Took time and patience for sure.PHENOMenalVinyl wrote:Eric Noa wrote:
I kinda wanna try this lol ughhhhh well see
BTW amazing job bro deff looks great!!
NICE. Exactly the look I was hoping for. Just hope I can install as well as you did.D-Roll wrote:Yep just the park lights on.DJBeasy wrote:Thats just the running light, no brake applied?
Thanks, Good luck!DJBeasy wrote:
NICE. Exactly the look I was hoping for. Just hope I can install as well as you did.
Blue Batmobile wrote:
Nice job!
B@t