Valve cover gasket replacement
Valve cover gasket replacement
Has anyone replaced the valve cover gasket? It looks like a pain. I changed my plugs at a 105K and found oil around the number six plug.
-
cruzad3r
- Posts: 1340
- Joined: Fri Mar 05, 2010 6:34 pm
- Car: 2006 Infiniti M35x fully loaded
- Location: CT
Re: Valve cover gasket replacement
no but you can be our first one here who will  - FWIW it doesn't take much to take off the intake manifold though so i "think" the job isn't too bad.
-
Ilya

- Moderator
- Posts: 9209
- Joined: Fri Apr 23, 2010 11:20 pm
- Car: 2011 M56x but I spend a lot of time on my 2015 Kawasaki Vulcan S. Former owner of a 2007 M35x. Also take care of my wife's 2016 QX60.
- Location: Charlotte, NC
- Contact:
Re: Valve cover gasket replacement
I would post a video of myself installing my plenum spacer, but it won't really help as you can't see what I'm taking taking off and where the bolts are. But, it's basically the same process.
-
lovemycarM35
- Posts: 398
- Joined: Sun Nov 14, 2010 6:19 am
- Car: 2014 Lexus GS 350
With F-Sport Package
Nebula Gray
19" wheels
12.3 inch display
Navigation
Re: Valve cover gasket replacement
I cant believe thee even leaking
Re: Valve cover gasket replacement
Have you changed your plugs yet? The seals around the spark plug sleves tend to leak after a 100k miles.lovemycarM35 wrote:I cant believe thee even leaking
-
Ilya
- Moderator
- Posts: 9209
- Joined: Fri Apr 23, 2010 11:20 pm
- Car: 2011 M56x but I spend a lot of time on my 2015 Kawasaki Vulcan S. Former owner of a 2007 M35x. Also take care of my wife's 2016 QX60.
- Location: Charlotte, NC
- Contact:
Re: Valve cover gasket replacement
Here is the video of me doing the spacer...it should give you a general idea of how hard/long the process is to tear the motor apart to get to the valve covers. I think the video was set to 4x.
The biggest pain in the a** was taking off the hoses for the manifold. The ones in the back (that you see me struggling with in the video) was a PITA.
[youtube]http://www.youtube.com/watch?v=gCsnxwst2yw[/youtube]
The biggest pain in the a** was taking off the hoses for the manifold. The ones in the back (that you see me struggling with in the video) was a PITA.
[youtube]http://www.youtube.com/watch?v=gCsnxwst2yw[/youtube]
Last edited by Ilya on Wed Feb 27, 2013 1:21 pm, edited 1 time in total.
-
rxmclaren7
- Posts: 218
- Joined: Mon Aug 13, 2012 9:10 pm
- Car: 2006 Infiniti M35x
- Location: Cortland, NY
Re: Valve cover gasket replacement
just took my car to the dealer to have this done.....looks like the bill is going to be north of $300 so if you have the talent and the ability to do it yourself i would do it!!!!!!! i just dont have a garage and tools so i cant do it myself!!!
-
EniGmA1987
- Posts: 2258
- Joined: Tue Apr 28, 2009 5:13 am
- Car: '06 Infiniti M35 Sport
Re: Valve cover gasket replacement
I have blown my valve cover gasket 3 times in the years I have owned the car. It used to be a yearly thing come winter time, now that I am out of warranty I try really hard to baby my car in the winter cause I dont want to pay $300 of my own money to keep fixing it every year.lovemycarM35 wrote:I cant believe thee even leaking
-
Ilya
- Moderator
- Posts: 9209
- Joined: Fri Apr 23, 2010 11:20 pm
- Car: 2011 M56x but I spend a lot of time on my 2015 Kawasaki Vulcan S. Former owner of a 2007 M35x. Also take care of my wife's 2016 QX60.
- Location: Charlotte, NC
- Contact:
Re: Valve cover gasket replacement
The **** are you doing to that thing that it keeps blowing?EniGmA1987 wrote:I have blown my valve cover gasket 3 times in the years I have owned the car. It used to be a yearly thing come winter time, now that I am out of warranty I try really hard to baby my car in the winter cause I dont want to pay $300 of my own money to keep fixing it every year.lovemycarM35 wrote:I cant believe thee even leaking
Is your name Mario Andretti?
I have 100k and never had an issue with mine. Yet.
Re: Valve cover gasket replacement
Hey all, been following this forum for awhile, new to posting. My M35x just hit 98k. I live in NYC and I do daily spirited commutes. I've noticed for the last few months I've been loosing oil. Come to find out it is leaking from around the valve cover area, so I'm pretty sure my gaskets are worn and hoping it's nothing more (like the grommets within the VC itself, heard that's a pain to have to deal with.) Believe it or not the only Infiniti shop in my area wants to charge me $25 a gasket & $550 for labor. As Im actually heading back to school money is short, so I'm leaning towards picking up the gaskets at a local Nissan shop and replacing them myself. Any tips or cautions would be much appreciated as this is my first attempt. If possible I'll try to make a video as well.
Thanks in advance for all the input on these forums guys. Here I go!
Thanks in advance for all the input on these forums guys. Here I go!
-
cruzad3r
- Posts: 1340
- Joined: Fri Mar 05, 2010 6:34 pm
- Car: 2006 Infiniti M35x fully loaded
- Location: CT
Re: Valve cover gasket replacement
can you post the part number once you have it.
Re: Valve cover gasket replacement
The parts # for the left and right valve cover gaskets are 13270-8J112 and 13270-8J102. Picked them up at Nissan for $20 a piece. That is for the VQ35de.
-
wingFeather

- Posts: 1819
- Joined: Thu Jul 21, 2005 10:08 am
- Car: Current: 05 G35 Coupe
Previous: M35, M35 Sport, cube, J30, s13 sr20det, s13 rb20det, s14 zenki
Re: Valve cover gasket replacement
I would try tightening the bolts to the cover first. This might just be enough to stop the leak.
Re: Valve cover gasket replacement
Thanks, but if I go through removing the plenum I might as well replace the gaskets. My only real concern is if anything would need to be reprogrammed such as the throttle position. If someone says I wouldn't need to reset the idle after removing the TB then I'm set to start the task in the morning.
-
wingFeather
- Posts: 1819
- Joined: Thu Jul 21, 2005 10:08 am
- Car: Current: 05 G35 Coupe
Previous: M35, M35 Sport, cube, J30, s13 sr20det, s13 rb20det, s14 zenki
Re: Valve cover gasket replacement
I didn't see where you had mentioned removing the plenum for some other issue/modification. My mistake. If you're already that deep in, might as well...
-
CPJ LB

- Posts: 1026
- Joined: Sat Aug 28, 2010 4:06 pm
- Car: 12 G37X Sedan- stealthy modded
14 Altima 2.5
08 Tahoe
06 M35 S (gone)
14 Versa 4dr (gone) - Location: CA 2 CT
Re: Valve cover gasket replacement
I think the original post mentioned a leak in the spark plug tube -- this is a common item for the VQ35DE motor. Unfortunately, Infiniti/Nissan built the spark plug gaskets within the actual valve covers. The cause of leaking oil around the valve covers tend to be associated with leaky spark plug gaskets/grommets -- causing oil to pool inside the spark plug tubes and eventually getting outside of the valve covers. before you change out the valve cover gaskets, take a look inside your spark plug tubes and verify if you have oil in them...if this is the case, you might need to replace the entire valve covers AND valve cover gaskets. I've read up on this on the G35 driver forum and some guys attempted to buy grommets instead of entire valve covers. some say it works. I found a video where a guy does a step by step guide when changing his spark plug grommets...
overall, hopefully it's just your valve cover gaskets -- very inexpensive. But if its the spark plug seals, then it might be time to change the valve covers.... good luck.
http://www.orlandoforums.com/forum/gene ... -plug.html
overall, hopefully it's just your valve cover gaskets -- very inexpensive. But if its the spark plug seals, then it might be time to change the valve covers.... good luck.
http://www.orlandoforums.com/forum/gene ... -plug.html
Re: Valve cover gasket replacement
Thanks, I will do a thorough check of the spark plug holes tomorrow when it's light out. I've seen that guys fix, but I don't feel comfortable with the method. I just hope that's not the issue else I'll end up dishing out $200 a VC. Can't believe such a simply flawed design can cost near a grand in repairs (at a NYC Infiniti shop that is). I'll let you guys know how it goes.
Update:
So this morning has been very eventful. Got to work removing the plenums, hoses(what a pain), brackets and sensors just to reach the ignition coils. The water hoses and sensors underneath the TB are by far the worst. I'm guessing that's what IvanKol above was referring to. A helpful tip for anyone struggling with those in particular, slide the clamp down or off the hose if possible and use a flat-nose pliers to slowly loosen and pull the hose off. The sensors you will just have to either feel or like me use a small mirror and flashlight to help see what you are reaching for.


First two spark plug tubes & coils on right/drivers side dry as a bone

...then there was the third with a good amount of oil in the tube.
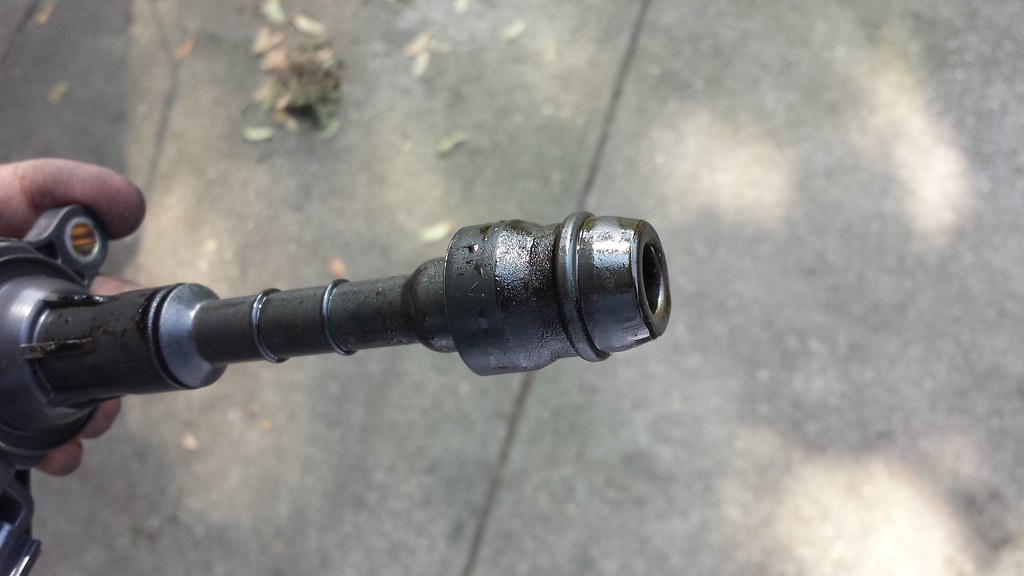

Looks like I'm replacing both VCs. Around 3:00 I was prepared to go back to my local Nissan shop and purchase the VCs only to call and be told that they closed at 2:00 and will reopen on Tuesday after the holiday. Also noticed that my windows were down and with everything unplugged I want going to put the battery back on just yet, so now to push it back into my garage. Sigh*...the steering is locked. Luckily it was pointed straight at the garage. I'm documenting this all with pictures. I'll have everything done and up by Wednesday.
Update:
So this morning has been very eventful. Got to work removing the plenums, hoses(what a pain), brackets and sensors just to reach the ignition coils. The water hoses and sensors underneath the TB are by far the worst. I'm guessing that's what IvanKol above was referring to. A helpful tip for anyone struggling with those in particular, slide the clamp down or off the hose if possible and use a flat-nose pliers to slowly loosen and pull the hose off. The sensors you will just have to either feel or like me use a small mirror and flashlight to help see what you are reaching for.
First two spark plug tubes & coils on right/drivers side dry as a bone
...then there was the third with a good amount of oil in the tube.
Looks like I'm replacing both VCs. Around 3:00 I was prepared to go back to my local Nissan shop and purchase the VCs only to call and be told that they closed at 2:00 and will reopen on Tuesday after the holiday. Also noticed that my windows were down and with everything unplugged I want going to put the battery back on just yet, so now to push it back into my garage. Sigh*...the steering is locked. Luckily it was pointed straight at the garage. I'm documenting this all with pictures. I'll have everything done and up by Wednesday.
Re: Valve cover gasket replacement
It's been 20K miles since replacing my plugs and noticing some oil in the spark plug tube on cylinder number 6. At the time I chose to due nothing, figuring the worst that can happen is the engine will misfire. I imagine there are many M35s on the road that have leaking sparkplug tubes and don't even know it - considering the plugs are changed at a 100K miles and there is no reason to check there integrity. Changing the valve cover looks like a pain, let us know how it goes.
-
CPJ LB
- Posts: 1026
- Joined: Sat Aug 28, 2010 4:06 pm
- Car: 12 G37X Sedan- stealthy modded
14 Altima 2.5
08 Tahoe
06 M35 S (gone)
14 Versa 4dr (gone) - Location: CA 2 CT
Re: Valve cover gasket replacement
^ @ SStroud90, sorry to hear bro...but good thing for checking - you may need to compare the integrity of the coils as well...the coil that was soaking in the oil could be 'softer' than those that are dry. you may need to think about replacing the coil as well. Not expensive. this will ensure no misfires.
reading all of the misfortune that some of the G35 guys experienced really alerted me of the possible issues to avoid with my M.
If someone can create aluminum valve covers with removable spark plug gaskets/grommets, I think that'll save a lot of money for infiniti/nissan owners...
good luck with the maintenance and on a good note, you recognized the oil leakage early rather than having something bad happen while on the road...
Re: Valve cover gasket replacement
Update: I successfully changed the valve covers, gaskets, and spark plugs, and cleaned out the majority of intake parts (excluding the TB). I have not noticed any drip of oil so far.  I'm sure pleased, but man it was quite a pain, in every sense of the word. I'm still sore from my lower back to my neck. I've several more pictures, but I'm going to try and summarize the job I just went through and all the findings before I update this post again within the next day or so. I look forward to sharing.
-
Larz
- Moderator
- Posts: 2894
- Joined: Thu Feb 21, 2013 8:55 pm
- Car: 2019 Q70-L RWD
- Location: Ft Lauderdale, Florida
- Contact:
Re: Valve cover gasket replacement
So pleased to hear there was a good outcome (minus the aches and pains) ! Please do post your pics and DIY as this could be a great help for us all when our M's need this repair. Cheers!
Re: Valve cover gasket replacement
Sorry for the late write up, been busy with work and school, but here I go. This will be my description of what I've done. I followed the service manual, and I recommend everyone to do the same and stick to the official instructions. This is solely a summary to help others know exactly what was done. The entire job can be done in under a day by someone who is confident that they already know what they are doing. It took me about 24 highly interrupted hours working through the night, and I paid the price with my back.
Ok, first up I would like to start with saying that for anyone starting work on engine components below the plenums, I would highly recommend purchasing a flexible drive shaft extension for their power tool if they do not already own one. Same for hand tools, torque wrench extension bars and adapters should all be preferably ¼” in diameter and/or flexible because there are several bolts on the valve covers and brackets that are in extremely small & hard to reach places, otherwise you will need to remove more parts to get to them. Magnetic tips may also help, however still be very cautious while removing the bolts, take care not to drop any. You will need a pair of pliers to squeeze and slide the clamps off all hoses, a scrapper tool, Permatex RTV silicone or equivalent, and lastly a spark plug wrench. Pliers can also be used to slowly wiggle the hoses off of their pipes if you are having trouble by hand. Be patient and slow as you don’t want to chew up anything in the process. I will try my best to detail what I did, but remember that you should always follow through the service manual and do some video research if you are unsure. This dude put up a pretty good video here (http://www.youtube.com/watch?v=Hm19WYXWy7E), but he didn't replace the covers, rather he drilled and fitted with a different seal than factory.
Engine covers and battery unplugged, I began by disconnecting my MAF sensor, uncoupling the air hose from my TB, & removed and covered the PCV hose attached to the air duct. All bolts and clips removed from brackets holding my intake in place, I lift the entire intake system from the engine bay. I recommend also covering your TB afterwards with tape as you do not want anything touching that butterfly valve (enough horror stories about that). Next I removed the (18) 10mm bolts from the upper plenum in the reverse order stated in the service manual. You should number each and set them in a safe place. Bolts removed, I disconnected the TCA (Throttle Control Actuator), removed the two water hoses from underneath the TB, the hose behind the TB, as well as the two hoses on the left side of the plenum. Unbolted the bracket to the EVAP canister purge volume control solenoid valve located on rear left side of the plenum near bolt 14, and then proceeded to remove the upper plenum and its gasket. (Removing the water hoses underneath the TB will be the first of a number of pains you will run into as you cannot lift the plenum high enough to see them well and it is a bit of a stretch. I used a flashlight and small mirror to help me see what I needed to reach.)
Next I removed the 8 bolts holding down the lower plenum in the reverse order also stated in the manual. As with the upper, I removed all attached hoses then lifted the lower plenum from the engine bay. (Immediately after removing it, have some tape or a towel to cover your intake manifold. You don’t want anything solid falling in there).
With the plenums removed I'm looking at my left and right valve covers. Before continuing I made some more room to work with by removing the vine-like mess of wires encircling the engine. I started with the furthest two connectors located behind the engine, in the dark, underneath where the TB would be (one of which is the cam position sensor). I continued clockwise, disconnecting the ignition coils connectors, intake valve timing control solenoids, several clips holding the vine in place on brackets, etc. (You may want to label them, however I did not since most were in a pretty fixed position along the vine.) I had to also remove all of the brackets from off of the valve covers to reach some of the ignition coils. Top of the VCs cleared I unbolted the ignition coils, popped them out, and checked the spark plug tubes for oil. (There was oil in the two rear tubes as seen above and I know others have had the same issue. I wonder if the seals wore out faster in the rear due to the extreme heat collecting in the rear of the engine from the exhaust manifold?)
Now the more difficult part. I removed the PCV hose from off of the top of the Left VC (passenger side) and the other air hose off the back of the Right VC. I didn't have room enough to remove the PCV hose that connects both VCs in the front until I removed one cover. I started with the "easy", right/drivers side VC. Got my 1/4" extension bar ready and began to remove the 10 bolts that mount the VC in reverse order as stated in the manual. (The manual refers to the VC as Rocker Covers in the "engine management section", the right/drivers side is also referred to as the Left Bank RC and vice versa.) With the bolts removed from the right VC, I grasped the cover at two ends & pulled it off with a few light tugs. The left VC was a bit more difficult as bolts 8 & 10 are just the biggest hassle to reach without removing extra parts such as the fuel sub-tube and a few lines. I really didn't want to, so I took a stroll to AutoZone and bought my flexible extension. Came back, slowly got them off without dropping them, & loosened the cover. I really cannot stress how bad of a position these bolts are in. I could NOT remove the cover completely from its position as easily as the first due to the fuel line system, but mostly because of a hard plastic housing for wires to the ECM preventing an easy lift from the rear. The position of IVTC solenoid blocking the front from lifting just added to my stress. I took me nearly 20min to figure it out. What I did was to pull back on the plastic housing enough to get just a lip of the cover over the solenoid in the front then slowly raise the rest of the cover at an angle perpendicular to the surface of the camshaft bracket it sits on, so that it clears the spark plug tubes and other fixtures underneath the cover. In other words you won't be lifting it straight up vertically, but at more of a slant. If you feel like it is impossible and that some step is missing, you can go the extra step of removing the fuel sub-tube on the left and the large water hose for the right side VC if you feel (as seen in the YouTube video), but there is nothing you can do bout the plastic housing and that is the main piece blocking you movement. For the record I got by without having to remove either the fuel sub-tube or water hose.
Covers removed, I patiently scraped all the old silicone off the surface and corners of the camshaft bracket and got the new VCs ready with gaskets firmly in their grove with a thin spot of adhesive here and there. (At this time, I replaced my 95k mile old NGK Platinums for a set of Iridiums) Once the surfaces are clean & dry I placed a generous amount of silicone down in the corner where the VC and camshaft surface meet, directly under the IVTC solenoid (the manual includes a detailed diagram). NOTE: You have a small window of time as to how long the silicone will remain wet to put a VC in place, make certain it is sitting flush, that the gaskets have not snagged anything or have fallen out of place, and bolt it down in the correct order. I also disconnected the fuel injectors on either side for some added space when doing this. The right VC was a simple enough job, but that left side was a nightmare! You WILL need a second person helping you to pull back the plastic housing underneath the fuel pump bracket while you maneuver the cover in. It took me a while. This was the last hard-to-reach procedure, but marked the end of my troubles.
Before I started rebuilding I took some time to clean out the plenums & intake manifolds as I noticed the rear ports collect a lot of gunk. Beginning the rebuilding process, I made sure that the bolts on the valve covers were torque'd to specifications, let them sit for awhile and checked them again. Retraced my steps and continued rebuilding the engine. It is also recommended you replace your plenum gaskets if removed (good time for some 5/16" spacers if you're going for aftermarket). Remember to plug/snap all sensors and connectors firmly to their respective devices and harnesses. Make sure you hear that CLICK* for each one. (One of my IVTC solenoid connectors were not snapped in fully and it threw the SES light up while I was on the highway. Scared the crap outta me thinking it was something worse I screwed up. I ran the code through a scanner and realized all I needed to do was to push the harness a mm in and hear it snap in place. I cleared the SESL and it has not returned.) I put back in place all brackets and clips, torque'd down the lower and upper plenums, plugged back in all hoses, and triple checked everything. Afterwards, 3 hours of sleep later, I connected the battery and performed the closed and idle throttle learning procedure, started the engine and did a road test. Over a week later, not a drip of oil. Hope this DIY gives you guys a bit of understanding. Best of luck!
-
svard75

- Posts: 1564
- Joined: Mon May 11, 2009 3:26 am
- Car: 06 M35x
- Location: Toronto, Ontario, Canada
Re: Valve cover gasket replacement
Fantastic writeup. Pictures would have made it even better. I enjoy reading these writeups and often almost relive it. Unfortunately it's too bad they went bad on you to begin with. Did you install a spacer? That would have been a perfect time to port and polish the lower plenum and runners.
-
szh

- Posts: 15932
- Joined: Tue Jul 23, 2002 12:54 pm
- Car: 2018 Tesla Model 3.
Unfortunately, no longer a Nissan or Infiniti, but continuing here at NICO! - Location: San Jose, CA
Re: Valve cover gasket replacement
Thanks for an excellent write-up!
This is a relatively time-consuming job, hence the reason high labor cost at the dealer unfortunately.
Z
This is a relatively time-consuming job, hence the reason high labor cost at the dealer unfortunately.
Z
-
PAdutchKorean
- Posts: 7
- Joined: Wed Jul 01, 2015 10:52 am
- Car: 2006 M35 Base
Re: Valve cover gasket replacement
oh s***... is this what I might have to do?
-
BlackCat81
- Posts: 422
- Joined: Mon Sep 21, 2015 4:09 am
- Car: 2006 Infiniti M35x
2003 Lexus GX470 - Location: Mesa, AZ
Re: Valve cover gasket replacement
For those of you who have leaking spark plug tube grommets, since the grommets are not available separately, you can use RTV on the tube/grommet area to keep it from leaking and save you the price of a new valve cover. It's fairly common for cylinders 5 and 6 to have leaky grommets.
-
KnoxRacing
- Posts: 2
- Joined: Thu Sep 08, 2016 8:30 pm
- Car: 9/02 made Black '03 M45
Re: Valve cover gasket replacement
Not that long just unplugging alot there a thighting sequence
-
Poirot
- Posts: 74
- Joined: Mon Aug 24, 2009 11:46 pm
- Car: 2007 Unbria/Bourbon M45 Sport
- Location: Stuck somewhere on 495
Re: Valve cover gasket replacement
Afternoon all. Since this was spot on for me, I though I would bring it back to the front of the congregation. I have an 07 M45 Sport, 116k on the clock. By all symptoms I have a leaking valve/rocker cover gasket on the passenger side, near cyl #5. I don't really have the space to do a proper job, and I doubt that security would be too agreeable with me doing it in the parking deck at work. So.....Would it be worthwhile to just have the valve covers and the gaskets replaced at the same time? There was no mention of any oil in the spark plug tubes or on the coil packs, when I had the plugs replaced. The klutz that I am, I have spilled a bit oil on the filler neck which may show up on coil pack #3. I can get both OEM covers and gaskets for about $450. I would think that the labor cost would be about the same if I just replaced the gaskets vs cover and gaskets. Maybe and extra 30min? Also, would you take this to a Nissan, Infiniti, or an independent shop. I know that the dealer would be the most expensive, but they would have all the right experience. Comments?
-
midnightclub619
- Posts: 267
- Joined: Fri Apr 18, 2014 9:51 pm
- Car: 2007 Infiniti M35x
- Location: San Diego, CA
Re: Valve cover gasket replacement
I'm currently in the middle of this job. I had a leaks on on both valve covers due to the gaskets. 129k on those gaskets. It was a pain to remove the passenger side cover and I accidently broke the PCV hose inlet on that gasket so I have to replace that valve cover. Since I'm going to replace one cover I'll just be replacing both valve covers at the same time with new gaskets as well. Per the FSM, it also says to replace upper and lower plenum gaskets so I'll be replacing everything since I have it all out. Definitely took longer to remove the passenger cover and installation on that side will also be a pain. But the rest of the install should be smooth sailing. I have a garage so I can work on it when I have the time, but from what I've worked on removal and installation would definitely be several hour job. Following the FSM is key if your doing this DIY.
Re: Valve cover gasket replacement
Pics please. When I changed my sparks the other day I had oil in bank 1....but the spark plug was not tight, so I attributed the oil to that. Reading this I'll have to go back and check it in a week or so...but will be good to have pics and a write up for the job  .
.