Well thank you sir, I definitely appreciate the feedback.
She's been a real battle at times but like anything that we love, is worth it to us in the end. I also really enjoy the smaller detail work as a hobby when the car has allowed me that, such as now.
Feel free to ask away about anything I've done and I can try to point you in the right direction!
Upgrading my TT...running journal (Updated!)
-
DCaff300ZX

- Posts: 4202
- Joined: Sun Jun 14, 2009 8:18 am
- Car: .
1993 CRP TT- Modified - Location: Tacoma, Washington
-
DCaff300ZX
- Posts: 4202
- Joined: Sun Jun 14, 2009 8:18 am
- Car: .
1993 CRP TT- Modified - Location: Tacoma, Washington
Re: Upgrading my TT...running journal (Updated!)
So as the worm turns, and things get done...the Home Improvement project moves forward as one window almost done, one to go.

Of COURSE, time was found for Z fun.
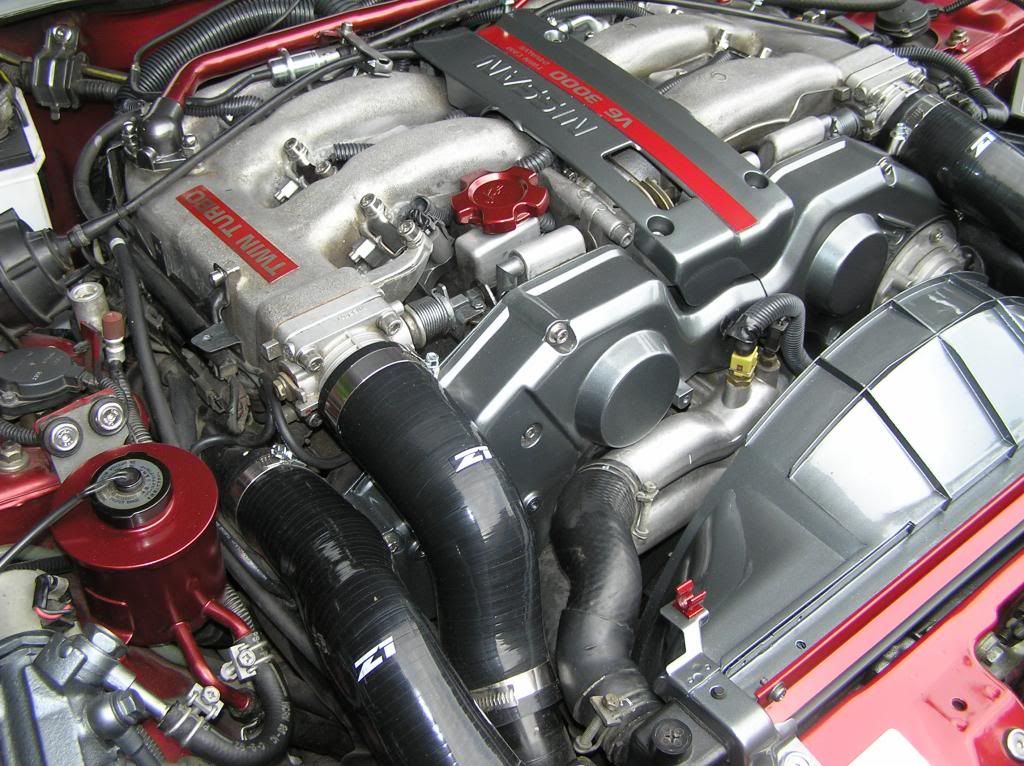
I had an itch that after finding no cure on the site I've been watching, Z1 scratched in two days- ZSpec '94+ chromed J30 throttle spring covers and SS fasteners + finishers...for my '93!
Like that little detail was gonna bother me for $40, I ordered them with no plan in mind and had them on and looking great in my 3 extra hours I found Saturday!
PS was easy peasy, dry fit as I wanted and mark, simple drill/tap into the useless coil hold down lump for the "inside" hole and a dead fastener/nut setup in the "outside" unused end- and Voila, perfecto!
Unfortunately, sitting as close as they do to the coil packs I think I need to add the red finishers there as well now...<sigh>

DS was far more of a problem, with only the small waste stud on the side of the throttle body to work with, and the plenum offset as well. I fabbed a bracket that failed because it couldn't mount as needed and also provide inside-to-plenum coverage, so running out of time and without proper materials, I made a flat backing bracket to fill to the plenum as needed and bolted it to the cover, then epoxied it in three places in the correct position. I was very happy that both positions I found lined up perfectly with the same coverage and general positions when viewing as a whole.

It sits solid on the throttle body stud and is very solid with the backer glued along the side to the plenum (JUST touching the DS cam cover) even before 100% epoxy strength, and if not and it fails, I'll figure out a correct bracket then. I could get the small angle aluminum I need from work but didn't want to wait.
Maybe my favorite dress up mod yet!
So here's the overall view now with current work done...New:

Versus old:
There still are a few items left to play with, like ZSpec SS manifold bolts/finishers.

I also contacted Chris at ZSpec for some of the longer fender bolts and cap screws in a mixed 25 pc. bag and he was back to me that same day and happy to oblige (GREAT guy and company, customer service) so these all will go on when Z fun time allows, which also now includes a paint refresh of the mirrors and window trims to match the cowls.
Thanks Chris for another quality product!
Stay tuned for more...

Of COURSE, time was found for Z fun.
I had an itch that after finding no cure on the site I've been watching, Z1 scratched in two days- ZSpec '94+ chromed J30 throttle spring covers and SS fasteners + finishers...for my '93!
Like that little detail was gonna bother me for $40, I ordered them with no plan in mind and had them on and looking great in my 3 extra hours I found Saturday!
PS was easy peasy, dry fit as I wanted and mark, simple drill/tap into the useless coil hold down lump for the "inside" hole and a dead fastener/nut setup in the "outside" unused end- and Voila, perfecto!
Unfortunately, sitting as close as they do to the coil packs I think I need to add the red finishers there as well now...<sigh>

DS was far more of a problem, with only the small waste stud on the side of the throttle body to work with, and the plenum offset as well. I fabbed a bracket that failed because it couldn't mount as needed and also provide inside-to-plenum coverage, so running out of time and without proper materials, I made a flat backing bracket to fill to the plenum as needed and bolted it to the cover, then epoxied it in three places in the correct position. I was very happy that both positions I found lined up perfectly with the same coverage and general positions when viewing as a whole.

It sits solid on the throttle body stud and is very solid with the backer glued along the side to the plenum (JUST touching the DS cam cover) even before 100% epoxy strength, and if not and it fails, I'll figure out a correct bracket then. I could get the small angle aluminum I need from work but didn't want to wait.
Maybe my favorite dress up mod yet!
So here's the overall view now with current work done...New:

Versus old:

There still are a few items left to play with, like ZSpec SS manifold bolts/finishers.

I also contacted Chris at ZSpec for some of the longer fender bolts and cap screws in a mixed 25 pc. bag and he was back to me that same day and happy to oblige (GREAT guy and company, customer service) so these all will go on when Z fun time allows, which also now includes a paint refresh of the mirrors and window trims to match the cowls.
Thanks Chris for another quality product!
Stay tuned for more...
-
DCaff300ZX
- Posts: 4202
- Joined: Sun Jun 14, 2009 8:18 am
- Car: .
1993 CRP TT- Modified - Location: Tacoma, Washington
Re: Upgrading my TT...running journal (Updated!)
So today I got a package from Powertrix...


Looking forward to the day when this is installed, and the body is completely repaired!


Looking forward to the day when this is installed, and the body is completely repaired!
-
Z-owned

- Posts: 3487
- Joined: Fri Aug 29, 2008 8:56 pm
- Car: 93 N/A Z32
90 VW Corrado
01 mr2 spyder - Location: Auburn, WA.
Re: Upgrading my TT...running journal (Updated!)
Looks familiar 
-
DCaff300ZX
- Posts: 4202
- Joined: Sun Jun 14, 2009 8:18 am
- Car: .
1993 CRP TT- Modified - Location: Tacoma, Washington
Re: Upgrading my TT...running journal (Updated!)
Once again I bow to your excellent taste by copying one of the details on your car, the cf and CRP is
So you get everything righty-tighty with your Z?
-
Z-owned
- Posts: 3487
- Joined: Fri Aug 29, 2008 8:56 pm
- Car: 93 N/A Z32
90 VW Corrado
01 mr2 spyder - Location: Auburn, WA.
Re: Upgrading my TT...running journal (Updated!)
Sadly not yet haven't had the funds to get the one piece driveshaft yet to finish it. Been working on the audi stance and wheels for the wife lol.
-
DCaff300ZX
- Posts: 4202
- Joined: Sun Jun 14, 2009 8:18 am
- Car: .
1993 CRP TT- Modified - Location: Tacoma, Washington
Re: Upgrading my TT...running journal (Updated!)
I hear ya, been a slow year for me as well other than the obvious stuff above...just hoping I actually am able to get her in a state where I can drive her this summer, but until I get the brakes done (too lazy/tired lately) it's just been easy-peasy stuff and my Mom's project...which I BETTER get done today!
So, any pics of the Wifey's car and your stance work?
So, any pics of the Wifey's car and your stance work?
-
Taleek
- Posts: 32
- Joined: Fri Apr 24, 2015 6:06 pm
- Car: 1990 Nissan 300ZX Twin Turbo
- Location: San Diego, CA
Re: Upgrading my TT...running journal (Updated!)
Just finished catching up on this entire thread. Wow! that z has been through the ringer and back even stronger. Excellent job with it! Also it's awesome to see someone with excellent tastes and attention to detail from my home state.
-
DCaff300ZX
- Posts: 4202
- Joined: Sun Jun 14, 2009 8:18 am
- Car: .
1993 CRP TT- Modified - Location: Tacoma, Washington
Re: Upgrading my TT...running journal (Updated!)
Thanks for the feedback! So you are from Washington, what area?
I agree that the poor thing has had a bad run of luck under my ownership, and deserves better so that has been my goal this last time around.
I just ordered a twinZ diffusor to finish out the body details in the rear to go with the cf spoiler, along with my Powetrtrix sideskirts and a new jspec front bumper and rear 1/4 panel still to purchase for the body front and rear 1/4 panel repairs...3 down, two to go!
I'm hopeful I can stay with my plan of getting the bodywork done this summer, and which may well result in a full repaint due to how badly the paint has sun faded. I do like the oranger/pinker hue actually, but color matching the whole car may well be too much hassle compared to strip and repaint while also taking out all of the little bitty dents and rock chips as a bonus...we'll see what my guy has in mind for the pretty reasonable price he quoted me for the entire ordeal.
-
Taleek
- Posts: 32
- Joined: Fri Apr 24, 2015 6:06 pm
- Car: 1990 Nissan 300ZX Twin Turbo
- Location: San Diego, CA
Re: Upgrading my TT...running journal (Updated!)
Originally yeah, I lived in Grayland/Westport area for the first 18 years of my life, and somehow I ended up in San Diego, where I'm at now.
That diffuser is going to look sick man, theres been a lot of love and work put into her. Cant wait to see it.
That diffuser is going to look sick man, theres been a lot of love and work put into her. Cant wait to see it.
-
DCaff300ZX
- Posts: 4202
- Joined: Sun Jun 14, 2009 8:18 am
- Car: .
1993 CRP TT- Modified - Location: Tacoma, Washington
Re: Upgrading my TT...running journal (Updated!)
Ah, Westport's nice to visit and I did a lot when I was a kid, and also a good friend was married there. How do you like SD? I have some relatives there and they like it a lot.
I agree with the diffusor, it's one thing I have wanted for some time but never really considered because I wanted the full bumper and will not pay that price, geez even just the diffusor put a on my face as I OK'd the transaction...same damn price as a full jspec front bumper with all the trimmings!
I never considered just the diffusor before but I trust my body guy will be able to make it look perfect if I can't...I'm going to try though!
I'm thinking the darker gunmetal color should be pretty awesome with the cf spoiler from a rear view...
I agree with the diffusor, it's one thing I have wanted for some time but never really considered because I wanted the full bumper and will not pay that price, geez even just the diffusor put a
I never considered just the diffusor before but I trust my body guy will be able to make it look perfect if I can't...I'm going to try though!
I'm thinking the darker gunmetal color should be pretty awesome with the cf spoiler from a rear view...
-
Taleek
- Posts: 32
- Joined: Fri Apr 24, 2015 6:06 pm
- Car: 1990 Nissan 300ZX Twin Turbo
- Location: San Diego, CA
Re: Upgrading my TT...running journal (Updated!)
That's about all westport is good for haha. I had to get out asap. SD is cool, there's a lot here, I've a little group of car people I know down here. Smog sucks! but just gotta know the right people to hook you up. Yeah, if I had my choice I'd go with the full bumper too, just a much cleaner look, although you know what you're doing so I'm sure it'll come out seamless
-
DCaff300ZX
- Posts: 4202
- Joined: Sun Jun 14, 2009 8:18 am
- Car: .
1993 CRP TT- Modified - Location: Tacoma, Washington
Re: Upgrading my TT...running journal (Updated!)
So the tracking said this was on the truck at 7:27 this AM, and I waited completely impatiently for this to finally arrive at 1:10 this afternoon.
OH...BOY.
This looks like FUN as well as gonna be SOOOOOO sexy, will be worth the trouble and cost for sure!


I will be detailing this puppy and painting it this weekend...stay tuned!
OH...BOY.
This looks like FUN as well as gonna be SOOOOOO sexy, will be worth the trouble and cost for sure!


I will be detailing this puppy and painting it this weekend...stay tuned!
-
grayman_TT
- Posts: 78
- Joined: Tue Aug 12, 2014 8:46 pm
- Car: 1990 Nissan Fairlady TT
Re: Upgrading my TT...running journal (Updated!)
Looking good Dcaff. Any install pics???
-
DCaff300ZX
- Posts: 4202
- Joined: Sun Jun 14, 2009 8:18 am
- Car: .
1993 CRP TT- Modified - Location: Tacoma, Washington
Re: Upgrading my TT...running journal (Updated!)
No install yet, had a lot to do on a short weekend, so I was only able to detail and get two goats of primer on the diffusor.grayman_TT wrote:Looking good Dcaff. Any install pics???
I had to repair a pretty big chip in the midsection...

...and repair a ton of pinholes after I eased all of the sharp edges, of which there were many. The thin gelcoat went away quickly, requiring several return coats of primer over them until they nearly all went away.
After the first coat of self etching primer, and some sanding and detailing


And the final coat just before I left for the evening

I'm hoping to get it final painted by the end of next weekend as I "only" get two days to do it as we are working OT again for a few more weeks. I will just wait until it's cured and can handle a little roughhousing so to speak installing it.
More then!
-
Taleek
- Posts: 32
- Joined: Fri Apr 24, 2015 6:06 pm
- Car: 1990 Nissan 300ZX Twin Turbo
- Location: San Diego, CA
Re: Upgrading my TT...running journal (Updated!)
That's looking nice man! Can't wait to see how it looks installed.
-
DCaff300ZX
- Posts: 4202
- Joined: Sun Jun 14, 2009 8:18 am
- Car: .
1993 CRP TT- Modified - Location: Tacoma, Washington
Re: Upgrading my TT...running journal (Updated!)
Thanks!
I have to admit I was thinking about it all day today at work, and can't wait to get it done and installed as well.
I'm now thinking I should fit it first before I hit it with paint, so next update should include some mockup pics as I scribe it in...it has a decent area for that purpose and I'm hopeful it won't take too much to get it in there nice.
-
grayman_TT
- Posts: 78
- Joined: Tue Aug 12, 2014 8:46 pm
- Car: 1990 Nissan Fairlady TT
Re: Upgrading my TT...running journal (Updated!)
+1 for fitting first then paint.
-
DCaff300ZX
- Posts: 4202
- Joined: Sun Jun 14, 2009 8:18 am
- Car: .
1993 CRP TT- Modified - Location: Tacoma, Washington
Re: Upgrading my TT...running journal (Updated!)
So I managed to find 4 hours Sunday for some Z time, and decided to begin fitting the diffusor.
After removing the tow hooks and mudflaps and loosening most of the bumper cover, first look at it in place

Some gaps to deal with as expected

Unfortunately, this damaged area affects the fit for the ps so I may not be able to fit this area completely before repairs

After one round of scribing and smoothing, fitting the license plate opening


The driver side has a double dip to it. You can see my scribe line as I begin to fit the shape

So I scribe to fit carefully, filing back to the line and dry fitting again

And repeat anywhere there's a gap

I also added a screen for the opening, epoxied in place. The bumpers hold the middle of the top side level, as the pressure of the fit wants to flex it into a curve which looks like crap

I also was without a dremel grinder I will need to grind back the backing to finish the fit for the top side against the bumper, and made an attempt to "fluff out" the bumper to fill those gap areas some which time did not allow me to try a dry fit...so it will all wait until next weekend, or most likely during some vacation time I am taking at the end of the month.
Stay tuned...
-
RubyRed300ZX
- Posts: 417
- Joined: Thu Apr 29, 2010 2:24 pm
- Car: 1993 300zx Convertible
Re: Upgrading my TT...running journal (Updated!)
Just an aside to the picture of the test fit. I know its just primer and you haven't painted it yet; but, I think the gray looks good against the Cherry Red. Maybe just a shade darker for the gray?
-
DCaff300ZX
- Posts: 4202
- Joined: Sun Jun 14, 2009 8:18 am
- Car: .
1993 CRP TT- Modified - Location: Tacoma, Washington
Re: Upgrading my TT...running journal (Updated!)
Thanks for the input, and I noticed that as well and agree the grey looked pretty good if a little too light for the car, and my scheme in mind considering the cf spoiler.
I was thinking about it all day, and think that the lighter gunmetal high temp wheel paint is my final choice, it's pretty light and shows well in sunlight, plus I'm also thinking about painting my wheels since the clearcoat is shot and they look pretty crappy and buying new wheels now is NOT in the cards. That way the colors would compliment from front to back and also match the body line for a complete package.
I was thinking about it all day, and think that the lighter gunmetal high temp wheel paint is my final choice, it's pretty light and shows well in sunlight, plus I'm also thinking about painting my wheels since the clearcoat is shot and they look pretty crappy and buying new wheels now is NOT in the cards. That way the colors would compliment from front to back and also match the body line for a complete package.
-
Z-owned
- Posts: 3487
- Joined: Fri Aug 29, 2008 8:56 pm
- Car: 93 N/A Z32
90 VW Corrado
01 mr2 spyder - Location: Auburn, WA.
Re: Upgrading my TT...running journal (Updated!)
I am away for a few weeks and come back to you with a twinz diffuser! Jealous I have been wanting one for awhile. My plan was to 3m wrap it in di-noc cf
-
DCaff300ZX
- Posts: 4202
- Joined: Sun Jun 14, 2009 8:18 am
- Car: .
1993 CRP TT- Modified - Location: Tacoma, Washington
Re: Upgrading my TT...running journal (Updated!)
Heh heh...had to get in front of you with at least ONE cool mod! 
Cool idea with the wrap, might have to look into that as it would obviously be easier to re-do for wear and tear than paint and look awesome with the spoiler.
Got a link to the cf wrap?
Cool idea with the wrap, might have to look into that as it would obviously be easier to re-do for wear and tear than paint and look awesome with the spoiler.
Got a link to the cf wrap?
-
Z-owned
- Posts: 3487
- Joined: Fri Aug 29, 2008 8:56 pm
- Car: 93 N/A Z32
90 VW Corrado
01 mr2 spyder - Location: Auburn, WA.
Re: Upgrading my TT...running journal (Updated!)
I don't have any specific link to it. Amazon, eBay would probably be the cheapest places to get a roll.
-
DCaff300ZX
- Posts: 4202
- Joined: Sun Jun 14, 2009 8:18 am
- Car: .
1993 CRP TT- Modified - Location: Tacoma, Washington
Re: Upgrading my TT...running journal (Updated!)
So I finally get to play with the Z yesterday after suffering with some medical issues for 3 days of my vacation...and due to that, have decided to do the brakes and paint the wheels.
I started with the fronts and got the calipers painted and one wheel prepped somewhat with the VHT high temp wheel paint yesterday, then today got a lot more done as the front brakes are completely changed and painted, and one wheel backside painted with the other in primer. Tomorrow I hope to be done with backsides and repairing/primering the faces, HOPING for paint but it's a lot of tedious work and I also need to do some curb rash repairs on one wheel, so Friday may be the final day for fronts and rears on the weekend (easier both for paint and shoes). I also need to source a new hubcap lost in the accident I presume, you can see it staring at you in the wheel pic.
Some pics of the progress...finished brakes, everything painted gunmetal now.

The one scuffed wheel...

...now in primer and then paint.


The 2nd front wheel now also in primer on backside and that was it for the day.

More after I am done this weekend.
-
DCaff300ZX
- Posts: 4202
- Joined: Sun Jun 14, 2009 8:18 am
- Car: .
1993 CRP TT- Modified - Location: Tacoma, Washington
Re: Upgrading my TT...running journal (Updated!)
So I nearly got the front wheels done today, figured I'd update and explain things a bit for anyone wondering how this was being done.
I began with final primering the front side of the first wheel with VHT wheel primer after some minor repairs...

...which was already masked on the newly painted inside with delicate surfaces masking tape and detailed (fine scotchbrite pad I made/wipe clean/degreaser) from yesterday. Then while drying I began the repair of my damaged wheel #2 face with some Evercoat Rage body filler...

...then detailed the primer on #1 with the scotchpad/wipe/degreaser, and shot the face VERY carefully a little area at a time in a little rotating pattern to avoid spraying too much in one area, any dry spots from overspray, or runs with the VHT gunmetal finish paint. It went on GREAT. Notice I have the wheel on spacers to avoid and possible damage to the painted other side. Yes, those are reflections of trees outside in the paint.


Then I masked and cleaned the face of damaged wheel #2. Here's some shots of the repairs before primer. I had previously filed any burrs flat before filler, so I roughed in the filler with old 80 grit, then got close with 120, then blocked with 180 grit paper.


Then I shot primer on wheel number 2 face...

...and while that dried, decided that I'd use the dark bronze paint on the valve stem covers and center caps which required scuffing for adhesion purposes. 80+ degree weather is helping drying time for everything immensely.

Oh, and eventually I found the only Enkei Fittipaldi Design center cap in existence last night (prob the guy who cleaned up the road after my accident) and all it needed was my $25...it's on it's way by the 2nd.
The primer on #2 face will need detailing at the repair sites tomorrow as well as the center caps for cc ripples, then final coat for #2 and on to the rears (brakes AND wheels) with most of Saturday and Sunday to get it done...may not be enough time, we'll see.
I'll at least post finished installed front shots tomorrow, the one finished wheel looked VERY good so far. Not show quality, but plenty good for my $80!
-
DCaff300ZX
- Posts: 4202
- Joined: Sun Jun 14, 2009 8:18 am
- Car: .
1993 CRP TT- Modified - Location: Tacoma, Washington
Re: Upgrading my TT...running journal (Updated!)
So today was a good one, although it started roughly as the back masking left some repair work to do, and basically made the back masking process useless so the good of it all was deciding from the repair spray that I was just going to do both sides at a time.
This left me with two wet wheels however and the need for the jack to begin the rear wheels and brakes, so I made do with the hubcaps and other details until the wheels were cured enough to handle, and mount.
As promised...if without clearcoat yet.


DEFINITELY a different feel from the wheels this color instead of silver...it's taking me some getting used to although I do like the color. It's just darker overall than expected but may pop more in direct sunlight as these pics sort of suggest.

So I then got the rear brakes done hastily...


...and the new method plus digging out my compressor and orbital sander netted me both wheels painted before I left very late this evening.

This means I WILL have finished shots tomorrow!
-
DCaff300ZX
- Posts: 4202
- Joined: Sun Jun 14, 2009 8:18 am
- Car: .
1993 CRP TT- Modified - Location: Tacoma, Washington
Re: Upgrading my TT...running journal (Updated!)
Well, the thrash took it's toll and I don't have the time to spend to repair the few problems AND get them clearcoated and installed, so I detailed the blemishes for repair and clearcoat later and put them on the car so it can be on all four again.
I had to leave the masking for the clearcoat later, but I set two hubcaps in place for the final effect.


More when I get back to it later!
I had to leave the masking for the clearcoat later, but I set two hubcaps in place for the final effect.


More when I get back to it later!
-
Z-owned
- Posts: 3487
- Joined: Fri Aug 29, 2008 8:56 pm
- Car: 93 N/A Z32
90 VW Corrado
01 mr2 spyder - Location: Auburn, WA.
Re: Upgrading my TT...running journal (Updated!)
Is this the color you plan to do the diffuser in as well? Little dark but I think it makes those wheels look better. Clear coat should help some as well with making them pop a bit more.
-
NolimitZ32

- Posts: 7042
- Joined: Fri Jun 27, 2008 9:07 am
- Car: 91 AG2 2+0 TTMT swap/E39 BMW 540i6/E53 4.6is Dinan S3
- Location: Houston, TX
Re: Upgrading my TT...running journal (Updated!)
D, that looks great man, I just wish I had the time to do this kind of stuff to mine, I'm lucky if I get 1 weekend a month to even put my hands on it. Keep it up, every time I see you make progress its a kick in the a** for me to get on to mine.