Time to show it off and get feedback...(new pics added!)

Forum for the Xterra, Frontier and Hardbody, the smaller workhorses of the Nissan lineup!
Drafteddesign
Posts: 89
Joined: Sat Dec 19, 2009 4:24 pm
Car: 1990 Nissan Hardbody. Lowered, modified, and never complete.

Post

It's been many moons since I last posted on here, but it doesn't mean I haven't been Nissan-Busy. The last time I was here, I had a blown head gasket... My truck is back on the road now, so I have been busy doing that voodoo that I do... modding the wizz out of it. Here's where I was when I was last here...
Image

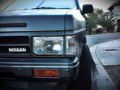
My truck was a sad old rattle can black. I have since primed it and painted the upper half Cherry red, with gloss black below the line. I have a silver 1/4" pinstripe to go on the paintline once everything is color sanded and cleared. Here's the truck as it sits tonight:
ImageImage

I hit up the junk yard today and bought a pair of Pathfinder seats. Since I have set out changing my interior color to black, I dyed the seats black too:
Image

Stock, my truck had the vinyl ragtop style headliner. I wasn't happy with that, so I built and upholstered a smooth headliner with black microsuede material:
Image

I also got a pathfinder maplight, but again, it wasn't the right color,so I had to mask it and dye it black:
Image

My dash, a posts, kick plates, door threshhold covers, carpet and floor mats were all dyed black.I need to dye the shift boot, and get a new steering wheel (which should be in next weeek). I have the microsuede to cover the back of my cab, which will be the same as my door panels.I built these door panels myself and upholstered them too. They are much softer and plusher than the factory set. As you can see in the pics, I still need to get a set of billet window cranks, and finish the door handles. The speakers are a temporary thing til I can get new ones.Those will be covered with grilles soon or even possibly put onto a color matched piece to stand off of the door panel:
Image


All of this is in addition to all the work I have done already. Some of it is the little things that noone will notice but me and the most hardcore of hardbody fans. I've shaved the cowl vents, put in a set of horns where the windshield washer nozzles once lived,:
Image

swapped the grille out from the black '90 style to the chrome '95 style, removed the Nissan hamburger from the grille, added the electric mirrors to the truck and painted them black, and changed every piece of the interior to black-a nonfactory option for the hardbody.

I still have lots left that I want to do, like shave the door handles, but leave the door locks(an old school minitruck thing), swap out this hood for the bubble hood, 17" chrome wheels, airbags, calicombo and shaving all the rear gaps, caddy lights, shaving the fuel door, paint matched fiberglass tonneau cover and fuel cell in the bed, custom dash/gauge set up, and custom center console.

I know this doesn't seem like a lot of work has been done, but I promise you it has been hours and hours of work put into it. I am the first to admit that there is still work to be done, but I couldn't be happier with how its turned out so far. Let me know what you guys think!
Last edited by Drafteddesign on Wed Aug 03, 2011 3:59 pm, edited 1 time in total.


User avatar
AZhitman
Administrator
Posts: 54540
Joined: Mon Apr 29, 2002 2:04 am
Car: 58 L210, 63 Bluebird RHD, 64 NL320, 65 SPL310, 66 411 RHD, 67 WRL411, 68 510 SR20, 75 280Z RB25, 77 620 SR20, 79 B310, 90 Z32, 91 GTi-R, 92 Silvia Qs, 98 S14, 23 Z.
Location: Surprise, Arizona
Contact:

Post

I dig it.

Not sure about whatever's in the windshield washer holes tho... what is that?

Needs some old-school mesh wheels. :)

Drafteddesign
Posts: 89
Joined: Sat Dec 19, 2009 4:24 pm
Car: 1990 Nissan Hardbody. Lowered, modified, and never complete.

Post

They are teeth from a machine that we use at work. I just thought they would look different. Since my windshield washers didn't work anyways, I figured what the hell-ya know? Once I find a bubble hood or a cowl hood, I will shave the holes completely. Maybe I catch a bird with them on the highway!! :naughty:

User avatar
Rev_D21
Posts: 5946
Joined: Sun Jan 12, 2003 9:49 pm
Car: 1986.5 D21 LB HD 2WD V6 5Speed
1991 D21 Reg 2WD Auto
1995 D21 Reg 2WD 5Spd
1996 D21 Reg 4WD 5Spd
2012 Versa 1.6S 5-Speed
Location: Somwhere in Western NY
Contact:

Post

I like it. I got a kick out of the horns. Different. I'm glad you painted it, looks awesome.

User avatar
osegundo
Posts: 101
Joined: Sat Jul 02, 2011 6:49 pm
Car: 1989 2.4L Nissan D21 4x4
Location: Las Vegas, Nevada

Post

I like... I think it needs some wheels big time!! Hey I'm curious as to how you dye your parts!? How or where do you get the dye from and also was your truck 4x4? I thought I saw the 4x4 knob!!!

Drafteddesign
Posts: 89
Joined: Sat Dec 19, 2009 4:24 pm
Car: 1990 Nissan Hardbody. Lowered, modified, and never complete.

Post

Thanks, Rev! I'm stoked to see it under gloss again! I like the horns,too. A little mean, a little funny...
osegundo wrote:I like... I think it needs some wheels big time!! Hey I'm curious as to how you dye your parts!? How or where do you get the dye from and also was your truck 4x4? I thought I saw the 4x4 knob!!!
My truck is 2 wheel drive.My shift knob is from an Isuzu Rodeo. It has the correct layout for the gears, and it threaded right onto the gear shift. My OEM knob was busted and jagged around the edges.

As for the dye, I bought mine at Advance Auto Parts for $7.47 a can. O'reillys and even Wal-Mart sells it here. I used Duplicolor brand Vinyl and Cloth dye.They sell several colors, but I didn't see any wild colors-just OEM types (maroon, blue, black, grey, etc) For the plastic pieces, I degreased them as best I could using Simple Green cleaner, and rinsing them really well. Once clean, dry them, and spray the dye. It is essentially spray paint for cloth and plastic. The vinyl on the seats took the dye perfectly. One coat coverage. The other pieces took 2 coats to get it the way I wanted it. As for the fabric, clean the fabric of any oily residues and vacuum them, then spray them over and over and over. It took 3 cans to do my 2 bucket seats because the fabric was so thirsty. I hope this helps!

User avatar
AZhitman
Administrator
Posts: 54540
Joined: Mon Apr 29, 2002 2:04 am
Car: 58 L210, 63 Bluebird RHD, 64 NL320, 65 SPL310, 66 411 RHD, 67 WRL411, 68 510 SR20, 75 280Z RB25, 77 620 SR20, 79 B310, 90 Z32, 91 GTi-R, 92 Silvia Qs, 98 S14, 23 Z.
Location: Surprise, Arizona
Contact:

Post

For future reference, prep the vinyl with SEM Vinyl Prep before dying it. It'll last a LOT longer and look more uniform.

User avatar
RT22
Posts: 841
Joined: Wed Jul 01, 2009 9:55 am
Car: 1991 nissan hardbody

Post

Nice and that truck is screaming for the stock chrome wheels, would look awesome on that paint job. I also added the leather pathy seats and also added a dual map light by mirror though mine came out of a import mini van but the color was right and it was a easy mount. I cut an old black thick rubber map to make a gasket and screwed the light tight into the headliner board and it is tight and firm. The truck dome light in back is USELESS lol. The truck looks great keep us up on what you mod, I love modding mine and any new ideas are always welcomed. I love fresh ideas from folks, even if I do not use them they spark more thinking.

Drafteddesign
Posts: 89
Joined: Sat Dec 19, 2009 4:24 pm
Car: 1990 Nissan Hardbody. Lowered, modified, and never complete.

Post

RT22 wrote:Nice and that truck is screaming for the stock chrome wheels, would look awesome on that paint job. I also added the leather pathy seats and also added a dual map light by mirror though mine came out of a import mini van but the color was right and it was a easy mount. I cut an old black thick rubber map to make a gasket and screwed the light tight into the headliner board and it is tight and firm. The truck dome light in back is USELESS lol. The truck looks great keep us up on what you mod, I love modding mine and any new ideas are always welcomed. I love fresh ideas from folks, even if I do not use them they spark more thinking.
I actually made my headliner itself froma sheet of 1/4" luan plywood. Lots of trial and error on the fitting. The rearview mirror mount helps hold up the front of the headliner. The A-post trim holds up the sides, and it is screwed into the back brace of the cab roof. The upholstery i used covers all that,and it tucks into the rear window trim, the door trim, and under the rubber strip across the windshield. I cut a hole just big enough for the lamp parts to fit thru, and I use the original tension clips that nissan used to hold it to my headliner. I shaved the stock dome light. Its ugly and useless. :yesnod

I agree, RT22. I won't be satisfied til I have turned everybolt and swapped out every part til I get the truck the way I want it.I like to see what others have done to theirs,as well. It makes me feel like i'm not the only one who has this affliction. :chuckle:

@AZHitman: is the SEM vinyl prep just a degreaser or is it an adhesion promoter too?

User avatar
osegundo
Posts: 101
Joined: Sat Jul 02, 2011 6:49 pm
Car: 1989 2.4L Nissan D21 4x4
Location: Las Vegas, Nevada

Post

Drafteddesign wrote:As for the dye, I bought mine at Advance Auto Parts for $7.47 a can. O'reillys and even Wal-Mart sells it here. I used Duplicolor brand Vinyl and Cloth dye.They sell several colors, but I didn't see any wild colors-just OEM types (maroon, blue, black, grey, etc) For the plastic pieces, I degreased them as best I could using Simple Green cleaner, and rinsing them really well. Once clean, dry them, and spray the dye. It is essentially spray paint for cloth and plastic. The vinyl on the seats took the dye perfectly. One coat coverage. The other pieces took 2 coats to get it the way I wanted it. As for the fabric, clean the fabric of any oily residues and vacuum them, then spray them over and over and over. It took 3 cans to do my 2 bucket seats because the fabric was so thirsty. I hope this helps!
Thanks man, I mite just do some color dyeing on my truck!!

User avatar
AZhitman
Administrator
Posts: 54540
Joined: Mon Apr 29, 2002 2:04 am
Car: 58 L210, 63 Bluebird RHD, 64 NL320, 65 SPL310, 66 411 RHD, 67 WRL411, 68 510 SR20, 75 280Z RB25, 77 620 SR20, 79 B310, 90 Z32, 91 GTi-R, 92 Silvia Qs, 98 S14, 23 Z.
Location: Surprise, Arizona
Contact:

Post

Drafteddesign wrote:@AZHitman: is the SEM vinyl prep just a degreaser or is it an adhesion promoter too?
Both. :yesnod

Drafteddesign
Posts: 89
Joined: Sat Dec 19, 2009 4:24 pm
Car: 1990 Nissan Hardbody. Lowered, modified, and never complete.

Post

I decided to start building a center console since I have those nice bucket seats and a gaping hole down the middle. :naughty:

I built what you see here out of 1/4" Luan, and I stapled it together until I can put the resin and cloth over it. Of course, this isn't finished, but it gives you a good idea of the size and shape of it. I will be putting 2 cupholders at the front, just before the bull nose rounds under. The large flat area behind that will be for air pressure gauges and switches for my airbag setup. The largest flat area is my arm rest. Once the material is stretched out, I will decide whether there is enough room to make a pocket for my phone and mp3 player to sit upright in(think like a pack of cigarettes). The front most wall is going to hold 2 led lamps that will light up the floor boards, and a 12v power supply for a phone charger. I built a ground bus bar at work today, to make it easier to wire things. 12v will come in the back by way of a 4ga amp cable that I had laying around, and the ground bus will be connected with the ground cable from that same amp setup. More pics will follow as the project goes along.


Sorry some of these are dark. I took them pics last night.

Image

Image

Image

Image

Image

User avatar
Rev_D21
Posts: 5946
Joined: Sun Jan 12, 2003 9:49 pm
Car: 1986.5 D21 LB HD 2WD V6 5Speed
1991 D21 Reg 2WD Auto
1995 D21 Reg 2WD 5Spd
1996 D21 Reg 4WD 5Spd
2012 Versa 1.6S 5-Speed
Location: Somwhere in Western NY
Contact:

Post

Looks very nicely made.

User avatar
RT22
Posts: 841
Joined: Wed Jul 01, 2009 9:55 am
Car: 1991 nissan hardbody

Post

I built a small console to cover shifter and run up to the dash with a pocket box found in local junkyard and covered in vinyl, i have a cheap console I picked up at wal mart in it now but plan on doing a full console from scratch myself will post pics when I get it going.

Drafteddesign
Posts: 89
Joined: Sat Dec 19, 2009 4:24 pm
Car: 1990 Nissan Hardbody. Lowered, modified, and never complete.

Post

Thank you, Reverend! I really took my time on this one. I want this to be a "ooh and ahh factory"when I'm done. :chuckle: I have seen others built too quickly... The amount of work down the road needed to put in to make up for the slop done early on was not a good trade off.

I added 2 simple 1/4" round dowels to the inside of the console, to give it a little extra rigidity while I work the fleece and resin. I will be starting on that tomorrow, so I will be sure and take a uselessly large amount of photos to document the work. If I'm really happy with its end result, I smell a tech article!!!!

User avatar
Rev_D21
Posts: 5946
Joined: Sun Jan 12, 2003 9:49 pm
Car: 1986.5 D21 LB HD 2WD V6 5Speed
1991 D21 Reg 2WD Auto
1995 D21 Reg 2WD 5Spd
1996 D21 Reg 4WD 5Spd
2012 Versa 1.6S 5-Speed
Location: Somwhere in Western NY
Contact:

Post

Bring it Brotha! I'll get it published as a NICO truck article.

Drafteddesign
Posts: 89
Joined: Sat Dec 19, 2009 4:24 pm
Car: 1990 Nissan Hardbody. Lowered, modified, and never complete.

Post

Reverend D21 wrote:Bring it Brotha! I'll get it published as a NICO truck article.
:woot: :woot: I'm building the article offline right now!

Here's the console under fleece.
Image

I have more pics of the console, but I have to save something for the article.... LOL It's going under resin tomorrow.

On a different note, I am going to lightly wet sand the truck and give it a second coat of paint in the morning. probably going to remove the hood to make sure this second coat is much more uniform and even. After that, comes the high shine clear and silver pinstriping! Then my Auto Glym High Definition Wax...

I have a decal designed for the tailgate. It's gonna remain a teaser for now!!

Drafteddesign
Posts: 89
Joined: Sat Dec 19, 2009 4:24 pm
Car: 1990 Nissan Hardbody. Lowered, modified, and never complete.

Post

I got the console coated with resin and smeared with bondo. hopefully, I will have it sanded, primed, painted and wired tomorrow. I'm building the article as I go along. I'm not rushing it tho, so if it doesn't happen tomorrow, it will happen! I'll post a pic of it at daylight tomorrow!


Return to “Nissan Trucks Forum”