Ok Boys and Girls,
Here is the install tutorial that I promised that I would do once I got my BBK in from Stillen. I have to say that the brakes looked sexy in the box but now even sexier on the coupe! This tutorial is to help you to replace both front and rear rotors and calipers, brake pads, and brake lines.
So, Let's get to it. You'll need to jack your car up on stands first. Luckily for me, my friend owns a garage so using a lift was very convenient
Then of course take off the wheels. When the wheels are off, Use a hydraulic wrench and disconnect the brake lines and let them bleed out the DOT3 fluid. Then take out the retaining clip that holds the line in the holder. There are two of them, one on the body and one on the strut. While that's draining, there are two bolts that need to be unscrewed so the front caliper can be removed entirely.
While that is draining, loosen up these two bolts but do not take them all the way out. Once you have the calipers off, remove the OEM disc. It should just come off. If it doesn't, use a hanger and strike the disc in between the lugs to release it. Be careful not to hit the threads on the lugs. You can screw on the lug nuts over the thread while you hit the disc to protect the threads if you so choose.
If there is rust behind the disc, now is the time to clean itup with a small air sander or wire brush.
Place the new Rotor on the hub/strut assembly and use a lug nut to hold it in place with a lugnut in the bottom position.
Next take the Stillen brake adapter and with the big bolts that you loosened in the earlier step, tighten these bolts into the brake holder. Be sure to use red locktite in the threads before screwing it down (oooo...that sounded dirty )
Next, take the pre-loaded calipers and with the two black hex nuts given, screw them through the caliper onto the brake holder. Screw these down to 30lbs ft. torque and don't forget about the locktite.
Next install the new Stainless Steel Brake lines in the reverse order of how you removed the OEM lines. Pretty straight forward. I didn't think that warranted pictures.
NOTE When installing the new lines, start from the caliper and work your way back up to the main connecting point. Doing this will ease the installation of the line as well as promote natural "bends" in the line. Connect the hose back to the connecting point and tighten down the nut with the hydraulic wrench. Don't forget to use the clips to keep the hose in place. Leave the bolt that screws in the caliper loose at this point to continue the bleeding process.
This is how it should look like when you're done the one side.
When you're done, Go on to the the other side and repeat the process.
Now it's on the the rear rotors!
Start by loosening the nut that connects the brake line to the brake hose. Let the line bleed out the old fluid.
Again, behind the caliper, there are two bolts. Loosen these bolts to remove the caliper. Once you have the caliper off, remove the hose from the caliper.
remove the old pads and if need be remove any form of rust or deposit off of the caliper.
Once they are cleaned off. Install the new PADs with some brake grease.
Put on the new rotors and hold it in place with a lug nut at the bottom so the rotor doesn't fall off accidentally. Attached the new SS hoses onto the caliper and reinstall the caliper back and tighten down the bolts.
There is a little rubber bushing that needs to be taken off the old rotor and installed on the new one.
Now it's time to bleed the brakes!!!
Bleed the brakes in a cross pattern
That means bleeding the right front then the left rear, then the left front followed by the right rear.
Go around the vehicle and loosen all of the bleeder valves with a hydraulic wrench and hand tighten them back up.
It's best if you have a plastic bottle with a hose that you can slip over the bleeders as to catch all of the excess brake fluid. It is possible to bleed the brakes by yourself but it is always easier with two people.
I'm not going to do a write up on this as this is very simple.
When you are sure that ALL of the old fluid is out and the new fluid is in the lines and in the hoses, tighten (not crank down on it) up the bleeder valves.
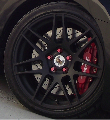
Now SLOWLY place the wheel on the hub and MAKE SURE that the wheel clears the calipers of the BBK. Hand tighten down the nuts before going crazy with an impact wrench. If you are certain it will clear the caliper, then proceed slowly to tighten. When it's all done, High Five yourself or your buddy that helped you and stand back and take in the glory of the Big Brake Kit!
Hope you guys enjoyed the show
The "Dangeris" Big Brake Install Tutorial
Re: The "Dangeris" Big Brake Install Tutorial (dangeris)
I want those brakes
-
BlackNWhite
- Posts: 1631
- Joined: Thu Oct 04, 2007 8:30 pm
- Car: 08 Altima Coupe
Re: The "Dangeris" Big Brake Install Tutorial (mcheddadi)
Nice write up.
Haha, you have no headlights. Did you drive it like that?
Haha, you have no headlights. Did you drive it like that?
-
fiftytseng

- Posts: 172
- Joined: Tue Mar 11, 2008 6:12 pm
Re: The "Dangeris" Big Brake Install Tutorial (BlackNWhite)
wow that looks amazing on your car.
Re: The "Dangeris" Big Brake Install Tutorial (BlackNWhite)
who needs headlights anyways
-
dangeris

- Posts: 5139
- Joined: Wed Sep 19, 2007 6:18 pm
- Car: 08 Code Red 3.5
08 BMW 328xi Coupe
90 300ZX 2+0 NA - Location: Lansdale PA
- Contact:
Re: The "Dangeris" Big Brake Install Tutorial (BlackNWhite)
Yeah I did. No laws in PA saying that you can;t drive without headlights during the day. It's like driving with your headlights off...no differenceBlackNWhite wrote:Nice write up.
Haha, you have no headlights. Did you drive it like that?
Now at night would be a different story
Re: The "Dangeris" Big Brake Install Tutorial (dangeris)
so you are not gonna go stealth tonight and test out your brakes
-
marlin29311

- Posts: 8342
- Joined: Sun May 18, 2008 8:21 pm
- Car: 2008 Infiniti G35x
Re: The "Dangeris" Big Brake Install Tutorial (mikegtr06)
awesome! makes me wish i had an extra couple grand around to do it...
-
digitalbow

- Posts: 74
- Joined: Sat Apr 08, 2006 12:06 pm
- Car: 2003 Nissan Altima 3.5T
Re: The "Dangeris" Big Brake Install Tutorial (dangeris)
Nice. Same setup I have, too. I did have to bleed the lines a few times but other than that it was very straightforward.
-
LongBeachCoupe

- Posts: 9482
- Joined: Thu Aug 23, 2007 1:43 pm
- Car: 08 Altima Coupe (RIP Hurricane Sandy)
2005 Lexus RX
-
Stumpjumper
- Posts: 153
- Joined: Sun Jun 15, 2008 9:19 am
- Car: 2008 Altima Coupe 2.5S 6MT
- Contact:
Re: (LongBeachCoupe)
Excellent write up! I hope this gets stickied!

-
Sentientbydesign

- Posts: 5993
- Joined: Wed Feb 02, 2005 8:21 am
- Car: 03 Evo VIII - 330 AWHP
05 Subaru Legacy GT Stg 2 - Sold
05 G35 6MT Coupe - 278 WHP - Sold
04 WW Evo VIII - 302 AWHP - Ex's
96 I30 - Sold - Contact:
Re: The "Dangeris" Big Brake Install Tutorial (dangeris)
Dangeris,
Imma start converting your write-up into an article. I've got a couple of questions.
When you said use a "hanger" to remove the stuck rotor, did you mean hammer? Also, did the stock rotor have a thread hole specifically designed for removing it if it seizes?
Why did you suggest using Red loctite when the caliper adapter says to "Use blue Loctite provided in kit"?
Finally, how much were they? And why does AP Racing have the GAYEST logos?
-
dangeris
- Posts: 5139
- Joined: Wed Sep 19, 2007 6:18 pm
- Car: 08 Code Red 3.5
08 BMW 328xi Coupe
90 300ZX 2+0 NA - Location: Lansdale PA
- Contact:
Re: The "Dangeris" Big Brake Install Tutorial (Sentientbydesign)
Sorry Sentiment,..Just saw your post.
Yes I did mean to say a hammer. Spell Check probably inserted hanger by accident.
Yes the stock rotor did have a threaded hole in case it was ceased. In my case, since they were so new, they came right off.
I said to use red because of the strength. You can use the blue Loctite if you wanted to but I opted for red.
Not quite sure why AP have the gayest logo but I the pistons in the calipers are freakin huge! As for the costs, they weren't free but Stillen gave me a great price on them which they usually do not do for many people. Probably because I've bought a crap load of stuff from them already and probably because I live in the East Coast and felt sorry for me. They know guys on this side of the US aren't privileged enough to have cool manufactures.
-
dangeris
- Posts: 5139
- Joined: Wed Sep 19, 2007 6:18 pm
- Car: 08 Code Red 3.5
08 BMW 328xi Coupe
90 300ZX 2+0 NA - Location: Lansdale PA
- Contact:
Re: The "Dangeris" Big Brake Install Tutorial (dangeris)
hey guys, just wanted to post an update on the AP BBK. It's been a couple of months now so I though it'd be the time to do it.
The Brakes are holding up real well. They clean off really easy too. With all BBK though, you'll develop a slight squeal if you do normal driving. What it is, the brake pad gets a "glaze" over them which makes them squeal. A very easy fix for that though. Find yourself a back road where you can bring the car to about 50-60mph and slam on the brake. do this about 3 times. The trick is not to come to a complete stop as the heat build up on the pad will possibly warp the rotor.
Thanks Kyle for that tip
-
Sentientbydesign
- Posts: 5993
- Joined: Wed Feb 02, 2005 8:21 am
- Car: 03 Evo VIII - 330 AWHP
05 Subaru Legacy GT Stg 2 - Sold
05 G35 6MT Coupe - 278 WHP - Sold
04 WW Evo VIII - 302 AWHP - Ex's
96 I30 - Sold - Contact:
Re: The "Dangeris" Big Brake Install Tutorial (dangeris)
What kind of kooky advice is that?
Your pads shouldn't glaze because of "normal" driving.
Your pads shouldn't glaze because of "normal" driving.
-
dangeris
- Posts: 5139
- Joined: Wed Sep 19, 2007 6:18 pm
- Car: 08 Code Red 3.5
08 BMW 328xi Coupe
90 300ZX 2+0 NA - Location: Lansdale PA
- Contact:
Re: The "Dangeris" Big Brake Install Tutorial (Sentientbydesign)
I thought the same Nate but apparently the materials that the current brake pads are made of glaze the pads which gives off the God Awful shriek when braking. It's not constant anymore but it still does it from time to time. Kyle told me they are currently working with the manufacturer to come up with a pad that is a little less noisy and less brake dust.Sentientbydesign wrote:What kind of kooky advice is that?
Your pads shouldn't glaze because of "normal" driving.
-
Sentientbydesign
- Posts: 5993
- Joined: Wed Feb 02, 2005 8:21 am
- Car: 03 Evo VIII - 330 AWHP
05 Subaru Legacy GT Stg 2 - Sold
05 G35 6MT Coupe - 278 WHP - Sold
04 WW Evo VIII - 302 AWHP - Ex's
96 I30 - Sold - Contact:
Re: The "Dangeris" Big Brake Install Tutorial (dangeris)
Were those AP Racing Pads?
If so, two fails for them. One for UGLY logos on the calipers and two for poor brake pad design.
BTW, I want BBK
If so, two fails for them. One for UGLY logos on the calipers and two for poor brake pad design.
BTW, I want BBK
-
dangeris
- Posts: 5139
- Joined: Wed Sep 19, 2007 6:18 pm
- Car: 08 Code Red 3.5
08 BMW 328xi Coupe
90 300ZX 2+0 NA - Location: Lansdale PA
- Contact:
Re: The "Dangeris" Big Brake Install Tutorial (Sentientbydesign)
The logos aren't that bad. Ive seen worst but I would have to agree with the pad design. Hopefully they'll get a new design out that incorporates better materials.Sentientbydesign wrote:Were those AP Racing Pads?
If so, two fails for them. One for UGLY logos on the calipers and two for poor brake pad design.
BTW, I want BBK
Ask Santa...he might bring you a BBK if yout good
Re: The "Dangeris" Big Brake Install Tutorial (dangeris)
what size is the bolts that hold the caliper on (the 2 long bolts that you would take off if u were just doing a normal brake job)
-
Loop
- Posts: 1246
- Joined: Sat Nov 03, 2007 8:12 pm
- Car: only nissan cars
- Location: somewhere in socal
Re: The "Dangeris" Big Brake Install Tutorial (Sentientbydesign)
I agree about the logo. Its not the best.Sentientbydesign wrote:Were those AP Racing Pads?
If so, two fails for them. One for UGLY logos on the calipers and two for poor brake pad design.
BTW, I want BBK
BBK are amazing. I had a little to much fun when I bedd-in my Rotora BBK.

Re: The "Dangeris" Big Brake Install Tutorial (Loop)
Very nice detailed write up
The breaks look amazing
The breaks look amazing