NOTE: It has not been on a trailer ever(unless a tow truck counts).
So ive been wanting to make my build thread for a long time so i guess ill start with this, i'm fairly busy but will hopefully be able to update daily.
My mind was initially set on a nice grip setup when i got the car as well as the (OMG! NA KA is the best setup ever! mindset you know you've thought about it N/A KA with itbs and cams lol )
I bought the car 6 years ago completely stock from the original owner with 188k miles. All records even have the original insurance picture. I drove it around like that for awhile just changed the oil and around 3000 miles later i changed the water pump and thermostat and did a coolant flush. I also bought a cheap ebay short shifter for i think it was $30 shipped which i still have and its been on the car for 6 years working fine amazingly, anything was better than the stock shifter with the badly worn plastic tip. I could literally rotate the shifter in a large circle while it was in gear.
(Picture coming soon)
The first upgrade i did was i bought Cusco motor mounts (which i still have and they work just as great as they did when i first bought them.) and a peak performance transmission mount. The next thing i did not too long after that was a Hotshot ceramic coated header. It was nice i felt a definite mid range gain. (pictures coming soon)
I started researching a little bit more and found out how restrictive the stock intake manifold is, plus its a pain in the a** to work on as you all know. I found out since my friend blew his head gasket on his dohc ka which meant pulling the manifold which was quite a challenge at the time. Now i could do it in no time but anyways I found the company Xcessive manufacturing which made a dohc ka intake manifold which was a great design imo.
I went ahead and bought the xcessive manifold i believe i was the second or third buyer of that manifold since he started making them, the one i got had a small crack in the casting which probably was not all the way through but for the money i spent i wasn't going to take a chance. I explained to him that there was a crack in it and that id need a new plenum as fast as he could get it to me, I sent it out and gave him the tracking info while he sent out the new one with 2nd day shipping! Rich is a wonderful guy there at Xcessive and their parts are top notch.
So anyways the manifold went in everything worked out great with it, i had a thermal gasket on there as well which it came with, i bypassed the throttle body coolant lines also. It was nice i felt a definite gain on the top end with little to no loss at low end. I had to make a custom short ram intake as well as bang the crap out of my hood to make everything fit in there and have the hood close still, i did not mind though since i was going to get a hood vent later anyways.
I bought a Koyo radiatorAgency power hosesNew water pump and thermostatMagnecor spark plug wiresNGK Laser Iridium plugs $10 a piece omg!
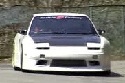
All that went in once it was all figured out i took a picture of it which is this here.
I drove it for a while and then figured it was time to change the clutch since it was high mileage i figured i might as well get it out of the way.
I bought a Fidanza flywheel and an Exedy OE replacement as well as a Nismo Clutch Fork pivot. Along with that i also purchased a 1 piece DSS aluminum driveshaft. That went in and i broke in the clutch nicely, response was a lot nicer! (Driveshaft pic coming soon)
I drove it for a few months like this and noticed the front seal was leaking which meant time to replace that! I also picked up a UR pulley.
I left everything at that with the engine since i was happy with it and started working on the rest of the car.
I started by doing a full RS*R polyurethane bushing kit
I first worked on the front, the power brace went in, the polyurethane bushings went in the LCAs, tension rods and the sway bar end links and mains went in as well as the steering rack bushings. The new ball joints also went in the front LCAs at the same time. Driving the car afterward was a lot more responsive as you can imagine having nice stiff bushings over the stock 20+ year old cracked rubber ones.(Picture coming soon)
Next up was the rear bushings, It was a pain first step was burning out all the old bushings. Then after they all burnt out all the metal sleeves had to be cut out which i believe there was 10 total in the spindles and lcas. After that installing the new bushings was easy. The new ball joints for the rear went in as well (89' Nissan Sentra front ball joints). After all that was done i coughed alot and blew my nose which probably equaled about one 205/40/17 in inhalated rubber.
Next on the list was the Solid aluminum rear subframe bushings. The aluminum bushings were still chilling in the freezer as the stock bushings finished burning completely (probably about 20 minutes). The metal sleeves then were cut out and everything was filed and smoothed to get ready for the solid bushings to go in. They went in nicely with a small tap from a block of wood and a rubber mallet. Finally the whole rear end went back in and i drove the car around it felt very good surprisingly responsive even for having stock struts/springs.
After driving for awhile i made up my mind on what coilovers to go with. I ended up deciding on going with Tein super drifts. They had the spring rate i wanted, i knew they were quality and PBM was not out at that time but those would be my second choice. I got my hands on a set which i purchased through FRSport as well as some Megan Rucas since they were more beefy than the Kazama ones since i had them side by side, i also heard good things about their "redesigned ones after their older model.
I also wanted to find some new wheels to put on at the same time the coilovers were installed so i found a nice deal on some 16x7.5 Kosei k1s with a +22 offset. They were light weighing only 13 lbs a piece (and i was not too concerned about fitment back then). I got them custom painted a honey gold color which i thought was a great match with the white paint. I bought four 215/45/16 Falken Azenis rt615 tires for them too which i was a fan of despite their 200 treadwear rating. I wanted to make sure the wheels would clear the coilovers 100% so i went ahead and bought two sets of H&R Extended studs with 20mm hubcentric spacers.
I installed the studs but did not end up needing the spacers with the wheels so i did not run them. Everything went on Including some Tein strut bars, the coilovers were adjusted to have the control arms parallel which i find to be a great grip/response/low to no bumpsteer setup.There are also some Circuit sports tie rods i got temporarily just because my stock ones were completely done. I will be getting some Tein ones soon or possibly the SPL setup.
(The pbm stuff happened way later i used to be running stock arms and then i got Circuit sports and then got PBM lol)
So this is how it looked after all that had happened.
I drove the car for about a year and a half without doing much to it besides changing the oil and doing some stuff to the interior.
I started by stripping out all the interior pieces i did not want and also removed all the sound deadener. I also did a wire tuck and it started to look like this.This is the Drivers side after sound deadener removal and before the tuck.
Heres the other side after the tuck.
More tucking!
Well Thats all for tonight, i will be updating this and redetailing it but i figure i might as well start it now because i have to start a build thread at some point! My monitor is starting to do weird things or maybe im just more tired than i thought.
Modified by OM3GA at 12:40 AM 2/22/2010
Modified by OM3GA at 1:05 AM 2/22/2010
The Daily Driven Trailer Queen Build.
-
vocationalzero

- Posts: 870
- Joined: Thu Jan 24, 2008 9:44 pm
- Car: 92 Too For Dee
87 BMW 635 CSi
06 Dodge Dakota Night Runner Edition
06 Nissan Sentra S - Location: Pfllugerville, Tx
-
OM3GA

- Posts: 3041
- Joined: Fri Apr 14, 2006 11:41 pm
- Car: A Sexy Mobile, 1993 Nissan 240sx 180sx Hatcher
Re: The Daily Driven Trailer Queen Build. (vocationalzero)
Thanks! There is a lot coming to this build thread i will be updating it more tomorrow after work.vocationalzero wrote:super clean
Thanks, I liked it on the ka personally there was a nice bit of added power at higher rpms 4500+ I enjoyed the power it had and i never had a chance to put cams on it and get it tuned with an AFC like i wanted to but it ran good just how it was.Veriest1 wrote:Nice build up so far.
What are your impressions of the Xcessive intake manifold on an NA KA?
-
S14toRPS13
- Posts: 2333
- Joined: Mon Apr 03, 2006 1:11 pm
- Location: Back to CA
Re: The Daily Driven Trailer Queen Build. (OM3GA)
So would you say it didn't fall flat on its face in higher rpms or was it just not as bad as stock?OM3GA wrote:Thanks, I liked it on the ka personally there was a nice bit of added power at higher rpms 4500+ I enjoyed the power it had and i never had a chance to put cams on it and get it tuned with an AFC like i wanted to but it ran good just how it was.
-
OM3GA
- Posts: 3041
- Joined: Fri Apr 14, 2006 11:41 pm
- Car: A Sexy Mobile, 1993 Nissan 240sx 180sx Hatcher
Re: (S14toRPS13)
Ive had them for about 2 years now, my friend and i bought them at the same time and they have both held up great. I have however heard that the pillow balls do eventually go out and youll need to replace that piece alone so maybe thats what happened to yours?S14toRPS13 wrote:First off, I use to wish my NA KA had more power, but never dreamnt of building up a NA KA. How long have you had your Megan RUCAS? Mine started squeeking like crazy after about a year.
It definitely had the most power starting at around 4k and i never redlined it but went up to about 6200 rpms and it was still pulling harder there. The stock manifold is insanely restrictive for high rpm flow. This manifold is nice because there is no secondary butterfly valves either.Veriest1 wrote:
So would you say it didn't fall flat on its face in higher rpms or was it just not as bad as stock?
-
TheBlaiant
- Posts: 300
- Joined: Sat Jul 25, 2009 9:54 am
- Car: Slow40sx
- Location: Miami, FL
- Contact:
Re: (OM3GA)
Nice bro!
-
Silvia-Tom

- Posts: 93
- Joined: Wed Feb 17, 2010 12:01 pm
Re: (TheBlaiant)
Super clean man, good wire tucking.
-
slidestyle69

- Posts: 500
- Joined: Fri Mar 27, 2009 6:11 am
- Car: 92 s13
- Location: Alabama
Re: (Silvia-Tom)
good deal man, i really like the keeping it simple here and not in a super big rush to get the JDM SWAP. very original and much respect
Re: The Daily Driven Trailer Queen Build. (OM3GA)
Stupid, but I'm assuming that manifold won't pass smog?
-
ILoveMyRHS13
- Posts: 2537
- Joined: Sat Sep 08, 2007 5:04 am
- Car: 1990 Nissan 240sx (Hatch)
-
OM3GA
- Posts: 3041
- Joined: Fri Apr 14, 2006 11:41 pm
- Car: A Sexy Mobile, 1993 Nissan 240sx 180sx Hatcher
Re: (TheBlaiant)
Thanks alot!TheBlaiant wrote:Nice bro!
Thanks man yeah the wire tucking took awhile. I first did just the passenger side and then realized in order to do the drivers side i had to take out all of the passenger side wiring all the way back over to the drivers side haha. Make sure if youre doing it to start by taking it completely over to the drivers side.Silvia-Tom wrote:Super clean man, good wire tucking.
I loved this ka setup it was amazing but later it all changes I was not in a rush for sure i was determined to keep the ka setup for a long time.slidestyle69 wrote:good deal man, i really like the keeping it simple here and not in a super big rush to get the JDM SWAP. very original and much respect
Nope, it deletes all emissions equipment.K3Fallout wrote:Stupid, but I'm assuming that manifold won't pass smog?
Thanks!ILoveMyRHS13 wrote:Pretty clean and simple setup. Keep it up.
-
OM3GA
- Posts: 3041
- Joined: Fri Apr 14, 2006 11:41 pm
- Car: A Sexy Mobile, 1993 Nissan 240sx 180sx Hatcher
Re: (OM3GA)
Fail for double post, oh well.
So there the car was, i did the brakes and left it like that for a long time. There was a big gap where i didn't do much of anything to the car besides work on stripping sound deadener out and keep it clean. I also did a few auto x events and just got to know the cars new handling better. I believe the gap was a couple years after the ka was done i would just do simple tune ups/oil changes.
I had a goal to have it tuned before 200k miles so i looked around for a good drop in tune which i figured would be good enough since i was running stock injectors and maf along with 91 octane, i figured an aggressive timing/fuel map couldn't hurt. At the time it seemed a great yet cost effective setup was to go with an Emance ecu tune since it had great reviews at the time.
I sent out my original ecu paid for everything got it back a few days later dropped it in started it up drove it around for about 50 miles. It seemed good some type of gain for sure although i never got a chance to really push it at all since i wanted to drive it easy for awhile and let it get used to the new setup. I took it to an auto x event about a week after i installed it (50-60 miles after the install). I was driving on the freeway maybe at around 75 mph, i felt the car cut out for a second which i thought was weird but instantly kicked back in so i thought nothing of it. I got to the track parked it went to get some food with a few friends, came back checked the oil went in line for the auto x.
I got onto the track i was in first shifted to second at about 4k rpms started accelerating again as the car just shut off i saw the rpms falling while i was still gassing and i pulled off the course. I tried to start it and got nothing, it would crank and crank and do nothing at all. I would turn the key to on and heard the pump but when i went to start it nothing would happen. I checked for spark and it had it and it was getting fuel to the rail at least.
I couldn't figure it out however i figured it was most likely the tune, so i swapped ecus with my friend who had the same year engine and ecu. Put his in and it would do the same thing, my ecu smelled a little hot i figured emance messed up on some part of soldering or something. So after realizing that my friends ecu did no difference i took it out and put it back in his car, he started his car right up however when he went to shut it off it wouldn't kill the power.
You could literally take the key out get out of the car and walk away and it would still be running. So great i owed my friend an ecu i had to get one for myself plus get my car towed home it was great. I later opened my ecu and found that a trace was fried it went back to pin #36 on the pinout diagram which lead to the ignition switch. I thought it was funny because i talked to Jason at emance and he told me exactly what it probably was. Coincidence? I don't know. I am investigating it more as well as finding out which diode was fried during all of this so anyone with the same problem i will be able to tell you what exactly to do to fix your ecu or you could send it to me and i could do it for you.(I did happen to figure this out in case someone runs into this problem.)
Anyways after trying to figure out what was still wrong and after checking the fuses over and over again i had someone else check it out, they did the smart thing and pulled the fuse for the engine control out (one of the brown box type) He tested it and it was sure enough bad... However it did NOT blow on the top where the inspection window is it blew on the side where you could not see it. After all that the fuse was replaced i put in another good working ecu and the car was not the same something was still wrong. It ran just not very great. I later found out that the Coil got messed up as well just after replacing every other sensor that could affect the response the way it was. After replacing the coil everything was smooth again.
I also forgot to mention that i had bought a Kazama skid plate. (This is after it did its job a few times.)
I drove it after this for awhile and got bored of the way the car looked, so i decided to change it. I wanted it to have bigger wheels and be lower.(the bandwagon right?) I looked at wheels forever and found some cool ones that had just came out not too long ago at the time. They were MB Battles the knock offs of CST Hyper zero 1 Of course they are everywhere now but i liked them when they were still the CSTs and almost picked up a set of polished ones but i went with the MB Battles in 17x9.5 in the bronze color.
I also looked at different 5 lug swap options. I liked the Attain ones but they were far more expensive than the Ichiba conversion, so i figured id give the Ichibas a shot and just replace the bearings when needed. I figured i should tuck my wiring harness also since the car was going to be lower it would most likely get destroyed. So i took off the stock plastic loom and put the whole harness in the usual spot. I then bought tires for the battles, i decided to run 235 40 Falken RT-615 on all 4. I ran these before on my other wheels and liked them a lot although they are expensive i feel they are worth their money and are very predictable. After getting the tires on the wheels everything went on smoothly.
I had the car still set up at parallel control arm height which is higher than stock when you have 17s. I drove it like that for a few days and finally had the time to lower it more, so i maxed out the rear coilovers in their sleeves, and took the same amount in mm and lowered the front that amount as well to keep the cars control arms lined up the same keeping the frame at least parallel with the ground. Once it was lowered i turned the wheel full lock both directions and saw that at full lock left it rubbed my harness, just barely but enough to make me uncomfortable. So an idea for a protection plate came into my head and was designed and tacked in place. This definitely does its job and has an opening at the bottom in case water happens to get in.
Modified by OM3GA at 1:16 AM 2/22/2010
-
bladetech8
- Posts: 36
- Joined: Thu May 28, 2009 1:35 pm
- Car: S13 Hatchback
Re: (OM3GA)
Ahh... Someone finally decided to post up their sexy white hatch I see..
Hahahah.. damn dude that's awesome that you finally made your build thread. Your totally right though you had to do it eventually..
Clean a** interior, but we definitely need to get you another white hood for sure..
Quote » My monitor is starting to do weird things or maybe im just more tired than i thought. [/quote]lol maybe too much p0rn viewage..
pS> lol your avatar makes me so happy..
Modified by bladetech8 at 2:27 AM 2/22/2010
-
OM3GA
- Posts: 3041
- Joined: Fri Apr 14, 2006 11:41 pm
- Car: A Sexy Mobile, 1993 Nissan 240sx 180sx Hatcher
Re: (bladetech8)
Oh my god you're alive
Modified by OM3GA at 2:45 AM 2/22/2010
Modified by OM3GA at 2:45 AM 2/22/2010
-
mattblancarte
- Posts: 1978
- Joined: Sat Jun 21, 2008 4:14 pm
- Car: 2005 BMW M3 Comp. Coupe
Re: (OM3GA)
Good stuff.

-
420sxWETDREAMS

- Posts: 514
- Joined: Sun Feb 24, 2008 3:37 am
- Car: 1991 240sx Hatchback
- Location: @ your moms house
Re: The Daily Driven Trailer Queen Build.
I know this thread is old.....  but anymore updates since I am in the middle of completing my interior floor, just scrapped out the tar and removed everything else with paint thinner. But would love so "DETAILS" on how to wire tuck with some pics.