the budget dilema - resto or flip? a build thread

1980-1986 Datsun 720 forums. All 720-specific topics and discussion can be found here.
User avatar
radracer
Posts: 56
Joined: Sat Jun 23, 2012 3:22 pm
Car: 1984 Datsun 720

Post

Well, This is Ramona.
Image

I picked her up last August after getting back from Iraq because I wanted a good little project toy for basically nothing, and she was the first thing I found that was workable for basically nothing. I paid 400 for her, though she is obviously worth quite a bit more. The guy wanted to move her, didnt know how to work on her, and I was in the right place at the right time. I bought her looking exactly as you see her (well, excepting the carb and hood were both in place), and it is normally not the kind of look I would choose for a truck. Actually, Im pretty much exclusively a car guy, but I have to admit I fell in love with Ramona nearly instantly.

Anyway, Im getting out of the Army in a little over half a year and Im looking at seriously beginning work towards pursuing one of my dreams - starting my own racing team. Ive raced in the past, briefly (some rally racing, before getting booted from the team for taking out an unfinished vehicle and wrapping it around a tree - ah, the idiocies of youth), but never anything on the management level, so Im going to start VERY small on the Chump circuits, the 500 dollar car racing. As I am quite serious about this, I want to set myself up for success right from the start, so I have to start with the best vehicle I can for that limit, and unfortunately a light pickup just wont likely see me very competitive in the endurance racing circuits, though I am open to argument on this. If enough of you experts can convince me she would be a legitimate choice, I'll use her as my race vehicle, but otherwise I plan to fix her up to one degree or another, sell her, and use the proceeds as partial financing of my future speculative vehicle.

So, where I stand now is thus: I got divorced about 5 months ago, and to finance that fiasco had to sell most of my other toys, ie tools and such. Really, all I have is a power drill, some screw drivers, and a cheap a** wrench set. So, OPTION ONE: I could invest in a decent, 2nd hand set of tools, to include a cherry picker and engine stand, grinder, sander, and the lot, and really put some work into the girl. I could invest the next 6 months and about 1k in tools and parts to get her into a condition where I could get the most amount of money for her, and being near a large military base as I am, there is a huge market for lowered light trucks (I had owned her for literally 2 days before I found a note in my window asking if I wanted to join a lowed truck club). OPTION TWO: I could put fix the few things keeping her off the road (vacuum leak and broken clutch cable), then chuck her onto craigs list and see what people offer me for her and just flip her. This way I could use the time and effort towards the next vehicle, rather than this one with which I intend to part.

As Im a nissan fan-boy, though, you can be sure Ill probably find another project to post up here either way. Or, maybe you guys will convince me to keep her. Lets see. Either way, pictures!

Image
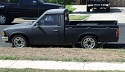
bad side pic, sorry. general idea of what she looks like in full profile, though.

Image
Engine bay, minus some obvious accoutrements. aside from a rusted battery tray and some other surface rust, actually not in too terrible condition, but in HORRIBLE disarray. Could make it look really pretty, though.

Image
Rusted battery tray. There are enough heavy rust spots like this, many of which I show below, which lead me to believe she was a rust bucket till a previous owner started restoring her, but stopped the project. Most of the body panels are rust free or at least relatively rust free, but nothing near as bad as this pic or those below.

Image
General interior. Nasty. No stereo, no speakers, wiring everywhere, no AC, no power steering, seat is disgusting, spray paint on dash, rusted out floorboards.... sigh.

Image
Image
floorboards. Bad.


Anyway, I'll get some more shots, particularly of the underside, in the coming days. I have 2 jack stands, but I want to get 4 more (Im SLIGHTLY ocd). The frame has some rust on it, but nothing that couldnt be ground out without the slightest worry.

And, gotta go. More later, be it basic pics, or work on the carb/clutch cable.

Stay Rad!
Last edited by radracer on Sat Jun 30, 2012 3:45 pm, edited 2 times in total.


synack7350
Posts: 364
Joined: Sun Jan 09, 2011 3:08 pm
Car: nissan '83 720 king cab pickup 2wd 2.4L Z24
Location: Boaz, AL

Post

man I love these trucks but the z24 isn't really a race motor by any means unless you were planning to swap plants. as far as rally with the thing. well the a** end is going to be light. hell the whole truck doesn't weigh anything. Just something to think about. lot of people use them for drifting as they are so easy to oversteer.

User avatar
radracer
Posts: 56
Joined: Sat Jun 23, 2012 3:22 pm
Car: 1984 Datsun 720

Post

I wouldnt be using her for rally, its just my past racing experience. Id be using her for 14-24 hour endurance racing, where longevity and reliability are paramount. I would keep the Z24, but add a boost package, either with an upgraded carb and a super, or an efi kit and a turbo conversion. Also, keep in mind that if I WERE to race her, Id likely remove the bed and put on traction bars, possibly add some dumb weight over the rear axle, that sort of stuff.

808NeSan
Posts: 16
Joined: Sun Jun 10, 2012 11:02 am
Car: 1986 Nissan 720

Post

i think personally you should race her, do what u said remove the bed use dumb weight the whole 9. But remeber to take alotta pics and videos and post that s*** on youtube, theres not enough 720 vids on youtube. But anyway i hope u race it that would be sick as f***

User avatar
radracer
Posts: 56
Joined: Sat Jun 23, 2012 3:22 pm
Car: 1984 Datsun 720

Post

808NeSan, I couldnt agree enough, it would be sick. The thing is, I really am quite serious about making a bid at starting a racing team. Im starting where Im starting because it is an accessible cost which will allow me to learn the ropes for what I can expect to encounter during normal racing circuits. After proving that I can run a competent team, and after corralling a dedicated sponsor or three, Ill move up to the next level and keep working. If I want to be successful, though, I have to remember that a good race team is a business. Now, I LOVE Ramona, but Im not sure that using her is the correct business decision here. It is hard to argue against the fact that I would be better served, from a competitive standpoint, to sell her for as much as I can and get a beater sentra, or miata, or something like that.

On the other hand, given that the prize money for these races is not exactly anything to rob a bank for (1750, 600, 400 for 1st, 2nd, 3rd per race), you could also easily argue that it is the experience which matters most in this venture, in which case Ramona is just as viable as any other low cost vehicle. Im torn, and I DO love her to death.

Either way, I promise work done to an '84 720 in this thread. I've got to get some basic tools whether I race her or something else, so I may as well use em, right? So, I figure no matter what else I do, Ill grind me some rust, probably pick me an engine, and clean me an engine bay, probably make the wiring look all nice and spiffy. Minimum.

User avatar
radracer
Posts: 56
Joined: Sat Jun 23, 2012 3:22 pm
Car: 1984 Datsun 720

Post

missed a pic I took earlier, behind the seat. you can see some more rust hiding back there.

Image

User avatar
radracer
Posts: 56
Joined: Sat Jun 23, 2012 3:22 pm
Car: 1984 Datsun 720

Post

Well, ive just about on my own decided that there are some things I just cant not do for Ramona, flip restore race or regardless- I just love her too damnable much. Problem is, my tool selection really is so incredibly pitiful that I cant do much of anything right now.

I tried taking out the nasty a** seat, but some genius welded it in. I tried taking out the dash, but I don't own a screw driver short enough to hit the screws against the windshield. So, I decided to release my godly, vodka and rage fueled wrath and fury upon the steering column.

All went well until it came time to remove the steering wheel, upon which I realized I didn't know how. Granted ive never worked on a datsun before at all, so I have been stumbling and groping my way around like a freshman who snuck into prom, but with this I hit the wall and need guidance.

Pica to follow. This is posted from my tablet which lacks both a camera and a functional spell check.

User avatar
radracer
Posts: 56
Joined: Sat Jun 23, 2012 3:22 pm
Car: 1984 Datsun 720

Post

Was out of town for a few days for a ceremony, but Im back now so I can post the pics I took a few days back when I was poking around.

Image

Image

Image
This is where I stand with the steering wheel right now, and Id really love some assistance. Im putting these up just after getting home, and just before going on a raid of some local pawn shops for some more tools, so I havent done much searching yet to see what info is out there, but if someone can at least point me in the right direction Id appreciate it.

Image
No joke, seat is welded in. I mean, really?!

Image
And you call this weather stripping? Who in the heck owned this poor girl? I have to remedy this.

Image
Also have to remedy this. Aside from a few screw drivers, a pair of vice grips, and a power drill, this is the extent of the tools I have that survived the divorce. I go pawn shop deal hunting tonight, though, so should have some more toys to play with for the work I plan on this weekend.

I'll Take more pics of this weekend's work, and actually try to finish one single project so I can get something cohesive going. I'll also get a list of my current projects with her up here as well.

Stay Rad!
Last edited by radracer on Sat Jun 30, 2012 3:45 pm, edited 1 time in total.

User avatar
radracer
Posts: 56
Joined: Sat Jun 23, 2012 3:22 pm
Car: 1984 Datsun 720

Post

So, they say take lots of pictures, but how many pictures is TOO many? That's the question we try to answer on tonight's post!

So anyway, joking aside, I decided that I had to have the interior as bare as possible no later than today for a few reasons. First, given the condition of the seat and dash, they both had to go if I wanted this baby to be a restoration project, which is what she is turning into. At the very least, shes no longer merely a flip. Second, I wanted an interior perspective on the rust problem, as the floorboard and front wheel well rust will have to go. Third, Id been suspect for a while now that the entire wiring situation in the whole truck was a lesson in applied chaos theory, and I needed to remove the dash to find out. I was right.

But, first things first, I got some more tools, so lets start there. As this is a budget project, I figure I should probably track my expenses so others reading this can get an idea how incredibly wrong they are going to be when they look at a truck and think to themselves "hey, I bet I can fix this baby up cheap!"
Image
So, I grabbed a tool box for 15 bucks, a couple socket wrenches and sockets for around 30, some more screw drivers, an angle grinder with some attachments which cost me 30, a light for 10, and other various pliers, bits, and items. I hit up numerous pawn shops, garage sales, and ended up going to Lowes for the light, angle grinder, and glasses (safety first!) All told I spent a little over 100, 121.44.

And then I got to Work! Fixing the ceiling fan in the living room. But then I got to work! Mowing the lawn. And then clearing out the living room. Actually, I ended up losing all of Friday and half of Today to chores, but then I was finally able to get into the garage and work on Ramona.

Again, priorities today were the Dash and the Seats. Both had to go. Id already removed most of the Dash mounting screws, so all I had to do was disconnect some wiring and remove the last few screws. When I started taking it out, I saw this:
Image
Ugh, that does not inspire confidence in the previous owner's electrical abilities. How did this girl ever even start?

Image
Yup, wiring disaster.

And thats not the only disaster, but I knew how bad the rest of the dash was...
Image

Image

Image

So yeah, this means one of two things. First would be that I can find a way to somehow patch or repair these damage spots (which cover approximately 40% of the surface area of the dash exposed to sunlight) or I get a new dash. Anyone got links to places I can get a dash cheap, or got any in their garage for an 84?

oh yeah, and there's this
Image
yup, thats 264k
Image
peeling on the bottom right, cause it just COULDNT be in good condition

Anyway, behind the dash...
Image

Image

Image

Image

Well, with the dash out, I was able to focus my efforts on the Seat. Not as much drama here, aside from that weld. I mean, really. But hey, there's no power like Joe power, so give me a damn wrench, a hammer, and a beer, and let me loose! Took me about 35 minutes and there she was, in the trunk with a bunch of other junk, which really does beg a question, but I cant seem to think exactly what that question might be...
Image

Aaaaaaaand, the aftermath. Its not pretty, and I didnt even bother trying to start cleaning it up. Im going to keep these for before and after pics as well.

Image

Image

Image

Image

Also, with all of the interior out, I was able to finally get a really good look at the rust. This is what I saw:
Image

Image
Is that spackle?!
Image

Image
Not sure what they tried to patch the floorboards with here, but anyone got any good ideas how to remove this gently? Or what the heck it is, lol?


Anyhow, long post, Im sorry. I wont be able to do another for a while, Ive got a 24 hour duty on Sunday, then Im senior chaperon for a bunch of single soldiers going on a retreat over the 4th of july, so Ill be gone then too. Work is a jealous mistress. Word of that must get around; Ill bet thats why the really cute girl at the phone store turned me down when I asked her out!

Stay Rad!

User avatar
radracer
Posts: 56
Joined: Sat Jun 23, 2012 3:22 pm
Car: 1984 Datsun 720

Post

Well, this project has officially spiraled TOTALLY out of control. Ive just put down a deposit on a cherry picker at a pawn shop, which means I guess Im taking out the engine. Im not swapping or anything, but Ill be cleaning her up for sure, as well as the engine bay. I can only hope that when the time comes I have the self control to NOT tear the engine apart and floss the bearings individually or something.

Stay Rad!

User avatar
radracer
Posts: 56
Joined: Sat Jun 23, 2012 3:22 pm
Car: 1984 Datsun 720

Post

Well, I started peeling that junk off the floorboards, and I can say with relative certainty that it's an old vinyl floormat that was either intentionally or accidentally form melted onto the floorpan. Did a good job protecting the metal, actually, lol. Anyway, Ive begun removing it.

Im considering doing the welding of the new floorpans myself. I can get a decent 115v arc welder shipped to me brand new for under a hundred bucks, and I can get the sheet metal formed pretty easily too locally. Why pay 500 when I can do it for 200 and keep the welder, right?

Im also starting to look into painting options, but from what Ive seen thus far, it would require a complete stripping of all the (incredibly horrible) paint that is already on her. still, would go a ways towards raising the value. Let me know what you guys think, oh ye mute masses.


btw, would still love some help on that clutch cable. Havent gotten to the point of fixing it yet, but has anyone got any reference material or experience with such?

User avatar
radracer
Posts: 56
Joined: Sat Jun 23, 2012 3:22 pm
Car: 1984 Datsun 720

Post

Did some serious poking around, and Im thinking that the rust issue is WAY worse than I originally thought. Gonna have to see, but she might end up being WAY beyond my abilities.

dirtdog
Posts: 52
Joined: Fri Jun 22, 2012 6:40 pm
Car: 85 Nissan 4x4 King cab

Post

The stuff on the floor boards is a sound dampening material. I have been dealing with it myself recently. Redoing some of my interior (mostly light rust and paint) I have been looking at replacing the window channel and moldings, but I need my retirement funds to retire on. Boy they sure are proud of that stuff!!! I live in Maine so there is very little resources near by. I am looking on the internet and at a local dealer. We'll see if they come through with some body grommets and the like.
Keep up the good work.
Dirtdog

User avatar
radracer
Posts: 56
Joined: Sat Jun 23, 2012 3:22 pm
Car: 1984 Datsun 720

Post

2 radiators. I took off the nose and found... 2 radiators. Is this normal for datsun? is one supposed to be strictly for oil cooling or something? The one in front has what look like factory mounts - or else someone did a heckuva job putting it in - but she aint connected to a damn thing!

also found: lots more rust.

Note to self: stop undertaking potentially expensive projects while under the grip of OCD. I see rust, I must uncover for repair. by uncovering, I see indicator of more rust. must uncover.

By the time Im done with this, I fully expect to have an engine, an old bench seat, and 1600 lbs of rust in my garage, and little else.

User avatar
radracer
Posts: 56
Joined: Sat Jun 23, 2012 3:22 pm
Car: 1984 Datsun 720

Post

Sound deadening material? I guess that makes sense. I had figured out in the process of removing it to repair the floorpans that it was probably a factory product - it was just too uniform to be anything else. Im sure I wont bother trying to put anything back in, seeing how much you seem to be saying it costs. That, and I couldnt be assed. Ya know.

User avatar
radracer
Posts: 56
Joined: Sat Jun 23, 2012 3:22 pm
Car: 1984 Datsun 720

Post

Well, I got some rum into me last night and did some work removing the front bumper and nose, and was a bit too gone to remember to take pics, but this is pretty much where I left off and started up this morning.

Image

That other radiator I mentioned...

Image

and, of course, more rust:

Image

Image


But, I persevered. I decided that to assess the extent of the rust I should remove all of the body panels. I can see under my duraliner that the bed is pretty badly rusted as well, so I expect to be removing the liner and replacing the bed as well, though of course that depends upon what I see when I hit that stage. But, first things first, quarter panel removal.

Image

Image

Image

and the other side...

Image

Image

The good news so far today is that the rust, while BAD, isnt scrap-the-truck-and-part-her-out bad. I used my angle grinder on some of the rust, and while the metal underneath is rather heavily pitted, I'll be able to treat, fill, and seal it. Rustoleum ftw, right?

Image

Of course, seeing as my OCD has obviously led me into a full resto (thread title bedamned), it also means I am going to have to pick up some serious tools... Such as:
-Arc welder: I feel comfortable with the idea of doing most of the sheet metal replacement work Ive seen so far myself, so I'm going to need to be able to weld the new pieces in. For anyone who is curious, this will be my very first foray into body work. Lets see how it goes! (approx price ~ 125)
-Engine Hoist, Engine Cradle, 4 more Jack Stands: I want to get out the engine and transmission so that I can clean her up and do a more complete job of rust repair. Since she is a lowrider, this also means getting her permanently off the ground for a while, thus the stands. (approx price ~ 320)
-Air Compressor and paint gun: Well, Im going to be removing much of the paint in the process of rust elimination, and the paint job on her right now is SO bad, that I may as well teach myself automotive painting as well, right? I mean, I cant do a worse job than the one on her already, so I feel comfortable there. (approx price, not including paint ~ 150)
-Shop Vac: should have gotten one already, really.


Before any more work today, though, I really need to clear out the rest of my garage. I'd been putting it off, as there were boxes everywhere after helping the ex move out after the divorce, but I want to build a workbench soon as well, so I need the space.

Image

Probably wont post again till tomorrow, but I'll have a fresh new batch of pics for you guys then.

dirtdog
Posts: 52
Joined: Fri Jun 22, 2012 6:40 pm
Car: 85 Nissan 4x4 King cab

Post

You can find replacement noise material from just about any local auto parts store (Price?).
Also that radiator in front of the radiator is part of the A\C system. So at some point that truck had A\C. I just removed mine. It didn't work and I can't get it fixed because it is the old R12 type. Don't really need it here in Maine any ways.

User avatar
radracer
Posts: 56
Joined: Sat Jun 23, 2012 3:22 pm
Car: 1984 Datsun 720

Post

Thanks for the info dirtdog! I'll probably end up getting some more of that sound dampening material to apply once the new floorpans have been made and welded in, if for no other reason than Im pretty sure that material was the only thing keeping the rust from spreading through the entire dern floor.

On the topic of Rust, Ive just about finished uncovering all of the rust on the old girl. I pulled off the bedliner and while it looks bad in the pics, I was hugely relived to discover that it's all surface rust, and the thick metal of the bed floor is fine otherwise. The end result of the rust search has me in a place where I will need new floor pans, and I'll probably end up going through 10 grinding wheels and as many cans of rustoleum, but in the end she is still solid enough to be worthy of a restoration. phew!


First things first, though, got my garage cleaned up a bit. Still need to get rid of all of those boxes and some of the other superfluous junk to make room for my future workbench, but at least I have more room to work with now.
Image


Bed Liner removed, as well as the bed panel walls, and laid out on the newly uncovered garage floor.
Image


Pics of the Bed with its all-encompasing surface rust. Also the wheel wells which have been dented. No way to get those dents out aside from hammering em out, so at some point in time before I get down to painting her, I'll take the rear tires off and get to it.
Image

Image

Image

As you can see from the underside pics, though, the rust hasnt eaten through the bed. There will be pitting for sure, but the plan was always to put the bed liner back on, so some simple sealant, filler, and rustoleum and she'll be set.
Image


More great news: the worst of the rust on the nose can be repaired without having to cut, fab, and weld. More stripping and treating, but this I can do in my sleep! This is after an exploratory foray with the angle grinder and a grind wheel, just to see how bad the rust would turn out to be. Looks much better in person than in the pic - totally salvageable.
Image


Anyway, tomorrow will be dedicated to rust removal. Im going to hit the bed hard, and probably get some more work done on the nose. Pics will follow.

User avatar
radracer
Posts: 56
Joined: Sat Jun 23, 2012 3:22 pm
Car: 1984 Datsun 720

Post

Well, my day was shortened by a few things. Had to do laundry, which lasted till about noon (my washing machine is long since dead, so I head on base and use the laundromats there - free, but takes time). So, I didnt get started grinding till about noon. I got in a few good hours of work, with only a break to head to Lowes and buy a few more stripping wheels for the angle grinder, but then a thunderstorm broke off the festivities at about 5pm. So, all in all, I got about 3-3.5 hours of actual work in, and MAN did I not get as far as I had really expected to. Getting into those grooves in the bed is slow, careful work. I alternated between my power drill and my angle grinder so as not to overload either tool.

Anyway, got a patch representing about 15-20% of the total bed surface area completely cleaned up.
Part way through
Image

Full patch cleaned and cleared
Image


Also did some little stuff last night. Removed the interior door panels,
Image

Image

finished removing the sound dampening material on the floorboards
Image

Image

Also took the grinder to a few other rust patches to see what kind of work I have ahead of me. Most notable was the rear tire well, where I discovered some dead metal
Image

My current plan is, assuming the restoration goes as well as I hope it will, to ditch the bed liner. It is perfectly functional, but pretty ugly aesthetically. As I want to have a decent paintwork on the truck, Im not expecting to use it as a work truck, so Im not worried about putting the liner back in. Instead, Im going to finish de-rusting the bed, then lay down a layer of spray-on liner on the bed floor and on the wheel wells. The side and back panels will be painted in kind with the rest of the paint scheme. This means I AM going to have to pound out those dents, though. Given that, and the location of the dead metal on the wheel well, it is likely that those small holes will develop into larger ones, and I'll probably have to weld in a patch when all is said and done. Not too big of a deal.

Bmacster
Posts: 13
Joined: Wed Jul 04, 2012 5:50 pm
Car: 85 720 4x4

Post

Sounds like we both will be doing the rust game. Oh the joy! :crazy: Good luck!

dirtdog
Posts: 52
Joined: Fri Jun 22, 2012 6:40 pm
Car: 85 Nissan 4x4 King cab

Post

Well, I'm feeling pretty good about the little bit I had to deal with since you posted these last photos. Man, that's gonna be a lot of tender loving care!!! This is my third 720, I bought a 84 brand new. I loved that truck! I'm still kicking myself for selling it to buy my wife a car.(not her fault, I was young and trying to impress her still) Any ways, I bought another 84 when I lived in Texas. I fixed it up and drove that crap out of it. I sold it off when we moved to Maine (it was dead by then). Got me a beauty now. Looked for a year. Found her (haven't named her yet) in NC. When I figure out how to post pictures, I will be putting some up. So far I am not as smart as my computer. I will figure it out. I'm sure it is not that hard, I just don't have any instructions.
Good luck and keep up the good work!
DD

User avatar
radracer
Posts: 56
Joined: Sat Jun 23, 2012 3:22 pm
Car: 1984 Datsun 720

Post

Yeah, I know what you mean, man. This is my fourth build overall, but my first restoration, and thus my first time working with rust. My previous builds were a couple classic cars and an 86 fiero, and while the 64 1/2 mustang that I worked on first did have rust, I simply (over)paid someone else to take care of it. It actually worked out pretty well, that just around the time that I've gotten the balls to try to handle a full project solo-a-mano it is with a girl who needs as much TLC as Ramona does. Well, at least it works out for my skill building. My wallet is already suffering for it, of course, and thats before I drop 700+ on tools this paycheck.

Sigh.

Note to self: Find classes on when enough is enough. Enroll.


p.s. sent you a pm with instructions for posting pics, dirtdog. hope it helps.

User avatar
radracer
Posts: 56
Joined: Sat Jun 23, 2012 3:22 pm
Car: 1984 Datsun 720

Post

Back from dentist. Surgery on my jaw. 16 stitches. Highh on percocet. wont be working on truck for a few days.

User avatar
radracer
Posts: 56
Joined: Sat Jun 23, 2012 3:22 pm
Car: 1984 Datsun 720

Post

Well, Ive been trying to find somebody who offers a molded carpet that will fit, and after talking with a rep on the phone I think I may have gotten what Im looking for.

http://www.carid.com...ets-225379.html

I still need to go grab new seats, which will decide upon the color of carpeting I choose, but this weekend I'll likely be ordering a molded carpet. I'll let you guys know if it fits well or not. I was sure to verify that they had a good return policy first. As an aside, for those interested in doing business with these guys, the customer service guy I spoke to (Robert) was incredibly helpful and friendly, and seemed willing to try to help me solve the issue by searching around for a proper fit if this one didnt work out. I'll be sure to report in again later.

For now, Im gonna work on removing the foam from my old dash, as Symrna demonstrated in his thread. Given that Im on prescription narcotics, I think thats about the only safe project I can work on. I'll leave the power tools alone today, lol.

note: also ordered a new battery tray today, and getting ready to put in orders for a new coolant overflow and a new windshield washer kit (complete with mounting, wires, everything). found great prices on both, about 95 for the two (where as Ive seen people asking for 125 for the overflow reservoir alone).

User avatar
radracer
Posts: 56
Joined: Sat Jun 23, 2012 3:22 pm
Car: 1984 Datsun 720

Post

Well, I got all of the foam padding off the dashboard, and sanded away some of the remaining fuzz. I'll apply the filler next and then paint it, but it isnt a priority in the project. It all depends upon how I feel tomorrow. This weekend is reserved for more rust work in the bed of the truck.
Image

Image

Image

Image

Image

Im not sure how it will end up turning out in the long run, but Im sure the money saved will improve the looks in my eyes. Anyway, Ive got a few tips for others who decide they may want to follow in Symrna's footsteps.

First off, be careful when taking off the foam material around the vents. I broke both of the side vents to varying degrees in so doing.
Image

If your dash has had enough UV exposure to be in need of this sort of tear down, then the plastic around the vents will be brittle as well. You should definitely remove the vents first, via the interior mounting hardware.
Image

Image

Image

I used a simply putty/paint scraper mixer to remove most of the padding. Given that the plastic underneath has been protected, and that you will be sanding and filling before finally painting it, dont worry too much about damaging the plastic. It is pretty soft, though, so dont hack at it.


Anyway, as I had already removed the AC radiator, and the truck did not come with the engine hardware for AC in the first place, Ive got a full set of AC/heater hoses and fittings that I no longer need.
Image

Image

Image

Image

If anyone wants these, Id be interested in selling or trading them. Id rather do the whole thing as a set, but I have nothing against parting it out. PM me if you want any parts of the AC/heater system. Ive got the blower motor as well, but I have no clue what-so-ever if it works. I'll try to figure that out soon.

User avatar
radracer
Posts: 56
Joined: Sat Jun 23, 2012 3:22 pm
Car: 1984 Datsun 720

Post

Well, as I was a bit too addled in the brain to trust myself using power tools on the truck today, I decided to knock out another project I'd been mentally courting for a few weeks. I needed a work bench!

Im sure I could have probably gotten some scrap wood for cheaper if I had looked around first, but I got all excited during a trip to lowes and left with 40 bucks of wood and a package of nails. Also found a guy selling an engine hoist and stand, both unused, for 170 cash. Seeing as I had put a deposit on a hoist at a local pawn shop that wanted 150 for the hoist, I went and canceled that and used the money to get a saw and some more wrenches. Im starting to feel like I have a semi-respectable garage again!

The wood:
Image

Image

The saw:
Image

Spent a few hours in the hot texas heat just having a blast and putting it all together. This is the very first thing I've ever made out of wood, and I have to admit that I ended up being idiotically proud of the finished product.
Image

had a plank and a bit of 2x4 left over, so made a lower shelf
Image

Now it looks like it's lived there the whole time!
Image

Way better than a couple weeks ago, when my garage looked like this:
Image

I'm planning on getting another grouping of 2x4s to make a second workbench (I got 2 pieces of plywood and only used one), and Im also toying with the idea of building a frame for the bench seat that came out of Ramona and making a garage couch, rather than just junking the seat. If I do that, I'll post pics of it too. So, didn't get any work done on the girl today, but still felt productive.

And just before I closed up, the guy dropped off the hoist/stand!
Image

So, I'll be able to lift out the engine soon! Im still going to finish doing rust repair on the bed and body first; the engine will sit there all fine, but rust never sleeps!


stay rad

User avatar
radracer
Posts: 56
Joined: Sat Jun 23, 2012 3:22 pm
Car: 1984 Datsun 720

Post

Well, got home from work late today, so only had so much daylight to actually work on Ramona. Grinding out the rust is loud as a pack of hogs having an orgy in a slaughter house, so I try not to do it once twilight hits. I got another small patch done on the bed today, but it included a corner and some areas around the wheel well, which are a bit more delicate and harder to hit, so I feel comfortable with my progress. Im going to be hitting the junk yards tomorrow, and I'll probably put together that second work bench, but even so I expect to be about 80% done de-rusting the bed by the end of the weekend.

So far, this is how Im doing:
Image

found a couple more spot where the rust ate through, but these were small enough that I'll be able to fix em with some bondo hair, once it arrives (had to order it in).
Image

In the end, once I got the new clean patch primed, I can say that about 2/5 of the bed is done.
Image

Image


Once the light went out, I moved onto a few other things that needed doing. I got the hoist put together
Image

The plan right now is that once Ive got the bed cleaned up, Im going to lift out the engine. I'll then finish repairing the rust on the front of the truck, and then in the cab, again using my daylight working hours. Once the sun goes down, I'll get to tearing the engine down. Yes, I've decided to do that. No, Im not happy with my self control. Whatever, though, Ramona deserves it, and when she is done she is going to be absolutely amazing.

I also discovered that I am WAY too ocd when Im on pain killers
Image

Anyway, hopefully my foray into the salvage yards will yield some seats and a few other neato toys. I'll report in tomorrow with what I ended up finding, as well as whatever work I get done.


stay rad!

User avatar
radracer
Posts: 56
Joined: Sat Jun 23, 2012 3:22 pm
Car: 1984 Datsun 720

Post

Well, I put together a list of salvage yards in the area and headed out with my hope high and brimming with confidence. Four hours later I discovered that all but three of the yards on my list had been turned into housing developments and mini-malls, of those two were closed, and of the single one that was open he had a grand total of perhaps 45 cars in his lot, not a dang one of them a nissan, let alone a datsun. And before you start in, I didnt call because the resource I used to put together the list didnt have phone numbers, and I didnt feel like going through 18 different searches just for numbers. Especially when Im also in the hunt for seats, which I'd be willing to take out of any vehicle, given that the seats were below a certain gross-ness factor (unlikely, I know, but its worth a shot. well, it WAS worth a shot, at least). So, all that is left to me now is about a 40 minute drive to the closes pick-n-pull next weekend. Oh well.

Given the time I spent driving around, and also given that I was feeling pretty lazy today, I only had about 4 hours to work on the bed rust. And, given that with the heat in texas right now that means I can use my angle grinder and power drill for about 15 minutes each before having to let them sit for 30 minutes to cool down, I didnt get as far as I would have liked.
Image

Image

and this is where I finished
Image

I also discovered another problem area, where the bed floor meets the back wall.
Image

It is rusted down there all along the whole line
Image

unfortunately, I simply dont have the tools to remove the rust down there, and I am not going to be removing the bed to hit it from the other side, so this is one part where "good enough" will have to be just that. I'll hit it with some rust inhibitor, stuff a load of bondo down into the gap, and presto.

Anyway, once the light went out I did get a chance to start poking into the engine bay. I removed the radiator. Didnt find anything I didnt expect to find, body wise. The crossmember has some rust, but nothing out of the ordinary at this point.
Image

There were a few surprises though.

First, when I drained the radiator, the coolant looked like rusty, bloody piss.
Image

The liquid coming from the block was nice and green like it should be, but that which came from the radiator was tainted. Im assuming this means my radiator is probably rusted as sin. Should I replace her?


I also found this: Yes, thats an old wasp nest.
Image


Anyway, more bed work tomorrow.

User avatar
radracer
Posts: 56
Joined: Sat Jun 23, 2012 3:22 pm
Car: 1984 Datsun 720

Post

question for everyone... found a vortec V6 and a 4 cyl VCT from a probe in the junk yard. should I pull and swap for one of those babies?

Image

Image

Image

both are certain to be rough, and possibly not even salvageable, but I think the vortec especially might be worth it. Id like everyone's opinions either way, though.

User avatar
radracer
Posts: 56
Joined: Sat Jun 23, 2012 3:22 pm
Car: 1984 Datsun 720

Post

Raining in my part of Texas today. The last thing I want to do is open the garage door and let in more moisture and humidity than I have to, so unless it stops soon enough for the sun to dry it out before 6 or 7pm, I wont be doing any grinding in the garage today.


Return to “Datsun 720”