So heres the write up, from begging to end, on how to install the tail light overlays. How this helps anyone considering doing this.
First you have to pull away the trunk wall carpeting from its original position near the tail light. You do this by simply finding where its carpet edges meet the car body near the top of the trunk bowl and pulling on it.
However once you get near the inside you can see theres a hook plastic clamp holding the carpet to the shell. You can remove this easily by prying out the middle tab from the hook portion. It will separate fully and now you can pull out the rest of the clamp and pull the carpeting away.
Next you will see a few wires, clamps, and 2 bolts. These white clamps are are connected to the tail light anchor bolts.
Remove the nuts from the end of the 2 bolts and pull away the clamps from around them. This leaves you with free access now to Pull out the tail light.
Next go to the outside of the car and pull away the tail light assembly from the car including the plastic shroud connected to it.
Next flip over the assembly, and take out the light bulbs. Twist the bulbs' plastic harnesses to the left and pull out all 4 of the bulbs.
Repeat for opposite side. And then you car will look like this.
Once the tail light is inside clean it very well before vinyl install. I am not going to do a write up on the overlay install because everyone is going to do it differently. Follow the instructions sent with the kit and make sure to keep the area between the light and the vinyl wet/soapy. Also keep applying heat from the hair dryer to get over the angles of the light. Took me a couples hours between the 2 to get it right. Its nerve racking but take your time it will work itself out just keep stretching the material until it lays flat.
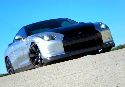
When you done cut off any access vinyl abruptly hanging over the edges of the light and go back outside and install them on your car! For install procedures reverse the removal steps. Then you end up with something like this.
Tail Light Overlay How To
-
SHIFT_2.5S
- Posts: 1219
- Joined: Mon Aug 13, 2007 9:32 am
- Car: 2008 Nissan Altima Coupe S 2.5
Re: Tail Light Overlay How To (adidas2go)
Looks great. Love the way it matches the color of your car. On behalf of NICO, thank you for these great step-by-step instructions.
-
mikemart
- Posts: 408
- Joined: Sat Jul 14, 2007 6:35 pm
- Car: 08 Nissan Altima Coupe S 2.5 CVT
Author of the greatest post ever.
Re: Tail Light Overlay How To (SHIFT_2.5S)
Agreed! Looks great----Thanks for the write up!
-
notaverage

- Posts: 520
- Joined: Tue Oct 16, 2007 6:04 am
- Car: Altima Coupe 3.5 SE w/ tech pkg and VDC. Precision Grey
Re: Tail Light Overlay How To (mikemart)
Thanks for the detailed pics! love the step by step info
-
adidas2go

- Posts: 4495
- Joined: Thu Oct 18, 2007 9:49 am
- Car: Cycle through all kinds of cars, trucks, motorcycles, and boats 🤙
Once upon a time: 1st turbo Altima Coupe - Location: Raleigh, NC
Re: Tail Light Overlay How To (notaverage)
the people on nissanclub actually scorned me for posting this as a how to.
-
BlackNWhite
- Posts: 1631
- Joined: Thu Oct 04, 2007 8:30 pm
- Car: 08 Altima Coupe
Re: Tail Light Overlay How To (adidas2go)
I post on both sites and they didn't 'scorn' you for it, they just pointed out exactly what this thread is. It is a 'how to remove your taillights' HOW TO, not a 'how to install overlays' HOW TO. When I read this thread, I was excpecting detailed tips and advice on how to apply the vinyls, how to avoid air bubbles, not "read the instructions that come with them".
-
SHIFT_COUPE

- Posts: 3887
- Joined: Fri Aug 03, 2007 3:36 am
- Car: 2014 Infiniti Q50 AWD
- Location: Bethel, CT
- Contact:
Re: Tail Light Overlay How To (adidas2go)
adidas, thanks for the post! Send me an email. You earned yourself a custom title for your username.
I'd like to add a couple things regarding actually putting the tint on the taillight.
-First, I'd recommend spraying the taillight and the tint with the soapy water solution.
- Lay the tint over the taillight, carefully lining up the shape to overlap on most of the edges so you have some slack to work with.
- Take a cloth and flatten out the tint on the flatter areas and get some excess moisture out.
- Use your hair dryer and warm up the vinyl to conform to the curves of the light. Don't warm the entire overlay up, just hit it in the spots where your working on. It helps to have a partner hold the hair dryer while you stretch and pull the overlay.
- Take your time and work out all the bubbles and use heat when necessary to make the overlay conform to the shape of the light.
- Using a credit card with a cloth you can go over the light to get bubbles out and smooth it over the light.
- At this point you should have some excess over the edge of the light. I found it easy to heat this up and tuck it under to make a clean edge.
- I spent a lot of time around the areas where your tucking the vinyl behind the taillight. Using heat and trimming where necessary.
You should come out with a nice clean look when your done. Adidas' came out excellent. JUST TAKE YOUR TIME!! Don't get impatient. A partner helps if you can grab a friend of yours.
Re: Tail Light Overlay How To (SHIFT_COUPE)
SHIFT_COUPE wrote:adidas, thanks for the post! Send me an email. You earned yourself a custom title for your username.
-
BlackNWhite
- Posts: 1631
- Joined: Thu Oct 04, 2007 8:30 pm
- Car: 08 Altima Coupe
Re: Tail Light Overlay How To (mcheddadi)
Where do you get the soapy solution from?
-
SHIFT_COUPE
- Posts: 3887
- Joined: Fri Aug 03, 2007 3:36 am
- Car: 2014 Infiniti Q50 AWD
- Location: Bethel, CT
- Contact:
Re: Tail Light Overlay How To (BlackNWhite)
Made itBlackNWhite wrote:Where do you get the soapy solution from?
- Squirt Bottle- Couple Drops of dish washing liquid- Water
Bam. "Soapy Solution"
-
generic808
- Posts: 2537
- Joined: Tue Jul 10, 2007 10:18 am
- Car: '08 Infiniti G35 S
'10 Infiniti EX35
Re: Tail Light Overlay How To (SHIFT_COUPE)
Hey Tyler and adidas, do you guys think regular tint would work for this? It seems to install just like tint, so just wondering if I could save a few bones and use regular tint? Or do you guys think the tint wouldn't "flex" enough to adhere to the rounding edges of the lights?
-
SHIFT_COUPE
- Posts: 3887
- Joined: Fri Aug 03, 2007 3:36 am
- Car: 2014 Infiniti Q50 AWD
- Location: Bethel, CT
- Contact:
-
adidas2go
- Posts: 4495
- Joined: Thu Oct 18, 2007 9:49 am
- Car: Cycle through all kinds of cars, trucks, motorcycles, and boats 🤙
Once upon a time: 1st turbo Altima Coupe - Location: Raleigh, NC
Re: (SHIFT_COUPE)
Yea with all the angles of the tail light vinyl is going to be the best choice/easiest for a DIY.
-
Blue Batmobile
- Vendor
- Posts: 750
- Joined: Mon Aug 13, 2007 2:25 pm
- Car: 1997 NSX
- Contact: