Hi folks, just wanted to say thanks for the writeups. I replaced my upper and lower control arm bushings with the poly kit from 4x4parts, and it's amazing what a difference it made in my 2000 Pathfinder. I didn't have a death sway, but more like a loose and bouncy feeling on rough roads. The new bushings tightened it right up and it rolls nice and firm now. The job turned into a multi-day ordeal as my rear lower bolts were seized inside the bushing sleeve on both sides, and I ended up having to figure out the right tools to cut them out. (air angle grinder with a 4" cutting wheel did the trick) But, I'm glad I did it, and it was a good excuse to finally get some good air tools. Per attofarad's post, an Aircat 1150 impact wrench broke the nuts loose with no problem.
I've also done the ball joints, valve cover seals, steering rack insulators, and new tires, and it's almost like driving a new truck for a fraction of the cost. I should mention that I live in CA, so overall everything else is in pretty good shape except for the rubber parts.

Replacing Rear Control Arms Guide
-
ncalnissan
- Posts: 12
- Joined: Tue May 26, 2009 8:20 am
- Car: 2000 Pathfinder 4WD
- Location: Northern California
Re: Replacing Rear Control Arms Guide
What is the spec for the bolt? I want to find them locally, but no one has answered the elusive spec question. M14? I know it needs to be Metric grade 10.9 or better, just need the length and width for certainty.
-
atraudes

- Posts: 1106
- Joined: Thu Jan 10, 2013 7:46 pm
- Car: 2001.5 Infiniti QX4 4WD
- Location: Sammamish, WA
Re: Replacing Rear Control Arms Guide
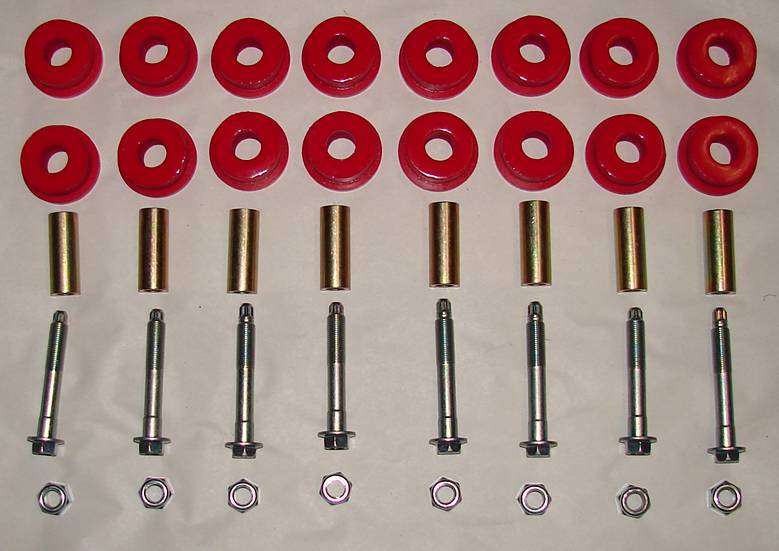
I'll tell you what I can about the original bolts. There were two types of bolts, four of each.What is the spec for the bolt? I want to find them locally, but no one has answered the elusive spec question. M14? I know it needs to be Metric grade 10.9 or better, just need the length and width for certainty.
The first:
- 106.9mm in length
- 12.96mm in width (center, smooth portion)
- 14mm in width (near head, smooth portion)
- 17mm head
- 19mm nut
- 12-point star at end, for use with 10mm socket/wrench
- Stamped with "S" at end

The second:
- 100.78mm in length
- 12.96mm in width (center, smooth portion)
- 14mm in width (near head, smooth portion)
- 17mm head
- 19mm head
- no 12-point star at end
- Stamped with "6" at end (or 9 if the dot's supposed to be on top)

Dunno if it matters, but the new bolts had the 12-pointed star on each of the bolts.
Re: Replacing Rear Control Arms Guide
That's awesome. Thanks so much, and I hope the fastenal will have what I need. I wonder if a bolt with out the smaller middle portion would be ineffective?
-
atraudes
- Posts: 1106
- Joined: Thu Jan 10, 2013 7:46 pm
- Car: 2001.5 Infiniti QX4 4WD
- Location: Sammamish, WA
Re: Replacing Rear Control Arms Guide
I have a feeling the smaller center is for ease of installation. I don't see why one width wouldn't work.
Something else I noticed about the new and old bolts was that the first turns of the nut onto the bolt were very simple and could be done by hand. At one point, though, it got much tighter, and I needed wrenches to continue tightening it. I imagine it's to discourage the bolt from just falling off if it loosens, but avoid cross-threading when first putting the nut on.
Something else I noticed about the new and old bolts was that the first turns of the nut onto the bolt were very simple and could be done by hand. At one point, though, it got much tighter, and I needed wrenches to continue tightening it. I imagine it's to discourage the bolt from just falling off if it loosens, but avoid cross-threading when first putting the nut on.
Re: Replacing Rear Control Arms Guide
Thanks for all the input! I hope this helps people in the future.
Keywords:
Pathfinder QX4 trailing arm specs control arm repair help diy replacement
Keywords:
Pathfinder QX4 trailing arm specs control arm repair help diy replacement
-
ncalnissan
- Posts: 12
- Joined: Tue May 26, 2009 8:20 am
- Car: 2000 Pathfinder 4WD
- Location: Northern California
Re: Replacing Rear Control Arms Guide
I'm not an expert, but I believe what you've described is the self-locking feature of the nuts used in this location. The replacement nuts I got from 4x4parts were visibly elongated, i.e. a slightly oval shape, and the way it works is that as the nut is tightened, it deforms to a more circular shape which holds it in place.atraudes wrote:Something else I noticed about the new and old bolts was that the first turns of the nut onto the bolt were very simple and could be done by hand. At one point, though, it got much tighter, and I needed wrenches to continue tightening it. I imagine it's to discourage the bolt from just falling off if it loosens, but avoid cross-threading when first putting the nut on.
-
ncalnissan
- Posts: 12
- Joined: Tue May 26, 2009 8:20 am
- Car: 2000 Pathfinder 4WD
- Location: Northern California
Re: Replacing Rear Control Arms Guide
By the way, I contacted 4x4parts.com directly about shipping costs, and they had no problem shipping via UPS priority mail flat-rate, which was a lot cheaper than their standard options. If Fastenal doesn't have the parts you need, that might be a good option unless you really want to save the $10. (assuming you're in the US)
Re: Replacing Rear Control Arms Guide
I'm in the middle of doing this now, a few comments on my experience.
-I am using an Aircat 1150 and it had no problems breaking all the bolts. Nothing was seized in the bushing sleeves so I was able to just hammer out the bolts.
-To remove the inner bushing sleeve, I was able to drill out the rubber parts then use the impact to spin/rip out the inner sleeve
-To remove the outer sleeve, I used a jig saw to make two cuts about a centimetre apart and then airhammer to bend back the seam. Eventually the whole sleeve popped right out. I tried doing this by hand but after about 30 mins I gave up and bought a $50 airhammer. Takes less than a minute now!
-The remove the alignment bracket for the lower arm bracket I used the air hammer with a chisel bit to break the spot welds. Again, under a minute. No need to grind.
Now i'm waiting for the 4x4parts to arrive so I can put it all back together.
-
madison
- Posts: 9
- Joined: Thu Nov 20, 2014 12:13 am
- Car: 1999 Pathfinder 2rwd
1975 280Z coupe - Location: Yucaipa, California
Re: Replacing Rear Control Arms Guide
Thank you, thank you, thank you. I did it mysef' w/ your help.
-
atraudes
- Posts: 1106
- Joined: Thu Jan 10, 2013 7:46 pm
- Car: 2001.5 Infiniti QX4 4WD
- Location: Sammamish, WA
Re: Replacing Rear Control Arms Guide
Cheers! Glad to hear it!

Re: Replacing Rear Control Arms Guide
Thanks for the really great "how to" on the control arms. I'm in the process of ordering the parts for the rear of my 2003 infinity Q4, I needed new bushings and after reading your post have decided on ordering the same bushing kit from "4x4" parts. I have a separate question to add to the post. I see that "WhiteLine" offers a "beefier" sway bar for my 2003 Q4 - part # BNR17, I was considering making the purchase and installing it in at the same time I do the bushings on the control arms - as the old saying goes - "killing to birds with one stone" so to speak. What are your thoughts on this - will the installation of this heavier sway bar improve the handling of the Q4 dramatically or am I wasting my money?
-
atraudes
- Posts: 1106
- Joined: Thu Jan 10, 2013 7:46 pm
- Car: 2001.5 Infiniti QX4 4WD
- Location: Sammamish, WA
Re: Replacing Rear Control Arms Guide
Dunno how dramatically since it's so dependent on the product, but I'm sure you will see a difference. I was interested in getting some sway bar upgrades too, after reading this thread on the Addco bars. Those in particular didn't end up working out due to fitment issues, but I'm stoked on your find! Let me know if you go for it and how it works out.
If you're looking to improve handling, you may also be interested in The Missing Link.

If you're looking to improve handling, you may also be interested in The Missing Link.
-
rgk
- Posts: 587
- Joined: Tue Dec 23, 2014 4:48 am
- Car: 02 Pathfinder LE 3.5 auto 4x4
- Location: Indiana Dunes National Park
Re: Replacing Rear Control Arms Guide
I just did this job today. It wasn't bad at all with the info gleaned from this site and some very helpful tools:
Floor jack to lift the vehicle at the differential
Oversize jack stands
20 volt battery-powered impact drill (300 ft. lb. of torque!), crucial.
Penetrating oil/grease/spray
Breaker bar
Sockets: 10mm, 12mm, 14mm, 17mm, 21mm (I believe), 3/4", and maybe a couple of others.
1/2" to 3/8" socket wrench converter
We did it in the following order: upper driver's, lower driver's, lower passenger, upper passenger.
We had to remove the stabilizer link on both sides in order to get to the upper arms. I was able to wedge the impact gun in on the driver's side without unbolting the stabilizer bar itself, but on the passenger side I had to unbolt the bar. This, however, was not a big deal. I did not need a ratcheting strap like Artaudes. Instead, I used the floor jack to inch the differential up until I could wiggle the end of the control arm in place. I placed a box wrench or breaker bar with socket on the head side while the impact gun removed the nut. For both the upper and lower arms we removed the sides toward the front of the vehicle first.
Just keep your eyes open and use some common sense. It helps to have two people for the job, but one can do it without much of a problem. I can't imagine doing this job without some sort of impact drill, as we had to have fresh, warm batteries every two arms just to remove the nuts.
-
rgk
- Posts: 587
- Joined: Tue Dec 23, 2014 4:48 am
- Car: 02 Pathfinder LE 3.5 auto 4x4
- Location: Indiana Dunes National Park
Re: Replacing Rear Control Arms Guide
A couple of other important tools were a hammer and a punch to remove the bolt while the control arm was still in place. It also helped to loosen both bolts before trying to remove the old control arm.
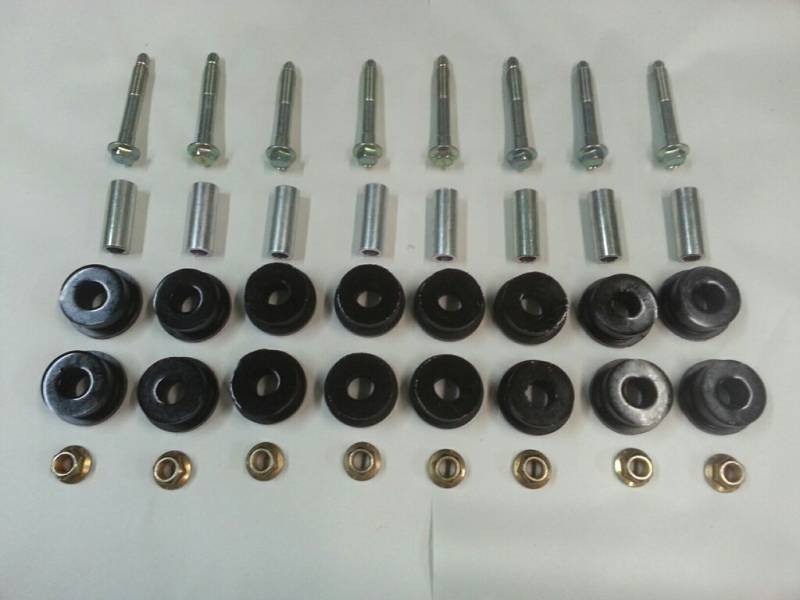
For those of you still driving with the death sway, thinking that it's no big deal, see pic below. I visually inspected the arms before even knowing that I needed to perform this fix, thinking that they didn't look too bad. Well, take a look what the old bushings looked like:

The center is entirely separated from the rest of the bushing. Very dangerous.
For those of you still driving with the death sway, thinking that it's no big deal, see pic below. I visually inspected the arms before even knowing that I needed to perform this fix, thinking that they didn't look too bad. Well, take a look what the old bushings looked like:
The center is entirely separated from the rest of the bushing. Very dangerous.
Re: Replacing Rear Control Arms Guide
So, I decided to go all the way and replaced the shocks, springs, upper and lower control arm bushings, sway bar and sway bar link as well as installing in the front one of the "missing links". What a difference in ride quality. Listed below are the replacement parts that I used.
Rear Shocks : KYB KG4163 Gas-a-Just Monotube Shock Absorber
Rear Springs : from 4x4 parts.com - Medium Duty Rear Coils (SPPF00129A)
Upper & Lower Control Arm Bushings : from 4x4 parts - Complete Trailing Arm Bushings 2-Pack (SPACTRBUSH96PFWBOLTS)
Sway Bar : from "WhiteLine" - part # BNR17
Sway Bar Links : Proforged 113-10166
Front end : from jackson autosport - The "Missing Link".
All installed without a hitch and the ride difference is night and day, allot firmer ride and a huge ride/steering/roll improvement over the old tired out suspension parts and I gained almost a 1 1/2" ride height in the rear. Next Job - to tackle the front end.
For those interested in installing the "Missing Link" when I phoned Jackson Autosport they had only 3 of them left and I was lucky enough to get one leaving only 2 left - better contact them while you can as it sounded like they were no longer going to be manufacturing them in the future.
-
atraudes
- Posts: 1106
- Joined: Thu Jan 10, 2013 7:46 pm
- Car: 2001.5 Infiniti QX4 4WD
- Location: Sammamish, WA
Re: Replacing Rear Control Arms Guide
I was all set to buy a Missing Link last month, but after finishing the thread on NPORA about them, found out they were out of production. I was all bummed out and just decided to keep an eye on pick-a-part places. I just called them after reading your post and found out they just sold the last one

Anyway, I'm glad to hear that it worked out so well for you. I'm going to be doing a lot of suspension work in a month or two after it warms up a bit. Did you have any problems with the Whiteline; did it take any finagling? Was it actually white?
Anyway, I'm glad to hear that it worked out so well for you. I'm going to be doing a lot of suspension work in a month or two after it warms up a bit. Did you have any problems with the Whiteline; did it take any finagling? Was it actually white?
Re: Replacing Rear Control Arms Guide
In case anyone is thinking about the 1 piece bushing kit from 4x4 parts, I just installed them and took a video of how i got them in. I'll leave it here:
-
atraudes
- Posts: 1106
- Joined: Thu Jan 10, 2013 7:46 pm
- Car: 2001.5 Infiniti QX4 4WD
- Location: Sammamish, WA
Re: Replacing Rear Control Arms Guide
Damn, excellent video!  I tried doing the same thing with the lateral arm since they were only available as single pieces and ended up giving up and cutting them in half. I was using hand tools though and would not recommend it. If I had seen this first I would have tried using my hand drill.
All of the polyurethane bushings I bought this summer were the same dark purple as yours; they must have changed suppliers or something.
All of the polyurethane bushings I bought this summer were the same dark purple as yours; they must have changed suppliers or something.
Re: Replacing Rear Control Arms Guide
Thanks man, glad to contribute. By lateral arm do you mean the panhard rod? I bought those as well but am debating putting them in. Was it hard to get it lined up again after you removed it?
I have some poly bushings for the rear sway bar as well that I won't be using, since I ditched my rear sway bar altogether. If you want them they're yours.
I have some poly bushings for the rear sway bar as well that I won't be using, since I ditched my rear sway bar altogether. If you want them they're yours.
-
atraudes
- Posts: 1106
- Joined: Thu Jan 10, 2013 7:46 pm
- Car: 2001.5 Infiniti QX4 4WD
- Location: Sammamish, WA
Re: Replacing Rear Control Arms Guide
The panhard rod, yeah. It wasn't terribly hard to get the bar on and off. It took some finagling but was nothing compared to the control arms. The rubber on those was in surprisingly good shape, and I didn't feel any difference after installing them. I guess that's a testament to the other bushings though
I'd totally take you up on your offer, but I already replaced mine a few weeks ago. Actually, all of the suspension bushings are poly now The ride is nice and tight all around!
I'd totally take you up on your offer, but I already replaced mine a few weeks ago. Actually, all of the suspension bushings are poly now
-
marioc89
- Posts: 156
- Joined: Thu Oct 10, 2013 5:19 pm
- Car: 1990 Acura Legend coupe
2000 Infiniti Qx4 3.3L - Location: Houston
Re: Replacing Rear Control Arms Guide
So...no definitive method on taking out the old bushings? Other than having them pressed out? It seems the only way. Do you think maybe hammering it out with something that fits precisely from somewhere like Lowe's or The Home Depot?
-
atraudes
- Posts: 1106
- Joined: Thu Jan 10, 2013 7:46 pm
- Car: 2001.5 Infiniti QX4 4WD
- Location: Sammamish, WA
Re: Replacing Rear Control Arms Guide
Just hammering on it won't get it out. It takes a heck of a lot to pop them out. Some precisely placed blows from a sledgehammer might do the trick, but no guarantees.
I've heard of some folks taking a blowtorch to the rubber over a bucket of water. That'll leave you with just the outer metal ring which you can take a hacksaw to. Just cut a bit at a time until you can use a large socket and a hammer to pound it out. Just be sure to only cut as much as is necessary; you want to avoid cutting into the arm as much as possible. On that note, be sure to cut on the side of the ring that connects to the arm so if you do cut into the arm it'll be in a reinforced area.
I had to do the same thing on my lateral arm bushings and used a drill to punch a bunch of holes in the rubber, then used a saw to cut between the holes so I could knock the center piece out. The drill bit cut close enough to the ring that I could see it and used the hacksaw technique on it.
It's much more labor intensive than getting them pressed out, but it gets the trick done and you can do it in your backyard
-
Hawairish
- Posts: 462
- Joined: Sat Nov 08, 2014 1:43 pm
- Car: 2004 Nissan Pathfinder SE 4WD
- Location: Surprise, AZ
Re: Replacing Rear Control Arms Guide
This is basically what I did when I changed mine. Didn't drill much, instead built a vice-held press (metal plates/washers, threaded rod, sockets) to press the inner sleeves out from the rubber. Used a thin chisel to scrape some rubber from the outer sleeve, then used a $23 reciprocating saw from Harbor Freight to cut the outer sleeve. A few taps with a chisel/punch, and the sleeve slides out. I didn't have any issues with cutting into the trailing arm...just gotta know how to handle your tool.atraudes wrote: I had to do the same thing on my lateral arm bushings and used a drill to punch a bunch of holes in the rubber, then used a saw to cut between the holes so I could knock the center piece out. The drill bit cut close enough to the ring that I could see it and used the hacksaw technique on it.
Re: Replacing Rear Control Arms Guide
Awesome thread! For those of you who have replaced your arms, what do you do with the old ones? Anyone willing to sell me their old ones so I work on that while the truck is still on the road?
Old faithful has 285K miles and while the replacement parts will probably outlast the vehicle, the ride is currently really crappy.
Old faithful has 285K miles and while the replacement parts will probably outlast the vehicle, the ride is currently really crappy.
-
CrackingFilms
- Posts: 1
- Joined: Sun Sep 06, 2015 1:29 pm
- Car: Infiniti Qx4
Re: Replacing Rear Control Arms Guide
Hi,
Thanks for posting all this great info. Bought a used 2002 Qx4 (111,000) and have the "death sway". I want to order all of the parts I need and bring them to a mechanic (I can afford) with your guide. Can I confirm that I need to order these?
Dorman 905-803 Rear Driver Side Lower Trailing Arm
Dorman 905-804 Rear Passenger Side Lower Trailing Arm
And then this one is optional?
Complete Pathfinder Split Design Trailing Arm Bushing Kit
Will that cover everything? Also, can you confirm that these parts are the polyurethane ones people are recommending?
Thank you,
Audrey
-
Hawairish
- Posts: 462
- Joined: Sat Nov 08, 2014 1:43 pm
- Car: 2004 Nissan Pathfinder SE 4WD
- Location: Surprise, AZ
Re: Replacing Rear Control Arms Guide
Audrey,
You're wanting two uppers, and two lowers. They are identical driver vs passenger side.
The bushings are if you plan to re-use your current arms and just replace the bushings. The Dormans will come with rubber bushings already installed. Of course, nothing prevents you from replacing those new bushings with poly ones.
In either scenario, you will need new hardware. Do not re-use the existing hardware per Nissan. In most cases, they are damaged during the removal process.
Here's some details about the hardware:
http://www.nissanpathfinders.net/forum/ ... /?p=751089
Note that Nissan uses "prevailing torque lock nuts" (PTLNs) flange nuts instead of regular or nylock nuts. I suggest using them. See my note about just using the short bolts instead.
Also, you should check to see if your mechanic is willing to install customer-supplied parts. Many shops won't.
-
atraudes
- Posts: 1106
- Joined: Thu Jan 10, 2013 7:46 pm
- Car: 2001.5 Infiniti QX4 4WD
- Location: Sammamish, WA
Re: Replacing Rear Control Arms Guide
If you're bringing it to a mechanic, new arms aren't required. I got new arms when I did mine so I had some time to get the bushings they came with pressed out and the polyurethane ones installed. The shop will have everything there, so they can just press the old broken bushings out, install the new ones, and reinstall the arms.
You can buy new arms (or even just new rubber bushings) and skip the polyurethane kit, but I've read a number of reports here that say the rubber bushings that come with new arms don't last that long (less than a year). In that case you're back to step one and have to have the work redone
For what you're doing, I would recommend just getting the "Complete Pathfinder Split Design Trailing Arm Bushing Kit" (which, yes, is the polyurethane kit). It includes the nuts and bolts (hardware) that Hawairish was referring to. He brings up a good point, though. Some shops won't install customer-supplied parts because it's a "liability issue"
-
rgk
- Posts: 587
- Joined: Tue Dec 23, 2014 4:48 am
- Car: 02 Pathfinder LE 3.5 auto 4x4
- Location: Indiana Dunes National Park
Re: Replacing Rear Control Arms Guide
I've read that too and have a hard time believing the bushings only last a year. I wonder which brand of arms is in question...
-
screenmachine
- Posts: 7
- Joined: Sun Jun 15, 2014 1:31 pm
- Car: 99.5 Nissan Pathfinder
Re: Replacing Rear Control Arms Guide
Did you still need old trailing arms? I'm about to take mine out today.EdBwoy wrote:Awesome thread! For those of you who have replaced your arms, what do you do with the old ones? Anyone willing to sell me their old ones so I work on that while the truck is still on the road?
Old faithful has 285K miles and while the replacement parts will probably outlast the vehicle, the ride is currently really crappy.
Find Your Forum!