Hey everyone, I'll be replacing my lower ball joints tomorrow on my '01 4WD. I know this has been discussed before, but I wanted to see if anyone had specific tips or advice.
My main concer is moving the half-shafts out of the way. Are the hub caps and snap rings the only things I need to remove?
Replacing Lower Ball Joints Tomorrow…
-
barnaclebob
- Posts: 249
- Joined: Tue Feb 10, 2015 2:55 pm
- Car: 2001 Pathfinder LE
2011 Altima SR
Re: Replacing Lower Ball Joints Tomorrow…
I don't have any tips but if you took some pics and posted them after the job is done that would be awesome.
Re: Replacing Lower Ball Joints Tomorrow…
Try doing the drivers side first I think. After removing the grease cap and snap ring, there are a series of 6 bolts holding the half shaft to the diffy which need to be removed. Then it should slip out.
A pickle fork will work on these ball joints. Big hammer helps - I used a 5 lb dead blow. I repacked my wheel bearings at the same time since I was in there anyway.
All in all not too bad a job - some cars are a lot worse. Good luck!
A pickle fork will work on these ball joints. Big hammer helps - I used a 5 lb dead blow. I repacked my wheel bearings at the same time since I was in there anyway.
All in all not too bad a job - some cars are a lot worse. Good luck!
Re: Replacing Lower Ball Joints Tomorrow…
Well it took two days but I got it done. I will post my results here in a second, but I had a couple of concerns I wanted to ask about:
1. I forgot to put the zirc fitting into one of the ball joints. I figure I can just plug the hole until I need to regrease? It probably came with enough grease in it, yes? I would put it on but the cv joint is in the way.
2. I did not use a torque wrench for any of the bolts I removed/reinstalled, is this a big problem? Does the control arm require torque specs?
Re: Replacing Lower Ball Joints Tomorrow…
Here is the write-up/pictures:
Step 1:
Unlock lug nuts, jack up car, place jack stand, remove wheel.
Step 2:
Remove black hub cap
This is a metal cap, it can be removed by placing a pickle fork between it and the hub. There should be a dent in one side of the cap's rim. I guess this is there to hold the hub cap on, just pry the dent back.
Step 3:
Remove snap ring from half shaft
I bought a $10 tool at Auto Zone that can both expand and contract snap rings, very helpful. In this case, you need to expand the snap ring.
***At this point I think it is a good time to crack open all of the nuts/bolts you need to remove (4 that hold on the control arm, 3 that hold the ball joint onto the control arm, and 6 that hold the half axle to the diff). Once the lower control arm is off/loose, everything will get very floppy.
Step 4:
Remove lower control arm
I had to do this in order to get the half shaft out. There are 4 bolts that hold the lower control arm to the car. They were 7/8" on my car. I needed a 14" breaker bar with a 36" cheater bar to break them all loose.
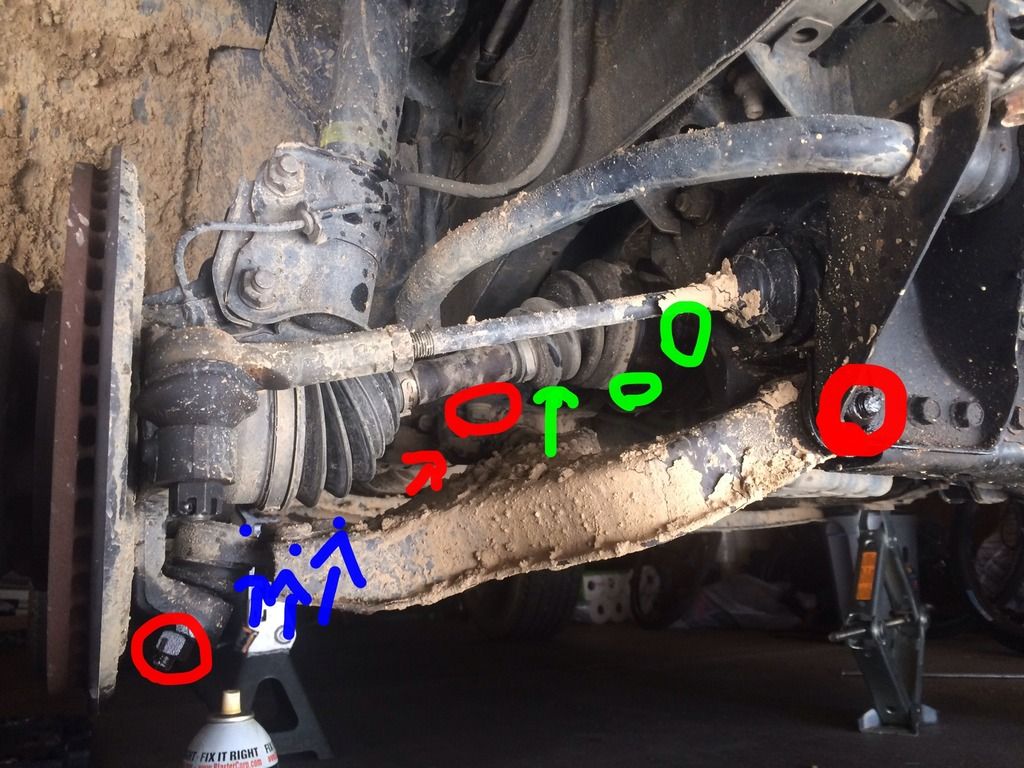
In the picture, the red shows the four bolts/nuts for the lower control arm, the blue shows the three ball joint bolts/nuts, and the green shows the three pairs of bolts for the half shaft.
Step 5:
Remove the three nuts that hold the ball joint to the lower control arm.
Step 6:
Step 6 is to remove the 6 bolts that hold the half shaft to the diff. HOWEVER, with the lower control arm off, you will probably find that the whole hub/knuckle/strut assembly is kinda floppy. In my case, I was able to push the assembly gently away from the car, which let the half shaft come out of the hub far enough for me to pull the ball joint out of the knuckle.
If you find that you do need to remove the half shaft though, you will need someone to apply the brakes so you can bust off the 6 bolts. A ratchet was enough leverage in my case.
Step 7:
Put everything back together!
Depending on how much shifting happened during the process, you may need to turn the steering wheel in order to line up both the front wheels. Remember to check to see if you need to install a zirc fitting before you crank everything down.
I did the driver's side first and it took me about four hours, with a friend. Once I had everything figured out though, the passenger side only took about two hours.
-
atraudes

- Posts: 1106
- Joined: Thu Jan 10, 2013 7:46 pm
- Car: 2001.5 Infiniti QX4 4WD
- Location: Sammamish, WA
Re: Replacing Lower Ball Joints Tomorrow…
Great writeup, thanks! Looks like you've been doing a bit of puddle jumping 
If you or anyone is interested in removing the CV joints while doing this or something similar, I found a technique for doing so. You'll want to loosen the six bolts on the CV before you unbolt anything else like the control arm. Rotate a pair of bolts to the 10:30 position (this gives you a straight line of view of them) and slide a screwdriver into one of the vanes of the brake rotor right next to the brake caliper bracket, so that when you start torquing on the wrench the screwdriver butts up against the bracket and stops the wheel from turning. Just put the screwdriver into the vane on the other side of the bracket when you go to reinstall the bolts. I used a 12mm socket on a 2 ft. or so extension and it was a cinch. Be sure to use threadlocker blue on the bolts when you put them back in
In answer to your earlier questions, it may be a problem that you didn't grease it, depending on whether the manufacturer greased them before you got them. I'd imagine there's some grease in there, but not enough to gamble having to do it over again. I'd take care of that sooner than later if you haven't already. Plug it up immediately so it doesn't get contaminated in the meantime.
I didn't use a torque wrench for reinstallation either, but I'd be more concerned about most people not tightening things enough than too much. Double check the tightness in a week or two if you have any doubts.
I always recommend Proforged parts for this type of thing whenever possible since they make really high quality parts that don't require regular greasing and come with a million mile warranty.
Glad to hear everything worked out well!
Re: Replacing Lower Ball Joints Tomorrow…
I got underneath and re-torqued the nut that connects the ball joint/control arm to the knuckle on each side. Can't tell if it made any difference but my steering feels great now, especially after the alignment.
I got Autotrust non-greasable ball joints from autopartswarehouse.com. During installation, I found that one of them had damaged threads, so I had to put a Masterpro one from Oreilly's on the passenger side. We'll see how they compare, but I might just get a replacement from APW so the pair matches.
I got Autotrust non-greasable ball joints from autopartswarehouse.com. During installation, I found that one of them had damaged threads, so I had to put a Masterpro one from Oreilly's on the passenger side. We'll see how they compare, but I might just get a replacement from APW so the pair matches.