I would atleast through on a 4" in/out Magnaflow muffler on there. That is what I did. Either a 6" or 7" core body, what-ever length you feel fit. No raspiness, no rice, nice and deep tone.....bmxarmy wrote: Also with the turbo I made a new back plate to weld the exhaust to. I am thinking of running straight 4" Any thoughts on this. Will it be way to loud? or sound stupid?
RBambler build thread
Re: RBambler build thread
Re: RBambler build thread
Ramius83 wrote:I would atleast through on a 4" in/out Magnaflow muffler on there. That is what I did. Either a 6" or 7" core body, what-ever length you feel fit. No raspiness, no rice, nice and deep tone.....bmxarmy wrote: Also with the turbo I made a new back plate to weld the exhaust to. I am thinking of running straight 4" Any thoughts on this. Will it be way to loud? or sound stupid?
Awesome ya, that was one of my major goals. No rice, nice! hahaha. thanks man I will likely do that.
-
robbie2883
- Posts: 605
- Joined: Thu Jun 01, 2006 5:36 am
- Car: 1998 RB25 Kouki
Re: RBambler build thread
you have an RB. you could run it straight open dump and it won't sound ricey.
-
l0nestar
- Posts: 2251
- Joined: Fri Mar 10, 2006 5:24 am
- Car: 1993 Nissan 250SX
2004 Toyota Altezza
1963 Chevy Impala SS - Contact:
Re: RBambler build thread
Your right - not 'ricey' at all.. just the resonance at cruising speed is deafening.robbie2883 wrote:you have an RB. you could run it straight open dump and it won't sound ricey.
... ask me how I know..
Re: RBambler build thread
HAHAHAHA ok, I have never had an rb before so I dont know! I have a blown small block in tin can hotrod......ask me how i know about resonance! ahhaha thanks guys looks like straight 4" for now. if it is to loud I will quite it down in the winter.
-
robbie2883
- Posts: 605
- Joined: Thu Jun 01, 2006 5:36 am
- Car: 1998 RB25 Kouki
Re: RBambler build thread
i like both quiet and loud. so i have a cutout! LMAO
Re: RBambler build thread
Update time.
It was Canada Day long weekend up north! I was able to get 2 solid days out in the garage. I got the rear end all finished. I got it all leveled and centered under the car and tacked the ladder bars to the rear housing. I then made the panhard bar to keep the rear centered and tacked it into place. Last was shock brackets. After it was all fit up I lowered it to the ground and tried it out. Once it all checked out I removed it all for final welding.


Then I assembled the center section, I have never done one before so I took my time and triple checked everything. It all turned out good though, with the proper meshing of ring gear and pinion. I ended up running 4.11 gears.


In between all this I got the header sand blasted and gave her a coat of high heat black.


Also got the holset completely cleaned up and ready for action!

Once I got all that done I got everything ready for a coat of rust bullet. I love this stuff for things like chassis parts. Its kinda like dp-40 but way harder, Once it is cured you can hit it with a hammer and it wont chip! They claim you can spray it directly over rust too! haha ( I wouldnt try) I sprayed the gas tank, ladder bars, pan hard bar and the rear end.


I also went through a tube of seam sealer in the car as I am done welding it all now, And looking forward to final assembly I Still need one more tube to finish and will pick one up tomorrow.

Lastly I installed the rear disc kit on one side. It was a bit of a f*** around due to running 11" disc on 15" rims but with a light shave to the caliper and a 3/8" wheel spacer I got it to fit.

Final note, My father in laws frame is back and pretty much fully assembled. It is now a roller! Next step is seam sealer and rust bullet on the bottom of the body before the 2 can be mated again.

I have a final push on now to get it all done by the second weekend in August. There is a local weekend camping/car show we never miss and we cant fit all of our camping stuff in the hotrod for some reason.
nolan
It was Canada Day long weekend up north! I was able to get 2 solid days out in the garage. I got the rear end all finished. I got it all leveled and centered under the car and tacked the ladder bars to the rear housing. I then made the panhard bar to keep the rear centered and tacked it into place. Last was shock brackets. After it was all fit up I lowered it to the ground and tried it out. Once it all checked out I removed it all for final welding.
Then I assembled the center section, I have never done one before so I took my time and triple checked everything. It all turned out good though, with the proper meshing of ring gear and pinion. I ended up running 4.11 gears.
In between all this I got the header sand blasted and gave her a coat of high heat black.
Also got the holset completely cleaned up and ready for action!
Once I got all that done I got everything ready for a coat of rust bullet. I love this stuff for things like chassis parts. Its kinda like dp-40 but way harder, Once it is cured you can hit it with a hammer and it wont chip! They claim you can spray it directly over rust too! haha ( I wouldnt try) I sprayed the gas tank, ladder bars, pan hard bar and the rear end.
I also went through a tube of seam sealer in the car as I am done welding it all now, And looking forward to final assembly
Lastly I installed the rear disc kit on one side. It was a bit of a f*** around due to running 11" disc on 15" rims but with a light shave to the caliper and a 3/8" wheel spacer I got it to fit.
Final note, My father in laws frame is back and pretty much fully assembled. It is now a roller! Next step is seam sealer and rust bullet on the bottom of the body before the 2 can be mated again.
I have a final push on now to get it all done by the second weekend in August. There is a local weekend camping/car show we never miss and we cant fit all of our camping stuff in the hotrod for some reason.
nolan
-
AZhitman

- Administrator
- Posts: 54544
- Joined: Mon Apr 29, 2002 2:04 am
- Car: 58 L210, 63 Bluebird RHD, 64 NL320, 65 SPL310, 66 411 RHD, 67 WRL411, 68 510 SR20, 75 280Z RB25, 77 620 SR20, 79 B310, 90 Z32, 91 GTi-R, 92 Silvia Qs, 98 S14, 23 Z.
- Location: Surprise, Arizona
- Contact:
Re: RBambler build thread
<sigh>
This is easily and by far my favorite thread on the whole forum. Period.
Nolan, we gotta hang out someday. Your fab work is incredible, and that shop is to die for.
Thanks for sharing this build with us... Keep rockin'!!!
This is easily and by far my favorite thread on the whole forum. Period.
Nolan, we gotta hang out someday. Your fab work is incredible, and that shop is to die for.
Thanks for sharing this build with us... Keep rockin'!!!
Re: RBambler build thread
Thanks greg, We will hang out someday! The shop is pretty sweet, it just gets me depressed some days when it is so cluttered. I always pictured my dream garage and I built it. I never pictured the mess! haha
Re: RBambler build thread
Monday night update,
I got the rear end ready to put in the car. I ran the new brake lines to a flexie hose that will go to a bracket on the frame rail.


I also sprayed the bottom of the car with rock gaurd/ undercoat, The pics make it look like a** but it actually turned out pretty nice. Once again its not gonna be a show car. It is going to be driven and driven hard.

I think I will give it another coat before I throw the rear end back in, by the pics it looks like I missed some spots anyways! haha
Lastly I mocked up the turbo so I can stop and get some custom lines made. There is a local distributor that can make them on the spot for about 40 or 50 bucks a line so I figure its worth the while. The motor is gonna look pretty good once she is all buttoned up!

Hopefully more updates tomorrow.
nolan
I got the rear end ready to put in the car. I ran the new brake lines to a flexie hose that will go to a bracket on the frame rail.
I also sprayed the bottom of the car with rock gaurd/ undercoat, The pics make it look like a** but it actually turned out pretty nice. Once again its not gonna be a show car. It is going to be driven and driven hard.
I think I will give it another coat before I throw the rear end back in, by the pics it looks like I missed some spots anyways! haha
Lastly I mocked up the turbo so I can stop and get some custom lines made. There is a local distributor that can make them on the spot for about 40 or 50 bucks a line so I figure its worth the while. The motor is gonna look pretty good once she is all buttoned up!
Hopefully more updates tomorrow.
nolan
-
240sxwanted

- Posts: 39
- Joined: Tue Sep 28, 2010 7:13 am
- Car: 03' 350z track edition, 97' rb25 s14
Re: RBambler build thread
f*** awesome work man. You should make me a custom turbo elbow...
Re: RBambler build thread
I would love too......Its just hard to fab something that will work without a car to mock it up on! to bad you didnt live closer! haha
Re: RBambler build thread
Weekend update
I was in my friends wedding party on Saturday which took up most of my week and weekend. It was a blast though! Lots of friends family and drinks! I did get a few things done this afternoon and earlier in the week.
I got the rear end fully assembled and put back in the car. It all turned out pretty good and I think it is going to work well, only time will tell I guess. The only thing I have left on the rear is the e-brake lines. I am going to have to dream up a way to get the new cables hooked up to the old line. I am going to wait till it is all running and put it on the lift for that.


I got a bunch of things finished up on the motor as well. I got the coolant lines plumbed back up and will be running the stock oil cooler for now. I just put a small piece of hose between the heater feed and return lines for now. If time allows I will get a small heater in the car for those cooler nights driving home.


I have to get a tap to clean up 3 of the exhaust stud holes. 3 were broken when I got the motor and once I got them out I need to clean up the threads. Side question....How heavy is everyone's exhaust mani? My turbo and manifold is pretty heavy and seems like a lot of stress on the head. I am guessing it is ok but it just seems a lot heavier than a regular manifold.

Also got some custom lines made for an oil feed line to the turbo and a flexi hose from the frame to the clutch cylinder.

Last thing done I modified a coil spring to fit in the front. When I put the car on airbags 2 years ago I through out the stock springs Now I am having a hard time finding coils that will fit. Worst case I will run the front bags till I can find some coils that will work. I think what I have will work its just that I am not to fond of heating and bending spring steel.

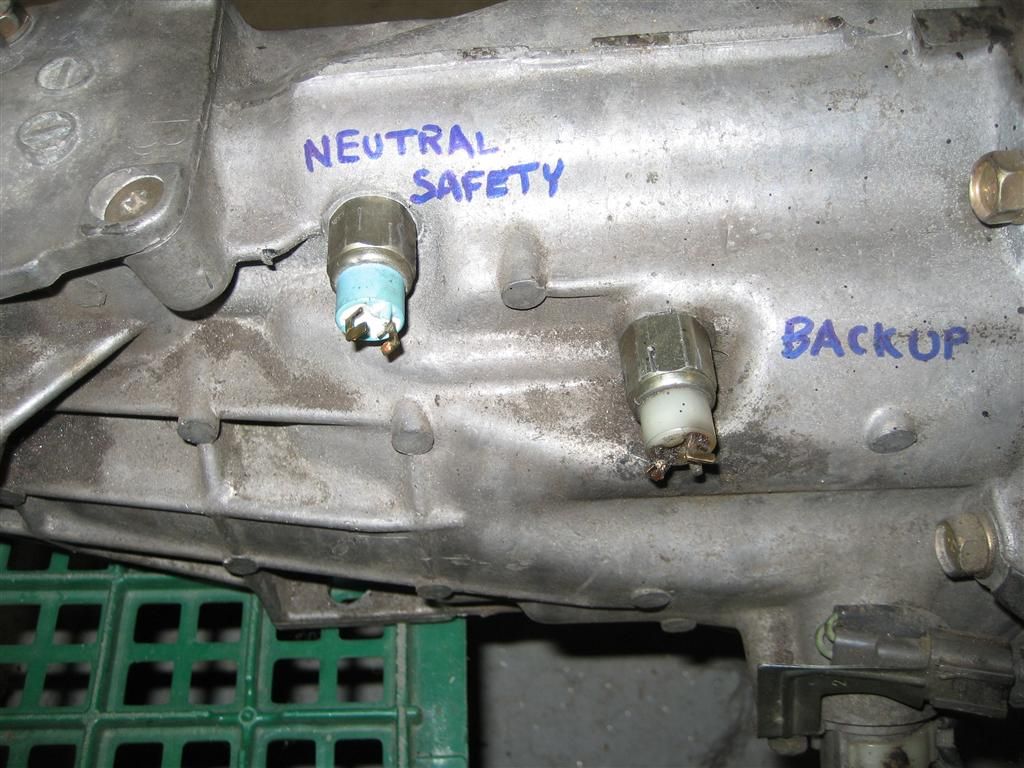
I also figured out what the 2 sensors on the trans are. One is a neutral safety switch and the other a reverse light switch. I metered out both switches and none of them work. Does anyone know were I can find new one's or why they both dont work? Is it fairly common for them to fail?
thanks again All!
nolan
I was in my friends wedding party on Saturday which took up most of my week and weekend. It was a blast though! Lots of friends family and drinks! I did get a few things done this afternoon and earlier in the week.
I got the rear end fully assembled and put back in the car. It all turned out pretty good and I think it is going to work well, only time will tell I guess. The only thing I have left on the rear is the e-brake lines. I am going to have to dream up a way to get the new cables hooked up to the old line. I am going to wait till it is all running and put it on the lift for that.
I got a bunch of things finished up on the motor as well. I got the coolant lines plumbed back up and will be running the stock oil cooler for now. I just put a small piece of hose between the heater feed and return lines for now. If time allows I will get a small heater in the car for those cooler nights driving home.
I have to get a tap to clean up 3 of the exhaust stud holes. 3 were broken when I got the motor and once I got them out I need to clean up the threads. Side question....How heavy is everyone's exhaust mani? My turbo and manifold is pretty heavy and seems like a lot of stress on the head. I am guessing it is ok but it just seems a lot heavier than a regular manifold.
Also got some custom lines made for an oil feed line to the turbo and a flexi hose from the frame to the clutch cylinder.
Last thing done I modified a coil spring to fit in the front. When I put the car on airbags 2 years ago I through out the stock springs
I also figured out what the 2 sensors on the trans are. One is a neutral safety switch and the other a reverse light switch. I metered out both switches and none of them work. Does anyone know were I can find new one's or why they both dont work? Is it fairly common for them to fail?
thanks again All!
nolan
-
AZhitman
- Administrator
- Posts: 54544
- Joined: Mon Apr 29, 2002 2:04 am
- Car: 58 L210, 63 Bluebird RHD, 64 NL320, 65 SPL310, 66 411 RHD, 67 WRL411, 68 510 SR20, 75 280Z RB25, 77 620 SR20, 79 B310, 90 Z32, 91 GTi-R, 92 Silvia Qs, 98 S14, 23 Z.
- Location: Surprise, Arizona
- Contact:
Re: RBambler build thread
Nolan - Get some specs on the coils you think you'll need (diameter, # of free coils, wire thickness, and height). I have a few spare coils here, who knows - might get lucky.
Also, did you apply power to the switches and modulate them? Not sure if they're mechanical or pressure-actuated (I think they're both mechanical). They don't commonly go bad.
Also, did you apply power to the switches and modulate them? Not sure if they're mechanical or pressure-actuated (I think they're both mechanical). They don't commonly go bad.
Re: RBambler build thread
Thanks greg, I didnt power the switched. They are mechanical, driven by a plunger or rod attached to the shifter. Seems kinda fishy that both are bad!
Coils need to be 7" tall under full load.... Obviously I have no idea what that translates too uncompressed. The ID of the coil needs to be 5" and again #free coils doesn't matter so much as long as it supports the weight.....Car originally weighed about 2900lbs. Not sure if the rb would be heavier or lighter than the original straight 6.
On a side note I could always run the front bags for now till I find something that will work better, I just don't have a compressor to fill the tank. I used to run a big engine driven but that isn't gonna fit now and I hate noisy and slow electric ones.
nolan
-
AZhitman
- Administrator
- Posts: 54544
- Joined: Mon Apr 29, 2002 2:04 am
- Car: 58 L210, 63 Bluebird RHD, 64 NL320, 65 SPL310, 66 411 RHD, 67 WRL411, 68 510 SR20, 75 280Z RB25, 77 620 SR20, 79 B310, 90 Z32, 91 GTi-R, 92 Silvia Qs, 98 S14, 23 Z.
- Location: Surprise, Arizona
- Contact:
Re: RBambler build thread
The RB will be lighter, significantly.
Reason I asked for all those measurements is that's how you calculate spring rate.
Those switches are a simple design, remove them and test for continuity (open and closed). I doubt they're both bad.
One thing that DOES happen with those cheesy Nissan switches is where the metal sleeve is crimped around the plastic switch body, they'll leak. It's a bigger issue on an auto trans, but mine on my KA manual did it as well. Simple fix, coat the seam with some RTV and let it dry before reinstalling (I put a piece of heat shrink over mine as well after the RTV).
Re: RBambler build thread
Yeah I did take them out and metered them on the bench, fully out or in or anywhere in between no continuity. I could see how they leak too!
Whats the weight of an after market exhaust manifold? It might just be me but the weight of the wastegate turbo and mani seems like a lot to only be supported by the aluminum head. Think I'm just crazy?
thanks again!
Whats the weight of an after market exhaust manifold? It might just be me but the weight of the wastegate turbo and mani seems like a lot to only be supported by the aluminum head. Think I'm just crazy?
thanks again!
-
l0nestar
- Posts: 2251
- Joined: Fri Mar 10, 2006 5:24 am
- Car: 1993 Nissan 250SX
2004 Toyota Altezza
1963 Chevy Impala SS - Contact:
Re: RBambler build thread
I can't say about the weight on an aftermarket manifold and HX35, but if you are concerned, just build an isolated brace (one end bolts to somewhere like the oil-drain bolt or somewhere else solid, then the other bolts to an available bolt hole on the block. )
PS what frames are those in the background here:
PS what frames are those in the background here:
Re: RBambler build thread
Yeah, I think I will build a brace down to the block, just to be safe.
First bike is my old macneil miron frame, I love that bike. Spent many hours on that thing.
Next is a Powerlite p-40 race bike. Pretty top of the line in its day, long story I never raced it was just the right price
Behind that is my low rider bike I built a long time ago. I will take a better pic next time I'm out there. I built 96 spoke radial laced rims for it........took forever but looks sweet!
Side note on the Rbambler, I got the brake lines all bled. Ran into a slight issue on the front disc conversion but I hope to have that sorted out with new rotors tomorrow. The motor is ready to go in for the last time minus the brace I think I am going to make that will support the turbo. It now steers and stops.......I guess I better make it go! Oh and sorry for no pics, bleeding brakes isn't very exciting.
nolan
Re: RBambler build thread
Nolan, love your build. Just one thing; consider getting that manifold coated in something besides high temp paint. It's going to burn off VERY quickly (within days I would bet) and look crappy. Seeing the rest of your detail it will likely drive you nuts and you will end up taking the manifold back off anyway to get it back up to snuff!
I have a couple sets of coils. I will see if anything is close to what you are looking for.
I have a couple sets of coils. I will see if anything is close to what you are looking for.
Re: RBambler build thread
Awesome thanks man!
Plan for the header is to run it till winter hits the great white north. then it will be head studs/porting, head gasket and maybe rods/pistons if money allows then more boost!! At that time if the header is all good it will be getting ceramic coated. I agree it will bug me having an ugly black manifold but i will have to tuff it out till fall. I would hate to have it coated then see it crack in like a month.
Let me know about the coils...I appreciate that. I got new front rotors today off a Mazda MPV 89-91 fit like a glove and solved my problems!
nolan
-
AZhitman
- Administrator
- Posts: 54544
- Joined: Mon Apr 29, 2002 2:04 am
- Car: 58 L210, 63 Bluebird RHD, 64 NL320, 65 SPL310, 66 411 RHD, 67 WRL411, 68 510 SR20, 75 280Z RB25, 77 620 SR20, 79 B310, 90 Z32, 91 GTi-R, 92 Silvia Qs, 98 S14, 23 Z.
- Location: Surprise, Arizona
- Contact:
Re: RBambler build thread
(off-topic) We'll have to talk BMX someday... my oldest raced in the ABA for several years, won a pile of nationals and placed at the Grands... He owned a Powerlite, a Staats, a DK, a Titan, and a custom-built UFO (that I'm considering selling). I spent more on bike parts than I did on my first car.
Re: RBambler build thread
Sounds good. I will take a look at my coils.
Re: RBambler build thread
OT.....hahaha, oh well. Those silly bikes took me all over the world. I only rode parks and street, before 12 year olds were doing back flip tailwhips! hahaha It is pretty much like watching a video game now!
I just finished bolting up the exhaust mani for good. What a PITA!! Hopefully it wont have to come of ever when the motor is in the car! I dont think i am going to support the mani like i said i was. Now that it is all bolted up tight it feels pretty rigid.
Pics of the install coming shortly.
Nolan.
Re: RBambler build thread
Well had a pretty solid night out in the garage. I got the front brakes all fixed up and ready to rock. I am excited to see how this thing is gonna stop. In theory the car should be a bit lighter and I went from 9" drums all around to 10" discs up front and 11" discs in the back. I also got the motor back in and all bolted up.....hopefully for the last time! Once it was in I got the clutch line all hooked up and ready to bleed. Hopefully another night this week my neighbor can stop by and give me a hand with that. Then i vacuumed the interior all out and started on wiring. I have done about 5 cars with these e-z wiring kits and it always seems to go OK. Its a little confusing with the megasquirt also as there is some things it is supposed to control such as the fuel pump and others that I will have to disregard out of the ez kit. I didn't get to far with it tonight, I got the wife out there for a few minutes and she helped me pull all the stuff that goes to the front of the car through the firewall. If I have learned anything with these kits it is that you are way further ahead taking your time and doing everything nice and neatly. You rush through and try to leave things long or short and it turns out super messy. Anyways here is how it looks as of tonight.


Thats it for now, with any luck tomorrow I will get the easy wiring parts done (headlights,tail lights, turn signals,etc) Then I will move on to the harder stuff such as the megasuirt! I also started "the list" It is about a full page long of things that need to be done. The show I really hope to have her ready by is only 21 days away......I better get after "the list"
nolan
Re: RBambler build thread
Weekend update..We went camping this weekend so it was a slow start, I worked on the wiring for a little on Friday before we left and we made it home around noon today. We unpacked quickly and i spent the rest of the afternoon and evening out in the garage.
I cut apart the harness and got all the circuits I am never gonna use out of the way. Like I said before if you r are not careful you can make a rats nest quickly!

Then I finished up the dash wiring and put all the wires into a 12 pin quick connect plug and matched it to the one I did in the car.


I welded up a down pipe off the turbo and installed the wide band 02 plug. I need to pick up some more 3" pipe this week to finish the exhaust. I was gonna run 4" but room does not all for it! I also made new spark plug wires and mounted the ford coil pack.


Near the end of the night my parents stopped by with the fished front seat! My mom is getting pretty good with the upholstery! Its nice having someone who can do everything. Before they left my dad helped me through the dash back in. It is pretty awkward to get in there on your own


that's it for now, I have a busy week at work and a little day trip out of town, but I hope to finish up the wiring and fuel this week.
nolan
I cut apart the harness and got all the circuits I am never gonna use out of the way. Like I said before if you r are not careful you can make a rats nest quickly!
Then I finished up the dash wiring and put all the wires into a 12 pin quick connect plug and matched it to the one I did in the car.
I welded up a down pipe off the turbo and installed the wide band 02 plug. I need to pick up some more 3" pipe this week to finish the exhaust. I was gonna run 4" but room does not all for it! I also made new spark plug wires and mounted the ford coil pack.
Near the end of the night my parents stopped by with the fished front seat! My mom is getting pretty good with the upholstery! Its nice having someone who can do everything. Before they left my dad helped me through the dash back in. It is pretty awkward to get in there on your own
that's it for now, I have a busy week at work and a little day trip out of town, but I hope to finish up the wiring and fuel this week.
nolan
Re: RBambler build thread
I love this thread. Its soooooo full of winnnn.... Good work sir..
Re: RBambler build thread
Thursday update.
It has been a busy week but I have been able to get quite a bit done so far. I got the entire car wired up and tested, (not the motor yet,just the car) I must have learned something the last time I did one of these wiring kits as EVERYTHING worked first try. turn signals, park lights, the works! Even the dash lights come on and dim!

I got the fuel cell mounted up under the trunk where the stock tank was. After some debate, I decided to cut a big hole in the floor to access the fuel pump and sender. I figured I don't cut the hole and the pump will have issues week one, I cut the hole....never a problem. Either way better to be safe! i will make a new cover to screw down later.


Tonight I finished up the inter cooler piping. I used pre bent aluminum stuff on the hot side and steel on the cold side as I needed to weld on a flange for the bov. (my aluminum welding skills need some practice). It looks a lil goofie but should work ok.


Lastly I finished up the down pipe, sprayed it in high heat paint, And wrapped it in header tape. I want to keep as much heat away from the brake booster as possible. I threw it back in after so I can finish up the exhaust.


That is it for now, I am going to go hard on the car Friday night and Saturday all day.
nolan
It has been a busy week but I have been able to get quite a bit done so far. I got the entire car wired up and tested, (not the motor yet,just the car) I must have learned something the last time I did one of these wiring kits as EVERYTHING worked first try. turn signals, park lights, the works! Even the dash lights come on and dim!
I got the fuel cell mounted up under the trunk where the stock tank was. After some debate, I decided to cut a big hole in the floor to access the fuel pump and sender. I figured I don't cut the hole and the pump will have issues week one, I cut the hole....never a problem. Either way better to be safe! i will make a new cover to screw down later.
Tonight I finished up the inter cooler piping. I used pre bent aluminum stuff on the hot side and steel on the cold side as I needed to weld on a flange for the bov. (my aluminum welding skills need some practice). It looks a lil goofie but should work ok.
Lastly I finished up the down pipe, sprayed it in high heat paint, And wrapped it in header tape. I want to keep as much heat away from the brake booster as possible. I threw it back in after so I can finish up the exhaust.
That is it for now, I am going to go hard on the car Friday night and Saturday all day.
nolan
-
Cjmartz2k
- Posts: 1845
- Joined: Sat May 19, 2007 1:39 pm
- Car: Hunting for a '89 GTR now
- Location: Okinawa, Japan
Re: RBambler build thread
Great build man! 
Re: RBambler build thread
Weekend update.
I got a fair bit done on saturday and the later part of the week. Sunday was a bust, I went to the edmonton Indy race here and checked out the race. I had a friend running a crx in the gt4 series.....I think its a local racing thing, not to sure.
I finished up the trunk and got it painted to clean it up.


Next I finished up the entire exhaust system and got it all bolted and gasketed up tight. I ran straight 3" and used an exhaust tip off of a 2010 chev 1 ton diesel! haha I think it actually turned out pretty good. Its hard to tell until i get the car rolled outside and see it from a distance.


I got the radiator in the car and finished up all the inter-cooler piping.


I fit up a pipe that goes from the motor to the radiator inlet as I didn't like the idea of running a rubber hose that far.


I got the edis6 ignition module and coil pack wired up to each other and the relay board, Sooooooo......We should have spark now! I haven't tested anything yet. I also wired the fuel pump into the relay board, tested and works great. The megasquirt primes the pump for 2 seconds or so until it "see's" the motor running. The mess of wires is starting to come to an end. All that is left is all the motor sensors back to the relay bored and the injector wiring. Then I can tidy everything up and strap everything down.


That's it for now, I'm gonna drop of the drive-shaft yoke and give them my measurements for the new shaft tomorrow. Hopefully this week we will make some noise out in the garage.
nolan
I got a fair bit done on saturday and the later part of the week. Sunday was a bust, I went to the edmonton Indy race here and checked out the race. I had a friend running a crx in the gt4 series.....I think its a local racing thing, not to sure.
I finished up the trunk and got it painted to clean it up.
Next I finished up the entire exhaust system and got it all bolted and gasketed up tight. I ran straight 3" and used an exhaust tip off of a 2010 chev 1 ton diesel! haha I think it actually turned out pretty good. Its hard to tell until i get the car rolled outside and see it from a distance.
I got the radiator in the car and finished up all the inter-cooler piping.
I fit up a pipe that goes from the motor to the radiator inlet as I didn't like the idea of running a rubber hose that far.
I got the edis6 ignition module and coil pack wired up to each other and the relay board, Sooooooo......We should have spark now! I haven't tested anything yet. I also wired the fuel pump into the relay board, tested and works great. The megasquirt primes the pump for 2 seconds or so until it "see's" the motor running. The mess of wires is starting to come to an end. All that is left is all the motor sensors back to the relay bored and the injector wiring. Then I can tidy everything up and strap everything down.
That's it for now, I'm gonna drop of the drive-shaft yoke and give them my measurements for the new shaft tomorrow. Hopefully this week we will make some noise out in the garage.
nolan