
The sticky at the top of this forum is just a dead link and missing most of the pictures/
Does anyone have all of the pics for the power valve screws for the 3.5L??
My qx4 has 160K on it and I think I might aswell do it the easiest way I possibly can but be sure that Im not going to suck up any screws
If anyone has the pics Id love to see that thread or link posted in the sticky to be working so I could read it in depth and have an idea of what I was geting into
Thanks!
Power Valve Screws Sticky Pics Arent Working
-
Pwnin O'Brien

- Posts: 1612
- Joined: Wed Jun 24, 2009 1:10 pm
Re: Power Valve Screws Sticky Pics Arent Working
Sorry about that, the switchover messed up the links and the pictures in that thread. Here's the link to the originating thread w/pics: http://npora.ipbhost.com/index.php?showtopic=17104. That has all of the pictures intact. I also have a bunch of pics from when I did it but they're on my external hard drive which is 330 miles away. Let me know if you have any questions!
Re: Power Valve Screws Sticky Pics Arent Working
Thanks I appreciate that, 'll read it over a few times and see if anything seems mis leading
Did you remove the plenum with the $50 gasket he did in the sticky?? I believe he said it was optional and just a matter of making the job a bit easier...
Did you remove the plenum with the $50 gasket he did in the sticky?? I believe he said it was optional and just a matter of making the job a bit easier...
Re: Power Valve Screws Sticky Pics Arent Working
so in his thread, this is the piece that you are pulling off of the engine when you undo the 13 bolts?? his thread doesnt show any pics of where the 13 bolts exactly came from
And all of the screws are INSIDE this plenum?? Only on the right sideor are there screws on the left side 2?? Just trying to figure out what exactly gets loctite and where it came from lol
I actually wanted to polish/paint the plenum that was exposed at the top of the engine and it seems that the piece pictured and it has to come off anyways.
-
Towncivilian

- Posts: 4868
- Joined: Sun May 23, 2010 10:21 am
- Car: 2001.5 Nissan Pathfinder SE 3.5L 2WD A/T
2007 Nissan Altima 2.5L CVT
2012 Nissan Sentra 2.0L CVT Special
2012 Infiniti G37 Sedan 7A/T - Location: Florida, USA
- Contact:
Re: Power Valve Screws Sticky Pics Arent Working
I was also planning on getting this done soon. I don't plan on taking off the lower intake plenum, just the upper to get at the screws and apply some threadlocker to them. Is buying replacement gaskets absolutely required? I read in one of the lengthier power valve discussion threads on NPORA that the gaskets seem durable, but I would have no qualms with buying the gaskets, it's still cheaper than having the dealer or somebody else do the job. morpheus's post on NPORA says that unless the gaskets become damaged in the process, they can all be reused. He's a Nissan service manager for North End Nissan, so I'm inclined to take his word for it.
Will "Permatex High Strength" red threadlocker from Advance Auto Parts work fine? The packaging's specification table says it withstands 300F temperatures. I read that there's no reason not to use permanent threadlocker as there's no purpose in removing the screws in the future.
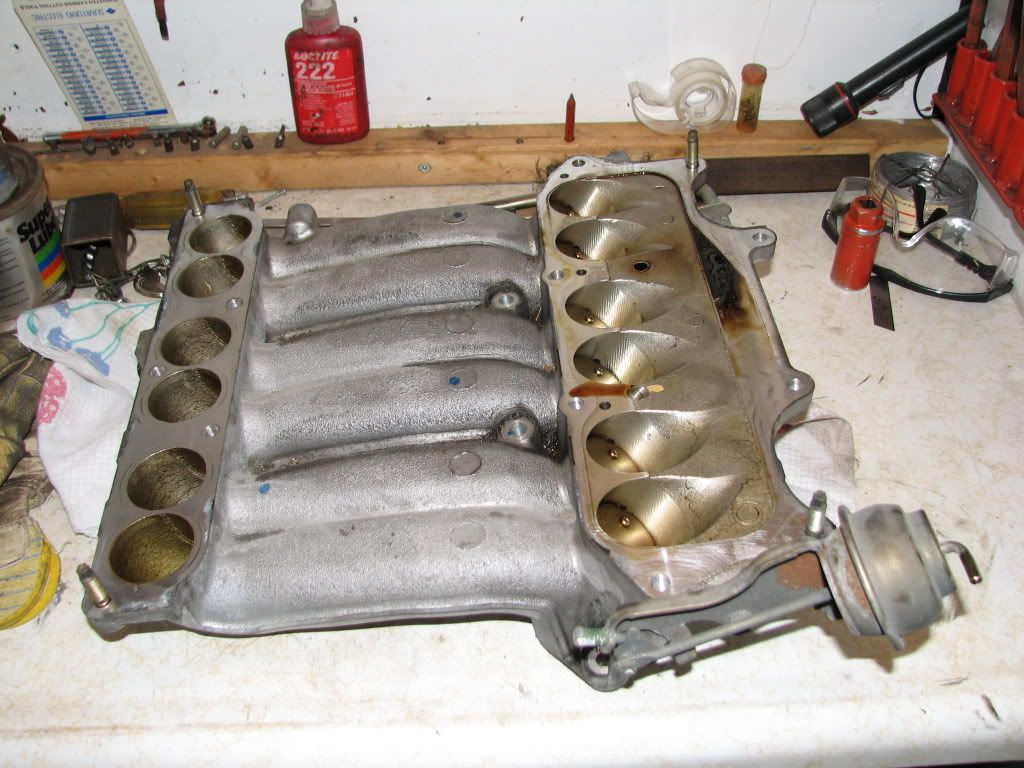
@CanuckQX4: I believe that is the lower intake plenum and you don't need to remove that to get access to the screws. See this pic (from here).
Will "Permatex High Strength" red threadlocker from Advance Auto Parts work fine? The packaging's specification table says it withstands 300F temperatures. I read that there's no reason not to use permanent threadlocker as there's no purpose in removing the screws in the future.
@CanuckQX4: I believe that is the lower intake plenum and you don't need to remove that to get access to the screws. See this pic (from here).
Re: Power Valve Screws Sticky Pics Arent Working
I can tell you after doing this 3 weeks ago that I did Re-use the gaskets that were on there , since a service manager at
local dealership had told me it was fine . I did buy a Felpro gasket kit and had it at the ready .. in case I felt I needed to replace or damaged one .. but actually returned the box un-opened to auto parts store .
I did spray each gasket with Spray Tack , gasket sealer spray ...nice stuff , holds in place and seals well , sprayed each side .
I also did not remove the Throttle Body , I simply left all the hoses and connections to it intact and tilted the left side of upper plenum up in the air , (viewing from front) (passenger side ) on end resting on the throttle body and tied with rope the TB , leaving me with plenty of access to the screws , mine were all tight but , removed and Loc-Tite Blue each one ... All went well and done in 1.5 hours ...
All is well .
-
Towncivilian
- Posts: 4868
- Joined: Sun May 23, 2010 10:21 am
- Car: 2001.5 Nissan Pathfinder SE 3.5L 2WD A/T
2007 Nissan Altima 2.5L CVT
2012 Nissan Sentra 2.0L CVT Special
2012 Infiniti G37 Sedan 7A/T - Location: Florida, USA
- Contact:
Re: Power Valve Screws Sticky Pics Arent Working
So you basically took the engine cover off, removed the bolts and brackets for the upper intake plenum (and I guess some hoses and any other item that would be in the way?), and moved it out of the way (resting on the throttle body) and had access to the screws that way?Litey wrote:I can tell you after doing this 3 weeks ago that I did Re-use the gaskets that were on there , since a service manager at
local dealership had told me it was fine . I did buy a Felpro gasket kit and had it at the ready .. in case I felt I needed to replace or damaged one .. but actually returned the box un-opened to auto parts store .
I did spray each gasket with Spray Tack , gasket sealer spray ...nice stuff , holds in place and seals well , sprayed each side .
I also did not remove the Throttle Body , I simply left all the hoses and connections to it intact and tilted the left side of upper plenum up in the air , (viewing from front) (passenger side ) on end resting on the throttle body and tied with rope the TB , leaving me with plenty of access to the screws , mine were all tight but , removed and Loc-Tite Blue each one ... All went well and done in 1.5 hours ...
All is well .
Re: Power Valve Screws Sticky Pics Arent Working
Sounds fairly straight forward
I hear a few paragraphs about 2 hard to reach bolt that you need to get at with a wrench in both explanations, but I cant figure out what bolt or what it hinders...
I think Im going to go ahead and do this, this weekend
I hear a few paragraphs about 2 hard to reach bolt that you need to get at with a wrench in both explanations, but I cant figure out what bolt or what it hinders...
I think Im going to go ahead and do this, this weekend
-
Pwnin O'Brien
- Posts: 1612
- Joined: Wed Jun 24, 2009 1:10 pm
Re: Power Valve Screws Sticky Pics Arent Working
There is a bolt which holds the upper (or maybe lower) intake plenum to the intake manifold. The bolt attaches a bracket which holds the two together. The bolt is on the rear of the engine, the top of the bolt head literally faces the firewall. Here are the special tools you will need to finish this job (outside of your regular wrenches and torque wrench): a 10mm Gear Wrench (it's the ratcheting wrenches with the movable elbows) and a deep 10mm (or 12mm?) socket. I suggest buying a deep socket set which includes both a 10mm and 12mm socket. I would also recommend just buying a 10mm and 12mm Gear Wrench since they just make life easier. Other than that you should be fine, just make sure you follow the tightening patterns precisely and make sure you torque the bolts properly. If you only remove the upper and lower plenums then this job wont take more than a few hours. I purchased the Felpro gasket set from Advance for like $13 (it costs about $80 at the dealer!!!) and I also did the intake manifold.CanuckQx4 wrote:Sounds fairly straight forward
I hear a few paragraphs about 2 hard to reach bolt that you need to get at with a wrench in both explanations, but I cant figure out what bolt or what it hinders...
I think Im going to go ahead and do this, this weekend
If you need help or have any questions just let me know!
Re: Power Valve Screws Sticky Pics Arent Working
Im just going to go ahead and tear into this tomorrow with half my truck in the garage and no heat in probly close to freezing canada temps lol
I'll take pics along the way and maybe they can help others.
Hope its easy!!
And I actually hope to find a semi loose screw so I can justify the job lol.....
I'll take pics along the way and maybe they can help others.
Hope its easy!!
And I actually hope to find a semi loose screw so I can justify the job lol.....