Okay this is the finish version of the first thread but i couldn't update it because it is 10 pictures per post, so basically i need to reserve posts right after mine to make a full complete post. It is the finished version of this thread
**Mod edited. Please no linking to competing forums**
Now, here we go....
PURCHASES[*] Foglights from EBAY or any other retailer (ive only seen these on ebay)[*]H11 Pigtail Connectors[*]HL87199 Wiring Harness
Preparation 1. Things need to be spliced together. Take the H11 connectors and connect them to the black and green wires by means of taps or soldering, whatever you are more comfortable with.
2. Now they can be connected into the foglights, im pretty sure polarity doesnt matter because i connected them in MANY ways and no matter what they always powered on
3. Now you need to get the switch ready, i did not like the green switch that came with the harness so i went to radioshack and purchased my own red one that looks like it COULD possibly be a OEM part instead of green which sticks out like a sore thumb. But the connection should be black, then yellow, then purple, read back of the switch and it will tell you where to start. Just remember, YELLOW GOES IN THE MIDDLE!!!
These just stick on, no soldering needed and they are pretty solid.
4. Now you have to decide what you want to do with the OTHER END of the purple wire. That is the sensor/power wire. It feeds power through the switch so basically, if you want to only be able to access your foglights when your headlights are on, then splice them into the + headlight wire. If you want to be able to be turned on when the parking lights are on then splice them into the + parking light wire. If you want to take the route i did and have the ability to turn your foglights on and off regardless of your car running or not, then do what it says in the next illustrations
This is what my harness ended up looking like with the purple wire tucked away
Now you are pretty much set for preparing the installation. Now for actually putting the damn thing in your car!!!
Installation1. Take off bumper. Some people may disagree but i found that taking off the bumper, though more work, gives you a LOT more room to work with so your hand isnt feeling around for the appropriate place to put something. To take off the bumper, use this guide
Technical Articles: Altima Coupe Bumper Removal
NOTE!!!There are an additional 5 more clips on the bottom side to be removed with the sedan. Not much more work, ive removed my bumper so many times i can do it in probably 5 minutes flat.
This is my bumper removed (i have a HID kit so thats the extra wires you see on the left)
2. Now you we have to get the purple, black, and yellow wire from the engine bay INTO our interior. I have a fujita intake so my intake removal is easier, you guys have to unscrew 2-3 screws and open 2 clips. Also VERY easy if you just look around the airbox, its a very easy removal. This is what you will be looking at now
3. Now locate the BIG bundle of wire that travels along the fusebox to the right. Its the big black thick plastic thing that goes right towards the driver side. If you peer around, you see this
Now after locating the wire, you have to understand that the switch will be going through that hole but you have to poke through a bit of cloth, a bit of cardboard, and 1 thick rubber grommet. A lot of people said it was a pain in the ***, however if you have a dremel, just use that to drill a hole through the grommet. But back to the steps
4. Go inside the car and stick your head under the steering wheel area. Look near the parking break to the left side and look for the bundle of wire that slams RIGHT into the firewall
Now use a sharp knife to cut an L shape into the cardboard, but make sure you are around .5-1 inch to the right of the wire bundle to make sure you dont cut any wires. Cut hard because you have to get thru the damn cardboard.
this is autoconcepts picture from his firewall penetration guide, NOT my picturethis is autoconcepts picture from his firewall penetration guide, NOT my picture
5. After locating and cutting through the cardboard and fabric, take a drill, preferably dremel and drill through the rubber. Using my dremel at full speed, it took barely a second. I was surprised that i was so quick and i thought i didn't do anything.
6. Then take a wire clothes hanger and shove through the hole. If you hear a metal clang then you hit the inside of the metal hole, pull it back and shove it through until you don't feel anything preventing it from going any further.
7. Go back into the engine bay and take a look at where the wire bundle is, see if you can locate the clothes hanger and pull it through.
8. Tape the switch wires to the end of the clothes hanger, go back into the interior and pull the wires through.
9. Now we have to take apart the plastic right under the steering wheel to give the switch a place to sit. On the left side, there should be a half circle, remove that. Now if you look close to the hood pop handle, there should be a plastic square with a hole. Yank that piece out and remove the Phillips head screw you see
THESE 2 PICTURES BELONG TO tooslow_4_u, I DID NOT TAKE THEMTHESE 2 PICTURES BELONG TO tooslow_4_u, I DID NOT TAKE THEMTHESE 2 PICTURES BELONG TO tooslow_4_u, I DID NOT TAKE THEM
10. Now with the lower piece off, look inside near the switch that opens the trunk. You will be placing the foglight switch in one of the blank spots. You can easily pop out one of the slots but i just removed the entire tray by unscrewing the two phillips heads holding it down and taking off the trunk switch wireWhen popped out, you should have this
11. Drill a hole in which ever slot you want your switch to go into. You need to hollow out the back as well so the ring for the switch can fit. For me, i used a dremel + sanding bit and gouged out the back so everything fits nice and snug. The hole looks bad but you can't see the hole itself when the switch is in place
12. Reattach the wires to the switch
13. And put everything back in its place. Heres what mine looked like when everything was together
14. Now for rigging up the actual foglights themselves. On the inside of the bumper, there are 2 screws to be removed, 1 on top of each foglight. Take out the plastic pieces of crap and put the foglights into place. Keep in mind there are guides on the left and right of the light, 1 screw at the top and 1 clip at the bottom.
15. Now connect the red wire of the harness to the positive battery terminal and the black wire to the negative battery terminal.
16. securely fasten all the wires away not too close to the transmission or engine but in a dry place. Other words, near the battery. I placed it between the battery and the front because the top of my relay broke off so i just ziptied the sucker down there and it is stable.
17. Connect foglights together and place the bumper back on, put all screws and clips back on and make sure everything is stable
17. MAKE SURE ALL WIRES ARE SECURE, check EVERYTHING and then check everything AGAIN.
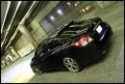
And your finished. Final product :
Any questions or suggestions, post here or PM me. Don't be afraid to ask. I am NOT electrically inclined but i rigged this whole thing up in less then an hour. I'm just another guy with cash and a wrench.
OEM Foglight Preparation/Installation Guide!!!
-
gatorglaze

- Posts: 162
- Joined: Sat Feb 23, 2008 4:00 am
- Car: 08 Nissan Altima Sedan

Re: OEM Foglight Preparation/Installation Guide!!! (gatorglaze)
Very Nice install.. Only thing I would have done different is find a more stock looking switch or a small micro switch...Other then that looks great.
Re: OEM Foglight Preparation/Installation Guide!!! (08Coupe)
I couldn't find a 12V, lighted micro switch that fit. Radio Shack has one, but it was a snap-fit vs ring-on-the-back and the way those blanks are configured it wouldn't go on firmly (and stay). I discovered this after ordering ($12....) and it's still in my box. I mounted my switch under that pod, near the emergency key switch to be less obtrusive (aesthetics and the light glare). Here's also a shot of the old switch in my Accord, which was perfect but no longer available (at least thru Radio Shacks confounded website..).
08Coupe wrote:Very Nice install.. Only thing I would have done different is find a more stock looking switch or a small micro switch...Other then that looks great.
-
gatorglaze
- Posts: 162
- Joined: Sat Feb 23, 2008 4:00 am
- Car: 08 Nissan Altima Sedan
Re: OEM Foglight Preparation/Installation Guide!!! (ssjones)
The only reason i went with the same style switch is because im afraid of not remembering to turn the fogs off when i get out of the car. I got red because red is the most visible color in the color spectrum so i will notice it better. i wanted a switch like you have on the accord but radio shack didn't have the illuminated version and i was installing it later that day. It was the one i chose, or a huge *** toggle switch that looks like it's for a wet shot of nos. Too obnoxious. I find this one slightly obnoxious.
Re: OEM Foglight Preparation/Installation Guide!!! (gatorglaze)
I had to order the one used in my Honda, RS doesn't carry lighted, 12V switches in the store. Same for the new one, heck the shipping was more than the switch.gatorglaze wrote:The only reason i went with the same style switch is because im afraid of not remembering to turn the fogs off when i get out of the car. I got red because red is the most visible color in the color spectrum so i will notice it better. i wanted a switch like you have on the accord but radio shack didn't have the illuminated version and i was installing it later that day. It was the one i chose, or a huge *** toggle switch that looks like it's for a wet shot of nos. Too obnoxious. I find this one slightly obnoxious.
-
SHIFT_COUPE

- Posts: 3887
- Joined: Fri Aug 03, 2007 3:36 am
- Car: 2014 Infiniti Q50 AWD
- Location: Bethel, CT
- Contact:
-
gatorglaze
- Posts: 162
- Joined: Sat Feb 23, 2008 4:00 am
- Car: 08 Nissan Altima Sedan
Re: (SHIFT_COUPE)
Custom title? For what?SHIFT_COUPE wrote:Great write-up!
Make sure to contact either me or Eric for your custom title if your interested in one!

Re: OEM Foglight Preparation/Installation Guide!!! (gatorglaze)
Nicely written. Luckily, my sedan came with fog lights. But i'm in the process of changing low beams and fogs to HIDs. thanks for the link on how to remove front bumper.
Re: OEM Foglight Preparation/Installation Guide!!! (gatorglaze)
Gator you just love to sprinkle the int0rwebz with information Now get back to ghetto rigging that wired remote to the D3 so I can know how to do it too
-
Coupeguy23

- Posts: 611
- Joined: Thu Jul 10, 2008 8:34 am
- Car: 2006 G35 coupe sport
- Location: Nashville TN
Re: OEM Foglight Preparation/Installation Guide!!! (Jose3.5)
I have question can you use fog lights from the sedans altimas on the altima coupe ?
Re: OEM Foglight Preparation/Installation Guide!!! (Coupeguy23)
Yes, you can.Coupeguy23 wrote:I have question can you use fog lights from the sedans altimas on the altima coupe ?
Re: OEM Foglight Preparation/Installation Guide!!! (gatorglaze)
where's your custom title!?
Re: OEM Foglight Preparation/Installation Guide!!! (mcheddadi)
Great write up and great pictures
-
Coupeguy23
- Posts: 611
- Joined: Thu Jul 10, 2008 8:34 am
- Car: 2006 G35 coupe sport
- Location: Nashville TN
Re: OEM Foglight Preparation/Installation Guide!!! (ursus)
Thanks guys im still learning how to put pic on here