Hello all! I'm fairly new to ODPL, yet I have been poking about here for close to a year trying to absorb some motivation to tackle this project.
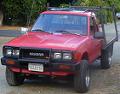
I picked up this 85 720 4x4 7-8 years ago for the nice bed and lumber rack which my former employer built. It pulled more than it's share up until 2005 when it blew a head/head gasket and I moved onto driving another rig.
My plans are to make this a reliable daily driver once again, yet mod it enough to sit on 31/10.5's and see some light trails on the weekends.
Here it is as it sits. I have stolen the wheels to roll another vehicle and plan to return them shortly.
The rear wheels are off a newer rig, look horrible, and the nissan lugnuts almost fall through the holes! Not recomended.
Yup, dirty oily z24 before tear down. I have previously tore down 3 motors, two small block chevies, and an old vw, and have only gotten one back together. (betcha can't guess) -- Although I have done my own wrench work on over a dozen vehicles over the last 15 years.
Between OPDL's stickies and my Chilton manual I now feel optimistic about seeing if this head is still in good shape. If all else fails I expect to have a running z24 coming my way from a friend who will likely start a thread on his turbo'd chevy small block install soon.
Overall the immediate plans I have for this rig include:
New headgasket32/36 weber (have one kickin around), Pacesetter headersfabricated suspension liftand likely some mods to the bed.
The truck ran well when parked, other than exhaust in the coolant. But is locked up now. I put penetrant in the spark plug holes and hope to free it up in a few days.
I do have some thoughts on the front suspension, and would like any feedback if anyone has a moment to spare. I've looked for a lift kit for this vehicle since I purchased it, yet every company built them up to 84, and from 86 on.
I've recently found one lift kit that was an extended shackle in the rear and a new top A-arm (some inch tubing and a plate with 4 holes in it that replaces the designation C in the photo) that fixed the caster/camber issues allowing you to crank up the torsions giving 3-1/2 inches more ride height which I am guessing (hoping) is what the front cv joints will handle.
Cranked up torsions and a blown compression bushing on the lower A-arm made for a crazy amount of lean to my left front tire.
After looking at this "Lift kit" that was made up of a couple of pieces of tubing and selling for $200 my first thought was how I'd rather build the A arm myself. But why go to the trouble if adjusting caster/camber angles at normal ride height only takes a few spacer shims? (B) As you can see in the pic I used quite a few shims and a couple of washers to try and bandaid that blown compression bushing 5+ years ago
Anyway, to get to the point. Why not put a block in the place of those spacers? The only object hindering this idea is the top shock mount(A) which with a grinder, welder, and a short bit of steel, I could extended the mount as needed.
Thats all for my long winded intro. I want to say that you guys have a great thing going on here at ODPL. Thank you for the info so far, and for the info to come.
New guy with yet another 85 720 (MetalFab Build Thread)
-
MetalFab
- Posts: 226
- Joined: Sun Feb 28, 2010 10:02 pm
- Car: 1985 720 4x4 reg cab flatbed.
- Location: Northern California
- Contact:
New guy with yet another 85 720 (MetalFab Build Thread)
Last edited by MetalFab on Sun Sep 26, 2010 11:48 pm, edited 1 time in total.
-
lino

- Posts: 3533
- Joined: Mon Aug 15, 2005 7:48 am
- Car: 1991 Q45a Fed-Spec, IQP/White, Texasoil 9 Accumulator Recharge, '93 TCU 1st Gear Start, JWFSB, B&M 70268 Transmission Cooler, BBS Forged Wheels, DRLs, Silverstars, Tint, Very Well Serviced.
- Contact:
Re: New guy with yet another 85 720 (MetalFab)
Looks like you have a nice little project on your hands, but it seems like you got it under control. Best of luck with it!
-
MetalFab
- Posts: 226
- Joined: Sun Feb 28, 2010 10:02 pm
- Car: 1985 720 4x4 reg cab flatbed.
- Location: Northern California
- Contact:
Re: New guy with yet another 85 720 (lino)
Thanks, every time I look at this truck I think solid axle conversion, 6 inches of lift, full width axles, lockers, and the biggest tires I can fit and still keep a low center of gravity! but, sadly.. it's not in the budget. And then another part of me screams "Steal the lift off the chevy!" Muahaha..lino wrote:Looks like you have a nice little project on your hands, but it seems like you got it under control. Best of luck with it!
-
alientravler
- Posts: 108
- Joined: Tue Aug 04, 2009 9:52 pm
- Car: 1982 Datsun 720 4x4
Re: New guy with yet another 85 720 (MetalFab)
What a beauty!! I cant wait to see what you do with this one man!! Love the cool flat bead!!
-
MetalFab
- Posts: 226
- Joined: Sun Feb 28, 2010 10:02 pm
- Car: 1985 720 4x4 reg cab flatbed.
- Location: Northern California
- Contact:
IT's aliiiive!
I have to give props to nissan, these little trucks are hard to kill. After 6 years or so after freezing up due to sitting water in the cilynders, a motor I had given up on lives again. Several days ago I pulled each spark plug and gave the cilynders a good dousing of oil, and decided today to see if it would budge via socket to the crank pulley bolt and she free'd right up like it had never been stuck! Perhaps I overestimated it's demise.
So, after a fluid check, couple gallons of gas, and stolen battery, I pulled the coil wires and let them rest up against the fender and cranked it over in short spurts for a good two minutes, making darned sure I had a good oil prime, and noting audibly that I had good spark. I had forgotten how quiet the z24 cranks over. After connecting the coil wires and not getting a sputter out of her, I pulled the fuel line to the carb which was bone dry, and try pouring some gas down it's gullet, hop back in the car and presto! It's alliiiive! for all of two seconds.
I ended up tracing the fuel lines from the whirring fuel pump, but did not get far as I noticed that it was spewing my empty fuel tank all over the ground via a rotten rubber line. I did find however that it was better to purge the fuel line with the main carb feed disconnected, one would think air would push through the carb easier than fuel would, but it just seems to work out that way.
After all of a half hour of tinkering with it after letting it sit for 6 years, it runs like it did before I parked it. Even with a blown head gasket it still purrs at an idle somewhere around 8-900 rpm. The clutch and brakes still feel solid. I'm not sure if I should count myself lucky or patiently wait for the bad news.
Still have a head to pull, and all belts and hoses will have to be replaced, water pump, radiator sent in, etc.. Should keep me busy until payday after next
-
lino
- Posts: 3533
- Joined: Mon Aug 15, 2005 7:48 am
- Car: 1991 Q45a Fed-Spec, IQP/White, Texasoil 9 Accumulator Recharge, '93 TCU 1st Gear Start, JWFSB, B&M 70268 Transmission Cooler, BBS Forged Wheels, DRLs, Silverstars, Tint, Very Well Serviced.
- Contact:
Re: IT's aliiiive! (MetalFab)
I'm happy to hear that you're having such good luck with it .
-
MetalFab
- Posts: 226
- Joined: Sun Feb 28, 2010 10:02 pm
- Car: 1985 720 4x4 reg cab flatbed.
- Location: Northern California
- Contact:
Re: IT's aliiiive! (MetalFab)
I've been lookin around but can't find the post I was lookin for on deleting vacume lines. I have my motor tore down atm and don't even want to think about remembering (yea right) I mean looking up diagrams to put it all back together. I live in california but am lucky enough to be in one of the very few remaining smog for life counties, paid 800 bux to have this thing smogged 8 years ago. anyway, it's on non op now, and I won't be needing it anymore.
Was the vacume line delete only if one uses a weber carb? or can it be done to the stock carb? if so, how about the wiring to the carb and intake? looks like one plug has 4-5 wires that spider around the carburetor itself. Should I remove the ecu as well? Those of you who have done this, did you tuck away the plugs/wires to the intake etc, or remove them completely?
Just wanted to throw out some questions before I get to that point, thanks all!
-
MetalFab
- Posts: 226
- Joined: Sun Feb 28, 2010 10:02 pm
- Car: 1985 720 4x4 reg cab flatbed.
- Location: Northern California
- Contact:
Re: New guy with yet another 85 720 (MetalFab)
Guess I'm just overthinking things.. planning on the 32/36 I have on the shelf failing before I even test it out. It came off my 79 datsun pickup if my memory is correct, and the tags on it said the motor was (edit-107 hp not 117, but at 5200 rpm--great for 2wd but not 4), few more ponies than the z24. hmm.. come to think of it, I should have an adapter kicking around if it did come off the datsun.
You know you have the bug when your nightcap reading material is a service manual
Modified by MetalFab at 1:45 PM 3/19/2010
You know you have the bug when your nightcap reading material is a service manual
Modified by MetalFab at 1:45 PM 3/19/2010
-
bracktheron720
- Posts: 202
- Joined: Sat Oct 24, 2009 8:39 pm
- Car: 1984 720 with 1980 datsun front end,1972 yamaha cs3
Re: New guy with yet another 85 720 (MetalFab)
im runnin the stock carb and the only vac line i have is running to the dizzy for the advance...pulled everything else out..and plugged them..to my suprise it helped alot!!!throttle response is way better and the secondary opens way faster than befor also..
-
MetalFab
- Posts: 226
- Joined: Sun Feb 28, 2010 10:02 pm
- Car: 1985 720 4x4 reg cab flatbed.
- Location: Northern California
- Contact:
Re: New guy with yet another 85 720 (bracktheron720)
Awesome! you leave the wires to the carb and intake hooked up? looks like two more vac relays off the passenger fender that have electrical plugs on them as well.bracktheron720 wrote:im runnin the stock carb and the only vac line i have is running to the dizzy for the advance...pulled everything else out..and plugged them..to my suprise it helped alot!!!throttle response is way better and the secondary opens way faster than befor also..
I started second guessing myself on putting this thing down for a headgasket when I saw the junk that came out of that radiator, and the state of the hoses. but sure enough when I pulled out the thermostat and took a whiff it smelled strongly of exhaust. I don't know what was put in that radiator, but I dug out gobs of glassy sandy stuff guess I should put a new water pump on the list as well.
-
MetalFab
- Posts: 226
- Joined: Sun Feb 28, 2010 10:02 pm
- Car: 1985 720 4x4 reg cab flatbed.
- Location: Northern California
- Contact:
Re: New guy with yet another 85 720 (MetalFab)
Waiting on cash to put this project back together, currently working on modding the steering wheel, have a few aftermarket wheels for vw kickin around, but the spline shaft diameter is smaller on the nissan. Figure I'll save a few bucks and not buy the Grant wheel I really want but do not need. What I'm mainly looking for is a smaller wheel diameter and to bring the wheel several inches closer to the driver for added leg room. as it is my knee hits the stock wheel when I go to hit the clutch. These rigs were not made for us tall guys.
A shorter throw clutch might also be on the drawing board, or modifications to the pedal. No reason it has to flop out that far
A shorter throw clutch might also be on the drawing board, or modifications to the pedal. No reason it has to flop out that far
-
MetalFab
- Posts: 226
- Joined: Sun Feb 28, 2010 10:02 pm
- Car: 1985 720 4x4 reg cab flatbed.
- Location: Northern California
- Contact:
Re: New guy with yet another 85 720 (MetalFab)
Another late afternoon in the shop. Replaced the donut at the steering box. The old one came apart while trying to turn while not moving. I'm just glad the stock piece didn't fall apart going down the highway. Hope the new one lasts at least another 25 years.
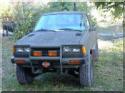
Doesn't look like nissan expected these to fall apart, and they might not have if the valve cover and power steering leaks hadn't of shortened it's life span. Those retainer bolts are pressed in, nothing a drill press can't handle. pulling the knuckle off the steering box was about the most annoying part. Had to wire wheel it for good measure =P
Got some other pics in while I was at it. The front end and ride height with 7.00R15's about an inch shorter than 31x10.5r15's and very narrow. I however would like the look once I get the camber issues corrected. 7.00r15's would make very nice snow tires new and studded. You can see how much more the left side pulls in at the top than the right due to a blown compression bushing. Kinda hard to see as I didn't match the pic angles, also threw a lot of camber adjusting shims at it before it went down.
and finally I went poking around the shelves and was suprised.
Only the left one is complete, two do not have any means for a choke that I see. I don't have any problem installing a "manual" push pull choke wire in the truck. the linkage is a bit sloppy on the complete one and the other two were tore down at some point for rebuilding and have no screws lol. I plan to look into a weber rebuilding shop and see if it's worth trying to resurect these.
I gutted the steering wheel, removing the splined sections from both wheels and tried a few mock ups. Thinkin the best route here is finding a really really thick chunk of steel.. or alum(yea right) and go play with the lathe some. Will add pics when thats complete.
Seeing as how I'm waiting on cash for this project I'll probably start on a 620 king cab I've had kickin around for a while
Pezi's ride has me wanting to play with a 2wd, it's no 720 but has a look all it's own. (or will, I hope)
Modified by MetalFab at 9:40 PM 3/19/2010
-
MetalFab
- Posts: 226
- Joined: Sun Feb 28, 2010 10:02 pm
- Car: 1985 720 4x4 reg cab flatbed.
- Location: Northern California
- Contact:
Re: New guy with yet another 85 720 (bracktheron720)
Guess I'm turning this into my build thread.. or rant thread. Lookin for a new intake manifold. local parts house doesn't show carying one online, and seeing as how their carbs are priced at 600+ there's no way in heck I'm getting this through them even if they do. I havn't found anything online through other websites, last case I'll call around junkyards.
Anyone know of any aftermarket intakes for the z24?
Holdin off on pulling the head until I get the gasket set so it all comes off and goes back on in an afternoon. An ear came off with the intake, actually, it stayed on the motor. I swear there wasn't a bolt left in it either lol. Although, if I never again tear down one of these it will be too soon. And if I do, I'm pullin the motor and putting it on a stand.
Going to have to find something do do on her over spring break.. that won't cost anything and will waste a lot of time.
Modified by MetalFab at 7:39 PM 3/24/2010
-
lil89ram50
- Posts: 118
- Joined: Mon Jul 13, 2009 8:14 pm
- Car: 1985 nissan 720 1989 dodge d50 1979 chevy luv
Re: New guy with yet another 85 720 (MetalFab)
you could always weld it back on.... or pay shipping for the one i have laying here waiting for you lol devils lake north dakota, 58301 if you wana get a shipping cost....
-
captainzeros

- Posts: 209
- Joined: Sun Jan 24, 2010 8:00 pm
- Car:
1981 Datsun 720 Longbed
1973 Datsun 240Z - Location: Independence, OR
-
MetalFab
- Posts: 226
- Joined: Sun Feb 28, 2010 10:02 pm
- Car: 1985 720 4x4 reg cab flatbed.
- Location: Northern California
- Contact:
Re: (captainzeros)
Wish I had a tig setup at home, or a head I could take with me and mount it to at school so I know it'll be flush. making a jig for something like this is too much hassle otherwise. I'm still broke until mid april otherwise I'd take you up on that lil89ram50, Thanks for the offer though =) as soon as funds roll in I'm raiding the junkyards. There are a half dozen junkyards that I know of here that are convenient (lol 4 on the same street) Anyway, pick and pull has like 8 of these trucks, I wasn't paying enough attention at the time to the differences in intakes on the motors, but my question is.. are the intakes the same on the z20, 22, and 24 engines? Also, anyone know what years to stick to for an 85 to scavenge engine parts? The book says 83-86 for most things, just wondering if 80-83 is that much different.
-
captainzeros
- Posts: 209
- Joined: Sun Jan 24, 2010 8:00 pm
- Car:
1981 Datsun 720 Longbed
1973 Datsun 240Z - Location: Independence, OR
-
breadbox

- Posts: 8549
- Joined: Tue Oct 17, 2006 4:09 pm
- Car: 89 Nissan 240SX
89 Koop
84 720 4x4KC - Location: Va Bch
Re: (captainzeros)
z22 had a different head and 2.2L displacement. Supposedly they rev higher and can swap some L parts. But I haven't seen one in person yet.
-
MetalFab
- Posts: 226
- Joined: Sun Feb 28, 2010 10:02 pm
- Car: 1985 720 4x4 reg cab flatbed.
- Location: Northern California
- Contact:
Slow going, still in plans.
Update on this project:
Been a few months of bad weather and peeking at this rig in the garage from time to time. My daily driver has been monopolizing my already insignificant income, letting me know she needs love in some highly frightening ways. Nothing like having a carb stick closed--and then stick wide open! to ruin your day (and your underwear) Anywho.
Things should be moving along soon on this rig. Short term plans are to make it a running and reliable daily driver. Will be nice to have a rig that gets better than 12 mpg when one has to commute 50miles+ each way to school/work.
Should have a motor with quite a bit of pep left in it on the way within a week or two. I've a few other goodies already ready to go into it, including new radiator, exhaust parts, steering wheel, front suspension bushings, as well as tires/wheels. I tigged up my intake in class, but have not the funds to do the head work.. yet! I plan to turn this motor into next semesters project in auto class.
Along side this project, my bro is ready to do his 350 chevy swap (where I'm getting my motor from) He has a stall open for the next 6 weeks in his buddies hot rod shop. I've seen a 350 fit in a 720, now we're gonna make it happen.
Next things on my list to get/fix is..
Alternator
New m/s clutch cylinders
Power steering hoses
Rebuild front suspension
and I should be ready to roll!
More info to come.
Been a few months of bad weather and peeking at this rig in the garage from time to time. My daily driver has been monopolizing my already insignificant income, letting me know she needs love in some highly frightening ways. Nothing like having a carb stick closed--and then stick wide open! to ruin your day (and your underwear) Anywho.
Things should be moving along soon on this rig. Short term plans are to make it a running and reliable daily driver. Will be nice to have a rig that gets better than 12 mpg when one has to commute 50miles+ each way to school/work.
Should have a motor with quite a bit of pep left in it on the way within a week or two. I've a few other goodies already ready to go into it, including new radiator, exhaust parts, steering wheel, front suspension bushings, as well as tires/wheels. I tigged up my intake in class, but have not the funds to do the head work.. yet! I plan to turn this motor into next semesters project in auto class.
Along side this project, my bro is ready to do his 350 chevy swap (where I'm getting my motor from)
Next things on my list to get/fix is..
Alternator
New m/s clutch cylinders
Power steering hoses
Rebuild front suspension
and I should be ready to roll!
More info to come.
-
MetalFab
- Posts: 226
- Joined: Sun Feb 28, 2010 10:02 pm
- Car: 1985 720 4x4 reg cab flatbed.
- Location: Northern California
- Contact:
Re: New guy with yet another 85 720
I dug into my front end today and I'm still confused as to how my ball joint arrangement is different from anything in the book, and anything I've seen on any other 4x4 720. The lower ball joint faces down, with the castle nut on the bottom, while every setup in the book says it should face up. At first I got to thinking that someone flipped it to get added height but the taper is right for the way it is currently facing, no way to turn it around. I do seem to have a lot of room in the fender well, the tires in the pics above are 30" tall. I bet I could fit 33's with no problem the way it sits. wouldn't even have to worry about stuffing them into the fender, there is not much travel at all in the front end.
In the plans as of now I'm going to loosen up the torsions, I believe the last owner cranked them way too hard. At a full droop with no top arm on the suspension, the torsion bar still wanted to rip the compression rod off until I loosened the torsion bolt an inch. The ride was very stiff, which is nice for hauling lumber. (I've had 20' 2x6's all the way across stacked 3 high and it only felt a bit tippy) but not what I need for a DD for the next year of college. Reality check, big tires = expensive, and they make gas mileage not even worth driving a 4 banger. I never checked, as it's been some time since this rig has has 4 of the same size tires on it (since it was parked) but it looks like the front end sits higher than the rear. I find this amusing as most 4x4 nissans have a forward lean.
Bearings look brand new, I'm going to be cheap and just reseal everything, throw new bushings in it, and get it alligned. I replaced both top balljoints 5 years ago and they still look in good condition with no play. I'm glad now I didn't return all the bushings and lower balljoints I got from nissan back then! New steering joints are definitely in order, brakes still look brand new.
Alittle extra time with the sand blaster and some good 'ol rustoleum and I'll throw the front end back together.
-
MetalFab
- Posts: 226
- Joined: Sun Feb 28, 2010 10:02 pm
- Car: 1985 720 4x4 reg cab flatbed.
- Location: Northern California
- Contact:
Re: New guy with yet another 85 720
The parts list keeps adding up. Someones gone through this front end recently (mileage wise) most of the grease is still yellow. Everytime I've dug into a hub in the past, the grease is black =) Anyway, the frame horns the compression rods attach to on the rear are shot. Someone welded a washer onto the front side of the left frame horn, looking at it from the back side, someone ran this rig for some time with shot bushings and augured the hole out. Looking at the right side, they didn't weld a washer on, but it's showing signs of wear. The left side has a sleeve protecting the compression rod, the right side doesn't, and the book doesn't show a sleeve covering the compression rod, just the rod, 2 bushings, 2 washers, and a nut. it did a good job protecting the compression rod from wearing, but it seems too long and may be holding the washers apart from compressing the bushings enough. The left lower control arm is tweaked as well. Local wrecking yard here I come.
I'm not sure I like the idea of welding in a washer on the front of the frame horn, seems to me as it would push the a-arm forward the thickness of the shim. Not to mention the fact the the last person to dig into this threw two more washers in there that rubber crap inbetween them, all this combined added 5/16 + blown bushings compounded by a floppy lower balljoint. I can see why my tire had a heavy lean to it. I'll put it together now minus the extra washers and hope that the 1/16" washer thats welded to the framehorn won't mess with the caster/camber too much. A friend mentioned replacing the frame horns, but if I'm to go as far as replacing them, I'm cutting everything else out and going with a SAS!


Is it just me or does that horn look like it's been welded on at some point before the whole washer thing? Or does every nissan pickup have goobers a few inches above the hole like that? Another something I'll have to look for when I hit the junkyard. If I've learned anything from this so far, it's that cranking the torsions + big tires = horrible ifs problems. For any 4x4 nuts out there, make SASing your rig your first upgrade. It won't cost much more than a complete ifs rebuild, and you won't have to redo it all every couple of years.
Anyone see that 720-patrol lookin truck on cardomain? The bright yellow one. I want that xD only a KC + sas. Bob the bed front and rear, weld it to the cab, open up the back, build a soft top, carpet everthing. Oh yea.
I'm not sure I like the idea of welding in a washer on the front of the frame horn, seems to me as it would push the a-arm forward the thickness of the shim. Not to mention the fact the the last person to dig into this threw two more washers in there that rubber crap inbetween them, all this combined added 5/16 + blown bushings compounded by a floppy lower balljoint. I can see why my tire had a heavy lean to it. I'll put it together now minus the extra washers and hope that the 1/16" washer thats welded to the framehorn won't mess with the caster/camber too much. A friend mentioned replacing the frame horns, but if I'm to go as far as replacing them, I'm cutting everything else out and going with a SAS!
Is it just me or does that horn look like it's been welded on at some point before the whole washer thing? Or does every nissan pickup have goobers a few inches above the hole like that? Another something I'll have to look for when I hit the junkyard. If I've learned anything from this so far, it's that cranking the torsions + big tires = horrible ifs problems. For any 4x4 nuts out there, make SASing your rig your first upgrade. It won't cost much more than a complete ifs rebuild, and you won't have to redo it all every couple of years.
Anyone see that 720-patrol lookin truck on cardomain? The bright yellow one. I want that xD only a KC + sas. Bob the bed front and rear, weld it to the cab, open up the back, build a soft top, carpet everthing. Oh yea.
-
MetalFab
- Posts: 226
- Joined: Sun Feb 28, 2010 10:02 pm
- Car: 1985 720 4x4 reg cab flatbed.
- Location: Northern California
- Contact:
Re: New guy with yet another 85 720
Got my motor! Going to be a few more days until I tackle the motor swap. I'm currently helping my bro with his V-8 swap. Two days in on that project, gutted the motor, trans, drive line, had to gut the heater/ac assembly and move the firewall back 5 inches to clear the radiator. Motor+saginaw trans is mounted. Mounting the rad' in the back just isn't an option for this project, as the bed has a 5 foot subwoofer box in it pounding 4 12's with an 8" diameter 4' chunk of very thick pvc pipe plumbed into the cab between the seats. crazy stupid sound, with an insane (for a 720) 400 hp V8.. We fire it up tomorrow, should have the driveline back from the shop on friday, and any bugs worked out by the weekend. Perhaps he'll survive the test drive to post his build thread. 'nuff said.
Re: New guy with yet another 85 720
Welcome to the forum man. Good luck on your project.
Re: New guy with yet another 85 720
Did you have to get the doughnut from the dealer or were you able to find it online?
-
MetalFab
- Posts: 226
- Joined: Sun Feb 28, 2010 10:02 pm
- Car: 1985 720 4x4 reg cab flatbed.
- Location: Northern California
- Contact:
Re: New guy with yet another 85 720
The steering ring was a universal setup from the local parts store, or if you meant the compression rod donuts, I ended up going to the dealer. My buddy at the auto parts store couldn't get me a better deal if he had to have it shipped from the dealer anyway.
Ended up scrapping the chevy motor mounts we had fabbed to the frame. They're known to blow with a stock motor, and dude doesn't want the motor to move at all, yet doesn't want to hard mount the motor either. The old hot rod guys have been going with mounts no different than a poly bushing 4 link end holding their built 454's and such. Oh, and the stock transmission mount takes little modification!
Picked up a stick welder, AC only but beggars can't be choosers. I'm amped, can finally work on the projects I can't do at school.
Here's a teaser.
Re: New guy with yet another 85 720
The doughnut at the steering box. You show it in your 8th post.
Re: New guy with yet another 85 720
He bought the doughnut gskt from NAPA...
http://www.napaonline.com/Search/Detail ... 0066207719
http://www.napaonline.com/Search/Detail ... 0066207719
-
breadbox
- Posts: 8549
- Joined: Tue Oct 17, 2006 4:09 pm
- Car: 89 Nissan 240SX
89 Koop
84 720 4x4KC - Location: Va Bch
Re: New guy with yet another 85 720
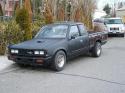
What station wagon is that in the back? Is that a goon?

-
MetalFab
- Posts: 226
- Joined: Sun Feb 28, 2010 10:02 pm
- Car: 1985 720 4x4 reg cab flatbed.
- Location: Northern California
- Contact:
Re: New guy with yet another 85 720
That would be a part of my VW collection, one of 4 of my type 3 wagons, have a few karamannghias and bugs up here as well. More projects than I can shake a stick at,
That steering kit worked well but the rivets where the old bolts were pressed in need to be drilled out, definantly burlier than stock. Looking at Visio's steering, his has ears that surround the upper drive bracket as a safety precaution. I plan to grab a set off a 2wd rig in the junkyard. My donut broke trying to steer the truck in one spot, I don't even want to think what would have happened had it done the same around a corner at 60mph.
That steering kit worked well but the rivets where the old bolts were pressed in need to be drilled out, definantly burlier than stock. Looking at Visio's steering, his has ears that surround the upper drive bracket as a safety precaution. I plan to grab a set off a 2wd rig in the junkyard. My donut broke trying to steer the truck in one spot, I don't even want to think what would have happened had it done the same around a corner at 60mph.
Last edited by MetalFab on Sun Sep 26, 2010 11:21 pm, edited 1 time in total.