My not-so-fun Rear Brake Job

Discussion of Infiniti's amazing (and underrated) sport-luxury crossovers, the EX35 and EX37. For 2014, the EX series will be renamed QX50, in line with Ininfiit's new naming conventions.
User avatar
NJGuy
Posts: 557
Joined: Fri Sep 23, 2011 10:05 am
Car: 2008 Infiniti EX35 Journey AWD

Post

I decided to take on a rear brake pad and rotor replacement this past weekend. I already knew the pads were close to being worn out, and I figured that it would be prudent to replace the rotors as well at ~97K; I was never much of a fan of getting rotors resurfaced. I changed my front pads and rotors a month or two ago, and everything about that job was pretty much straight forward; easy peasy, no headaches, no drama. I kinda knew that the rear brakes would be more of a challenge, but I was not expecting to go to war with my car.

Though I could probably conjure up hundreds of words to describe my negative experience, here are a few that should quickly sum things up.
1. AAAAAAAAAAARRRRRRRRRRRRRGGGGGGGGHHHHHHHHH!!!!!!!! :tantrum: (Ok, not a real word according to Webster's dictionary.)
2. PITA! PITA! PITA! :argh (That's 12 words right there.)
3. I almost feel like kicking the engineers who came up with the geometry of the brake mounts and rear suspension area. At a minimum I'd call it asinine, but I'd better describe it as "mentally disabled" (to be PC). There's literally no clearance to remove the lower bolts. Removal and reassembly of the caliper had to go in an exact order. I did a step out of order and ended up having to redo the process. I never had this issue on my other cars. :bang
Ok, now that I've vented a bit and got that off my chest, I can be a bit more clear about what had happened. :)

Battle number 1:
Those 19mm bolts that hold the caliper mounting brackets in place... well, I'll say that getting them loose took a toll on my body. The upper bolts, while tough, at least offered enough room for my 1/2" ratchet. The lower bolts on the other hand, were a different story. Since there is the smallest possible amount of clearance between the bolt an suspension link, I couldn't get my socket and ratchet in there. I was prepared for that and came in armed with a 19mm wrench, but even getting that set up on the hex head took multiple tries. There was barely enough clearance for the wrench to get in there between the hex head and suspension link; to get it on there, you had to have the wrench perfectly angled and aligned. That also limited where I could position the swing angle of the wrench. I tried contorting myself into different positions in and around the wheel well to get extra force on the wrench, but that bolt just would not turn. I'm not a big guy and probably weigh 160lbs. soaking wet, so I couldn't really muscle the bolts loose. I had also sprayed on some pentrating oil, but those things still wouldn't budge. The driver side did eventually give way after a struggle, but the passenger side had some more fight left in it. In order to get the passenger side bolt loose, I had coupled the open end of one wrench into the open end of the 19mm one for extra leverage. Sure, it worked, but I thought I could seriously hurt myself there; the other wrench was really flexing a lot and I thought it could have given way or slipped off at some point. But anyway, I was victorious! :banana:

Battle number 2:
Since the inner pads looked to be almost twice as worn as the outer ones, I wanted to re-lube the slider pins/bolts. But not all of them wanted to agree with me. Three of them broke loose with little drama, but the lower bolt on the driver side did not want to be taken alive. That area had some clearance issues as well for a socket and ratchet, but I bought a 14mm 6 point wrench exclusively for this job. Again, I sprayed on some penetrating oil. It did not work. The hex head had started to round off. Plan B was to apply heat with a propane torch, more penetrating oil, and a couple of taps with a hammer. But it was probably too little, too late, and it also didn't work. Ok, since the bolt head has no more edges for the wrench to catch onto, I move to plan C. Pipe wrench, more torch heat, more penetrating oil, and more hammering. Nope. #$@*!!! #$@*!!! #$@*!!! :cry: . The bolt did not loosen. Instead the pipe wrench had just mangled up the head. I had considered drilling out the bolt, but I pretty much gave up here. I didn't want to spend another hour or more messing with it. I'll have a mechanic remove it for me one of these days. I'm going to concede here and call this one a loss :facepalm: . I'm also going to name this bolt 'Rambo' because it was a tough SOB.

In the end I was still able to get the rotors and pads changed out. I had also cleaned some rust off the hub and adjusted my parking brake. While there were a few areas I could not conquer, I'll still say that I had won the war. Looking back I probably should have put some anti-seize on all those bolts to ease removal in the future, as I believe I had done that on my old car; however, that car was always parked outside and showed more rust vs. my EX. Living in the Northeast isn't kind on the metal parts of our vehicles, and this job has made me question my desire to keep on wrenching. I've got some sore muscles, and the battle scars on my arms have actually got me some sympathy from my kids :violin: . Heck, even my wife felt a little sorry for me; usually she thinks I take too long in the garage :gapteeth: . Anyway, I'll just take a break for now and probably just foolishly jump into the next maintenance job that comes ups and tempts me while forgetting about this last experience. Kudos to you guys who gets these jobs done without an issue :mike !


uklad99
Posts: 4
Joined: Tue Oct 27, 2015 5:16 am
Car: 2008 Infiniti EX35 Journey

Post

I'm ready for the battle :)

User avatar
XIS
Posts: 865
Joined: Wed Aug 24, 2011 11:00 am
Car: 08 EX35 RWD
17 QX30 Sport
Location: The Desert

Post

:)
I changed the rear brakes and it wasn't too bad, but I didn't mess with the rotors! :)

Glad you gotter' done!

User avatar
AWGD8
Posts: 1071
Joined: Wed Sep 10, 2008 5:34 pm
Car: 2008 EX35 AWD JOURNEY

Post

Now I am worried! I just spent almost $500 for a new Milwaukee tools to prepare myself to tackle brakes and suspension components.

I just ordered a Milwaukee M18 Fuel 1/2 impact wrench (compact) and also a M18 3/8 Right angle impact wrench. From youtube video, I've seen people uses compact impact gun with extension to remove the top and lower bolts that holds the calipers.

I do not undestand how a manual wrench will not fit it? Do you think if you use a cordless impact wrench or ratchet using an extension (wrench position inside) It will be a lot easier?

I am planing to work on my brakes soon, that is the reason why I bought the tools.

User avatar
NJGuy
Posts: 557
Joined: Fri Sep 23, 2011 10:05 am
Car: 2008 Infiniti EX35 Journey AWD

Post

XIS wrote::)
I changed the rear brakes and it wasn't too bad, but I didn't mess with the rotors! :)

Glad you gotter' done!
Well, if you ever do plan on changing them out, I'm betting you'll have better luck than I did. Working on a car can be a real pain when dealing with corroded parts, but that's something you probably don't have to worry about. Besides, it can't be any worse than what you experienced during your radiator change. :chuckle:

User avatar
NJGuy
Posts: 557
Joined: Fri Sep 23, 2011 10:05 am
Car: 2008 Infiniti EX35 Journey AWD

Post

AWGD8 wrote:Now I am worried! I just spent almost $500 for a new Milwaukee tools to prepare myself to tackle brakes and suspension components.

I just ordered a Milwaukee M18 Fuel 1/2 impact wrench (compact) and also a M18 3/8 Right angle impact wrench. From youtube video, I've seen people uses compact impact gun with extension to remove the top and lower bolts that holds the calipers.

I do not undestand how a manual wrench will not fit it? Do you think if you use a cordless impact wrench or ratchet using an extension (wrench position inside) It will be a lot easier?

I am planing to work on my brakes soon, that is the reason why I bought the tools.
In my opinion, the front brakes were much easier to change because it was easy to access all the bolts. There wasn't anything in the way, and I could get even more room for myself by turning the steering wheel full lock to the side I was working on. I believe the caliper bracket mounting bolts up front are a monstrous 22mm size and are tightened to a torque that can almost only be achieved by a gorilla (ok, maybe I am exaggerating a bit here). The impact tools should be able to fit in there and get them out without any issue, but I just used my 1/2" ratchet and cheater bar and they popped loose without any drama.

For the rear, you might be able to get the 1/2" impact on the upper bolts for the caliper mounting brackets. However, I don't think there's any way to fit it onto the lower bolts. It may be possible to get the 3/8" right angle impact on the lower slider pin bolts, but if you do it'll be a tight fit. If you have the time, I'd pull one wheel off to see what you can get in there. If you're just changing pads, you only need to remove the upper slider pin bolt. Also, you technically don't need to remove both slider pin bolts if you're changing the rotors.

I may have had issues getting my 19mm manual wrench on the lower bolt for a few reasons.
1. It had a six point box end, which limited the number of angles I could put it over the bolt head. A 12 point or ratcheting box wrench would likely be easier to get on the hex head, but I didn't want the risk of using a 12 point wrench or the expense of a ratcheting tool.
2. It was a professional grade tool, not the run-of-the-mill consumer wrench. The box end was a bit thicker than I was used to seeing (probably for extra strength and for more contact surface on the bolt head).
These reasons, along with the proximity of the suspension link, were behind the clearance issues I encountered with the wrench.

I kinda knew getting the bolts loose on the rear calipers would be a challenge; I was more worried about the 19mm ones. I looked for different ways to attack them and found this youtube video the most helpful: https://www.youtube.com/watch?v=1OLcUnGRW5A

Hopefully, the 7+ years of precipitation and road salt haven't been to hard on your brake components. If you do decide to take on the job, Good Luck! ;)

ex35manlyblue
Posts: 8
Joined: Sat Aug 01, 2015 5:04 pm
Car: 2011 EX35 Journey Arctic Blue
Location: Minnesota

Post

I feel your pain. Did all rotors and pads about a month ago and wasn't expecting a battle at all. I was happy to not have to drill out the phillips screws that are usually rusted into the hub that are on other rotors. I had several socket extensions of various sizes so didn't have too bad on the rears other than usual annoyance. I had one slider pin like yours that was just seized in there and I could tell it had been worked over before. I gave up trying to get it all the way out and just pushed as much grease/antiseize in there as I could. What really screwed me up was the front driver side I got the clip on wrong so the outer pad was positioned wrong. First test drive felt really weird so had to take that one apart again and realized the pad had snapped in half. Had to run to store to get another set and do that side over. I planned on 2 hrs, took a full day.

User avatar
NJGuy
Posts: 557
Joined: Fri Sep 23, 2011 10:05 am
Car: 2008 Infiniti EX35 Journey AWD

Post

It's nice to see that I'm not alone :) .

One of my older cars had the rotor screws installed, but they did not cause me any frustration. On one of my first brake jobs, it was the rotor itself that did not want to come off the hub. On the EX, my rear rotors came off surprisingly easy. Just a couple of taps with the hammer on the rotor hat, and they were loose. The fronts didn't even need any persuasion. The flower shaped mating surface of the hub vs. a round one probably helps out as well. Nonetheless, I still smeared on a thin coat of anti-seize just in case.

Sorry to hear about the broken pad, but Murphy's law always hangs over us when we take on small projects like this. Murphy can strike at any time and easily extend the length of a seemingly short and simple job.

Nice to hear you got it done though. :bigthumb:

User avatar
Lapin
Posts: 19
Joined: Sun Nov 15, 2015 9:31 am
Car: 2012 Infiniti EX35 AWD Navigation

Post

Thanks for the detailed post NJGuy! This is going to be a PITA for me to do in the next month :cry: especially because I'm in Canada without a heated garage. I could take it into Infiniti and pay $700 for new pads and rotors, but I would rather have the satisfaction of doing it myself and doing it (hopefully) right!

What type/brand of pads and rotors did you end up buying? I might start looking for some sales or hopefully a cute girl discount! ;)

CustomLowz
Posts: 137
Joined: Sun Nov 16, 2008 12:24 pm
Car: 2011 Infiniti EX35

Post

When I had to replace my rear brake pads, I figured I would up grade everything at that same time. I purchased front and rear kits from Powerstop (http://www.powerstop.com/product/power- ... TI&mo=EX35) and I have no problems or complaints.

User avatar
NJGuy
Posts: 557
Joined: Fri Sep 23, 2011 10:05 am
Car: 2008 Infiniti EX35 Journey AWD

Post

There is a sequel to my first story.

Being the incredibly stubborn person I am and that I consider myself to have questionable intelligence, I decided to attack 'Rambo' once again and see if I could take care of some unfinished business :facepalm2 . I was feeling a bit spiteful after being defeated by him last time, and the challenges he posed to me had driven me to want to face him again.

Actually, I was a little careless with the propane torch last time and ended up with a small hole in the caliper pin boot; so it needed to be changed. I know that I didn't need to remove that bolt to change out the boot, but since I would be pulling the caliper off again, I might as well see if I could make another attempt to get the stuck bolt out. I also figured that since I was close to my tire rotation interval, I could get that out of the way as well.

Plan A: This time around, I gave the bolt head 5 full minutes of heat with the propane torch. Then I immediately shot some penetrating oil on it and followed with a few hammer stikes. Using a small grinding wheel attachment on my drill, I removed some material off the bolt head to get a few flat surfaces to help the pipe wrench to grip better. I threw the pipe wrench on it again... no dice.

Plan B: I didn't want to fully detach the caliper from the car as it would require bleeding air out of the system; but I wanted better access to the bolt. This time I took it off the rotor and used a big c-clamp to secure it to the upper suspension link. I ground off a little more metal off the bolt head, and tried the pipe wrench again with a cheater bar. I thought I felt some movement, but wasn't sure if I was just chewing up the bolt head again. I stopped there to prevent any further damage. Hmmm....

Plan C: I have an old cheap set of made-in-China sockets, so I looked for one to be sacrificed in this project. The 13mm one seemed to be about the right size, so I ground down the bolt head a little more and was able to hammer the socket on. Using a 1/2" ratchet and cheater bar, the bolt turned without an issue.

YESSSSSSS!!!!!!! :woot: :dance :clap:

'Rambo' finally surrendered after being burned, oiled, beaten, crushed, chewed on, torqued, grated and suffocated. I guess all the heat, penetrating oil, and vibration I applied to the area finally broke away the surfaces bonded by rust. Things were a bit better this time around. I knew what I was in for, I remembered which sequences to follow, and I had more time and patience since I wasn't trying to finish up a full brake job.

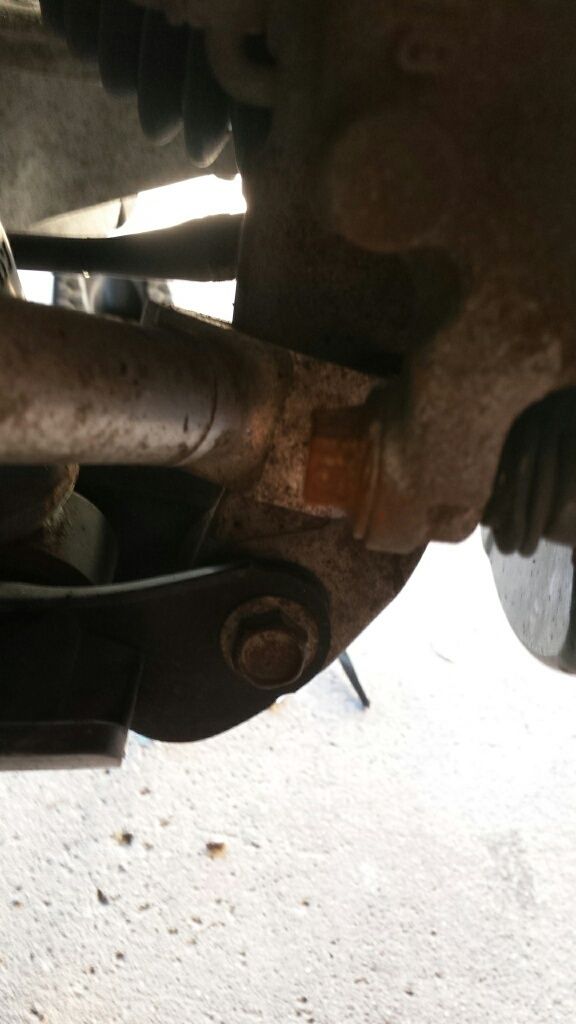
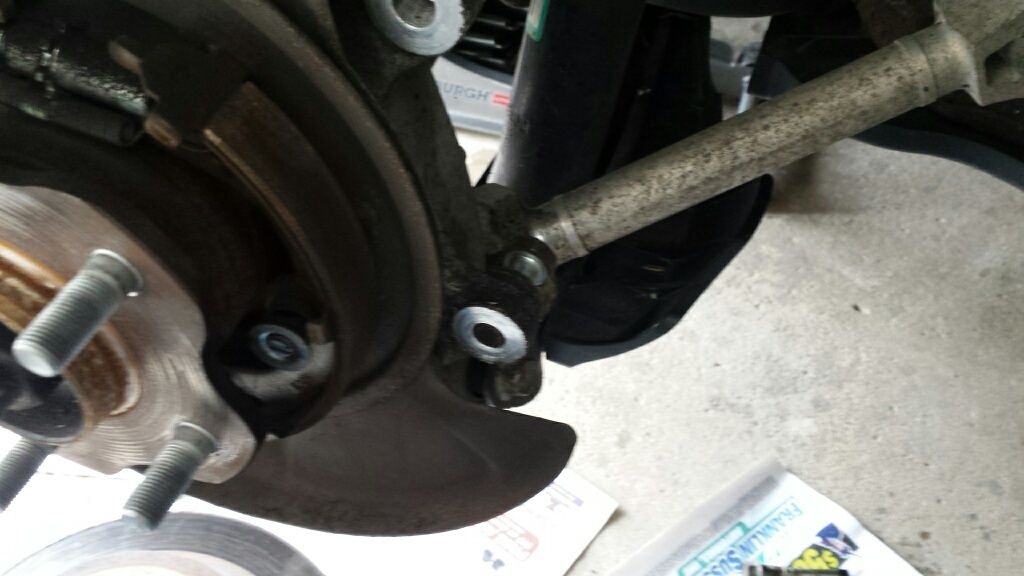
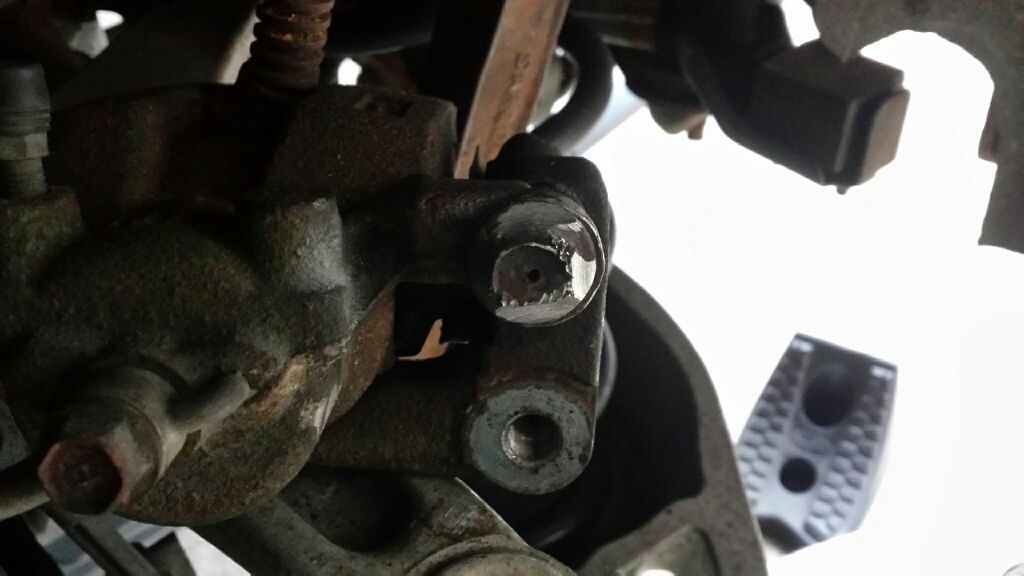
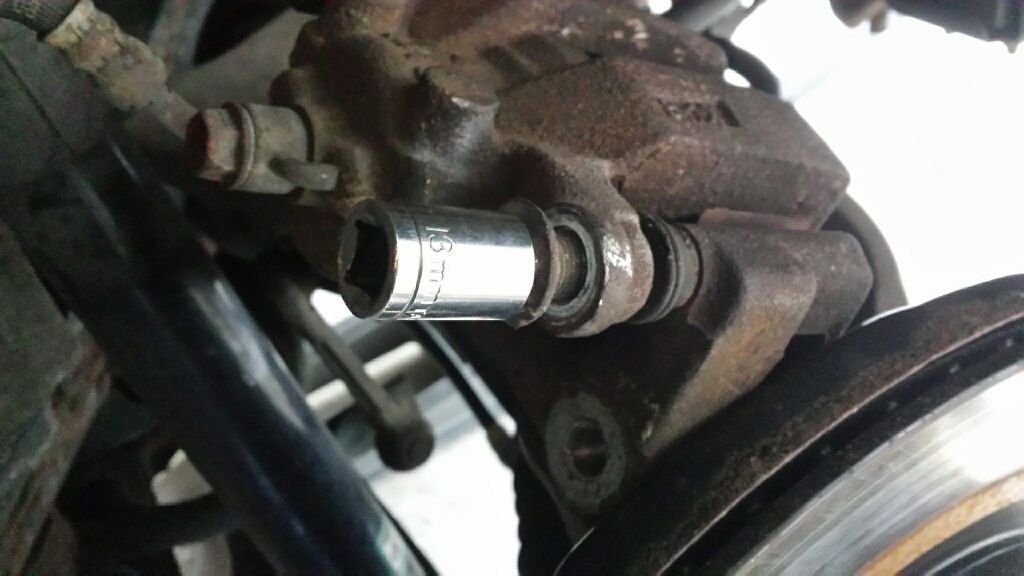
Here are a few photos I took while working on the car.

These two show the limited clearance between the bottom bolts and the lower suspension link. The U shaped fork at the end of the link gave me the most trouble.
Image
Image

Here's the caliper being held onto the upper suspension link with the c-clamp. You can also clearly see how I ground down the bolt head.
Image

Here's the sacrificial socket in the setup that finally worked for me. If you look closely at the rubber boot you can see the small tear.
Image

For those of you who took followed the posts of my mini-saga, thanks for taking the time to read them :bigthumb: .

I know I shouldn't even be giving this any of my time or attention, but I'm now intrigued by the though of trying to separate 'Rambo' from the 13mm socket that gave it's life in the battle... :)

User avatar
NJGuy
Posts: 557
Joined: Fri Sep 23, 2011 10:05 am
Car: 2008 Infiniti EX35 Journey AWD

Post

Lapin wrote:Thanks for the detailed post NJGuy! This is going to be a PITA for me to do in the next month :cry: especially because I'm in Canada without a heated garage. I could take it into Infiniti and pay $700 for new pads and rotors, but I would rather have the satisfaction of doing it myself and doing it (hopefully) right!

What type/brand of pads and rotors did you end up buying? I might start looking for some sales or hopefully a cute girl discount! ;)
It's hard to put a price on the satisfaction of getting a project done yourself. The cost savings does make the satisfaction greater though :) (for me at least) . If you even have a garage to work in, you should be ok. Keep out the wind and throw in a small space heater, it might be tolerable. If you're working on the driveway at this time of year in Canada... well, :luck: .

I don't know how much thickness you have left on your rotors, but you may be able to get away with keeping them on and just changing the pads. My dealer usually recommends cutting the rotors with a brake pad replacement, though I don't do that when I change the pads only. I changed my rotors out this time since my car was getting up there in miles and I thought that machining the rotors would bring them close to their service limit.

My favorite pads are the Akebono ProACT line. For the front rotors, I went with the Raybestos Advanced Technology line. Raybestos doesn't make that line for the rear brakes, so I bought Centric Premium rotors for the back.

Since the EX shares brake components with the G series and other Nissan/Infiniti models, there is really a lot of selection with varying levels of price and performance when it comes to brakes for our vehicle. Pick what you like. OEM pads and rotors are the baseline performance standard I wouldn't want to go below for myself. I usually don't go with OEM because I don't think they're the best in terms of value. If you're looking at saving money, I wouldn't recommend an economy line of a parts chain store for brakes. I would probably steer towards the Powerstop Autospecialty brake kit if I were on a really tight budget. I don't really know what to suggest if you want something more performance oriented. But if you search through this forum, you should be able to find a good number of recommendations. Others here have tried different performance brake setups and are quite happy with them.

Please let us know what you end up choosing; and if you do end up doing the job yourself, don't be afraid to share your experience with us here.

serotta
Posts: 9
Joined: Mon Apr 20, 2015 6:56 pm
Car: 2014 QX50
Location: NC

Post

NJGuy,

The instructions, visuals, and comedic commentary were so good I read it twice!

I am probably years from replacing mine at this point, but I will remember this when the time comes and be back here reading it again.

Thanks for the entertainment and the instruction.

User avatar
Lapin
Posts: 19
Joined: Sun Nov 15, 2015 9:31 am
Car: 2012 Infiniti EX35 AWD Navigation

Post

NJGuy,

Definitely one of best posts in this forum. :) I appreciate your saga and recommendation for pads/rotors. I will post with how my brake pad replacement goes...mostly likely in the Spring as I have 3mm left. Rotor thickness TBD as I was starting to get too cold and along with poor light in the garage to check when I was switching over to my winter tires. I did have to top of my brake fluid two weeks as the emergency brake light would flash on when I accelerated hard. Sure sign that the rear brake pads are low.

User avatar
NJGuy
Posts: 557
Joined: Fri Sep 23, 2011 10:05 am
Car: 2008 Infiniti EX35 Journey AWD

Post

Thanks guys. I consider my personality to resemble that of a three toed sloth, and I also think that my comedic talent level is about the same as what a rock would have. I'm just honestly sharing the strange thoughts that go on in my head. If I tried hard to be funny, I'd be met with unchanged facial expressions and at the most, a brief expression of uncomfortable forced laughter.

I would have actually preferred to do a formal DIY write-up with a list of tools and supplies, and a step-by-step instruction. But my time frame to work on the car is limited, and it takes extra time to take photos and organize a well written set of instructions. Also if you do a quick Google search, the web is littered with all kinds of write-ups and videos for how to change brakes. I try to be somewhat detailed, but my primary objective is to be helpful.

While I'm not an expert in anything, I've learned a bit about working on cars from automotive forums and I want to "give back" by passing along things that I've both learned and experienced. This car isn't a high volume seller or a highly sought after model and the activity level of this forum reflects that. I post in here much more than in other forums to help keep the traffic up and provide some discussion fodder for the few of us who have an interest in our vehicles.

Chelsea John
Posts: 59
Joined: Fri Nov 07, 2014 2:02 pm
Car: EX35

Post

Top of the line posting. One's trials and tribulations and sharing these certainly makes life a lot easier for the rest of us, and is truely appreciated.
Thank you Sir...
Cheers,
John.

mikey1951
Posts: 99
Joined: Tue Dec 02, 2008 5:21 pm
Car: 2008 EX 35

Post

NJGuy - service tech would not touch my caliper bolt because they would not be able to get a replacement bolt if they broke it off--understandable,no problem.

I'll attack the bastard tomorrow so I can fret about it all day tomorrow. Funny,I ended getting the same Okebono pads you used - like minds!!

Wish me luck & godspeed!! :)

User avatar
AWGD8
Posts: 1071
Joined: Wed Sep 10, 2008 5:34 pm
Car: 2008 EX35 AWD JOURNEY

Post

NJGuy, thanks for creating this thread.

My 2008 EX35 AWD is at 83k miles now and the last time both front and rear brake pads were replaced was @ 48k miles.

So far the braking is smooth and quiet, it is just a bit deeper when I push the brake pedal. I read this thread and decided to buy the front and rear brake pads and some new front and rear brake kits and NAPA grease (Rubber grommet, metal clips , caliper guide pins etc...)

I went with the brake pad brand you recommend. So I bought the Akebono ACT905 for rear and ACT888 for the front. I believe it only cost $90 for both shipped from Amazon. I spent more money on the brake kits and Caliper bolts and rods... These small things really adds up! I also bought some bleeder kit so end up spending $229 for all.

I check the 4 rotors and it appears smooth and wear is even. I think I will just keep the stock rotors and calipers for now since the brake feel is still smooth and no pulsation or vibration or pull from the steering wheel and brake pedal.

According to what I read, brake calipers and and rotors should be replaced within 7-10 yrs of use.
I am on my 8years this coming Sept.

I will save up for new rotor and brake caliper for next year I guess. Do you have to change the brake lines off the caliper too? My wife wants to keep the EX35 as long as we can. I am just afaid of unforseen issue that it might bring being an old car.. We are setting aside a saving of at least $2,000. Just for the EX35 repair bill. I guess better than a new car payment...

Off topic: Does anyone ever used a Highmileage engine oil? Do you guys have some tiny spot of oil around some area of the camshaft gasket? I noticed mine has some small damped area around the gasket, but I sprayed it with brake cleaner when the engine was a bit warm and it cleans it up.
I heard the high mileage oil makes the seal swells and prevent leaks for older engines. The new Pennzoil Full Synthetic high mileage oil is now beng stock at my Local Walmart and they removed the Pennzoil Ultra Platinum (black color jug) that I normally use. I used to buy Pennzoil Platinum synthetic, but this causes my timing chain cover to leak ($2000 warranty worked done)

User avatar
AWGD8
Posts: 1071
Joined: Wed Sep 10, 2008 5:34 pm
Car: 2008 EX35 AWD JOURNEY

Post

After I did my oil change, I decided to check out the rear caliper bolt and I attempted to loosen it.

These are my tool recommendation.

Rear Brake:

19mm top Caliper bolt : Use a regular 1/2 " wrench with 6 points 19mm socket.

19mm Caliper bottom bolt: Use an open end 6 points 19mm wrench (longest you can find ) with teeth. Please don't cheap out on this specific tool. You need a professional grade one. I bought mine at NAPA for $10.50 Open end with teeth.
Last edited by AWGD8 on Fri Jun 10, 2016 9:29 pm, edited 1 time in total.

User avatar
AWGD8
Posts: 1071
Joined: Wed Sep 10, 2008 5:34 pm
Car: 2008 EX35 AWD JOURNEY

Post

Image

Image

- Rubber mallet
- PB Blaster oil
- propane torch from Walmart ($15) Blue tank.

I Had a hard time removing the lower 14mm caliper guide pin/bolt. So I stopped , since I do not want to round the hex head. Maybe it is a good idea to get a 14mm open end wrench with teeth too.

I will use my impact wrench on these lower rear 14mm bolt when the whole caliper is out.

Regarding the front brake, I have not seen it yet, but I have 22 impact wrench socket ready.

I am still waiting for more brake parts that I ordered including front and rear rotors.

User avatar
AWGD8
Posts: 1071
Joined: Wed Sep 10, 2008 5:34 pm
Car: 2008 EX35 AWD JOURNEY

Post

I like this wrench so much I went back to NAPA Auto Parts and grabbed some more Carlyle combo wrench with anti slip features (teeth) .
Infact I went there 3x ! Spent $8 for the 19mm and went back the next day to got the 22mm , 10mm and 14mm for $23. I went back again today to pick more since it is on sale till the end of the June! I went home with 8mm, 15mm, 17mm and 12mm for $32!
BTW, they are a bit longer than the standard wrench.

Image

These anti slip (teeth) features really works! I used a rubber mallet with the 19mm open end wrench on that lower caliper bolt, and the teeth of the wrench never marred! It bit into the bolt and turned! Of course the PB blaster and porpane torch did help too, but the wrench did the job!

Does anyone know what size for the front and rear Caliper bleedr screws?
The one I bought in Amazon shows front and back, but spec notes says rear only.

mikey1951
Posts: 99
Joined: Tue Dec 02, 2008 5:21 pm
Car: 2008 EX 35

Post

I too had a horrible experience with brake pad/rotor replacement all around.

1st - the caliper bracket bolts need to be broken loose by a pro - torqued way too much for a human. 1 hour on a rack with multiple tools and they are loose. Lower rear caliper bolts will not come out without lower bracket loose to swing caliper out. I too had a rounded off lower caliper bolt - used bolt remover tool to grab & remove lower caliper bolt - Irwin kit.

2nd - you need a narrow 17mm wrench to hold caliper guide in place while removing caliper bolts in front.

3rd - front bracket bolts can be removed with break over bar with wheels turned out to get good access.

I painted calipers and added decals while I was there.

I did spark plugs (NGK lasers) & silicone intake tubes (red) while I was off work - tedious but not too bad.

So listen to posts above and be prepared to fight to defeat this damn Infiniti!!

Good luck all!! :mad:

User avatar
AWGD8
Posts: 1071
Joined: Wed Sep 10, 2008 5:34 pm
Car: 2008 EX35 AWD JOURNEY

Post

So for the rear caliper lower bolt, even when loose, do you mean I would not be able to totally remove it due to the suspension parts blocking it? How do I go about removing it?

User avatar
NJGuy
Posts: 557
Joined: Fri Sep 23, 2011 10:05 am
Car: 2008 Infiniti EX35 Journey AWD

Post

mikey1951 wrote: 1st - the caliper bracket bolts need to be broken loose by a pro - torqued way too much for a human. 1 hour on a rack with multiple tools and they are loose. Lower rear caliper bolts will not come out without lower bracket loose to swing caliper out. I too had a rounded off lower caliper bolt - used bolt remover tool to grab & remove lower caliper bolt - Irwin kit.

2nd - you need a narrow 17mm wrench to hold caliper guide in place while removing caliper bolts in front.
Yes, the fronts do need the 17mm open end wrench to keep the slider pins from turning in place. If I remember correctly, you can break the slider pin bolts loose first, and then throw the 17mm wrench on and continue loosening them. I thought that reinstallation was a bit trickier, as the 17mm wrench may start to get pinched in the caliper body as you tighten the slider pin bolt. I think I ended up switching over to using a thinner adjustable wrench. I didn't talk much about my front brake job because it was a ho-hum experience and I didn't come across anything that I thought I needed to strongly warn others about. It also wouldn't make for good storytelling :) .

One other word of caution to others who look to take this on. The rear slider bolts appear to have slightly tapered heads. I believe the intention here was to make it easier to get a wrench on them. However, that feature also makes them more prone to getting rounded off. And when they get rounded off, they tend to taper even more, making it much harder to get a good surface to bite on. Just to reiterate what's already been mentioned here, proceed with caution when trying to get them loose.

mikey1951 wrote:I too had a horrible experience with brake pad/rotor replacement all around.

So listen to posts above and be prepared to fight to defeat this damn Infiniti!!

Good luck all!! :mad:
This x1000.

User avatar
NJGuy
Posts: 557
Joined: Fri Sep 23, 2011 10:05 am
Car: 2008 Infiniti EX35 Journey AWD

Post

AWGD8 wrote:So for the rear caliper lower bolt, even when loose, do you mean I would not be able to totally remove it due to the suspension parts blocking it? How do I go about removing it?
Yes, due to the proximity of the lower suspension link, I don't think the 14mm lower slider bolt on the rear will come out all the way unless the caliper is fully removed. It's one of the frustrations I ran into with the geometry of the rear suspension and caliper placement.

And the 19mm caliper mounting bolts do not need to be fully removed to dismount the caliper bracket, they just need to be loosened all the way.

User avatar
AWGD8
Posts: 1071
Joined: Wed Sep 10, 2008 5:34 pm
Car: 2008 EX35 AWD JOURNEY

Post

Thanks guys for the new info!

My issue with the rear brake , after the 19mm lower bolt removed, was the lower caliper slider pin .
I will tackle this 14mm lower slider pin bolt when the caliper is totally removed. I might just use my impact gun with this.

The front brakes, I have not really loosen or check it at all, it is another battle to win...
I think I have all the right tools in hand...

User avatar
AWGD8
Posts: 1071
Joined: Wed Sep 10, 2008 5:34 pm
Car: 2008 EX35 AWD JOURNEY

Post

I finally just finished my brake job today.

I did not replace my rotors since dealer wants to resurface it , still in great conditions. So I told them I am doing the pads in my garage.

I have both brand new front and rear rotors that I was planning to replace today , but the freakin old rear rotor won't come loose! I decided to just change the pads on the rear and put a new caliper slider pins .

I also cleaned the front pads(6mm) and replaced the old caliper slider pins.

If I have to replace the rotor next time,
I will do it like this...
https://m.youtube.com/watch?v=mtsTJCRljAs

The Milwuakee cordless impact wrench was a huge help removing the rear 14mm caliper slider pin.

There is a sequence in removing and installing these 14mm and 19mm rear bolts.

First use an open end 19mm wrench for the bottom caliper bolt. To remove this bolt you need to use a smaller jack (bottle jack will do the job or the stock Nissan jack) place the jack under the knuckle area (suspension part) 6 O'clock below the rotor. When you do this, the 19mm bottom caliper bolt will rise up away from the suspension bar that tends to prevent it from totally removing the bolt using an open end wrench.

Next use a socket wrench for the top caliper bolt. Pretty straight forward. Once the caliper us out , use a 14mm socket with impact gun and remove the caliper slider pin/bolt.

Putting the rear bolts back in sequence.

Top caliper bolt ----> Top caliper guide pin/bolt----->Lower caliper guide pin/bolt----> lower caliper bolt (with bottle jack still in place)

When changing brake pads , it is easier to have to the caliper installed and one slider pin removed.

Front is very easy. With impact wrench used, it was flawless... Very easy.

Installing the caliper guide pin/bolt requires a thin 17mm open end wrench. I did not have an issue removing the 14mm since I used an impact gun and it loosen the 17mm bolts too.

User avatar
AWGD8
Posts: 1071
Joined: Wed Sep 10, 2008 5:34 pm
Car: 2008 EX35 AWD JOURNEY

Post

Just an FYI, you can get a nice set of open end wrench with thinner design to fit in the front brake caliper 17mm bolt @ Harbor Freight for $12.

I prefer NAPA Carlyle wrench, but the cheapo wrench does the job well!

jakenbake
Posts: 131
Joined: Wed Feb 18, 2015 10:35 am
Car: 2009 Infiniti EX35
Location: Phoenix, AZ, USA

Post

I tackled the front and the back pads and rotors this last week. I used Bosch Quiet Cast rotors and pads. So far they feels great and just and good if not better than the ones the dealership put on for me last time. Plus, I like the silver coating on the rotors...hopefully it will keep the fins and hats from rusting for a long time. Also, the shims don't require grease because the shim is all one piece. Furthermore, the shim has glue between it and the pad and when it gets hot the shim will glue itself to the pad. So don't put grease in this area if you go with these pads.

Thanks to some online videos, this thread, and the service manual I did not have too hard of a time because I had a good idea of what to expect. The front were easy and I had no problem. The back were a more difficult but I did learn a few tricks that might help some of you out.

1st: I bought a set of crow foot wrenches to use with my breaker bar and with my torque wrench. This gave me the clearance to get my breaker bar in there and get the bolts off without a problem.

2nd: I backed the car up on ramps initially to give me more clearance to break the bolts lose...Once I had the bolts lose, I took the car off the ramps and used the jack and stands to get the tires off the ground.

3rd: The bottom slide pins do not have enough clearance to be removed unless you loosen the bracket...Once the bracket is loose, you can wiggle it to get the bottom slide pin out.

4th: Just like the bottom slide pin, the bottom bolt for the bracket cannot be removed unless the top bolt is loosened first. Once the top is loose, you can wiggle the bracket to get the bottom bolt out.

5th: The threads on the slide pins and the bracket bolts all had rusted a little (I didn't have this problem on the front). I used a wire brush to clean up the threads really well and when I remounted the bracket and caliper I added a little blue loctite to help keep the bolts from coming loose but to also help prevent them from rusting in place in the future.

6th: Make sure to put the caliper back on the bracket before mounting the bracket...remember my 3rd tip, you can't fit the slide pins in when the bracket is fully mounted.

7th: The head of the torque wrench was too big to fit on the lower slide pin and bracket bolts (even with the crowfoot wrench)...So I tightened the bolts with just a regular ratchet and crowfoot and then put the car back on the ramps so I could fit underneath. Then with the crowfoot and an extension I was able to use my torque wrench to make sure the lower bolts were torqued correctly which will hopefully make them easier to remove again in the future.

8th and last: The front slide pins are 20 ft lbs and front bracket bolts are 98 ft lbs. The rear slide pins are 32 ft lbs and the rear bracket bolts are 62 ft lbs. Without thinking I almost torqued the bolts to the same specs as the front but then remembered they are not the same. I am glad I remembered and didn't do the rear brackets at 98, otherwise I might never get them off when I do another brake job.


Return to “Infiniti EX35 / EX37 and QX50 / QX55 Forum”