
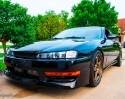
I have been posting this build on zilvia for a long time, but never here.
It's not done yet. I have a HUGE blog dedicated to the build here (no forum chit chat):http://onyxsyndicate.com/newma....html
The zilvia thread is here:http://zilvia.net/f/tech-talk/....html
There are tons and tons of pictures on the site, but I'll post these two images here:
Keep it real, guys.
EDIT: I just saw I had started a thread about this back in 06, but didn't really know what I was doing back then... LOL: zerothread?id=213222
Modified by ctnewman at 12:06 PM 7/22/2009
My 1987 BMW 325IS w/ single turbo RB26 build. E30GTR


-
slidestyle69

- Posts: 500
- Joined: Fri Mar 27, 2009 6:11 am
- Car: 92 s13
- Location: Alabama
Re: (Coolwhip)
holy s***


Re: (virus77)
Nice project man!
-
BoostFab

- Posts: 3529
- Joined: Wed Dec 03, 2003 8:23 am
- Car: S13cp, S13fb, S14z
- Location: Nismo Land
- Contact:
Re: My 1987 BMW 325IS w/ single turbo RB26 build. E30GTR (ctnewman)
i thought you had scrap the 26, good to see you keeping it alive lol
Re: My 1987 BMW 325IS w/ single turbo RB26 build. E30GTR (BoostFab)
Thanks guys.
I'm taking it to the paint shop on Saturday to paint the body!
I'm taking it to the paint shop on Saturday to paint the body!
-
HxC_Nismo
- Posts: 1036
- Joined: Sat Sep 23, 2006 10:26 am
- Car: '98 Nissan 240SX SE R33 RB26DET
'07 Nissan Titan SE
'05 Toyota Corolla - Location: Missouri
- Contact:
Re: My 1987 BMW 325IS w/ single turbo RB26 build. E30GTR (ctnewman)
wow that is an amazing build man i cant wait to see it done.
Re: (l0nestar)
You're probably right.
But this project isn't necessarily about all out performance. It's also about building a street car that no one else in the world will ever have.
It's about the journey, not the destination.
but I know one thing. When the E30 hooks, it's going to be fast as f***.
But this project isn't necessarily about all out performance. It's also about building a street car that no one else in the world will ever have.
It's about the journey, not the destination.
but I know one thing. When the E30 hooks, it's going to be fast as f***.
l0nestar wrote:Wow man!
I would be inclined to believe the S240 would spank the E30, but I can't wait to find out. Now just try getting it in a 'SPEC' series..
-
Yellow4g63
- Posts: 3718
- Joined: Mon Jan 20, 2003 6:07 pm
- Car: 95 Nissan RB20 240SX RB20
91 Nissan NX2000 VE power
95 Nissan 240SX Stock - Contact:
Re: (ctnewman)
Nice project! love the wheels too.
Re: (Yellow4g63)
Very nice build man, checked out a few of your interesting sections.
For the valve shims when you were grinding them down to proper thickness was that one at a time? How many did you end up making and what was the total cost?
What camshafts are being used here?
For the valve shims when you were grinding them down to proper thickness was that one at a time? How many did you end up making and what was the total cost?
What camshafts are being used here?
Re: (Shocker)
just imagine this thing rolling up beside you and taking off..... you would be like... .
+1 for clean sleeper
+1 for clean sleeper
-
RustspecS13

- Posts: 928
- Joined: Sat Sep 08, 2007 5:30 pm
- Car: '74 260z and '88 300zx turbo
Re: (Nesquick)
I saw this build just after you had started cutting the transmission tunnel. I believe I understood what you were doing with the exhaust, and it seemed simple to me.
Its looking 100X better now though. I had no idea it was the same car until I saw the build link. It'll definitely be a sick car. GL
~Alex
Its looking 100X better now though. I had no idea it was the same car until I saw the build link. It'll definitely be a sick car. GL
~Alex
-
ST240
- Posts: 575
- Joined: Sun Aug 04, 2002 11:45 am
- Car: RB30DET Nissan S13
'01 Nissan Pathfinder - Location: Edmonton, Canada
Re: My 1987 BMW 325IS w/ single turbo RB26 build. E30GTR (ctnewman)
Welcome to NICO!
I've been following this build forever; and thought she was dead a few times. Glad to see it's still alive. Hugely inspirational.
By the way, the only thing i can think of when i see your avatar is "... Hence the expression, as greedy as a PIG" hahaha.
Keep it up man. And just out of curiosity, what is your job anyway specifically? I'm a mechanical engineer too and it looks like you have some great experience with machining. My job experience has helped me design and machine parts and whatnot too...
Haven't updated this in FOREVER:
hellz yeah
First, some day shots of the car. Looks a lot different, huh?
Next I made some coolant pipes (i installed the IC piping to ensure clearance)
Shot of the intercooler and radiator installed (temporarily):
Then I started installing the window gaskets and some of the trim. The trim is actually blacked out with vinyl, which is a pretty popular way to do it. It looks really good:
Lastly, I made and installed some AN lines to be used with my PCV vacuum setup. That unaatached line will go to a catch can, then into the exhaust evacuator.
Got my coolant pipes coated in brushed aluminum PC and my bumper brackets in black.
I put a bead on the pipes with these vice grips I modified. Got the idea from Dan (JUICEDZ4)... In fact that's actually his pic... but mine are nearly identical.
Check out his AWESOME cavalier build here. I know it's a Cavalier, but check it out, it's unreal.
I bought some cheap summit racing window cranks and machined an adapter to run them on my gutter power window housings.
More shots of the outside. It's even more yellow than it appears in photos. Very odd color indeed. 4/6 windows are in. As is BLACKED OUT TRIM
PHAT AZZ... (the apron has some black on it at a weird angle so it looks crooked, but it all gets covered by the rear valence) Also got the trunk latch and tails installed. Looks like a fox notch hahah.
A shot of the CHROME BILLET WINDOW CRANK$$$ installed (23 bucks from summit)
And FINALLY got a set of these. SOOOO much better than a crescent wrench with electrical tape on it.
Also summit racing must hate that I keep adding s*** to this order over and over. Check out all those different ship dates, all on 11.95 handling.
Nah, they probably love me...
Look at all this other s*** I ordered.
Added a line clamp for the oil feed line and installed the EGT fitting into the manifold. The schedule 10 should be thick enough to not weld a bung on there, time will tell.
Powdercoated coolant pipes installed, you can also see where I am going to weld the BOV flange on.
Steph's baffled catch can installed. You can kinda see how the lines route now. One more line comes from the bottom of the catch can to the exhaust scavenger, which will be after the WG return and flex section.
A shot of the line feeding the catch can and also notice the brake booster check valve installed in-line. Again, trying to keep it ultra clean looking, this time line mounts to firewall.
Rear PACKAGE TRAY dyed black and installed. Instead of factory mounting I simply chose to use 2 stainless self-tapping screws in the front and clips in the back.
Lastly for tonight: Back Glass.
Just scooped up this, and the interface to communicate directly with AEM:
http://www.race-technology.com/dash2_2_31.html
And a fuel sender from summit. (Oh yeah and a 2.75 cent fitting that's backordered until october, LOL)
First thing I did was install the fuel tank level sending unit. Pretty straightforward.
Radiator fan installed:
Wideband bung welded on:
Spiffy downpipe bracing to motor:
Lastly, and most awesomely, I made this closeoff out of laser cut aluminum and pre-preg carbon fiber.
-
mattblancarte
- Posts: 1978
- Joined: Sat Jun 21, 2008 4:14 pm
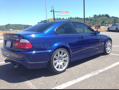
- Car: 2005 BMW M3 Comp. Coupe
Re: (Carl H)
The downpipe punching through the firewall with that custom carbon and aluminum... siiiiiick.