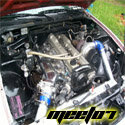
Just when I was about to give up a buddy of mine text messaged me. The text was a link to a rb25det motor set that a guy was selling for cheap. The deal was too good and everything feel right into place for me to purchase this motor set.
Looked over the motor and everything looks pretty good. I noticed that intake runners 2-3 and 6 had a little water in them. The guy had them sitting in the bed of is truck for a week ( he said). So I blew the water out with my air compressor not thinking anything about it.
I decided that it might be best to go ahead and do a compression test on this thing to see how healthy of an engine I have. Hate to swap over all of my previous goodies to find out that the motor was a waste. Bolted the transmission back up. Bolted back up the starter and pulled the Saturn SW2 into the garage. I needed some juice to turn this thing over.
Hooked up the jumper cables, used my jumper wire to trigger the starter and tested all the cylinders. The test read from cylinders 1 to 6
180-120-70-195-185-140
As you can tell they where all over the place. I added a little bit of engine oil to cylinders 2,3, and 6 to see what would happen thinking that the piston rings are toast. Cylinder 2 went from 120 to 210. Cylinder 3 went from 70 to 100 and number 6 went from 140 to 145. Not much change at all. So what to do next???
I got to thinking back to the water in the intake runners......I read that if its not the piston rings then the problem might be in the head. I proceeded to pressurize the cylinder at TDC for the ones that where bad. Each bad cylinder had air leaking out of the intake ports past the valve. So that little bit of surface rust was not allowing the valves to seat...A HAHHH!!! I got it.
Solution:
-What should I do now?
-Can I fix the problem without removing the head?
I mean this is my 3rd motor set so I have now 4 heads. One that I personally ported, has new valve stem seals, and resurfaced. I mean I do have an extra OEM head gasket and ARP head studs from my previous build. Should I just go ahead, remove the current head and just slap on my freshly rebuilt head??
Meet07--Let's try this again build
-
USMCgetsome

- Posts: 2030
- Joined: Wed Apr 14, 2004 7:38 pm
- Car: OWN S13.5 RB25DET/2003 G35
- Contact:
Re: Meet07--Let's try this again build
Lazy way to fix is just run that mofo in hopes it will reseal around the rusted valve seat. Or since you already have a head on the shelf ready to go..., SWAP THAT BISH!!!
Re: Meet07--Let's try this again build
Swapping head out with known good and adding arp's seems like a no brainer.. or would you rather do it in the car?
-
meet07
- Posts: 1189
- Joined: Tue May 08, 2007 5:48 am
- Car: 89 180sx rb25det
- Location: North Carolina
- Contact:
Re: Meet07--Let's try this again build
If I have to swap out the head I would rather do it while its on the engine stand. I popped the valve covers off and its clean as a whistle!! Just didn't want to tear into this motor.
The setup cam wit another isis intake manifold. I was thinking about painting it wrinkled black. The valve covers are wrinkled red. What you think?
The setup cam wit another isis intake manifold. I was thinking about painting it wrinkled black. The valve covers are wrinkled red. What you think?
-
meet07
- Posts: 1189
- Joined: Tue May 08, 2007 5:48 am
- Car: 89 180sx rb25det
- Location: North Carolina
- Contact:
Re: Meet07--Let's try this again build
I thought about that too....USMCgetsome wrote:Lazy way to fix is just run that mofo in hopes it will reseal around the rusted valve seat. Or since you already have a head on the shelf ready to go..., SWAP THAT BISH!!!
Re: Meet07--Let's try this again build
Before you get too excited about that isis manifold lay a gasket across it and make sure the ports line up. I would definitely drop your rebuild head on there.
-
meet07
- Posts: 1189
- Joined: Tue May 08, 2007 5:48 am
- Car: 89 180sx rb25det
- Location: North Carolina
- Contact:
Re: Meet07--Let's try this again build
Yeah I can do that. The ports on my other manifold lined up pretty nicely but then again I bought it before ISIS even start making stuff for the RB. All I did with my other freddy intake is remove the merge casting that was found in each runner. It was the material where u can tell they pressed 2 pieces together (un sure of the process)240z4u wrote:Before you get too excited about that isis manifold lay a gasket across it and make sure the ports line up. I would definitely drop your rebuild head on there.
So I'm in the works of tearing everything down so I can remove the head and install my ported rebuilt head. I went ahead and swapped over my good oil pump and water pump. Also installed my cooler "T" Stat.
Debating on whether or not to use this transmission or my original? There was nothing wrong with my original? I'm selling one of them....

Not sure if these are ARP exhaust manifold bolts or not but they look nice. Should I use them??

Swapped over oil pick ups. This motor was originally setup to power a 2004 BMW 325i. I have a custom oil pan, custom pickup and motor and transmission brackets that might be of use to someone.....

The turbo is in good shape but I don't need it either.

Here is the head that I have to remove. It's kinda a shame that the inside looks so nice. The guy left it in the back of his truck for a rainy week. Oh well I have 3 more heads.


Stock Clutch is also in great shape but its going in the for sale pile as well.

-
meet07
- Posts: 1189
- Joined: Tue May 08, 2007 5:48 am
- Car: 89 180sx rb25det
- Location: North Carolina
- Contact:
Re: Meet07--Let's try this again build
Removed the head and found a little build up from the water. Well most of it is oil from the compression test I performed yesterday. I looked over the cylinder walls and they still have the factory cross hatching. Everything in the pictures are loose. I pretty much can write my name in the cylinder lol
Here are the cylinders:
Cylinder 1

Cylinder 2

Cylinder 3

Cylinder 6

I'll turn the motor on its side tomorrow afternoon and clean out the tops of the pistons. I know I read somebody on here saying that they cleaned the tops of the pistons with a tooth brush and some sort of solution? Spray the cylinder walls down with brake cleaner, lubricate and install my rebuilt head. Hope I have enough ARP grease for the head bolts.
Re: Meet07--Let's try this again build
Those look exactly like the exhaust stud / nut set I got from Enjuku for my RB fwiw.meet07 wrote:Not sure if these are ARP exhaust manifold bolts or not but they look nice. Should I use them??
-
meet07
- Posts: 1189
- Joined: Tue May 08, 2007 5:48 am
- Car: 89 180sx rb25det
- Location: North Carolina
- Contact:
Re: Meet07--Let's try this again build
I had to cut a few to fit my S-Tec manifold. I guess I'll use the studs that I can...daemonyk wrote:Those look exactly like the exhaust stud / nut set I got from Enjuku for my RB fwiw.meet07 wrote:Not sure if these are ARP exhaust manifold bolts or not but they look nice. Should I use them??
-
meet07
- Posts: 1189
- Joined: Tue May 08, 2007 5:48 am
- Car: 89 180sx rb25det
- Location: North Carolina
- Contact:
Re: Meet07--Let's try this again build
So I cleaned the pistons and cylinder walls. Everything looked pretty good:

Then I checked the cylinders in 1-3-6 and they had a little rust on them:


What do you think:
-Do you think after running it for a bit the little bit of water residue will disappear?
-Do I need to hone
I mean cylinder 3 is the worst. You can tell that a little bit of water got into the cylinder and sat with the piston at BDC.
Re: Meet07--Let's try this again build
If ur goin to run it like that I would hit that rust with real fine sandpaper like 1500 or 2000 just incase theres any build up. Just as a precation That may keep it from scorching the sides.
-
meet07
- Posts: 1189
- Joined: Tue May 08, 2007 5:48 am
- Car: 89 180sx rb25det
- Location: North Carolina
- Contact:
Re: Meet07--Let's try this again build
Talking to one of my mechanics today he says to try using scotch brite. He's built many many diesel engines over the past 30+ years.mixeds14 wrote:If ur goin to run it like that I would hit that rust with real fine sandpaper like 1500 or 2000 just incase theres any build up. Just as a precation That may keep it from scorching the sides.
Re: Meet07--Let's try this again build
I would just scotch brite them as best as possible. Dont put a ton of pressure on the pad but it should be fine. Check for pitting where the rust was. Pitting of the wall could lead to ring damage.
Also, for the valves - you could just try lapping them in. Do a google search on valve lapping. You basically are just using a polishing compound on the valves and valve seat and it will help clean them up and provide a seal. You will have to pop the valve locks/retainers off and remove the valve springs too.
To test the valve seal, I always flip the cylinder head upside down on a level surface and pour water into the combustion chamber. Watch for water leaking past the valves and that will tell you if you need to keep lapping them.
-
meet07
- Posts: 1189
- Joined: Tue May 08, 2007 5:48 am
- Car: 89 180sx rb25det
- Location: North Carolina
- Contact:
Re: Meet07--Let's try this again build
I probably will lap these valves and try and sell the head. This makes 4 cylinder heads that I have not. I mean I might need one spare but not really...Booztd 3 wrote:I would just scotch brite them as best as possible. Dont put a ton of pressure on the pad but it should be fine. Check for pitting where the rust was. Pitting of the wall could lead to ring damage.
Also, for the valves - you could just try lapping them in. Do a google search on valve lapping. You basically are just using a polishing compound on the valves and valve seat and it will help clean them up and provide a seal. You will have to pop the valve locks/retainers off and remove the valve springs too.
To test the valve seal, I always flip the cylinder head upside down on a level surface and pour water into the combustion chamber. Watch for water leaking past the valves and that will tell you if you need to keep lapping them.
I bought the lapping tool and compound on the last build I had. Used it and it was still leaking water. Ended up being a bent valve so I had to purchase another head just to us the valves. The exhaust valves at the time where out of stock.
I tried to hit cylinder #3 last nite with a little bit of scotch brite. Didn't seem to loosen that rust up off the cylinder. Me and my mechanic talked about having to hone this thing out. I don't want to do it but I would feel more comfortable freshening up the block and throwing a new set of rings in it. He says depending on what the bearings look like they might be able to be used. I'm kinda against it but he says that he has had customers in the past come into the shop with there 18 wheelers. Rebuilt motors and reused bearing on many trucks that run from one side of the coast to the other......
-
meet07
- Posts: 1189
- Joined: Tue May 08, 2007 5:48 am
- Car: 89 180sx rb25det
- Location: North Carolina
- Contact:
Re: Meet07--Let's try this again build
Looking into getting a flex hone tool. What grit should I look into?
-
meet07
- Posts: 1189
- Joined: Tue May 08, 2007 5:48 am
- Car: 89 180sx rb25det
- Location: North Carolina
- Contact:
Re: Meet07--Let's try this again build
Decided to go ahead and install the AEM cas disk....
Installed the disk. Something isn't right???

Ok had it upside down. Had to press the shaft out again and flip the disk....
See what's wrong in this picture. Start to re install everything and forgot to re install the gold screws at the base of the shaft.....had to pull the bearing right back off...huhhhh....

Picture of the nifty tool I rigged up. 2 washers and a socket:

I ordered a set of oem piston rings and a flex hone carbide tool 240 grit. Has anyone ever used one of these? And if so can you shoot me any pointers? Looks like All I need to do is go in and out as fast as I can and make sure I keep the same amount of passes on each cylinder.
Do I have to file fit the piston rings?? Someone was telling me that they should be cut for factory specs?? Not sure since the only set of rings I've worked with are wiseco and you have to file fit those...
-
meet07
- Posts: 1189
- Joined: Tue May 08, 2007 5:48 am
- Car: 89 180sx rb25det
- Location: North Carolina
- Contact:
Re: Meet07--Let's try this again build
Update:
My 3.5 Flex Hone (240 grit) and oem piston rings arrived on Friday. I performed about 180 passes in cylinder 3 and there was no saving it. Dropped it off at the machine shop. Looks like a single sleeve, decking the block, honing the rest of the cylinders and hot tank cleaning.... It will set me back about $200 dollars but I'm pleased
My 3.5 Flex Hone (240 grit) and oem piston rings arrived on Friday. I performed about 180 passes in cylinder 3 and there was no saving it. Dropped it off at the machine shop. Looks like a single sleeve, decking the block, honing the rest of the cylinders and hot tank cleaning.... It will set me back about $200 dollars but I'm pleased
-
meet07
- Posts: 1189
- Joined: Tue May 08, 2007 5:48 am
- Car: 89 180sx rb25det
- Location: North Carolina
- Contact:
Re: Meet07--Let's try this again build
Ok I have been contemplating on whether to fire this thing up stock or reinstall all my big boy parts and break the motor in that way?? I'm looking for a factory fuel pump assembly b/c mine was rigged for dual stealth pumps and upgraded wiring to the tank. Plus I need a oem style downpipe or a aftermarket downpipe. Should I take the money needed for the downpipe and fuel pump assembly and put it towards a dyno tune or purchase whats need for stock and ride it for a month or 2?
What do you guys think??
What do you guys think??