M56 Rear Subframe Bushing Replacement ***WARNING. IMAGE INTENSIVE***

Forum for Infiniti M37, M56 M35h Hybrid and Q70 owners.
Yoda's Master
Posts: 440
Joined: Tue Jul 10, 2018 11:26 pm
Car: 2012 M56
2009 370z
Location: Rock in the middle of nowhere

Post

WARNING! You're doing this at you're own risk. I'm not responsible for anything that happens to you or your car. Also, disconnect your battery before you start!

For those who have shot subframe and/or diff bushings and/or anyone who just wants to upgrade their bushings then you've found the right post.

First off, there's no direct fit aftermarket solution so be prepared to do some extra work.

I ordered the following. If you use a different brand, then you might need to make further adjustments.
Subframe Bushing: Prothane 14-103 https://www.amazon.com/gp/product/B00BU7XV9Y subframe bushing kit for the 350z/370z.
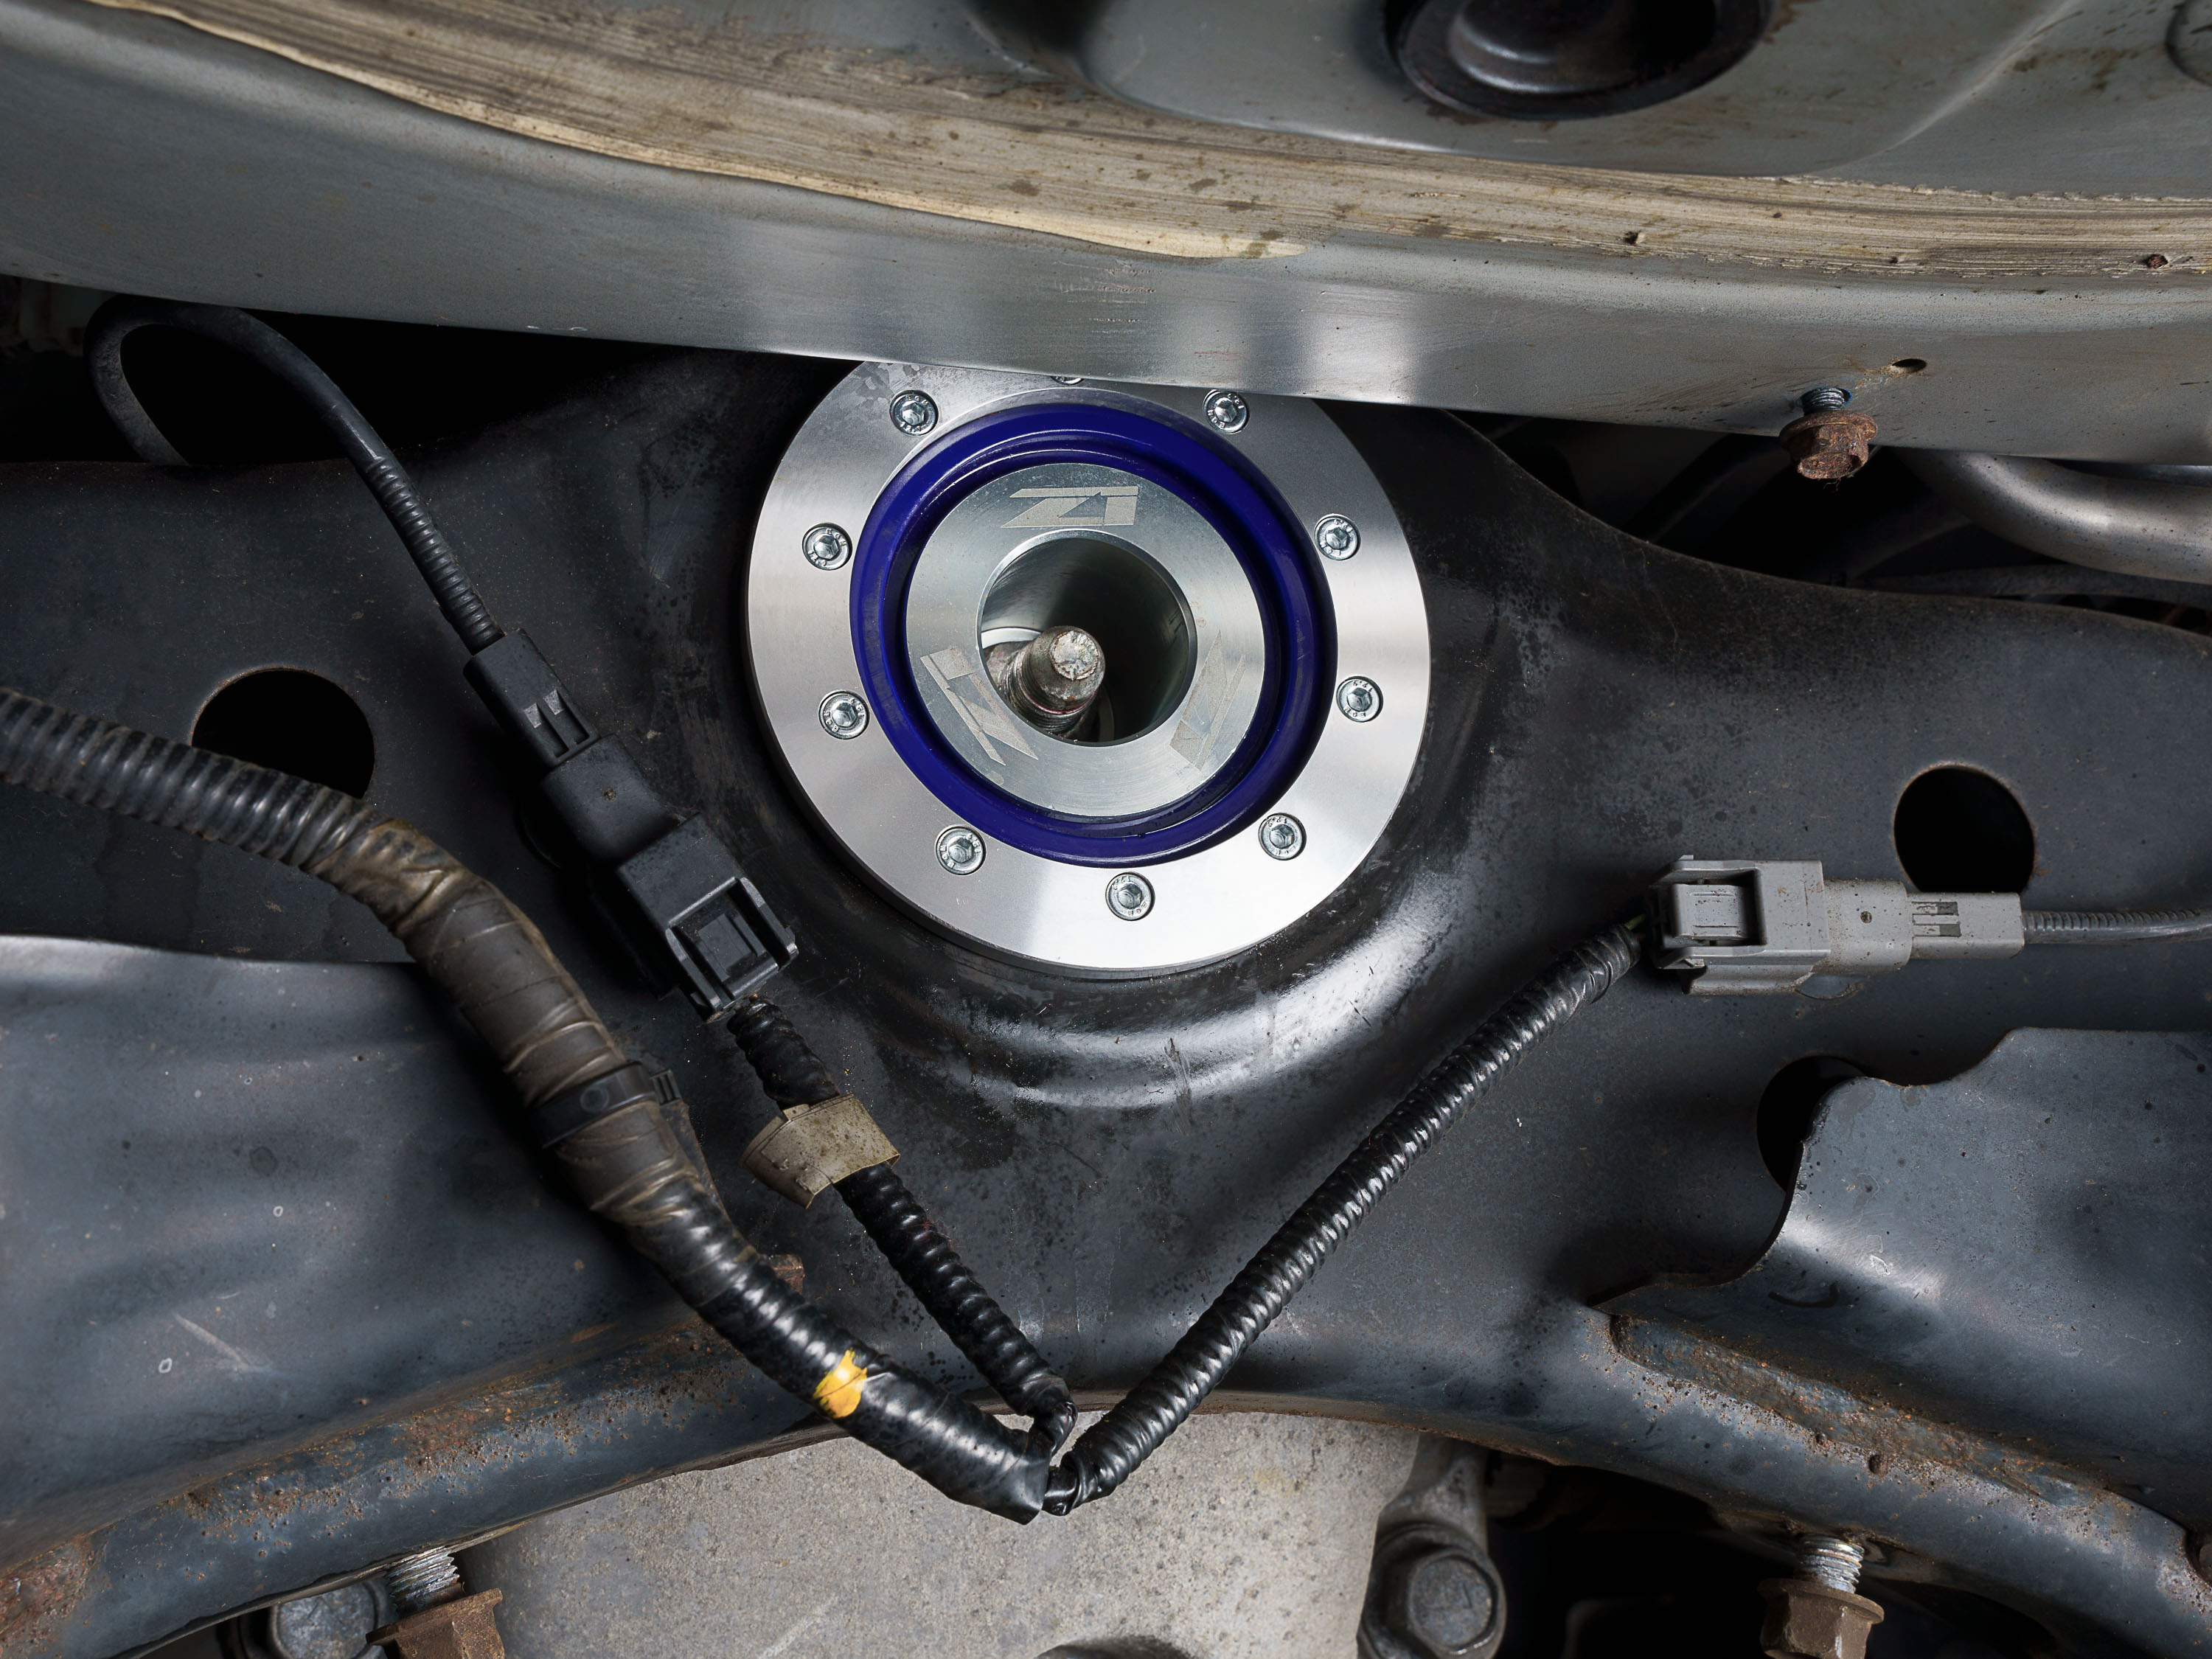
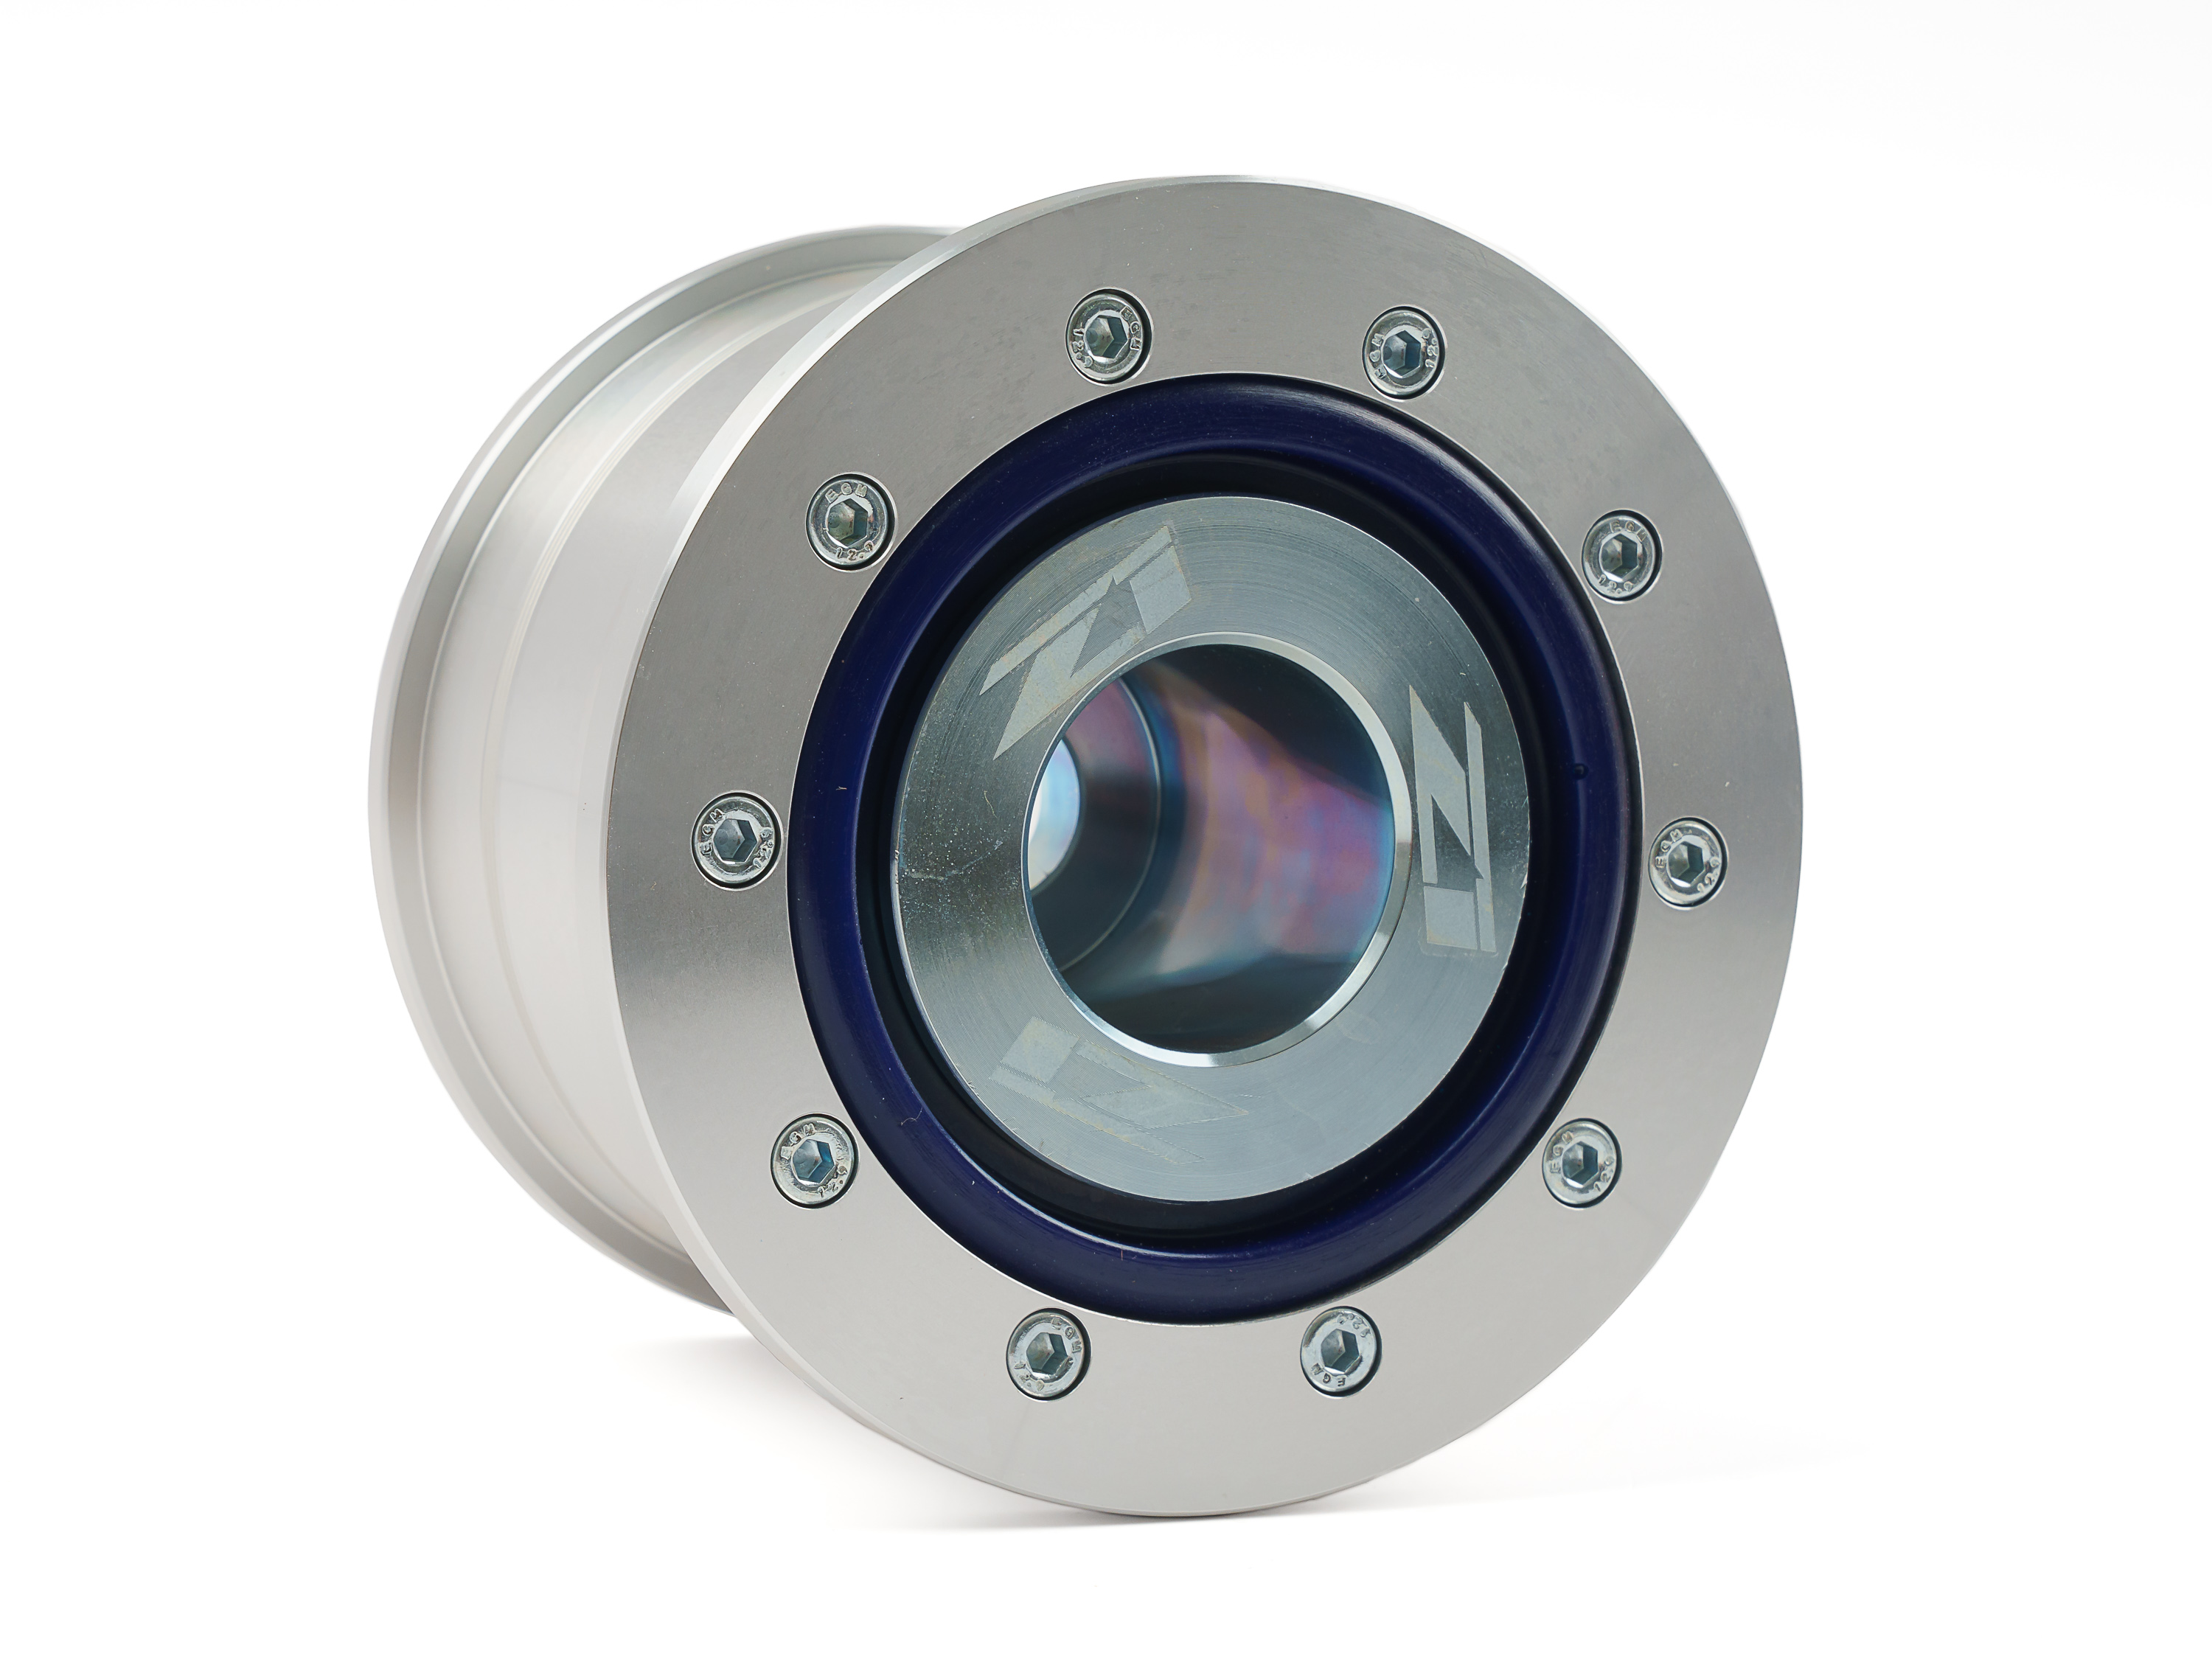
Rear Diff Front Bushing: Nolathane REV200.0016 https://www.amazon.com/gp/product/B06XY6CZ13 Front Rear Diff Mount Bushing for the 350z/370z.
Rear Diff Rear Bushing DIY 80A HP Liquid Poly https://www.suspension.com/diymmi
Poly KY Jelly: Energy Suspension 9.11104 https://www.amazon.com/gp/product/B000MW5SJ4
1/8" UHMW Plastic Sheet https://www.amazon.com/gp/product/B0070ZAR8I
3/16" UHMW Plastic Sheet https://www.amazon.com/gp/product/B000ILJZE8
1/2" Split Ring Lock Washer (2 ea) from Home Depot
Wheel Bearing Grease

Optional parts to install:
Your choice of Q50 Rear Camber Kit
SPL Rear Lockout Kit
SPL Z33/Z34 Rear Control Arm Bushing (REQUIRES MODIFICATION OF YOUR EXISTING CONTROL ARM)

OEM Parts to order:
55269-AG00E (12 ea) Control Arm Nuts
54588-1CA0A (4 ea) Camber Arm Nuts
08918-6401A (2 ea) Parking Cable Nuts
37120-AH00A (3 ea) Drive Shaft Bolts
37121-JK20B (3 ea) Drive Shaft Washers
37171-AL60A (3 ea) Drive Shaft Nuts
08918-3401A (2 ea) Near CAT Back Exhaust Flange Nuts
20692-8H30A (1 ea) Near CAT Back Exhaust Flange Gasket
40037-1CA0A (2 ea) Axle Nut Washers
00921-5402A (2 ea) Axle Nut Cotter Pins

Optional:
11298-8H303 (2 ea) Rear Shock to Knuckle Bolts (Mine were bent)
08921-3252A (2 ea) Rear Upper Control Arm Ball Joint Cotter Pin.
01225-00062 (2 ea) Drive Shaft Intermediate Nuts

Tools:
Medium sized Amazon Box
Zip ties
Socket and Wrench sets (Mostly 10, 12, 14, 16, 17, 18, 19, 21 mm)
Multiple jack stands
Multiple traditional jacks
Transmission jack
Dolly
Impact wrench
32mm Axle Nut Socket
Flat head screw drivers
Dykes
Pliers
Sharpie
Reciprocate Saw
FIRE!!!
Cleaning Tools/Supplies

Now the fun begins :cry:

WARNING! Disconnect your battery before you start! Not my fault if you fry the wheel sensors.

I put the front on ramps and lifted the rear to get it leveled and removed the wheels.
Image

Remove the Calipers and tie them out of the way.
Image

Remove the Axle Nuts. Yours will not be the same setup as mine.
Image
Image

Unbolt the Shock Bolts. Mine were bent/curved over the years so I ordered new Bolts. (11298-8H303)
Image

Unbolt and remove your Mufflers. These Nuts were tight. Order extra Nuts if you round them (08918-3401A)
Image
Image

Disconnect both Wheel Sensor Wires and pop the clip off the Subframe.
Image

Devil Exhaust Nuts. Replace even if you remove them intact. (08918-3401A)
Image
Image

Remove the mid-section and the heat shields.
Image

Mark your Camber and Toe Bolts so you know how realign them afterwards. Do not mix them up when you remove them later.
Image

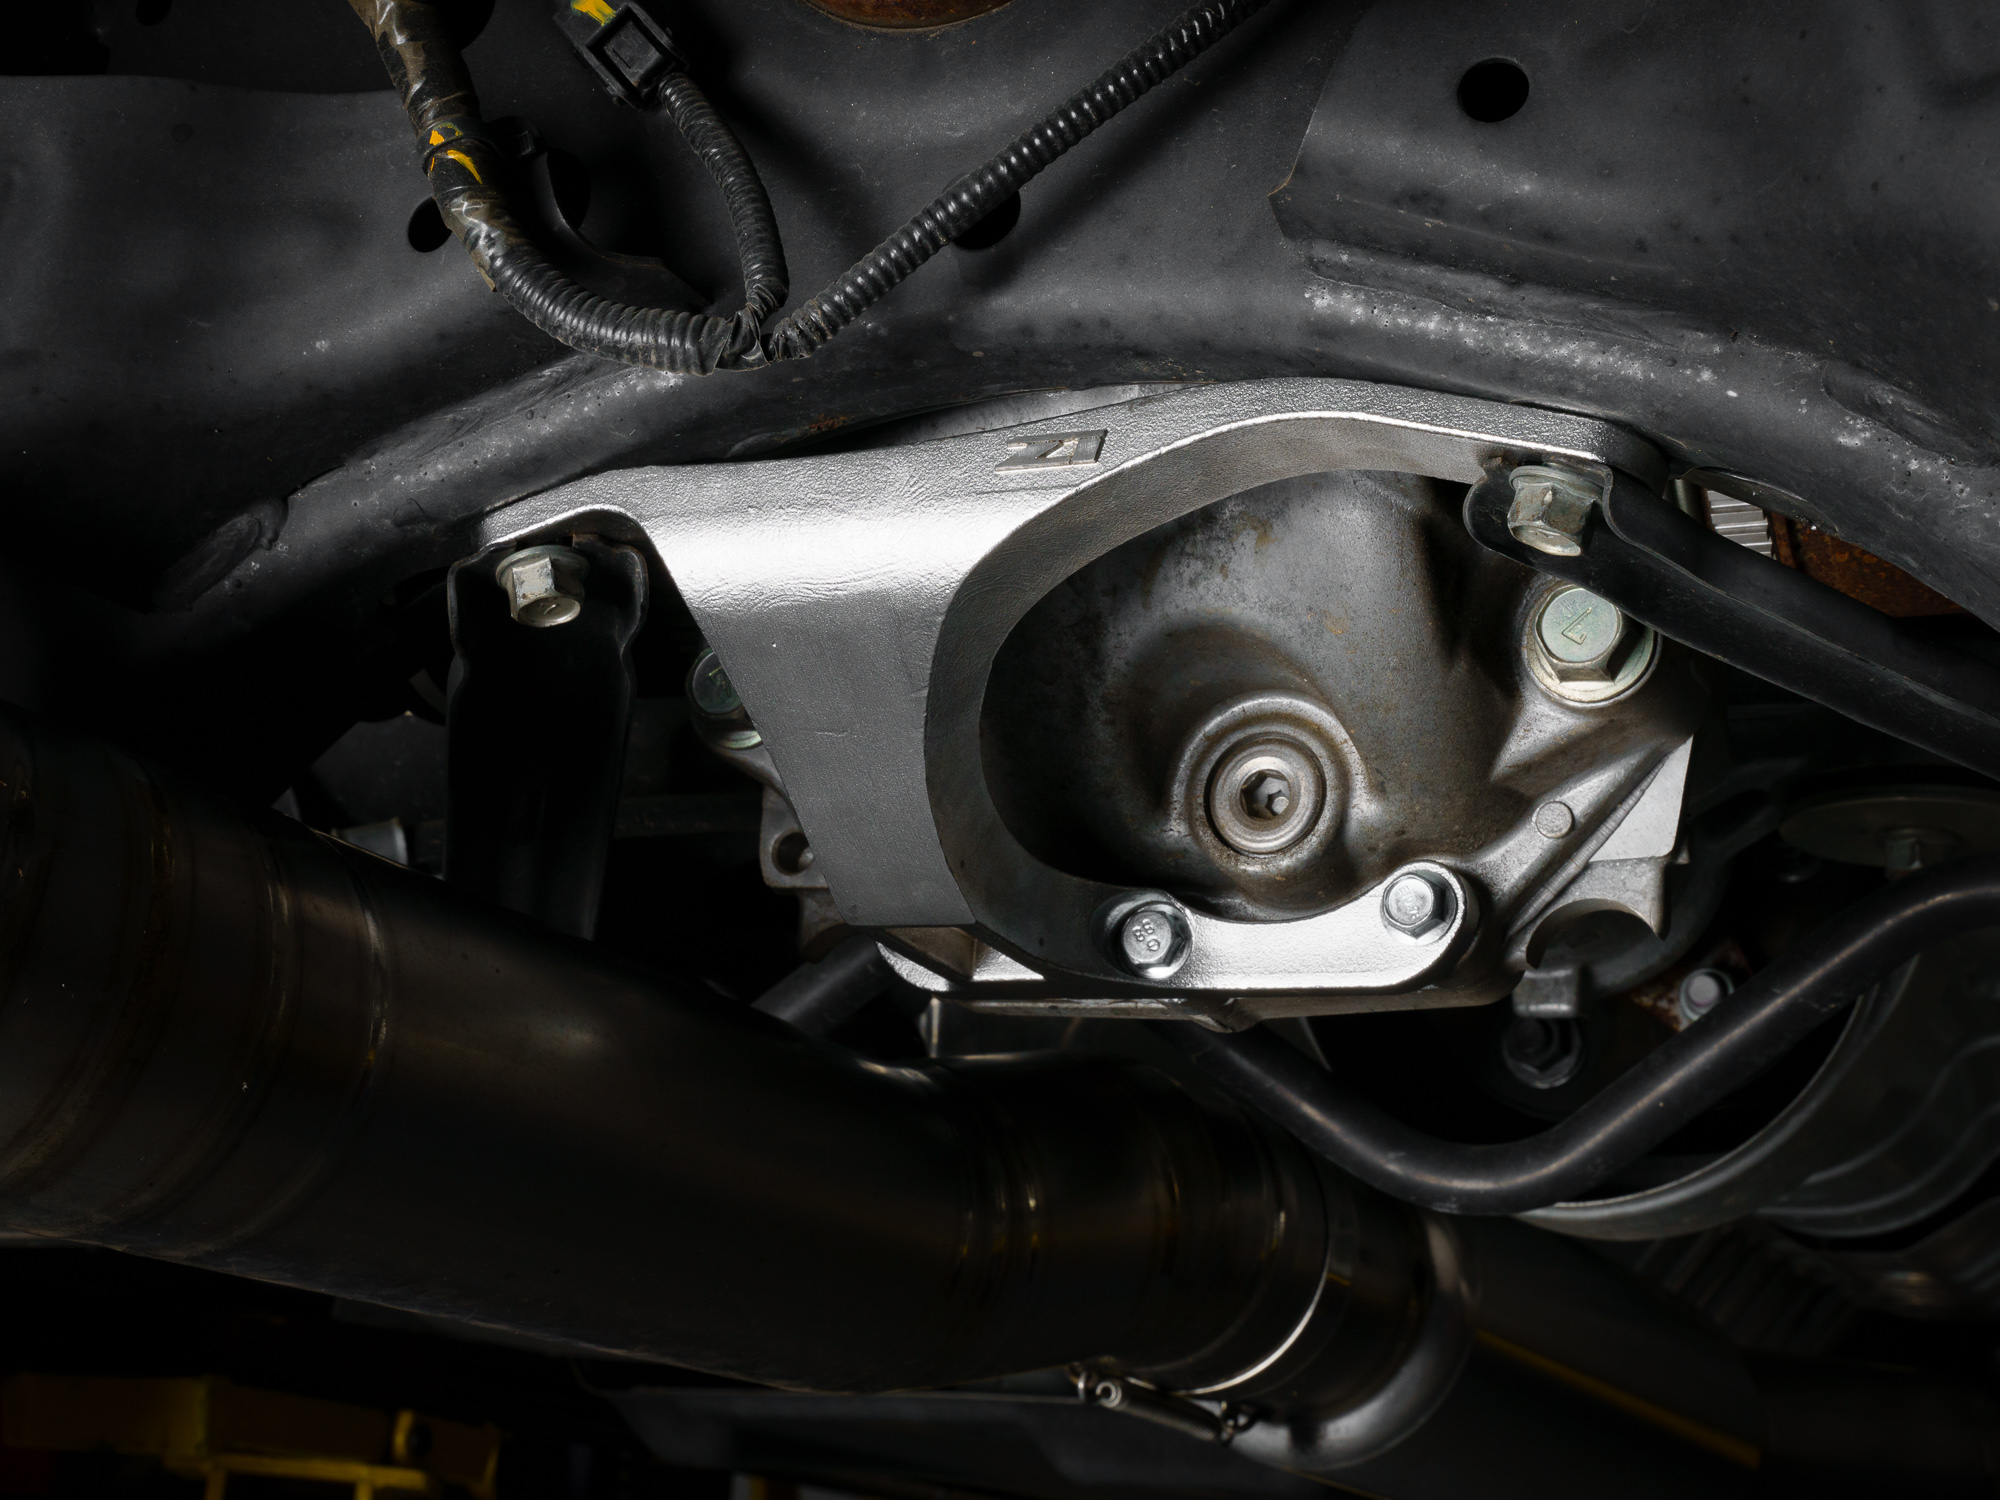
Mark your Drive Shaft and remove the fasteners.
Image

I took this off because i thought I had to in order to separate the Drive Shaft from the Diff, but you don't have to since it'll come apart as you're lowering the Subframe. Make sure you put the Amazon Box below the Drive Shaft if you do take this apart! Reinstall the Nuts after dropping the Drive Shaft and buy the optional Nuts if you do take it apart. (01225-00062)
Image

Rest Drive Shaft on Amazon box.
Image

I took off the Parking Brake cable here instead of taking the Parking Brakes apart.
Image

Remove the two diagonal braces the doesn't really have a purpose.
Image

Install transmission jack and start unbolting your Subframe.
Image
Image
Image
Image

Drop the phat rear end.
Image
Image
Image


Yoda's Master
Posts: 440
Joined: Tue Jul 10, 2018 11:26 pm
Car: 2012 M56
2009 370z
Location: Rock in the middle of nowhere

Post

Slide it out.
Image

Recommend you take off both discs since they are heavy AF before transferring it to the dolly.
Image

Put jack stands under the Axles and remove the Knuckle and Control Arms.
Image

Remove the Speed Sensor Wires from the Subframe and pop out the vent tube.
Image

Unbolt the Diff and remove the Subframe.
Image
Image

Tiki torches. Watch out, if you have unpopped silicon filled sacs, then they'll explode and spray out when the rubber burns away.
Image
Image

Don't burn this! Go buy a new Subframe if you do.
Image

Use a reciprocate saw, cut to grooves along the frame side and chisel out the bushing shell.
Image

Do it to all four corners, Smooth out your gouges with a rotary tool and give it some black chassis paint
Image
Image

Clean the surface rust, paint the bare steel surfaces, pop those silicone sacs, and wash it out. I trimmed the rubber flap from both sides. Make sure you hold something in front of it unless you want a face full of silicone.
Image
Image

I forgot to take a picture, but I covered one side with packing tape and bolted a backing to plug one side and level the other side to pour the poly.
Image

Prep your poly and pour it in and let it dry. WARNING. Don't start this unless you're ready. You only have 15 mins to pour.
Image
Image
Image

Pour some out on the side so you can check when it's dry enough to handle. Remove the backing and this is why I trimmed the flap on both ends.
Image

Now let it cure for 7 days.

Prep the Rear Rear Bushing. Make a 3/16" spacer and a 1/8" spacer. I used a 3-1/8", 3-3/4", and 1-1/4" hole saw to make these out the the UHMW sheets. I originally used aluminum, but changed it afterwards.
Image
Image
Image
Image
Image
Image
Image

Make a 3/16" spacer for the Rear Front Bushing. I didn't want to buy another hole saw so I used the 3-1/8" and trimmed it down with a jigsaw.
Image

Bust out the KY :chuckle:
Image

Yoda's Master
Posts: 440
Joined: Tue Jul 10, 2018 11:26 pm
Car: 2012 M56
2009 370z
Location: Rock in the middle of nowhere

Post

Apply to all surfaces and press in the parts and use zipties to keep them together.
Image
Image
Image
Image
Image

Subframe is now complete! Now lets do the Diff front bushings.

Tilt the diff up, hammer out the bushing, and light em up.
Image
Image
Image

Now use a wire wheel and clean off all the remaining rubber that didn't burn off so you end up with something like this for both bushings.
Image

Prep the Bushings. And make two more UHMW 3/16" spacers. I used a 2" hole saw and drilled out the center to a little bit bigger than 7/8". The thicker poly will feel loose, but will firm up once everything is installed. The 1/2" split ring lock washer is installed the the thinner poly.
Image
Image
Image
Image

Pound the bushing shells back into the Diff and assemble the bushings. Don't forget the KY :chuckle:
Image
Image
Image
Image

Reassemble in reverse order and take reinstall the Subframe.
Image
Image

Make sure you torque the aft Diff Stud before reinstalling the Subframe into the car.

Clean off the mounting surfaces to the best of your ability. You don't want to trap debris between the bushings and the frame.
Image
Image
Image

Reinstall the Subframe.
Image

Don't forget the KY :chuckle:
Image
Image

Tighten them up. Yes, I realized I reinstalled the rotor on the wrong side :facepalm:
Image
Image
Image

Reinstall everything and take her out for a spin.

User avatar
Ilya
Moderator
Posts: 9803
Joined: Fri Apr 23, 2010 11:20 pm
Car: 2011 M56x but I spend a lot of time on my 2015 Kawasaki Vulcan S. Former owner of a 2007 M35x. Also take care of my wife's 2016 QX60.
Location: Charlotte, NC
Contact:

Post

Great stuff man!

Yoda's Master
Posts: 440
Joined: Tue Jul 10, 2018 11:26 pm
Car: 2012 M56
2009 370z
Location: Rock in the middle of nowhere

Post

Thanks. The car drives so much better now. I used to have some weird bouncing s***, but no more.

Next will be my BC coilovers. Just waiting for the law here to change so I don't have to do another bs vehicle inspection.

Larz
Moderator
Posts: 3054
Joined: Thu Feb 21, 2013 8:55 pm
Car: 2019 Q70-L RWD
Location: Ft Lauderdale, Florida
Contact:

Post

First allow me to say "Wow, just Wow!". Probably the most photos ever in a DIY and it needed it, too! Well done! Oh, and when you gave that bastard bolt the finger? I think we all shared that emotion. Cheers!

Yoda's Master
Posts: 440
Joined: Tue Jul 10, 2018 11:26 pm
Car: 2012 M56
2009 370z
Location: Rock in the middle of nowhere

Post

There's finally an aftermarket solution to the differential bushing!
I think my way is better.
https://www.z1motorsports.com/z1-produc ... 34730.html

Image

Image

Yes, I know it says Q50, but the Q50 uses the M37/M56/Q70 Rear subframe.

I'm not sure if the front bushing will fit or not.

I think the rear diff brace might fit.
https://www.z1motorsports.com/z1-produc ... edTogether

Image

User avatar
Ilya
Moderator
Posts: 9803
Joined: Fri Apr 23, 2010 11:20 pm
Car: 2011 M56x but I spend a lot of time on my 2015 Kawasaki Vulcan S. Former owner of a 2007 M35x. Also take care of my wife's 2016 QX60.
Location: Charlotte, NC
Contact:

Post

Nice!

austin713
Posts: 166
Joined: Thu Jan 08, 2015 7:44 am
Car: 2011 M37

Post

mine popped a long time ago and i can only imagine the loss of torque being transferred to the wheels from all that flex. looking on infinitiparts the rear subframe says it fits M37 Q50 Q60 Q70. i really might have to give it a shot. i just wonder how much more driveline vibrations can be felt being hardmounted to the subframe like that.

Yoda's Master
Posts: 440
Joined: Tue Jul 10, 2018 11:26 pm
Car: 2012 M56
2009 370z
Location: Rock in the middle of nowhere

Post

austin713 wrote:
Tue Sep 26, 2023 11:57 am
mine popped a long time ago and i can only imagine the loss of torque being transferred to the wheels from all that flex. looking on infinitiparts the rear subframe says it fits M37 Q50 Q60 Q70. i really might have to give it a shot. i just wonder how much more driveline vibrations can be felt being hardmounted to the subframe like that.
None. It's not hard mounted unless you use solid bushings


I guess this thread isn't image intensive anymore since they all died

User avatar
VStar650CL
Technical Expert
Posts: 8407
Joined: Thu Nov 12, 2020 1:25 pm
Car: 2013 Nissan Altima 2.5 SL
2004 Nissan Altima 2.5 S

Post

Yoda's Master wrote:
Tue Sep 26, 2023 3:52 pm
I guess this thread isn't image intensive anymore since they all died
If you still have the originals, photoshop them to under a meg each and send them to Rogue or AZ, I'm sure they can reinsert them as attachments. This was a great thread, it's a crying shame if it's lost. The beauty of attachments is that they're forever, not dependent on a cloud host. Yes, you lose some detail because of the size limits, but they'll be there for posterity.


Return to “Infiniti M37, M56, M35h Hybrid and Q70 Forum”