Ok guys
This is probably been long over due and this project has taught me a WHOLE LOT about projectors, wiring, soldering, with a whole lotta cuts and F-bombs.
This project was not easy, and a lot of people who have done this said that it takes a lot of patience, a well planned out attack, and lots and lots of time. I have spent numerous hours online at various sites such as hidplanet.com, retrofit source.com, & high-intensity.com and even a fellow nico member here on this forum. I've sent countless emails, and asked thousands of questions before embarking on this journey, and all in all it was well worth the experience and time I've spent to learn everything i can. This was my very FIRST project ever and I'm glad to say that I'm happy with the results give or take a few mishaps along the way.
So before we get going, I would like to say this first.
"THIS PROJECT DEMANDS, TIME, PATIENCE, AND A DIY ATTITUDE AND AS SOME HAVE SAID GROWING A PAIR AS WELL"
PLEASE PLEASE DO THIS STEP FIRST BEFORE ANYTHING ELSE, it is how to aim you projectors, FAILING TO DO SO will result in the GREATEST F-BOMB that will ever leave your mouth.
Here is what dangreis wrote to me and i HIGHLY RECOMMEND following this because it'll save you a whole lotta trouble.
5. What kind of steps should I take to aim my projectors properly?
Dangreis answer:
Ahh, the best question of them all and when you do a write up you might want to put this at the top of the list...directly after removing the light. I'm assuming that you don't have another set of lights. Hopefully you do. I had a spare set of OEM HIDS and what I did to aim my new light is this. You'll need a table, a wall, painters tape, and a extra car battery or motorcycle battery,tape measure and a piece of cardboard big enough for the headlight to place on: I placed my spare (working) light on a table, on top of the carboard. I then leveled up the light using books and whatever I had to prop it up. Once it's leveled, trace the outline on the cardboard. Take the tape measure and measure the distance between the front of the light and the wall. Note it down! Take a set of alligator clips (wire with two insulated clips on both ends) and supply power to the low beam. Take a piece of tape and mark off the top edge of the low beam on the wall. Do the same for the highbeam. Those tape marks will now be your baseline. You can do this to both sides but they should be the same. After installing the projectors on your retrofit, place the new lights in the outline. make sure the distance for the light and wall is the same as the number you jotted down earlier. Supply power and adjust the low beam (by the green screw thingy in the back) till the top edge of the light is at the tape mark. For the high beams I used washers on the top or bottom till I was where I needed to be. Once you're done with one light, do the next.
So FOLLOW that EXACTLY and you'll end up with perfect results towards the end.
So without further a due, here is a a write-up on how to do your own retrofit. (sedan version, but coupe almost the same, will do one for coupe in future)
The ToolsDremel drill with all cut-off wheelAssorted Lengths of Flat-Head screw drivertorque screw driver3M Strip Calk - "cat's a**" as dangries as so had put it in one of our emails.Wire StripperElectrical tapeOven MittsOvenHeat gun (needed for an extremely important part)Soldering Gun & SolderVery skinny marker400 & 600 grit sandpaperSemi-gloss Black Spray Paint by engine enamelPrimer by duplicolor32 Thread counts screwsSame size lugnut & washersClamps (to keep a tight squeeze when sealing up the Headlights)Velcro (to secure the ballast)
MaterialsProjectors - I personally use the tsx because of the multiple mounting holes it hasShrouds - I used the gattling guns, because it just so sexy lolBallast - I used matshisuta G3 ballastBulbs - I used the phillips ds2+ 6000k bulbsCCFL Rings - optional but if you do get it size is 90mmLed strip - optionalSpare Set of Headlights - optional, but recommended because for me if anything ever happens to my retrofit, i can swap it out without a problem.
Let's Begin
1. The first step is to set the oven to 200 degrees. Reason is because this is the best temperature I have found that will allow you to handle the headlight without burning yourself, but still use oven mitts anyway. Remove all bulbs and screws from the headlight, then pop it in the oven for about 10 min and remove with oven mitts on.
2. This step will probably take you the longest because this is when we will be opening up the headlights. so the first part you should go to right after you take it out the oven is the top right corner, stick in the flat hard screw driver and pull up and slide down slowly.
At this point you should be seeing the shiny black stuff, release it kung fu grip on the lens and your sliding down the edge of the headlight.
But once that stop, and it starts to get harder to do, pop it back in the oven for another 7-10min or so.
It took me literally 3-4 times in the oven before i was able to take it out, and it took me 30-50mins so take your time, you dont want to damage the lens or back housing of the headlights.
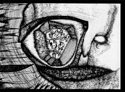
3. Once you have the headlight separated, it should look a little something like this.
4. Next step is a complete BIT*H because it took me a whole week to try and take off, only because i didnt know what the hell i was doing, but then it just clicked and i found out what to do, but also by rereading what brandon wrote, when he first wrote the write up.
In this step you need to remove the reflector bowl out of the back housing. In order to do so the first thing you need to do is use the flat-head screw driver, and on the back of the housing there is a green knob and also a tan-sih color stick sticking out in the back. Using the flat head, turn it so that the tan color stick gets as short as it can be.
*this isnt as short it can be, it can get shorter*
Once that is done, this is the fun part. Starting from the bottom right right corner, where the low beam area is, pull forward with a good grip and it should pop out. Then pull down and forward where the tan color stick is to pop that out. Then pull sideways and forward to pop it out of the last socket.
This is the result after.
After you have removed the reflector bowl, next is to remove all that sealant around the back housing, and in order to do this grab your heat gun, flat-head screw driver and oven mitt.
Slowly heat up one area at a time by swaying back and forth the heat gun, and then use the flat head to pry out all the GLOSSY sealant, and this should be your end result.
all the left over sealant from back housing, after being pried out and gutted lol. This step is REALLY IMPORTANT because it will help so much towards the end when putting everything back together.
5. Ok time to move onto the lens area, where the amber light is and what not.
From here take out the bottom two screws long the bottom of the lens with the torque screw driver.
Then take it all apart and from here, you can remove the amber light, or do what i did, PAINT IT. so here how to paint.
6. I painted the top reflector bowl, and the piece that held in the amber light. So first step is to sand it down with 400 grit paper first, and do it thoroughly. Rinse then sand it down again with the 600 grit paper to give it that final smooth finish.
Just as a heads up, when sanding down the chrome parts, it will become black, which is normal so dont worry.
7. Next step is to spray it down with the primer. I did 3 coats which is over kill, but whatever , 2 is all you really need. Do ten minutes in between the coats. Then let it rest for about an hour before applying the color paint.
8. Once the hour has pass and you had your lunch and cleaned your hands, next step is the paint. I did 3 coats, again over kill but whatever , 2 should be fine. Do each coat about 10mins to 30mins of each other.
Let the paint dry and cure for a full week, but 24hrs will do so that it is completely dry and better to handle.
9. Now time for the long and boring part. Just kidding time for the painfully long and tedious mounting of the projectors. JOY!!!!
First part is to look at the back of the reflector bowl and where you see that small square on the back of the bowl, your main goal here is to have the projector line up as perfectly as possible to this spot without the projectors leaning forward.
10. Now once that is done, put the projectors inside and try to make a mark along the outside of the reflector bowl to the same shape as the projector. Now time to start cutting with the dremel drill.
11. Cut the circular part of the reflector bowl out first, then slowly carve out the shape of the projector fitting the projector in periodically to see how it fits. The projector should stick out about 2-3 inches from the top portion of the projector as shown below.*projectors shown upside down, should be the other way around*
12. Once the projector sits in nicely in the reflector bowl, use the very skinny marker and put it through the mounting holes to mark where you would be drilling out the holes for the screws. Use the dremel with the drill bit that is the same size as the 32 thread count screws.
13. After the holes are drilled, put the screws in, washers first and the end of the screw sticking out the back of the projector bowl and tighten it in place with the lugnut(that small 6sided shape circle thingy lol hopefully lugnut is the word) Then using the 5min expoy, bond the nut in place on the back of the reflector bowl. Also using the sanding bit for the dremel, sand down that small sqaure-ish area so that you can snake the ccfl ring wires through it cleanly.
Afterward, using electrical tape, tape up the back of the reflector bowl to help reduce any air or moisture from going into the projector. I dont have a picture of this part because i for got to take one, but just make sure it covered up nice and good with electrical tape.
*look at the bottom left of the picture, this is how it should look like. i readjusted the other two screws already.*
14. Next thing is to make the shroud fit around the projectors. Once again get the dremel ready as well as the marker. To make the shroud fit, first you have to cut about 1/4in - 1/2in around the shroud first. Then cut a piece out from one pillar to another so that it can slide in on the bottom and sand down what you need to to make it fit properly inside the reflector bowl.
* this is what i meant by pillar to pillar and sanding it down to make it fit. if you see that whitish part on the silver part that's where i sand it down so it can fit nicely.
*ignore the semi circle cut
15. If you happen to have brought the angels eyes, this is how you mount them on to the shrouds if you brought the same type as i did shown below with the silver base.
Using the 3M calk, put it around the top edge of the shroud and then press firmly but gently the ccfl ring onto the shroud and place a heavy hardcover book or whatever on top of the ccfl ring, and leave it for overnight.
16. Now once the ccfl ring is on really good, snake the wires though and under the projector and place on the shrouds over the projectors and BAM, your done. well the hardest part anyways.
17 Now if you decide to opt for the led strip this is how you go about on putting it on. Basically let it curve underneath the part where the amber lights goes and snake the wire through the side hole. The picture below will basically show you what it should look like once its done.
*Reason this is black is because i used electrical tape to to cover up the amber color, cut small squares pieces then place it in between the leds, and then another square piece and place it below the led so that only things seen is the led which is the small white square thingy.
18. Now its time to put everything back together, but please follow this step as it is important to have an air tight seal.
2 black balloons and the circular rubber part, cut the neck of the balloon then wrap it around the circular part. to have it look like this below
The before and after. Then put in some 3M calk into the crevasse where the circular part came from and put the circular part back into the back housing of the headlight and press firmly.
Not my headlight, but should look like this, since i forgot to take a picture again.
19. Ok so now to put it back together. First part is to put in the new bulbs into the projectors then place the reflector bowl with the newly place projectors. Snap it in the opposite way the you first took it out. Now the back of the projector may not fit out nicely, but that's fine since it will create a better seal and try to push it out so that you can place in the connection from ballast. like the way it was shown up above and below.
20. Next is to put the part where the amber light is all back together onto the lens and screw the screws back on the bottom like in step 5, then put that back onto the lens back housing.
21. Next step is to take the 3M calk and place it into the groove of the back housing all around. Then starting from the top corner of the headlight push it down and up to the top corner and press down firmly. Then press along the sides, down after then press down at the bottom corner. Here I recommend using clamps to hold it tight for 24hrs or overnight.
22. After 24hrs or so, use the 3M calk again and smear it across the side of the headlight for an even better seal all around. Now what i did is completely different from what anyone else has done, but i used eletrical tape ll around the edge to cover up the 3M calk so that it has a smoother finish and seal everything for good.
The shiny stuff you see on the side is the electrical tape, this is what i did so i don't touch the 3M calk because it's sticky stuff.
Then VIOLA a painstaking beautiful retrofit.
And there you have it. The retrofit is done and you have your brand new lights, but remember this is for the SEDAN, NOT THE COUPE, and why did i post it here? well because i wanted everyone to see it thats why haha, since the light/interior section dont get as much coverage as it does on here. so SORRY LBC >_<.
Next up is how to wiring up everything onto the car.
1. Remove the front bumper from the car. Remove all the clips and screws along the bottom.
Inside the wheel well, pullback the black part and using a 10mm socket wrench, take out the screw that connects the bumper to the frame.
2. Next part is to remove all the screws that are bolted on the headlight.
Took these from kanejuice, since i forgot -_- to take pictures again but this is for the coupe so should be better for you guys
So remove those bolts and then carefully pull out the headlight forward and unplug all the wires that are connecting to the headlight.
3. So to wire the leds so that they light up, just tap into the where the parking light is which is also know as the amber light, so just splice into there. solder it for a good secure connection, then wrap it with the electrical tape.
4. I recommend putting the ballast somewhere where it can be dry and away from getting wet. Here I have it underneath the headlight, but i've moved it to somewhere else because it fell off due to bumping roads and stuff.
5. Repeat for the other side and BA BAM!. this is what you end up with.
TA-DA!!!!!!
After months and months even more months, i finally finish. Hope you all enjoy this lito write-up and if you do happen to make the plundge and go do it, i'll say this.
It is an experience that makes all the trial and errors, f-bombs, cuts, and 'omg wtf' moments worth it when you see it light up, by what you did with your own two hands.
Enjoy everyone.
Modified by b88dragon at 8:55 PM 11/6/2009
Modified by b88dragon at 9:21 AM 11/9/2009
Modified by b88dragon at 9:35 PM 1/3/2010
LONG OVERDUE....but well worth the wait
-
shortys408
- Posts: 511
- Joined: Sat Sep 29, 2007 6:17 pm
- Car: '11 M37S
08 altima coupe 2.5s - *Sold*
Re: LONG OVERDUE....but well worth the wait (b88dragon)
holy crap, ill have to try this after I grow a pair.
Re: LONG OVERDUE....but well worth the wait (b88dragon)
Holly crap, nice write up.
-
chiapetchua01
- Posts: 362
- Joined: Tue Oct 14, 2008 1:46 pm
- Car: 09 2.5s a/c cvt
Re: LONG OVERDUE....but well worth the wait (shortys408)
LOL i second thatplain and simplethis is an expensive project so until i grow some cajonesi'm not going to drop this much into trying it outshortys408 wrote:holy crap, ill have to try this after I grow a pair.
but my godsick a** job
finally a diy for projectors! kudos 2 u
-
Blackmobile
- Posts: 1293
- Joined: Tue Sep 16, 2008 11:01 am
- Car: 2008 Altima Coupe 2.5S Super Black
Re: LONG OVERDUE....but well worth the wait (b88dragon)
props man, you did a great job! if i had the right tools (and cash) to do this i'd most definately be using this write up along with brandon's. lookin good, you should post more pics of your headlights lit up. quick question, can your halo's be on without your headlights being on?
Re: LONG OVERDUE....but well worth the wait (Blackmobile)
Yes the halo's are connected so that they turn on with the parking lights. But since i blew both of my inverters gotta wait til i got the cash to order up another set. Maybe i'll rewire it to that either the leds or halos turn on only when i use the turn signal. but that can be saved for future ideas.
-
DiamondWVU
- Posts: 464
- Joined: Sat Jan 17, 2009 10:22 am
- Car: 2.5
- Location: West Chester, PA
Re: FN-QR (mcheddadi)
WOW... thats all i can say right now. Looks great. Awesome job man. enjoy your custom title! haha
-
dangeris

- Posts: 5139
- Joined: Wed Sep 19, 2007 6:18 pm
- Car: 08 Code Red 3.5
08 BMW 328xi Coupe
90 300ZX 2+0 NA - Location: Lansdale PA
- Contact:
Re: (Dest556)
Great Job.. I've retrofitted a couple of lights already and its def. not for the faint at heart.

Re: (losenone)
Go buy a set of new lights. How much you selling this one for ?
hehehe
hehehe
Re: (DAAN.)
haha.....uhs...maybe...but i might consider doing them for people, but only one or two orders at a time and i'll be sticking strictly to low beam only since high beams are a whole other story, and that it will take awhile (meaning 4wks-6wks excluding the time for shipping) for you to get them back, and if i have the time to do them, but summer is most likely when i'll have more free time. But that of course is still up in the air.
Re: LONG OVERDUE....but well worth the wait for PROJECTORS XD (b88dragon)
did u have to realign your headlights once you finish mounting the headlights back and if so, how did u do it...
-
SHIFT_COUPE

- Posts: 3887
- Joined: Fri Aug 03, 2007 3:36 am
- Car: 2014 Infiniti Q50 AWD
- Location: Bethel, CT
- Contact:
Re: LONG OVERDUE....but well worth the wait for PROJECTORS XD (marbee)
Yeah i did, but i did mines a different way then what dangries had told me in one of our emails.marbee wrote:did u have to realign your headlights once you finish mounting the headlights back and if so, how did u do it...
For me personally, i made sure the the projector sat up right and leveled but also that the screw lined up as perfectly as possible to the back of the reflectorr bowl where that squarish lookin thing is out of the back, so that i figure would be the base height, and then all i had to do was adjust the height using the green knob.
Here is what dangreis wrote to me and i HIGHLY RECOMMEND following this instead because it'll save you a whole lotta trouble.
5. What kind of steps should I take to aim my projectors properly?
Dangreis answer:
Ahh, the best question of them all and when you do a write up you might want to put this at the top of the list...directly after removing the light. I'm assuming that you don't have another set of lights. Hopefully you do. I had a spare set of OEM HIDS and what I did to aim my new light is this. You'll need a table, a wall, painters tape, and a extra car battery or motorcycle battery,tape measure and a piece of cardboard big enough for the headlight to place on: I placed my spare (working) light on a table, on top of the carboard. I then leveled up the light using books and whatever I had to prop it up. Once it's leveled, trace the outline on the cardboard. Take the tape measure and measure the distance between the front of the light and the wall. Note it down! Take a set of alligator clips (wire with two insulated clips on both ends) and supply power to the low beam. Take a piece of tape and mark off the top edge of the low beam on the wall. Do the same for the highbeam. Those tape marks will now be your baseline. You can do this to both sides but they should be the same. After installing the projectors on your retrofit, place the new lights in the outline. make sure the distance for the light and wall is the same as the number you jotted down earlier. Supply power and adjust the low beam (byt he green screw thingy in the back) till the top edge of the light is at the tape mark. For the high beams I used washers on the top or bottop till I was wehere I needed to be. Once you're done with one light, do the next.
So FOLLOW that EXACTLY and you'll end up with perfect results towards the end.
-
Rmuth25

- Posts: 661
- Joined: Fri Dec 07, 2007 11:27 am
- Car: 08 Altima Coupe 2.5s CVT [Premium & Tech Packages]
Re: LONG OVERDUE....but well worth the wait (shortys408)
Honestly can some company just make these. Not I have to send mine away, just flat out make them.
Re: LONG OVERDUE....but well worth the wait (Rmuth25)
Theyll be out, aftermarket projectors that is. But theyll never be as good as a custom projector retrofit with OEM projectors inside.Rmuth25 wrote:Honestly can some company just make these. Not I have to send mine away, just flat out make them.
-
rjdmmfl1

- Posts: 5111
- Joined: Tue Sep 25, 2007 8:52 pm
- Car: 2008 Altima Coupe, Radiant Silver, 3.5SE, Premium Package, VDC
Re: LONG OVERDUE....but well worth the wait (toxik)
Great job OP!!!!!!!
Re: LONG OVERDUE....but well worth the wait (rjdmmfl1)
post a night time picture of the light projection

Re: LONG OVERDUE....but well worth the wait (DAAN.)
Fantastic right up, also kutos for the great work. You have some serious talent!
Re: LONG OVERDUE....but well worth the wait (Chuck2417)
haha thanks, no talent really, just a TON of patience and research and asking questions, then finally growing a pair and doing it. But still got to fix it up here and there, not 100% yet, but overall was a great learning experience. Now if i have some spare cash i just might tackle the coupe's light next and see how that'll work out haha. but you never know.
-
Colton92

- Posts: 783
- Joined: Wed May 07, 2008 3:44 pm
- Car: 2008 Nissan Altima Coupe 2.5S - WinterFrost
- Location: Raleigh, NC
Re: LONG OVERDUE....but well worth the wait (b88dragon)
Awesome you have got me thinking about doing this haha
-
sentrastace

- Posts: 1496
- Joined: Mon Jun 09, 2008 9:38 am
- Car: 2007 Nissan Sentra 2.0S
- Location: Silver Spring, MD
-
PHENOMenalVinyl

- Posts: 4607
- Joined: Fri Apr 11, 2008 4:17 pm
- Car: 08 altima coupe 2.5 mt
- Location: New York City
- Contact:
Re: LONG OVERDUE....but well worth the wait for PROJECTORS XD (sentrastace)
wow n ive been told my sig is to big lmao i guess T N A really do get u far lolsentrastace wrote:amazeballs!
i like her rims though
-
Rob.Vegan
- Posts: 2665
- Joined: Thu Jul 10, 2008 7:05 pm
- Car: 08 2.5S Altima Coupe 76 Datsun 280z (not running)
- Location: Orange County, CA
Re: LONG OVERDUE....but well worth the wait for PROJECTORS XD (PhEnoM78)
Was there ever a doubtPhEnoM78 wrote:i guess T N A really do get u far lol
Re: LONG OVERDUE....but well worth the wait for PROJECTORS XD (Rob.Vegan)
Great write up!!
I got projectors and all tools needed but never enought time!!I should just get some fukked up headlights off ebay (as long as they work) to install on my car while i'm working on my headlights. I have a feeling this project will take me even longer then it took you to finish LOL
I got projectors and all tools needed but never enought time!!I should just get some fukked up headlights off ebay (as long as they work) to install on my car while i'm working on my headlights. I have a feeling this project will take me even longer then it took you to finish LOL