I know other people on here installed them but i have never seen a guide or DIY thread on how to put these in, but now we'll finally have one.
Total Install time: 2.5Hrs ( Most of time is jacking car up, placing jack stands, putting on and taking off wheels etc )
The Kit:

First, Jack up the rear of the truck by the pumpkin on the axle, you want to jack it pretty high because you want to have a wide range of mobility for the axle to go up and down,
Position your jackstands just in front of where the trailing arms attach to the frame of the truck, one it is on those, now you can use your floor jack to adjust the axle up and down as needed.

Second, your going to want to remove your lower shock nuts on each side, because when they extend fully they hinder the axle to go any lower, which it can but these are not allowing it.

Third Remove your coils on each side ( note i have 2" lowering coils, i am not sure if you will need to use a spring compressor or not with stock coils )

Fourth you need to drill that hole out in the coil perch in order for the air line and everything to fit. Airlift said 3/4" drill bit, i thought that was way to big and did 1/2" and then make sure you smooth out the edges when you drill it out!! I used a dremel in my case and it was extremely smooth and rounded off.

Fifth, i cut the air hose line they gave me in half, so i had a half for one side, a half for the other. I also set mine up so each airbag is independent, but you can also use a T fitting they include to you would just have to air up in one spot to fill 2, but theres less direct management of the pressure like you can do using each one independently. Put on the clamp on the hose, then attach the hose to the fitting, and put the clamp over it.

Sixth, Run the airline thru the hole and put the bag inside of the coil, and manuever it onto the perch ( note if you have stock coils this part you may have to put the spring in first, then squeeze the bags in thru the coil )


Seventh, run your airhose to the desired location, i ran mine torwards the front of the trailing arm and zip tied it to the abs wire, and i didnt mount my fittings anywhere, i clamped them on and have them sitting there. It is right under the back part of the running board, and i also did not mount mine anywhere since i will be getting the digital kit in 2 months or so, and then i can pump it or deflate it on-the-fly.


Eighth, put everything back together, trim any zip ties you used, torque back your shock absorber bolt, put on your wheels and you are done. ( Also, put at least like 10 psi in the bags or something before you lower your car to the ground fully, minimum psi allowed it 5 )


_____________________________________________________________________________________________
Onto the review:
I can make my rear go about 4 inches higher then i am normally at my 2" lowered height, It also made my rear end feel so much tighter, and surprisingly even now i have about 12-15psi in the bags, my rear sits 2" higher then it did before i put these in, and it feels like the car handles even better and tighter,then when i just had the lowering coils on, it also smooths out the harsher ride from my coils.
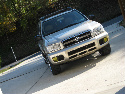
Heres a picture of the rear how it sits now:

Before i could only fit 2 fingers between the fender and the tire.
For $87 off amazon, you really can't go wrong with this. Im wondering why i didnt do this earlier now. Once i install the digital air leveling kit, i will be able to adjust the height of my rear by about 4 inches. I think these bags can handle up to 50 psi, but the most i had them at was 20, and i really dont think 50psi is safe anyways especially for mine which is lowered, unless you have 5 adults in your car, cargo, and towing a bigger trailier.
Questions/Comments/Thoughts