
This brake master allows the use of stock brake lines without bending up the stock lines to fit the new master...this is a nice alternative to the z32 master which requires the lines be bent.
The z32 master is a nice complement to the z32/r32 brake system upgrade and those of who have fitted the full brake system and driven the car with a stock master know that the pedal feel leaves much to be desired, if not somewhat dangerous due to the sudden lockup.
Having had a car with the r32 brake system/z32 17/16" master and knowing the great pedal feel it had then going to a car with the same brake system but stock master was a serious downgrade.
After finally sorting out more important things on my car (like an engine with low compression) I had a bit of extra coin to spend and try a setup I had been thinking would work for quite some time now.
The facelifted first gen Q45's (late 93-96) cars also had a change of a brake master cylinder along with several of the other changes nissan made to the car that year...s13 owners with z brakes can use the brake master from the earlier 89-early 93 cars with the same modifications as presented here.
The q45 brake master cylinder is identical to the s14 brake master in every shape, way, and form except for the fact that it is a 1" bore diamater instead of the 7/8" or 15/16" master which comes on the automatic cars.
For those of you with an abs equipped car, the q45 master will bolt right on with no modifications, however for us with non abs cars will need to modify the master as shown.
The q45 master has the ports for two front brake lines, however one boss is not drilled and will need to be drilled and tapped to work properly with an non abs car.
Another merrit of this is that q45 masters can be had for cheap, i paid 150$ shipped for a brand new OEM master cylinder off ebay.
For this project you'll need the following:
1 - M10x1.0 tap - this is a hard tap to find, however harborfreight sells a tap and die kit which has it
1 11/64" drill bit
1 11/32" drill bit - to drill for the m10 tap
1 q45 brake master cylinder
Good quality brake fluid - most napa stores can get pentosin DOT 4 fluid, part number is DOT4
Brake cleaner
light oil or tapping oil (wd40 is good)
1500 grit sandpaper
small wooden dowel 1/4" dia works well
drill stops
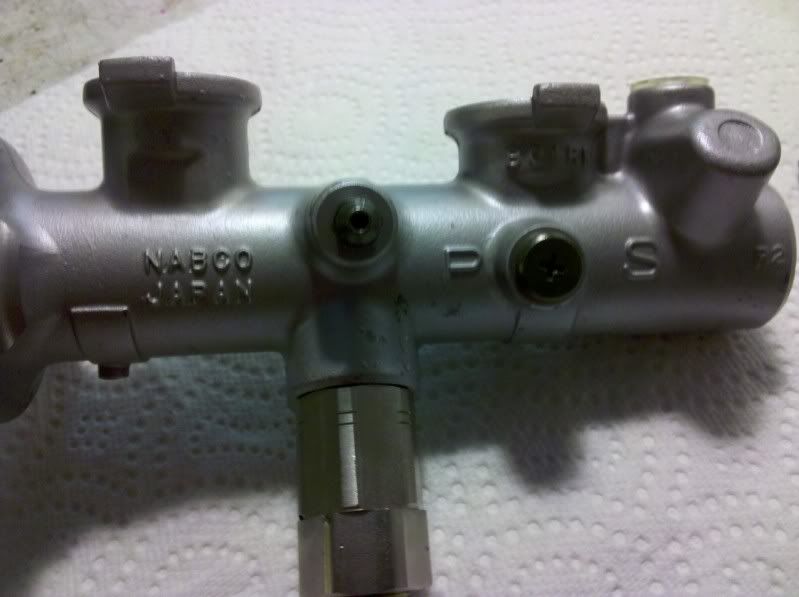
First thing that needs to be done is get the correct master cylinder, the master you want looks like this:
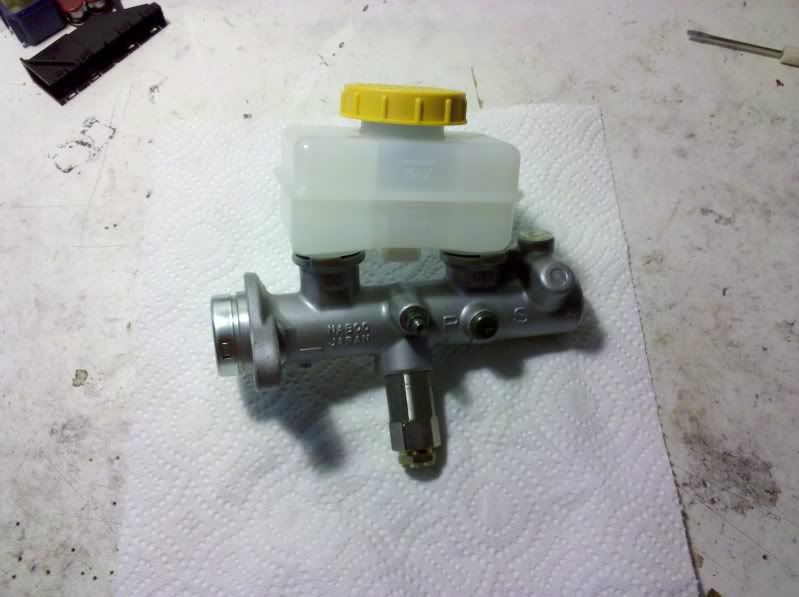
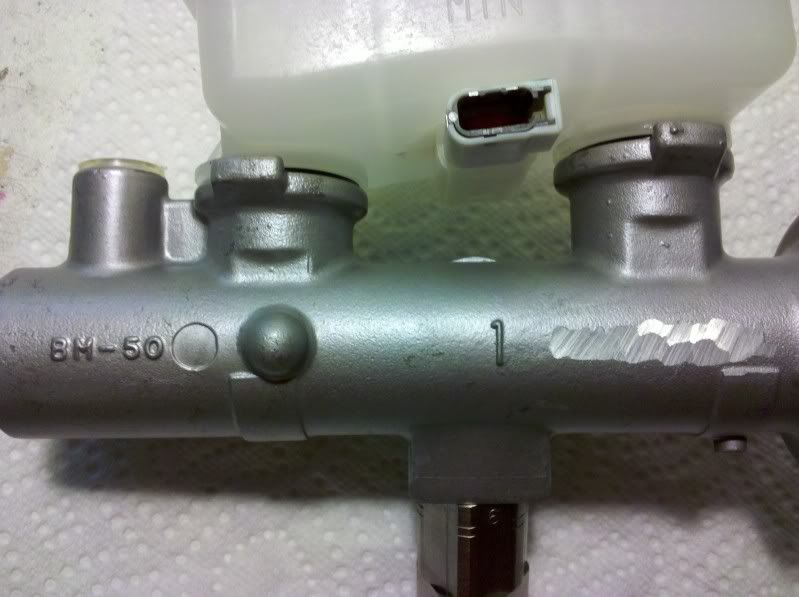
As a reference shot for the 1" bore, the '1' on the side clearly denotes it, my autospecality master (brand new) had the 'nissan' bit ground off from the supplier.
You'll need to remove the brake fluid resivor from the master cylinder, a good tug with support under the resivor will pop it right off.
Do not damage the resivor as it is a larger capacity than the stock s14 and the brake fluid sensor will plug right into it.
Also pull out the rubber bushings and set them off to the side, a clean screwdriver can be used to carefully roll them out.
Once its been removed it should look something like this:
Next step is to remove the back retaniner plate from the cylinder, this is very straight forward to do.
The retaning plate is held in place with two locking tabs, a thin watch screwdriver works well to pry them back out...ensure they are flush with the outer ring and DO NOT PRY THEM OUT COMPLETELY you will need to reuse this retainer plate so try not to damage it.
Remove the back piston and set it aside with the resivor and grommets, it should slide right out if you put a finger into the booster hole; at this point you'll want to keep everything in order so as to make reassembly easier.
Be sure when removing the piston not to move it around too much and scratch the bore, if the bore is scratched you MUST hone the bore to prevent seal damage.
to remove the front piston you must first remove the rear proportioning valve, I used a soft jawed clam to clamp the cylinder to my work bench and a wrench to pop the valve free...this will require some effort as it is on there quite tightly.
after the rear brake line proportioning valve has been removed you can remove the front piston.
to do so remove the philips head screw holding the piston in place, use a good quality screwdiver here as the metal is soft and tends to strip...impact driver bits are a great tool to use here!
A good tap or two against a flat surface should slide the front piston out, and again be careful when removing it as bore damage is no good.
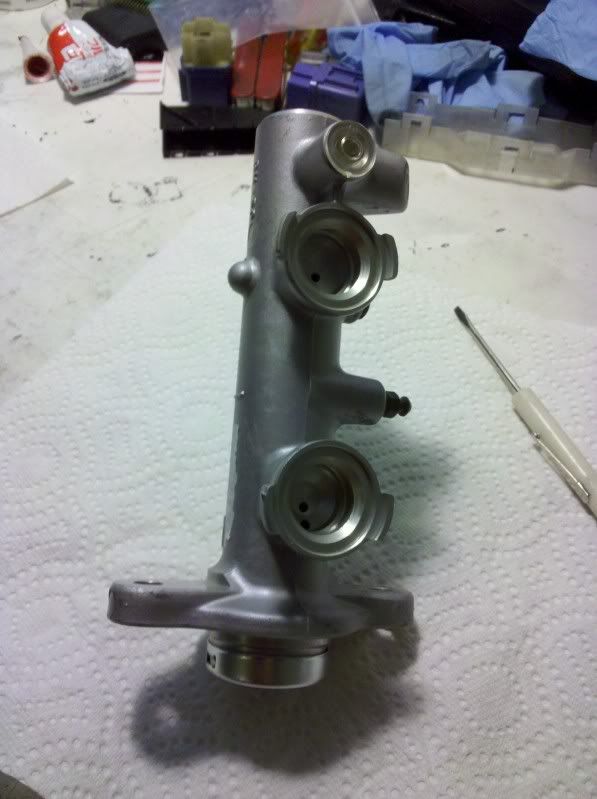
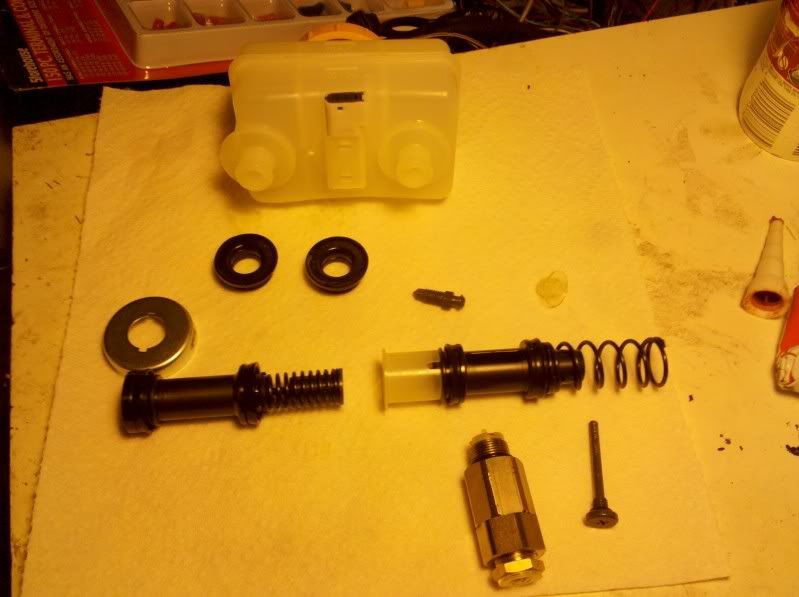
If all went well you should end up with a parts pile that looks something like this, if not check and see whats missing and remove it...EVERYTHING must be removed from the master cylinder for modification.
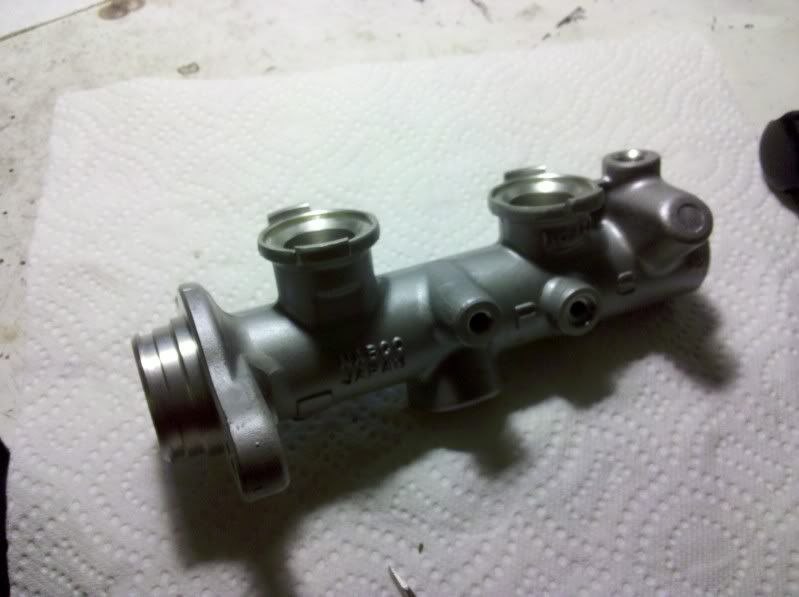
A shot of the bare master:
Unfortunately for this next part I dont have many pictures so I will do my best to describe what to do.
You'll need to cut apart your stock s14 master to remove a fitting from it so that the holes you'll be drilling have the proper inverted flare seat for the brake lines.
The best way to accomplish this is to use a dremel tool or an angle grinder to cut off the vertical port on the front of the master,cut as close to the cylinder body so as not to damage the fitting.
Try not to cut into the other port (angled) as you may damage the first one and its good to have a second try just in case...
Once you have removed the port from the cylinder body a drift can be used to punch out the fitting from the bottom, be careful tho as the fitting is made of somewhat soft steel and can deform.
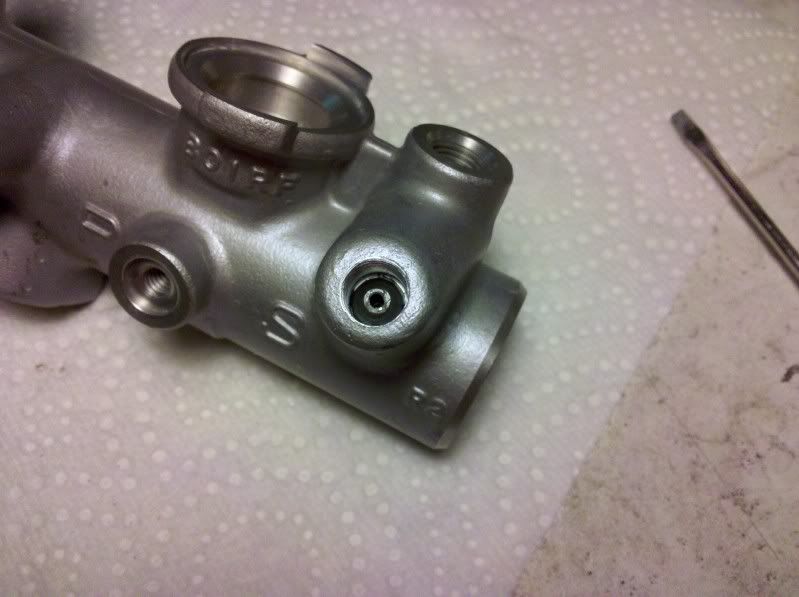
To drill the new port on the q45 master secure it in a soft jawed vice with the undrilled port facing up, you'll want to get this as level as possible.
center punch the boss in the middle of the 'outline' on the port to locate the drillbit, Al is a pain to drill as it is soft and the bit tends to 'slide' off of your intended drilling point, go slow with this or better yet do this in a drill press!
I like to drill a pilot hole to get the bits started, it keeps the successive drill bits in line and is normally easier to drill thru with a smaller bit.
I used a 1/16" drill bit for the pilot hole and drilled thru into the bore,the bit was not long enough to protrude in to the bore and cause damage from overdrilling.
Once the pilot hole is drilled you'll wanna use a drillstop and the 11/64" bit to drill the next hole, using the drill stop here is important as you do not want to hit the bore and damage it.
set the drill stop so that it will drill far enough to drill cleanly into the bore but not so far that it hits the other side, holding the bit up against the side of the port works well for this.
Once the 11/64" hole has been drilled switch to the 11/32" bit and use the old port from the s14 as a guide as to how deep to set the drill stop, i opted to drill a hair further than what the s14 port was drilled to allow for a bit more engagement.
Do not drill too much deeper than the s14 port as you will run the risk of having the fitting protrude into the the brake master cylinder bore and this is not a good thing.
Once all the drilling is complete, vacuum out all the aluminum shavings and clean out the cylinder bore, this will help keep the bore from getting scratched while you tap the hole.
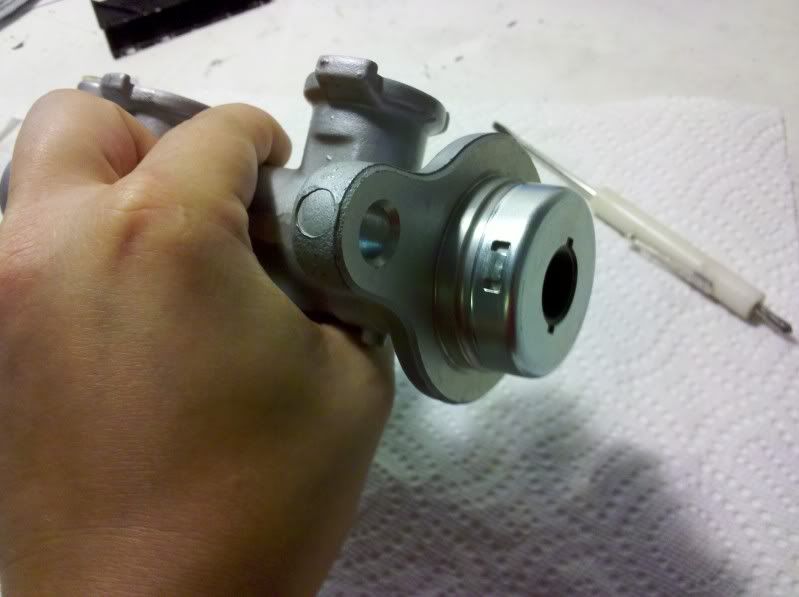
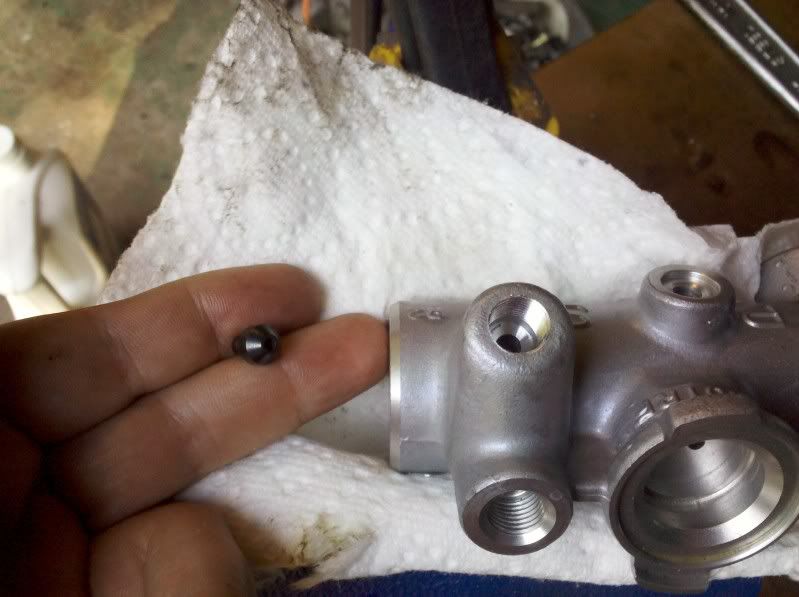
If drilling went well you should end up with something that looks like this; also note the fitting removed from the s14 master in my hand:
OPTIONAL:
if you have a half inch drill bit you may want to drill a little on the top of the port to create a locating chamfer for the brake line, this is not nessicary but is how the stock master is set up.
i did not do this and was just fine, however it is harder to start the brake line and does increase the chance of crossthreading without it.
just a little bit of material needs to be removed to make the chamfer, dont get too crazy here.
Tap out the hole with your tap, make sure its sprayed down with plenty of oil and ensure it starts straight, a good t handle is invaluable here.
only go 4 or 5 turns before stopping and reversing the tap, its a good idea to clean both the hole and tap to remove any shavings as these will only hinder the tapping process and can cause damage themselves.
continue to oil, tap, reverse, and clean till the tap bottoms out, you want to snug the tap up against the bottom of the drilled hole but dont put too much pressure on it as you also do not want to rip out the new threads.
once tapping is complete vacuum up all shavings and use brake clean to clean out the bore of chips, do not use any sort of brush to remove them as this can scratch the bore.
once you have cleaned and cleared all chips check for burrs from the newly drilled holes.
A good set of drill bits will leave minimal burring but cheap bits tend to leave large burrs.
Using the sandpaper wrapped around the dowel and taped in place you can smooth down any burrs by gently rolling the dowel across the hole, you'll need to do this a few times and use good pressure to wear down the burrs.
Do not sand with an in and out fashion as this can cause leakage and damage to the piston seals.
My cylinder required minimal sanding and trued up quite nicely, hopefuly yours will be the same.
Clean the cylinder bore out of any shavings and dust, spray out any and all orifice in the cylinder to get out any possible chips or shavings.
You'll want to install the fitting into your new port, to do so use a tapered drift or a piece of short flared brake line, flat drifts can deform the fitting if you are not careful.
a little light oil will help the fitting slide into place...
Should look like this when you're done:
Clean once more and use a lint free towel to dry the bores and remove any dirt, let all brake cleaner evaportate before attempting reassembly.
Reassembly is the reverse of the tear down, using brake fluid lube the bore and the seals of the pistons, better to make a mess here than put the pistons in dry and damage them.
Completed product as shown:
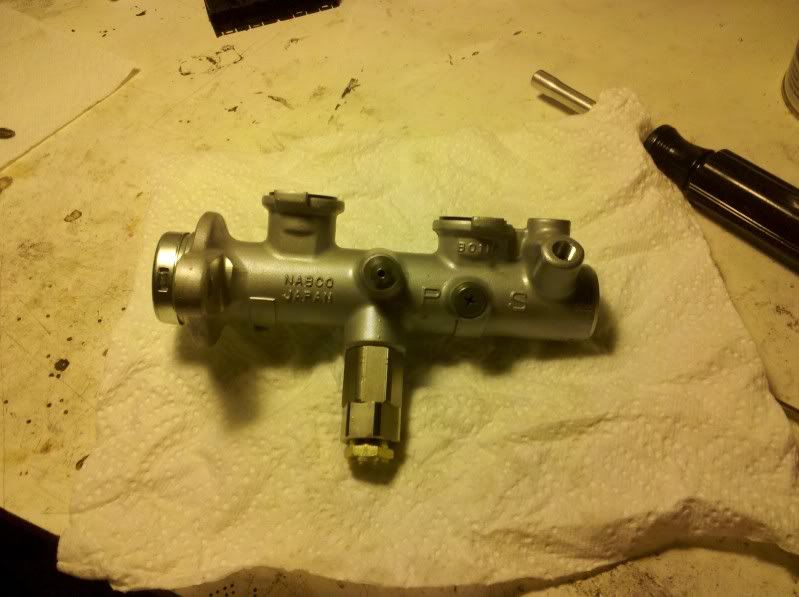
This should complete the reassembly and modifications to the master for use in a non abs s14.
Installation is like any master cylinder replacement...so remove as much brake fluid from the old master as possible to prevent paint damage and install your modified master.
It is very helpful to use the bleeder port on the side of the master and a tube running into a full resivor to bleed the master before trying to bleed the system, a great deal of air can be removed this way.
Bleed the full system, and enjoy a much firmer brake pedal with better feel!
