how to add radio steering wheel control
how to add radio steering wheel control
my car did not come with the radio control on the steering wheel, could i buy a control from a wreck car & install it in mine & would it work?
-
rjdmmfl1

- Posts: 5111
- Joined: Tue Sep 25, 2007 8:52 pm
- Car: 2008 Altima Coupe, Radiant Silver, 3.5SE, Premium Package, VDC
Re: how to add radio steering wheel control (bigbucks)
Uhh, this is actually a new question. No one has asked this before. It would depend on whether or not the wiring is there behind the steering wheel covering.. if it is, then yes, it will work, if it isn't , then no!
bigbucks wrote:my car did not come with the radio control on the steering wheel, could i buy a control from a wreck car & install it in mine & would it work?
-
khisanthax
- Posts: 92
- Joined: Wed May 13, 2009 10:36 am
Re: how to add radio steering wheel control (rjdmmfl1)
I'm thinking of the same thing, or at least cutting out a whole and putting something inside there and running the wire through to the HU
-
boystar22
- Posts: 452
- Joined: Sat Aug 23, 2008 6:48 pm
- Car: 2008 Nissan Altima Coupe 2.5S
- Location: Atlanta, GA
- Contact:
Re: how to add radio steering wheel control (bigbucks)
Yes it's prewired. Or at least my base 2.5 coupe was. Be careful though because if you get the navi/bluetooth controls with the extra buttons instead of just the radio buttons you'll have issues. Everything will work correctly but the buttons will be mislabeled. I got the wrong one and haven't bothered to order the correct one to fix it yet.
Its an easy swap too, just unscrew the airbag (two screws behind the covers on the steering wheel and the airbag is free, and the buttons are screwed onto the back of the airbag. The radio switches are also wired in with the cruise control, so you end up replacing both sides.
Anymore questions just ask. Total swap time was about 5 minutes.
-
khisanthax
- Posts: 92
- Joined: Wed May 13, 2009 10:36 am
Re: how to add radio steering wheel control (boystar22)
That's great news! Any pics while you did the install?
Do you have a link to what you purchased? Details!
If you buy the steering wheel mounted remote, it also comes with the cruise control buttons?
Do you have a link to what you purchased? Details!
If you buy the steering wheel mounted remote, it also comes with the cruise control buttons?
-
boystar22
- Posts: 452
- Joined: Sat Aug 23, 2008 6:48 pm
- Car: 2008 Nissan Altima Coupe 2.5S
- Location: Atlanta, GA
- Contact:
Re: how to add radio steering wheel control (khisanthax)
I did not take pictures of the install process; but I do still have the old pieces that came off, so I can use them as an example. Each side (radio & cruise control) are wired together in the same harness, so when you order them you'll get a new set of cruise switches in anyway.
To access them, disconnect the neg. terminal on the battery since you'll be working around the airbag. Once its disconnected on each side of the steering wheel on the back side you'll find two plastic caps that just pop off to reveal a screw on each side. Simply unscrew these and the airbag will become free from the steering wheel. You can either disconnect the harness from the back of it and take it in the house for the rest, or leave it on if you wish to work form inside the car. Also you'll need to disconnect the cruise control harness (since you're removing it). Looking at the back of the airbag you'll see that it has a flange around the sides where the switch shrouds (the silver trim) screw onto the airbag itself. There are two phillips screws holding on each side, simply unscrew the old ones, screw on the new ones, and reinstall everything in the reverse order! That's it!
If you have the time and want to check for yourself before you order, this whole process takes 5-10 minutes. Just disconnect the battery and unscrew the airbag and take a peek. Hopefully the pictures (especially the back side will help it make more sense). It is a super easy swap out. I purchased them off ebay (hence why I ended up with the extra nav controls that make the buttons act oddly) but you can find them on all the online parts stores. It's listed under the cruise control switch.
One last reminder, for some reason if you leave your battery disconnected for an extended period of time the alarm will go off when you reconnect the battery. So as a precaution if you're going to take your time doing this, pull the fuse for the horn so you don't have a heart attack or go deaf when reconnecting the battery (It might just be my car that does this, but it's happened twice for me).
If you have anymore questions just ask.
Sorry their huge, I did cut them in half, but I still wanted there to be some detail.
-
khisanthax
- Posts: 92
- Joined: Wed May 13, 2009 10:36 am
Re: how to add radio steering wheel control (boystar22)
Wow, that's so awesome. It does sound super easy, easier than changing a bulb in the car. I'll look it up on ebay under cruise control and see what I can find. Thanks a lot for the pics too!!
-
khisanthax
- Posts: 92
- Joined: Wed May 13, 2009 10:36 am
Re: how to add radio steering wheel control (khisanthax)
Alright, I'm coming off my noob excitement. I did some searching and didn't find any parts on ebay and I didn't find any good nissan parts dealers online, I think I'm searching wrong. Can you tell me who you used? Or anyone else can link some good online parts dealers?
-
boystar22
- Posts: 452
- Joined: Sat Aug 23, 2008 6:48 pm
- Car: 2008 Nissan Altima Coupe 2.5S
- Location: Atlanta, GA
- Contact:
Re: how to add radio steering wheel control (khisanthax)
Here is a link to +\(l32&cPath=6224_6225_6261_6265]Courtesy Parts I looked it up for a sedan but it should be easy for you to look it up if you have the coupe. I'm 99% sure the parts are interchangeable anyway. It is listed under "body electrical > 251 switch > then click on the 25550M in the picture (its the cruise switch assembly. It'll show you four different items. The cheapest one with the least amount of notes is obviously the base model one that you have (25550-L32001), the (25550-L32002) Looks to be what you need, it shows as optional for the 2.5 and standard equipment for the 3.5 (which the basic audio controls are standard on 3.5's), (25550-L32003) looks to be the assembly for the blue-tooth controls (for the TEL reference notes), and (25550-L32004) looks to be the switch set for navigation equipped models since it has the longest set of notes, and the highest price.
So for clarity I am 99.9% sure that you need part# 25550-L32002 if I had the correct set installed on my car I'd disassemble it for you and tell you what it was. I'm sure you could call Courtesy Parts and give them the part number and ask them if that's the correct set, they might give you the "you can't add options that didn't come from the factory speech," but obviously you can since I did.
Also I take no responsibility in any damages you might cause to yourself or your vehicle in attempting this, I can only tell you what I was able to safely do.
-
khisanthax
- Posts: 92
- Joined: Wed May 13, 2009 10:36 am
Re: how to add radio steering wheel control (boystar22)
Oh, i'm not worried in the least about installing it. I saw the price was $125 so I'm going to try to shop around a bit now that I have the part number, thanks!
-
khisanthax
- Posts: 92
- Joined: Wed May 13, 2009 10:36 am
Re: how to add radio steering wheel control (boystar22)
he's asking me for my vin. Should I give him mine or ask a 3.5 altima owner for their vin??
-
boystar22
- Posts: 452
- Joined: Sat Aug 23, 2008 6:48 pm
- Car: 2008 Nissan Altima Coupe 2.5S
- Location: Atlanta, GA
- Contact:
Re: how to add radio steering wheel control (khisanthax)
For a guaranteed direct match, i'd go on ebay and find either a 2.5 with them, or a 3.5 that does not have bluetooth or navi, and use that vin number. A good portion of the listings have the vin numbers, esp used cars since people always want to run carfaxes. But that's my opinion.
-
boystar22
- Posts: 452
- Joined: Sat Aug 23, 2008 6:48 pm
- Car: 2008 Nissan Altima Coupe 2.5S
- Location: Atlanta, GA
- Contact:
Re: how to add radio steering wheel control (boystar22)
I finally got up off my lazy butt today and took the whole thing apart and took pictures for everyone so this can hopefully clear up everything. I’m just going to start from square one to hopefully help everyone that has any questions about all of this, and for future people that wish to do this. Also if anyone wants to make a recommendation on this being a sticky for everyones future reference feel free!
First off; this whole write up was done on a 2008 Nissan Altima Coupe 2.5s base model with NO option packages. I was not pre-wired for anything thus far except the steering wheel switches (apparently). Your car my be pre-wired, it may not be, but the intent is to help you determine if you are, and if so how to install them easily.
Please remember that I in no way am responsible to any damages you may cause to yourself or your vehicle, this is just a guide on my installation process.
=================
To check and see if your car is pre-wired, follow the directions below; if you are certain that your car is pre-wired jump down below to the next set of directions on how to replace your blank plate with the radio controls.
Step One: Disconnect the negative terminal on your battery, if you haven’t done this on your car before, you need a 10mm wrench (or socket) to loosen the clamp. Once disconnected you can wrap something around the clamp to prevent it from accidentally bumping and making contact. I always prefer to remove the negative because it has a much smaller chance or arcing when you reconnect it after you are done, but its completely up to you, if you’d rather disconnect the positive feel free.
Step Two: Remove the bottom trim plate from underneath the HVAC controls. This is easily done if you open the cubby door half-way and reach up behind the back of the rectangular plate and pull down from the back. The front has tabs that hold it up so be careful not to break these.
Step Three: Remove the three a/c vents from above the radio. This thing is in there really good. My best advice is to take a flat screw-driver and wrap it in a towel (to help prevent scratching anything) and pry from the bottom two corners, being very gentile so as not to break it. Be very patient, this thing is a monster to pull out.
Step Four: Once its free, you’ll notice two sets of wires attached to the back. One for the hazard light switch, and the other for the pesky passenger airbag light. Each of these have a tab on the connector to remove them. It would have been nice if there were two more inches of wire to just set the thing on the dash, but nope; thanks Nissan! **IMPORTANT** Do not turn on the car with the passenger airbag light disconnected, it will trip the ecm and make it think that there is a fault in the airbag circuit!
Step Five: Remove the radio by taking out the four philips screws; one in each corner. Once removed the radio is technically free, but it is wedge in there pretty tight, Pull gently until it is free.
Step Six: You’ve probably noticed that there is a wire harness holding the radio pretty annoying close the dash, this would be the HVAC harness. It has a huge plug with a release tab on top. Just depress it and pull it out, I know I know you’ll have to do it by feel, because you can’t see it. Once its free you’ll gain much more room to see.
Step Seven: This is where it gets a bit different from model to model. You’re best bet is to just depress all the release tabs on radio harness(s) and take the whole unit out. You may have two harness(s) or up to four. I have three on my radio, one of the connectors on the radio doesn’t have one (the square shaped one for me) I think that is for the bluetooth module (not sure though). Also in my pictures you’ll notice I have an extra connector (wrapped in grey foam) partway down the main harness. This is where my factory iPod kit connects. I disconnected that from the main harness so I can better help the masses distinguish wire colors.
Step Eight: The big answer! On the main harness plug (20 pin) looking at it from the back side (where the wires go in) with the tab facing upwards. You will have an empty pin in the large hole farthest to the right, followed by two more empty pins on the bottom row (going left). The third pin on the bottom row should have a grey wire with a blue stripe. This is the Steering Wheel Radio Control B wire. The next pin on the bottom row to the left of that should have a Blue wire with a black stripe. This is the Steering Wheel Radio Control Ground wire. Directly above that ground wire on the top row, should be a pin with a white wire with a green stripe. This is the Steering Wheel Radio Control A wire. These are the only three wires that run up through the steering column to the back side of the clock spring. If all three of those wires are present you are pre-wired for the steering wheel radio controls.
**Due to the tightness of the plug I simply can’t get a descent picture of the wires up close ; I’m sorry. I can provide a pinout of the plug and the wires though!**
Step Nine: Hopefully at this point you’re happy! If not I’m terribly sorry you can’t add these so easily! Never the less, you have to put all this back together. It should be straight forward but I’ll remind you. Reconnect all the harness(s) to the back of the radio first, then the HVAC controls (since they’re so short). Line up the head-unit in the dash and depress it making sure to align the pins next to the screw holes. Once Aligned and seated reinstall the screws. Don’t forget to reconnect the airbag light and hazard switch on the vent assembly before putting it back in the dash! Lastly pop the bottom rectangle trim piece in over the cubby hole.
Step Ten: Reconnect the battery. Remember sometimes if you’ve had the battery disconnected for an extended period of time the alarm will go off. As a precaution to sudden heart attack or deafness you may want to pull the horn fuse prior to reconnecting the battery. At least this way only the headlights will flash, haha.
Step Eleven: Jump for joy if you are prewired, sulk and cry in shame if you aren’t. For the fortunate ones that are lucky enough to be prewired, please read further. Trust me replacing the switches is a hell of a lot easier than taking out the radio!
====================
If you are certain you are prewired here is how you can replace the switches on the steering wheel.
Step one: Disconnect the negative terminal on your battery, if you haven’t done this on your car before, you need a 10mm wrench (or socket) to loosen the clamp. Once disconnected you can wrap something around the clamp to prevent it from accidentally bumping and making contact. I always prefer to remove the negative because it has a much smaller chance or arcing when you reconnect it after you are done, but its completely up to you, if you’d rather disconnect the positive feel free.
Step Two: Wait approximately 3 minutes before doing anything else. Since you are working with and around the airbag it is important to wait and give all the capacitors in the system time to fully discharge their current.
Step Three: On the backside of your steering wheel there are two small circles that have a tiny slot on one side. Use a tiny screw driver (or a thumbnail) to pop them off. They are barely holding on and it’s probably a miracle that they haven’t come off on their own over time, but be prepared to go hunting for them when they fly.
Step Four: Under the caps you just removed are two bolts (one per side). Remove these with a 10mm socket. These two bolts are what hold the airbag to the steering wheel, so be prepared for it to become free from the wheel when you take out the second bolt!
Step Five: With the airbag loose, you will see three wiring harness’s connecting everything to the clock-spring. There is a grey connector, a yellow connector, and an orange connector. The grey connector has the shortest wire harness so you will probably want to disconnect it first. It has a release tab on the left side. Just press down and pull it out. This is the harness for the radio controls, and the cruise controls. Both the yellow and orange connectors are for the dual-stage air bag. To disconnect these, place a tiny flat screw-driver underneath the black central portion, and pry upwards. There is a notch on the larger side to place the screw driver in. Once the black portion pulls outward (it doesn’t come off, just raises slightly) from the connector, the plug is released and can be unplugged from the back of the airbag. Both connectors are the same, and color coded for easy reinstall.
Step Six: Now that you have the airbag and controls freed from the car, take them in the house and cool off in the a/c. You will notice on the back side of the assembly there are four silver phillips screws (2 per side). These are all that hold the cruise control & blank shroud to the airbag. When you remove the screws the switches and their metallic shrouds will come off and you can then remove the wiring harness from its metal clips. Also note the green wire. This is the ground for the horn, it simply pulls off the metal post it is attached to.
Step Seven: To add the radio switch assembly, you install in reverse. Feed the wiring through the metal clips on the back of the airbag. Line up the shrouds so that the holes for the phillips screws line up correctly and screw them together. Don’t forget to reconnect the green wire for the horn!
Step Eight: Once you’ve retightened the screws holding the shrouds to the airbag, reconnect the harness(s) to the clock-spring. Orange to orange, yellow to yellow, and finally the grey connector back into its plug. Don’t forget to depress the black center portions of the airbag harness(s)!
Step Nine: Align the airbag with the steering wheel and depress it back into position until its mounting holes line back up with the holes behind the little circles. Once in alignment, retighten the 10mm bolts (I do not have the factory torque spec for these bolts, and if someone can find it, I will be happy to add it). Just tighten it really really really tight! Then pop the little plastic hole covers back on.
Step Ten: Reconnect the battery. Remember sometimes if you’ve had the battery disconnected for an extended period of time the alarm will go off. As a precaution to sudden heart attack or deafness you may want to pull the horn fuse prior to reconnecting the battery. At least this way only the headlights will flash, haha.

Re: how to add radio steering wheel control (boystar22)
Good write-up man! Custom Title Get!
-
boystar22
- Posts: 452
- Joined: Sat Aug 23, 2008 6:48 pm
- Car: 2008 Nissan Altima Coupe 2.5S
- Location: Atlanta, GA
- Contact:
Re: how to add radio steering wheel control (l33th41)
A Custom title would be cool, but I have no idea what it'd be; or whom to ask. =pl33th41 wrote:Good write-up man! Custom Title Get!
Re: how to add radio steering wheel control (l33th41)
loll33th41 wrote:Good write-up man! Custom Title Get!
-
280degreeZ
- Posts: 1
- Joined: Tue Mar 22, 2011 2:38 pm
- Car: 1982 Datsun/Nissan 280ZX
2011 Nissan Altima 2.5 S Special Edition
Re: how to add radio steering wheel control
boystar22 wrote:
**IMPORTANT** Do not turn on the car with the passenger airbag light disconnected, it will trip the ecm and make it think that there is a fault in the airbag circuit!
Hello all. New to the site. Just swapped out the factory radio in the Altima and I wish I would have read this write up before I did. I disconnected the negative and went through the installation. After getting the radio connected we tested before mounting. So I turned car on to see if it was working ok. After it tested ok we connected everything again and started car up. Now the Service Engine Soon light is on, the passenger side airbag off light is on even when there is a passenger, and there is a flashing light on the dash panel that keeps flashing. Also now the window wont roll up automatically anymore when I pull button all the way up. It will roll down when I push all the way down but wont roll up. Was wondering can I get a refresh somehow? If it is the ecm know there should be a way to refresh or reboot it. Trying to avoid going to Nissan because Im afraid of what they might say. Any help would be appreciated. Thanks in advance.
-
GreatDane92
- Posts: 167
- Joined: Sat Jun 26, 2010 5:41 am
- Car: 09 Altima Coupe - 2.5 6Spd CVT - Super Black
Re: how to add radio steering wheel control
i cant help you with the airbag, your prolly screwed there and need a reflash or a bullydog... as for the window, that happens everytime you disconnect the battery if you have auto windows. just roll them all the way up and hold the button down for 5 seconds after they have hit the top and it will be reset and good to go.. the windows that is..
-
bundy26
- Posts: 1044
- Joined: Sat Sep 01, 2007 10:52 am
- Car: 2011 Buick Regal turbo
- Location: Dover NJ
Re: how to add radio steering wheel control
AIRBAG LIGHT RESET/DIAGNOSTIC PROCEDURE
From User Mode to Diagnosis Mode:
Diagnosis mode activates only when a malfunction is detected, by turning the ingition switch as follows:
1. Turn ignition switch "ON".
2. After "AIR BAG" warning lamp lights for 7 seconds, turn ignition switch "OFF" within 1 second.
3. Wait more than 3 seconds.
4. Repeat steps 1 to 3 three times.
5. Turn ignition switch "ON".
SRS will enter Diagnosis mode, if no malfunction is detected.
From Diagnosis Mode to User Mode:
After a malfunction is repaired, turn ignition switch "OFF" for at least one second, then back "ON". Diagnosis mode is returned to User Mode.
If Switching Diagnosis mode to User mode is required while malfunction is being detected, turn ignition switch as follows:
1. Turn ignition switch "ON".
2. After "AIR BAG" warning lamp lights for 7 seconds, turn ignition switch "OFF" within one second.
3. Wait more than 3 seconds.
4. Repeat steps 1 to 3 three times.
5. Turn ignition switch "ON".
**HOW TO ERASE SELF-DIAGNOSIS RESULTS**
Without Consult-II:
After a malfunction is repaired, switch the ignition "OFF" for at least one second, and then back "ON". Diagnosis mode returns to the User mode. At that time, the self-diagnostic result is cleared.
SpecVcepS
01-28-2004, 09:46 PM
CHECK ENGINE LIGHT RESET/DIAGNOSTIC PROCEDURE
In car ECM Diagnostics/ECM Reset procedure:
1) Sit in the driver's seat.
2) Turn the ignition key to the ON position and wait three seconds. (Do not start the car.)
3) Fully depress and release the accelerator pedal five times in less than five seconds.
4) Wait exactly seven seconds. Fully depress the accelerator pedal for ten seconds until the MIL light flashes.
5) Release the accelerator pedal and start counting flashes to obtain the four-digit trouble code.
Long flashes (0.6 seconds) indicate the first digit of the code; count the blinks one through nine and write down the first digit. (Ten blinks indicates a zero.)
The next three digits follow in turn in the same fashion except with faster blinks (0.3 second) and a 1.0-second pause between digits.
The ECM code repeats itself until you turn the ignition key to the OFF position, at which point the ECM resets itself to standard get-in-and-drive-the-car mode.
You can look up the trouble codes in the ESM/FSM; there's a bunch of them. In the ESM, refer to page EC-639.
Additionally, if you get four blinks of ten (0000), the ECM is indicating no malfunction.
I hope this helps.
-
KillahKev
- Posts: 47
- Joined: Tue May 15, 2012 8:53 am
- Car: 2010 Altima Coupe 2.5s
- Location: Brooklyn Ny
Re: how to add radio steering wheel control
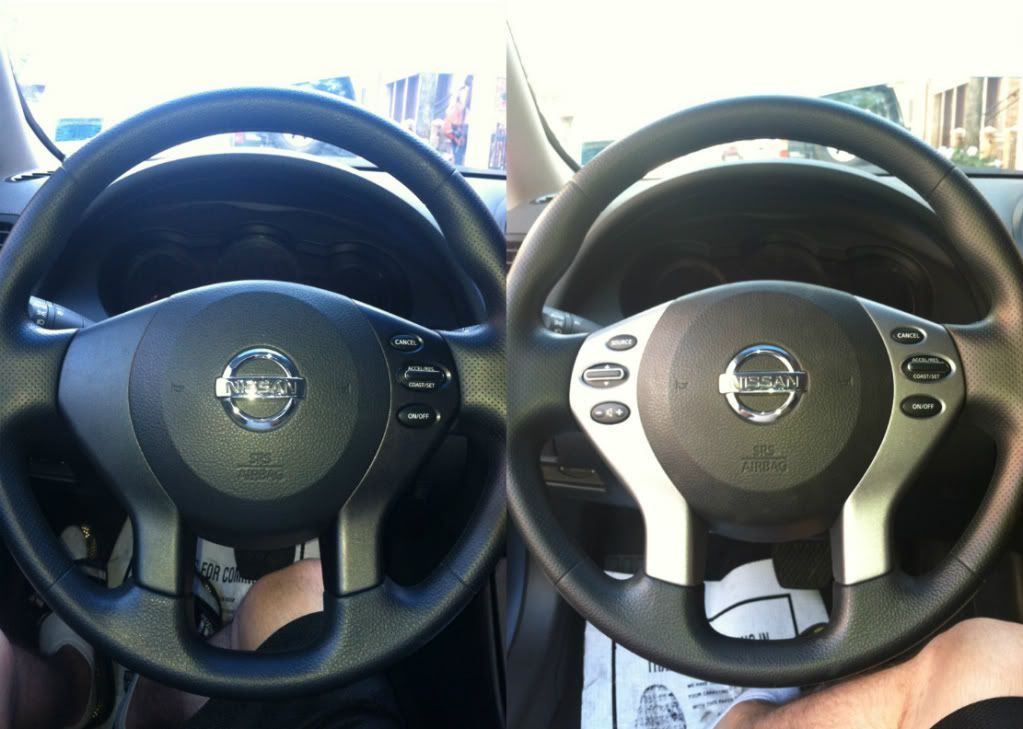
just installed mines hardest part was the air bag plugs/clips because I didnt wanna break them lol
before & After pics.
before & After pics.
Re: how to add radio steering wheel control
KillahKev wrote:just installed mines hardest part was the air bag plugs/clips because I didnt wanna break them lol
before & After pics.
Where did you buy the Controls? I have been looking all over the internet and unable to locate part# 25550-L32002. Did you have to call a parts store and did they ask you for a VIN?
Thanks in Advanced!
TucanoRC
-
KillahKev
- Posts: 47
- Joined: Tue May 15, 2012 8:53 am
- Car: 2010 Altima Coupe 2.5s
- Location: Brooklyn Ny
Re: how to add radio steering wheel control
Here after about 30mins of searching I was gonna give up butI found it. no vin needed nd it fits sedan and coupes just make sure ur pre wired or you have some wireing to do.
http://www.courtesyparts.com/25550m-swi ... 51530.html
http://www.courtesyparts.com/25550m-swi ... 51530.html
-
el_blacky06
- Posts: 942
- Joined: Fri Oct 02, 2009 9:40 pm
- Car: 2007 Nissan Altima Sedan 2.5s 6MT
- Location: Fontana, CA
- Contact:
Re: how to add radio steering wheel control
Just a quick bump on this, heads up on the controls. If you're not pre-wired, the controls will work but won't function properly. Got mine installed with Bluetooth connectivity and the volume controls change the radio stations, Bluetooth changes the source (cd / radio etc). Not a big deal since I'll be switching to a new head unit soon but its good to know for those who do get the steering wheel controls with bluetooth
 Re: how to add radio steering wheel control
Hi, I'm thinking to replace the original Steering Wheel with the Audio and bluetooth Controls,
I have a Pioneer AVIC Z-110BT. what do you guys think, will be to hard to setup?
I have a Pioneer AVIC Z-110BT. what do you guys think, will be to hard to setup?
-
Robs 08 Altima
- Posts: 28
- Joined: Sat Apr 11, 2015 5:55 am
- Car: 2008 Nissan Altima 2.5S Sedan
- Location: Raleigh, North Carolina
Re: how to add radio steering wheel control
Does anyone know how to run the wires so that you can install the controls if you are not wired?
-
RichardinKY
- Posts: 15
- Joined: Mon Nov 26, 2018 2:38 pm
- Car: 2010 Nissan Altima S 2.5
Re: how to add radio steering wheel control
I have a 2010 Altima 2.5S and I am changing the Head Unit (HU) from the OE Single DINN to a new DOUBLE DINN Jensen VX7528 HU with Navigation/Bluetooth/AM/FM/CD.
I picked up a pair of steering wheel (SW) control modules from ebay. (my Altima only had the Cruise module). The SW module pair I have from ebay has the cruise on the right and on the left the module has the radio/audio/hands-free phone control buttons.
Your opening remark which I pasted here, begs to be further explained in order for me to understand why you say that it will essentially NOT WORK CORRECTLY? And you state "the buttons will be mislabled".
Noting that I said my Head Unit (HU) does have navigation feature and also bluetooth capability, what issues would I have installing this left hand control module and getting it to function like it should function?
I know this is an older thread, but I really like ALL the great information and listed steps that you provided, and have copied and pasted all the directions over to a word doc for later use when I get ready to do the install in a few days or weeks from now.
One final question, most videos I watched on removing the steering wheel AIR BAG say to disconnect the negative terminal on the battery. WHY NOT BOTH NEGATIVE AND POSITIVE? Also... some recommended waiting 30 minutes after disconnecting the battery before unbolting the center section with the Air Bag and controllers. ?? Lastly, in one of the videos the guy wore a grounding strap as he was afraid of a static charge setting off the Air Bag. Any thoughts??
Thanks again for a great thread--- Please help me on these questions I posted tonight!
-
boystar22
- Posts: 452
- Joined: Sat Aug 23, 2008 6:48 pm
- Car: 2008 Nissan Altima Coupe 2.5S
- Location: Atlanta, GA
- Contact:
Re: how to add radio steering wheel control
I initially purchased a set of controls that were meant for OEM Nav equipped vehicles that had the extra buttons for those features. Since my car wasn't NAV/Bluetooth equipped the buttons didn't do their intended functions. Example: Volume down would change presets, volume up would mute the speakers, etc. When i replaced that set with the basic radio controls they worked correctly. I don't know how either set reacts to an aftermarket headhunt.RichardinKY wrote: ↑Tue Dec 11, 2018 10:39 pmOK you said in the first part of this thread QUOTE: "Be careful though because if you get the navi/bluetooth controls with the extra buttons instead of just the radio buttons you'll have issues. Everything will work correctly but the buttons will be mislabeled. I got the wrong one and haven't bothered to order the correct one to fix it yet."
I have a 2010 Altima 2.5S and I am changing the Head Unit (HU) from the OE Single DINN to a new DOUBLE DINN Jensen VX7528 HU with Navigation/Bluetooth/AM/FM/CD.
I picked up a pair of steering wheel (SW) control modules from ebay. (my Altima only had the Cruise module). The SW module pair I have from ebay has the cruise on the right and on the left the module has the radio/audio/hands-free phone control buttons.
Your opening remark which I pasted here, begs to be further explained in order for me to understand why you say that it will essentially NOT WORK CORRECTLY? And you state "the buttons will be mislabled".
Noting that I said my Head Unit (HU) does have navigation feature and also bluetooth capability, what issues would I have installing this left hand control module and getting it to function like it should function?
I know this is an older thread, but I really like ALL the great information and listed steps that you provided, and have copied and pasted all the directions over to a word doc for later use when I get ready to do the install in a few days or weeks from now.
One final question, most videos I watched on removing the steering wheel AIR BAG say to disconnect the negative terminal on the battery. WHY NOT BOTH NEGATIVE AND POSITIVE? Also... some recommended waiting 30 minutes after disconnecting the battery before unbolting the center section with the Air Bag and controllers. ?? Lastly, in one of the videos the guy wore a grounding strap as he was afraid of a static charge setting off the Air Bag. Any thoughts??
Thanks again for a great thread--- Please help me on these questions I posted tonight!
As for the battery; disconnecting the negative breaks the circuit which is all you need to do. Leaving the positive attached or taking it off won't make a difference since the circuit is incomplete. It's best to wait 10 minutes after disconnecting just to give any capacitors in the system time to discharge. I've never worn a ground strap and I've removed several airbags over the years with no issue.
-
RichardinKY
- Posts: 15
- Joined: Mon Nov 26, 2018 2:38 pm
- Car: 2010 Nissan Altima S 2.5
Re: how to add radio steering wheel control
Thanks Kevin!
Glad I found you and was able to get my questions answered. I am working with the techs at Crutchfield -- where I bought the Double DINN Head Unit (Jensen vx7528), I am believing the techs can get me squared away so I can be able to use all the buttons on the left hand SW module. So I think I will just have to wait and see if they can make it happen?
As for the battery terminal disconnect, thanks for the info. I will be sure and pull the horn fuse as I am sure I will be a long while getting all the installs done -- as I want to try and do the SW control swap out and the Head Unit install at the same time. (not sure how the horn would still be able to blow if the battery is disconnected? But I will take your word on it).
Thanks again, Merry Christmas -- Richard
Re: how to add radio steering wheel control
Hi all, thanks for the useful information.
So, I hear conflicting reports that controls still work on sedans that are NOT prewired? Anyone confirm this? I'm getting aftermarket Kenwood Double Din so I won't be using stock radio anymore.
So, I hear conflicting reports that controls still work on sedans that are NOT prewired? Anyone confirm this? I'm getting aftermarket Kenwood Double Din so I won't be using stock radio anymore.