Here's some pictures from recent updates that I haven't been able to load yet.
Here's my new Rear Toe Control arms after getting Koted and set next to the old factory units:
Here they are on the car. Notice how dirty the rest of my suspension has become...
Here's the cause of my latest electrical troubleshooting fiasco...
The top two holes bolt to the plenum of the intake manifold and the bottom hole goes to the block. The top two bolts managed to back themselves out and dissappear. The bottom one also came loose. The top of the bracket fell down and hit the feed terminal (which is exposed) on the starter which shorted out the whole car.
Fun.
I've never posted pictures of my harnesses.
I installed these last summer after driving around with those worthless ebay harnesses for a while. I got these from Zach for a good deal and they're amazing.
Finally, this is the under-body plate that I installed a month or so ago.
I picked this up from Nemo last year. It definitely makes jacking the front of the car up a little interesting.
This SHOULD be my last update for a while. Next on the list are either body work and paint or the 6-point roll bar install. I don't know when those will come. If any small things come up, I'll be sure to share.
KA-T is always in development, but I'll be lucky if I can get to that before winter.

evolution of the vert

-
DeXteR
- Posts: 2702
- Joined: Sun Sep 25, 2005 9:01 pm
- Car: 14 Titan Pro4X
05 Xterra OR
92 300ZX Slicktop
94 Sentra RS Rally Car - Location: Beulah, MI
- Contact:
Re: (the vert)
Thanks for reading. It's been a lot of fun, but it's far from finished.
Paint is needing to get worked out still. The vert is dailied in the summer, so I need to put another DD on the road because this isn't going to be a weekend project. I'll be working on my back-up DD this week hopefully. Then it's just a matter of finding a time that works well for Zach (the guy who's painting the vert). He hasn't gone anywhere - he's a good friend and fellow TCE member.
As far as boost... I should be re-employed come August, so hopefully this winter will begin the KA-T project.
-
nissan_star

- Posts: 531
- Joined: Mon Dec 10, 2007 5:18 pm
- Car: 2000 maxima se and 1993 240sx vert (5sp!!!)
Re: (DeXteR)
good luck man, I am pullin for ya!
-
DeXteR
- Posts: 2702
- Joined: Sun Sep 25, 2005 9:01 pm
- Car: 14 Titan Pro4X
05 Xterra OR
92 300ZX Slicktop
94 Sentra RS Rally Car - Location: Beulah, MI
- Contact:
Re: evolution of the vert
WOW!
Been a long time since I've been to Nico and a even longer since I've updated... Between my new job, house projects, and my other car projects (Mitsubishis, sorry), I just haven't found the time to get on here like I used to.
I'm back to being employed and liking my new job. I'm finally starting to get my bills paid down and my house projects under control. I'm finally getting back on my feet and starting to have some disposable car-project money to spend.
Not a whole lot has changed with the vert. Haven't really had the time to mess with it. In fact, we didn't even drive it that much this summer. Replaced the tie-rod ends and bought some bigger wheels. I'm moving my 17x9's up front and got a pair of 18x9.5's for the rear - all Sportmax 962's +35. I Still need to pick up some 10mm spacers for the front to clear my coilovers and Z-brakes and some 5mm spacers to keep things even in the rear. I did roll my fenders a couple weeks back - funny story.
So my buddy Steve comes up to have his friend buy one of my spare KA heads. We hung out for a bit and before he gets ready to leave he says, "Hey, Dexter, You want to roll your fenders? I have a Stance roller in the trunk of my Subie."
Uh... yeah!
So 20 minutes later, the 18x9.5's sit pretty flush.
The biggest thing lately has been some paint prep. There was a day a while back that I was working on one of my Colts and the wife comes out and says, "Where's the orbital sander?" To which my reply was, "over on the shelf... why?"
"I want to start on the vert."
"You're sure about this? It's not a weekend project you know."
And with that she started sanding the SIlvia hood - down to bare metal. So it began. Turns out, her dad used to do a lot of body work and prep work way back in the day, so he agreed to help her with the prep. It's been over a month now and the hood is stripped and the trunk has been stripped, filled, primed, sanded, primed, and sanded. They'll probably do another coat of primer and one more sanding before that's ready.
Unfortunately, I don't think this paint project is going to be ready for paint until early next summer.
Oh well.
In regards to the engine: I've pretty much abandoned the idea of turboing the KA. I do have most of the parts for a weekend boost kit with SR parts and other stuff I have laying around. I still have all the internals, ARPs, and stuff for doing a full blown KA-T, but have decided that something other than the vert is going to inherit all that stuff.
I've decided I'm just going to go NA VH for the Silvia vert.
I bought Zach out of his VH that's been sitting in the lab for a few years now. I've always liked the 4.5L V8 and dreamed of stuffing one in the vert. I've put a lot of thought into making the VH>KAT decision. We use the vert for summer driving only, long road trips, weekend get-aways, and general cruising around town. A 400-500HP KA-T just doesn't make sense. It's never going to be a full-blown race car. For what we want this car to be, the VH just seems to be the most logical choice.
I do have another project of mine in the lab that is going to be taking precedence over the vert for a while, though. Piecing together the parts I need for the VH swap is going to be slow going for a while until I get my other project car streetable. Then I'll be diving straight into a VH swap for the Silvia Vert.
When some paint actually makes its way to the car, I'll be sure to post up some pictures.
-
biggie

- Moderator
- Posts: 10332
- Joined: Wed Jul 24, 2002 2:31 am
- Car: '16 Q70L/'14 Q60S Vert/'19 Armada/'09 FX35
- Location: Clemmons, NC
Re: evolution of the vert
Well if you are messing with DSMs then we understand its a second full time job to keep them running. 
-
DeXteR
- Posts: 2702
- Joined: Sun Sep 25, 2005 9:01 pm
- Car: 14 Titan Pro4X
05 Xterra OR
92 300ZX Slicktop
94 Sentra RS Rally Car - Location: Beulah, MI
- Contact:
Re: evolution of the vert
I haven't driven a DSM in a while... but I have ONE Colt that I use for basic transportation. It has a few "factory upgrades" that I've put on. Originally, it was a 4-speed and it's now 5-speed. The captive rotor brakes with hubs and knuckles got changed out for some larger traditional brakes. I just need to find some 14"
I have a second Colt that is my primary project at the moment. Without getting into it too much, I call it Project POR (Press On Regardless). POR is a traditional rally slogan which is appropriate for how I feel about building this Colt into an entry level Group 2 FWD rally car. Basically going to be a normally aspirated, elevated compression 2.4 DOHC. Most DSM people are going to bust my chops forever for actually spending money and building an NA 4G63-variant engine, but I've always had a thing for building a stout NA 2.4 - screw 'em.
I also recently picked up an 87 Mitsubishi Starion. For it's age and history, it's pretty clean. This is a back burner project that I'd like to get to some day after POR and the vert are more completed. I'll pick up parts if I find good deals on things I need, but I'm not putting a lot of time/money/effort into that project any time soon.
Hi, my name is Dexter.
I'm addicted to car projects.
Oh, I should also mention that I got a new car for the wife to drive. Our old Pathfinder is just a giant rusty death trap now. It still fires right up after sitting all summer and the engine runs great, but it's just not something I feel comfortable letting my wife drive around. So we made the decision to spend some big money (to us anyway), take on a car payment, and have a vehicle that's actually nice for the first time in out lives. We ended up getting a 2005 Xterra Off Road. We've had it for about a month and we're really happy with it. VQ40DE + 6speed + 4WD = WIN!
-
krash
- Posts: 5064
- Joined: Mon Apr 11, 2005 10:43 am
- Car: 1993 Nissan 240sx Convertible
- Location: Memphis, TN
- Contact:
Re: evolution of the vert
mmmmmmmmm Starriioonnnnnn
-
Touge_Drifter

- Posts: 711
- Joined: Tue May 24, 2005 2:18 pm
- Car: 1995 S14.5
1995 Nissan 240sx SE
2004 350Z
2011 cube - Location: The Dirty glove of the US
- Contact:
Re: evolution of the vert
This thread sucks.
Seriously... When is this thing going to be done?
Seriously... When is this thing going to be done?
-
IanS

- Posts: 10090
- Joined: Thu Dec 23, 2004 3:07 pm
- Car: 2002 Subaru WRX, 2010 Subaru Forester XT, 2004 Infiniti G35 Coupe.
- Location: Esko, MN
- Contact:
Re: evolution of the vert
This is so much win.DeXteR wrote:
I have a second Colt that is my primary project at the moment. Without getting into it too much, I call it Project POR (Press On Regardless). POR is a traditional rally slogan which is appropriate for how I feel about building this Colt into an entry level Group 2 FWD rally car. Basically going to be a normally aspirated, elevated compression 2.4 DOHC. Most DSM people are going to bust my chops forever for actually spending money and building an NA 4G63-variant engine, but I've always had a thing for building a stout NA 2.4 - screw 'em.
I've always thought those Colt's would make good G2 cars. Are you planning to run under Rally-America? Im assuming you will mainly be doing regional events. Hopefully we will get a chance to compete against each other. You should start a build thread in the others forum, or are you on SpecialStage?
-
DeXteR
- Posts: 2702
- Joined: Sun Sep 25, 2005 9:01 pm
- Car: 14 Titan Pro4X
05 Xterra OR
92 300ZX Slicktop
94 Sentra RS Rally Car - Location: Beulah, MI
- Contact:
Re: evolution of the vert
LOL!Touge_Drifter wrote:This thread sucks.
Seriously... When is this thing going to be done?
I hate you too.
Thanks. Hope to run in RA regionally some day. I haven't gotten very far on the project, but should be deep into it this year. I am on special stage, but even less than I am on here these days.FlatBlackIan wrote: This is so much win.
I've always thought those Colt's would make good G2 cars. Are you planning to run under Rally-America? Im assuming you will mainly be doing regional events. Hopefully we will get a chance to compete against each other. You should start a build thread in the others forum, or are you on SpecialStage?
The colt is taking a turn towards boost this summer, just to get the thing on the road and driving it. This will give me some high performance seat time while I build the 2.4!
So as far as the convertible goes, which is what most of you care about here, I have gathered some more parts to get that dialed in a little better. I picked up a full Energy Suspension bushing kit. I need to drop the rear, burn out all the old rubber, paint everything, put the poly bushings in and put it all back together. I need to get some spacers and rubber still and then I'll be all right for a little while. I'll update this thread when I get into that. Hopefully now that it's starting to warm up, I'll get on that soon.
I need two wheels driven again too. I don't want to mess around with shimming the whomped out LSD I have right now. If anyone around here has a J30 that I could harvest the diff and axles from, that'd be great.
Oh yeah, buy my parts too. All proceeds from the KA-T abortion go right back into the convertible and not to the Mitsubishi projects I have laying around.
everything-you-need-to-build-300-hp-ka-t524475.html
-
DeXteR
- Posts: 2702
- Joined: Sun Sep 25, 2005 9:01 pm
- Car: 14 Titan Pro4X
05 Xterra OR
92 300ZX Slicktop
94 Sentra RS Rally Car - Location: Beulah, MI
- Contact:
So, it's time for an update.... with pictures!
Here's a couple shots of when Michelle was sanding parts last summer.
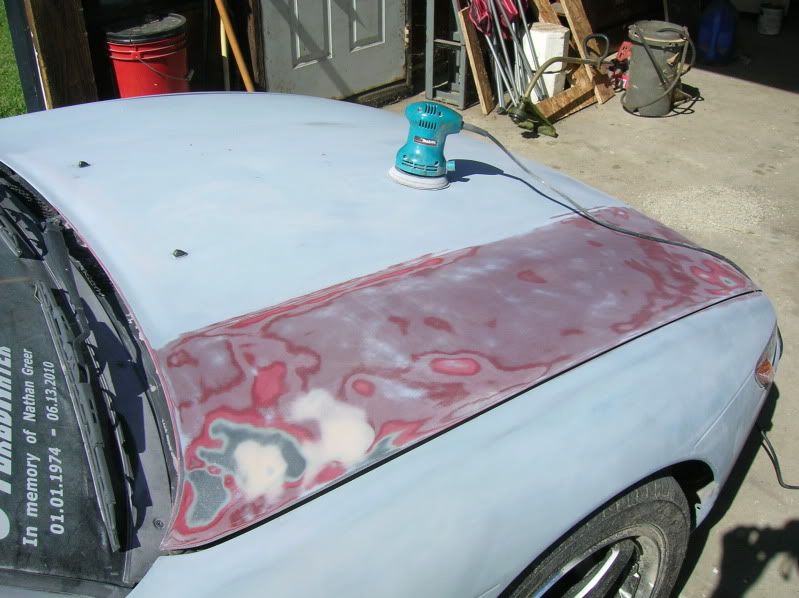

She actually got the hood and trunk all sanded down and a couple coats of primer on the trunk. Still has a long way to go.
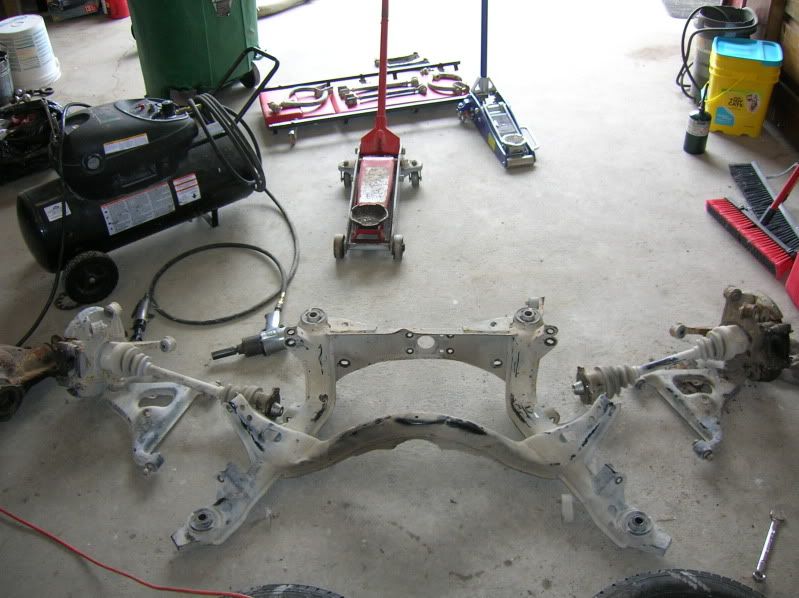
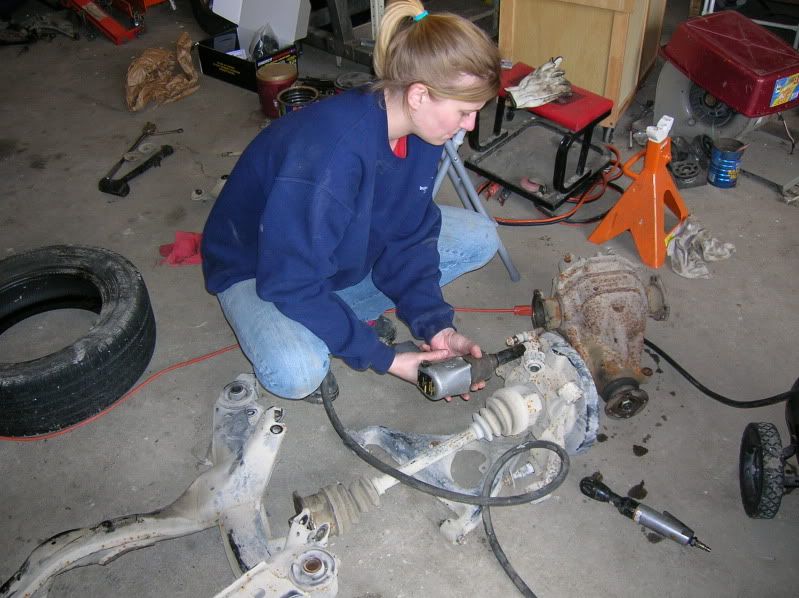
This weekend, we dropped the subframe and got started on that project. It went pretty smoothly. We started by removing the cat-back exhaust, the wheels and calipers, and disconnected the driveshaft at the diff. I thought it would be a good idea to remove the differential before trying to drop the subframe, so we dropped that out also. There were a couple small brackets that we needed to pull off the front of the subframe, and then it was as simple as removing four nuts and down it came. Now, remember, we live on a dirt road.
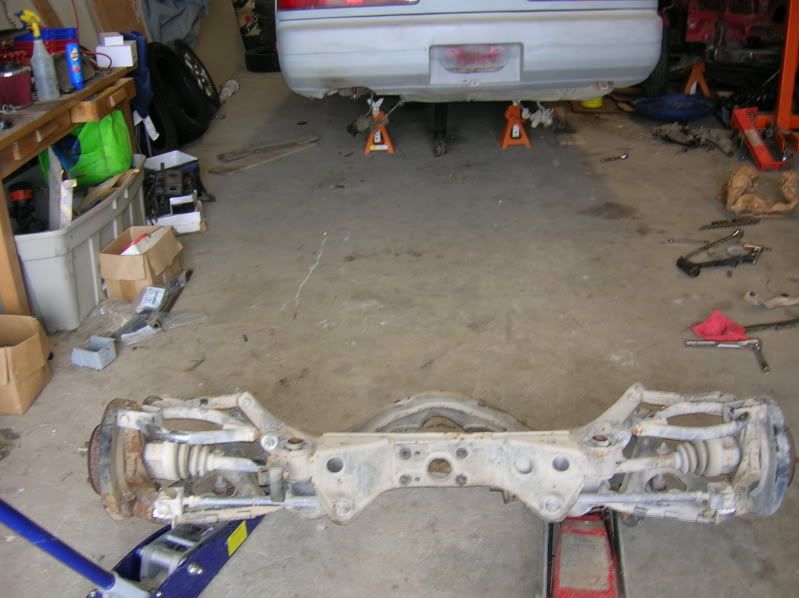
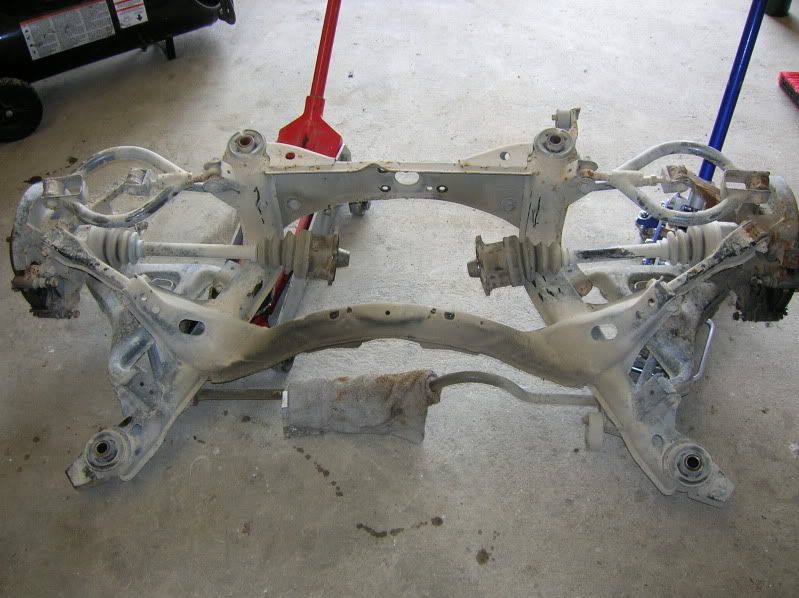
Then we started disassembling it. The sway bar was removed along with all of the control arms. Also pulled off the caliper brackets.
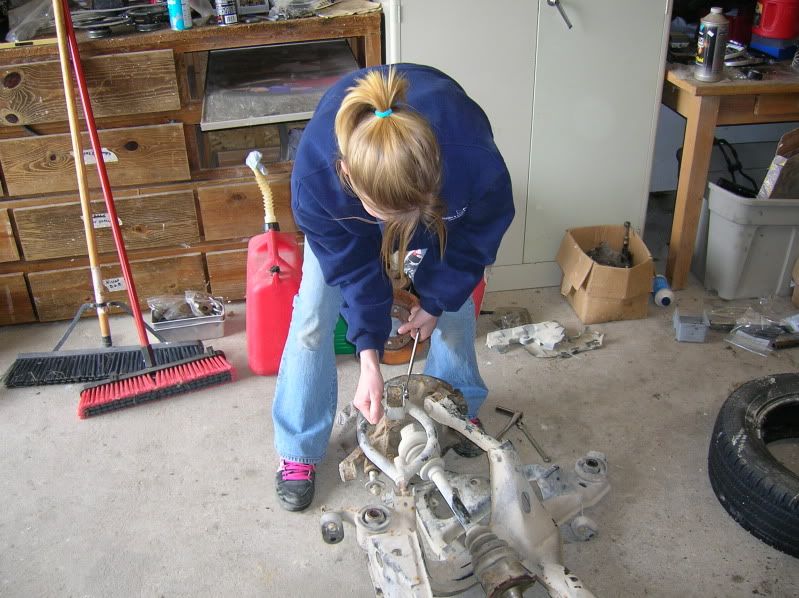
We separated the uprights from the lower control arms (which means we need new LCA ball joints). We pounded all the wheel studs out and tried to remove the hubs, but they don't want to come out. Lastly, tried burning out the old rubber bushings, but didn't get very far with my little propane torch. I'm going to need to figure out a better way to get those removed.
As Michelle was taking the wheels off, she commented on how small the rear brakes were. Then she asked, "How much is it going to cost to do the Z brakes in the rear? We should just do those now while it's apart."
Sounds good to me. So when we took a break for lunch, we got online to price out the Z brakes again. To our surprise, Advance was running an online special - spend $100 get 15% off + a $50 rebate on your next purchase. Perfect. We ordered the rotors and pads right away and then when we get our rebate, we'll order the calipers. I also ordered the conversion lines from SPL. So when all is said and done, we'll have spent $225 to get all the parts for the rear brake upgrade.
We'll probably have this all back together and painted and nice looking just before the county grates our road and sprays it with calcium chloride. So it won't take long and it will look just like it does in these pictures.
Here's a couple shots of when Michelle was sanding parts last summer.
She actually got the hood and trunk all sanded down and a couple coats of primer on the trunk. Still has a long way to go.
This weekend, we dropped the subframe and got started on that project. It went pretty smoothly. We started by removing the cat-back exhaust, the wheels and calipers, and disconnected the driveshaft at the diff. I thought it would be a good idea to remove the differential before trying to drop the subframe, so we dropped that out also. There were a couple small brackets that we needed to pull off the front of the subframe, and then it was as simple as removing four nuts and down it came. Now, remember, we live on a dirt road.
Then we started disassembling it. The sway bar was removed along with all of the control arms. Also pulled off the caliper brackets.
We separated the uprights from the lower control arms (which means we need new LCA ball joints). We pounded all the wheel studs out and tried to remove the hubs, but they don't want to come out. Lastly, tried burning out the old rubber bushings, but didn't get very far with my little propane torch. I'm going to need to figure out a better way to get those removed.
As Michelle was taking the wheels off, she commented on how small the rear brakes were. Then she asked, "How much is it going to cost to do the Z brakes in the rear? We should just do those now while it's apart."
Sounds good to me. So when we took a break for lunch, we got online to price out the Z brakes again. To our surprise, Advance was running an online special - spend $100 get 15% off + a $50 rebate on your next purchase. Perfect. We ordered the rotors and pads right away and then when we get our rebate, we'll order the calipers. I also ordered the conversion lines from SPL. So when all is said and done, we'll have spent $225 to get all the parts for the rear brake upgrade.
We'll probably have this all back together and painted and nice looking just before the county grates our road and sprays it with calcium chloride. So it won't take long and it will look just like it does in these pictures.
-
-RJ-

- Posts: 2469
- Joined: Wed Aug 09, 2006 4:26 am
- Car: S13 Convertible, 99 Frontier, 03 Sportage, 96 Protege
- Location: Virginia Beach
Re: evolution of the vert
I have that same blue aluminum jack!
Re: evolution of the vert
Haha... you take pictures while your wife is working on the car. That's funny. Come on!!! It should be the other way around.
I went to a small gathering in my neighborhood and they said I have tiny rear calipers and need upgrade. I do have rear z calipers.
This was one of the cars over there. Has same front and rear calipers.
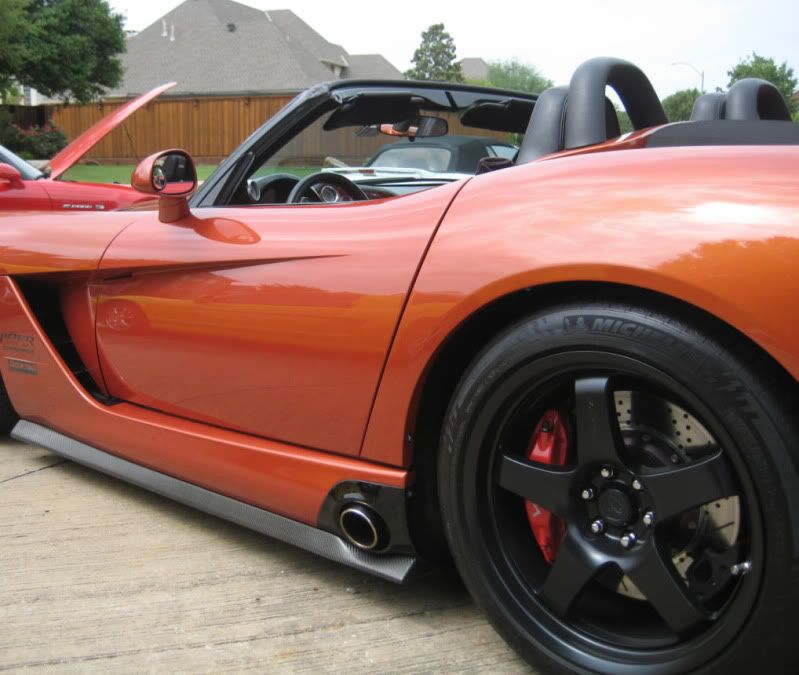
I went to a small gathering in my neighborhood and they said I have tiny rear calipers and need upgrade. I do have rear z calipers.
This was one of the cars over there. Has same front and rear calipers.
-
DeXteR
- Posts: 2702
- Joined: Sun Sep 25, 2005 9:01 pm
- Car: 14 Titan Pro4X
05 Xterra OR
92 300ZX Slicktop
94 Sentra RS Rally Car - Location: Beulah, MI
- Contact:
Re: evolution of the vert
It's no secret, this is her car. ESPECIALLY when she decided to start sanding. I tried to warn her that she was about to undertake a very large project. She went for it anyway. That was the end of last summer.
But I'm the one that normally takes pictures anyway. So it's either pictures of her working on stuff or just pictures of progress.
Anyways, I found a place that would mount 235's on my 9.5" wide 962's for a decent price. However, I first took them to my normal tire guy. His machine couldn't rear mount the tire because it's old and wouldn't fit. When he tried to mount the tire over the face, it popped off and scraped the lip of my brand new wheel. Good thing they're just (relatively) cheap wheels.
I also went to Harbor Freight and picked up a 12 ton shop press to help remove all these bushings. I figured it be quicker, easier, and cheaper than burning them out or taking them somewhere to have them pressed out. Besides, it's not like this is the first time I've ever needed a press.
Well, I'm starting to think that my money might have been better invested in a torch. I don't think this press will work to remove anything other than the lower control arm ball joints...
Any thoughts on strategy for pressing out the old bushings? Otherwise, I might just take the press back to HF and buy a decent torch.
I got one of the spindles removed from one of the hubs. It came out fairly easy once I got it started. I'm not having very much luck with the other side though. I PB Blasted it a LOT and pried and pounded to no avail. I soaked it down again last night and left it. I'll try it again later.
Lastly, the rotors and pads I ordered showed up. I almost forgot that I need to re-drill the rotors. I got a quote from a shop in town for $30. Seams reasonable, but I think I'll just take it to my father-in-laws wood shop and try it myself on his drill press. It's not rocket science.
Last edited by DeXteR on Sun Sep 04, 2011 5:39 am, edited 1 time in total.
-
breadbox

- Posts: 8550
- Joined: Tue Oct 17, 2006 4:09 pm
- Car: Red 89 240sx,Black 89 Koop, White 84 720 4x4KC
- Location: Va Bch
Re: evolution of the vert
nice.
Just line up one hole and use an old rotor for the guide. At least that's how my friend did his.
Just line up one hole and use an old rotor for the guide. At least that's how my friend did his.
-
IanS
- Posts: 10090
- Joined: Thu Dec 23, 2004 3:07 pm
- Car: 2002 Subaru WRX, 2010 Subaru Forester XT, 2004 Infiniti G35 Coupe.
- Location: Esko, MN
- Contact:
Re: evolution of the vert
For doing Bushings, look into renting/buying a "ball joint press"
Its essentially a ultra super heavy duty C clamp, with a Hex on the end so you can drive it with an impact. I have done 4 cars worth of full bushing kits with it, and it makes pretty quick work of them.
Its essentially a ultra super heavy duty C clamp, with a Hex on the end so you can drive it with an impact. I have done 4 cars worth of full bushing kits with it, and it makes pretty quick work of them.
-
DeXteR
- Posts: 2702
- Joined: Sun Sep 25, 2005 9:01 pm
- Car: 14 Titan Pro4X
05 Xterra OR
92 300ZX Slicktop
94 Sentra RS Rally Car - Location: Beulah, MI
- Contact:
Re: evolution of the vert
This was a great idea! Worked perfect. Definitely a tool I need to add to my collection. I rented one from a local parts store and still haven't taken it back. It's been a WHILE since I updated.FlatBlackIan wrote:For doing Bushings, look into renting/buying a "ball joint press"
My car club had a cruise about a month ago that I wanted to take the convertible on. However, I was working a lot leading up to the event and just did not have sufficient time to work on it. So I spent the week before sacrificing sleep thrashing on it after work and before work. I even took an extra day off the day before we were supposed to leave to give it a last minute effort. It was a lofty goal and we gave it our best.
I ended up taking the shop press back and renting the ball joint press like Ian suggested. Again, thanks for that idea. I got all the rear bushings removed by pushing the middle out, torching the rubber, then using my sawzal to cut the rings. Installing the poly bushings also required the use of the ball joint press and some creative use of bolts and washers to get them to go in straight. It really was a lot of work and with my lack of sleep, it was a challenge to not throw tools across the shop a few times.
While I was at it and wanted to replace the lower control arm ball joints. I had some added incentive that the boots were blown out anyway. Well, after calling around every parts store in the area including the dealership, I discovered that it's impossible to buy RLCA ball joints unless you get a whole new RLCA! Researching this and other forums lead me to the suggestion of using front lower control arm ball joins from an 89 Sentra work perfectly for RLCA ball joints on an S13. So I ordered a couple cheap ones from Rock Auto. They ended up sending me one that wasn't correct. They only have a 30 day return policy, so I'm going to have to buy another one.
As far as the brakes go, I did end up redrilling the rotors myself at my father-in-law's wood shop. Worked out pretty well with just one small incident. While we were drilling the final hole on the second rotor, just as we broke threw, the bit caught the rotor and just spun it around. We got the press shut off right away and avoided pers0nal injury and minimal damage to equipment. The bit was still straight and we only hit the neck of the press a few times with the rotor - it'll buff out.
So the subframe was reassembled and hoisted back into the car. Buttoned everything up using the factory service manuals I got from a friend who works at the local dealer. They were throwing them all away - I got 92 240sx with vert supplement! Anyways, as I was putting my coilovers back in, I noticed that the bottom of the driver side was cracked! I have to get a hold of the guys at Endura Tech and find out what the deal is with maybe exchanging it or getting another one. The bottom mount is cracked at the very bottom where it attaches to the suspension. Very weird.
I did end up getting the other spindle pulled apart from the upright. PB is amazing. Knocked out all the old shorty wheel studs and installed the 60mm versions I got from Otaku Garage.
So once that was all put back together, I put on the Z brakes and then the hubcentric spacers and new wheels. Everything was going great. Then I went to the front and did the same. Unfortunately, I learned the hard way that 10mm weren't enough for the front. I'm running the 17x9 sportmax 962 with the +38 offset. So +48 (EDIT - sorry forgot my offset math +28) doesn't clear either. So I slipped the 5mm spacers over that and they cleared fine, but that's just not how I'm going to leave it. On top of that, I think I got the wrong lug nuts. They go too far into the holes on the wheels for my comfort - I'm afraid they aren't large enough diameter to provide sufficient surface area on the nut to the wheel.
I did end up doing an oil change and adjusting the wiring for my electric fans so they work again - I'm fairly confident I need to run a bigger wire for those fans as they keep getting hot, melting the case and shorting out. Maybe needs a relay or something, I don't know.
After all was said and done, didn't end up getting the car complete enough to my satisfaction in order to take it on our car cruise. We ended up taking the Xterra instead. Let me tell you, the Tunnel of Trees is not nearly as fun in the X as it was in the Vert two years ago. This year would have been even better with the further suspension improvements. Maybe some other time.
So, here's what I still need to do - I still need to do the bushings in the front suspension and the front ball joints. I need to get a larger spacer for the front and I'll probably end up running the 10mm spacers in the rear - I don't want the front to be wider than the rear. That means I'll have to roll all the fenders again. I need to get another ball joint for the rear and probably some different lug nuts as well.
Now that I'm not working 26 days of the month on 12 hour shifts, I actually have some time (and some money thanks to all that overtime) to get this thing done. It sure would be nice to drive the Vert sometime this summer.
I'll update again later. Sorry for the lack of pictures with this update. We just didn't have the time or patience to take pictures while we were doing the thrashing. We'll probably have some pictures on the next one since we're not up against a deadline.
Last edited by DeXteR on Tue Jul 12, 2011 8:02 pm, edited 1 time in total.
Re: evolution of the vert
Good read. Glad to hear that you are still working on the vert.
Yes, wheel and tire fitment is such a pain. krash knows this too. I got 15mm spacers in the first place, so I got the right ones, but I got the wrong studs. Bought 50mm studs, but ended up buying 60mm studs again. So you have to make the offset +23 by adding 15mm spacers. Anyway, good luck with project and post some pics when you get a chance.DeXteR wrote:Unfortunately, I learned the hard way that 10mm weren't enough for the front. I'm running the 17x9 sportmax 962 with the +38 offset. So +48 doesn't clear either.
-
DeXteR
- Posts: 2702
- Joined: Sun Sep 25, 2005 9:01 pm
- Car: 14 Titan Pro4X
05 Xterra OR
92 300ZX Slicktop
94 Sentra RS Rally Car - Location: Beulah, MI
- Contact:
Re: evolution of the vert
First, I had to edit my offset. I got it backwards - I'm a bit dyslexic at times. I'd like to try to see if I can maybe get away with a 12mm spacer, but I'd have to figure out a way to shim my 10mm spacer an extra 2mm... I'm probably just better off getting a pair of 15mm spacers and being done with it. What's another few minutes pulling fenders, right?
Oh yeah, I don't have a fender roller. I'm probably just going to buy one on ebay.
Oh yeah, I don't have a fender roller. I'm probably just going to buy one on ebay.
Re: evolution of the vert
Don't shim it. Just get hub centric 15mm spacers. That's safer and good for long run. A little bit of pulling and negative camber should take care of it. Usually you can rent a fender roller from a local forums. Someone's gotta have it. It's one time use, so I didn't want to buy it.
-
DeXteR
- Posts: 2702
- Joined: Sun Sep 25, 2005 9:01 pm
- Car: 14 Titan Pro4X
05 Xterra OR
92 300ZX Slicktop
94 Sentra RS Rally Car - Location: Beulah, MI
- Contact:
Re: evolution of the vert
Oh No! I wouldn't shim it for use. Just to test fit. I have hub-centric spacers, just too thin. I'm probably just going to get the 15mm ones for the front, put the 10mm ones on the rear.
As far as a fender roller goes, it wouldn't be a one time use for me. I've got two other project cars that could use it and I know a few of the guys in my car club would use it and there's plenty of people around here that wouldn't mind renting it from me.
Anywho, got the front lower control arms and tension rods pulled. Hopefully tomorrow I can get the bushings and ball joints removed and replaced.
-
DeXteR
- Posts: 2702
- Joined: Sun Sep 25, 2005 9:01 pm
- Car: 14 Titan Pro4X
05 Xterra OR
92 300ZX Slicktop
94 Sentra RS Rally Car - Location: Beulah, MI
- Contact:
Re: evolution of the vert
Well it's been about a month and a half and I finally got to tinker with it some more the last few days. As usual, misadventures, insightful tips and some humor is about to be shared.
So let me start with my latest list of parts acquisitions since the previous update. I picked up an Eastwood fender roller, ordered another pair of Sentra ball joints to put in the rear from Advanced, three new front LCA's from Advanced (more on this later), a pair of 15mm hubcentric spacers from Ebay, and a 93 Q45 FSM (kind of not related ).
).
Two weeks ago, my wife and I went on vacation. It sucked because Irene ruined our plans - long story. Anyways, we got home Wednesday and I don't have to be back until this Tuesday. On the 17th of September I'm going to Street Life Tour in Xenia, Ohio, with my car club. Once I go back to work, I've only got two days I can work on the car before the event, so I wanted to use some of this time off to get some things ironed out.
I figured I'd start with the FLCA's. I originally ordered two entire control arms with ball joints because I couldn't find a decent price on ball joints. So I bought them online and got 20% off or something with an online promo Advanced was running. I ended up paying $130 for both the FLCA's and the rear ball joints.
I figured that since I had this whole polyurethane bushing kit I might as well get rid of those brand new, perfectly fine rubber bushings. I attempted to push out the bushing on the left control arm first. Again, using the ball joint press, I started pushing it out. I wasn't really paying attention to which way I was pressing and I probably should have. The next thing I know, the entire sleeve popped out of the control arm and jammed itself into the receiver on the press. Apparently the receiver was just a little too large. The flange of the sleeve was mangled too badly for me to want to try that again. So I put it back together, packaged it back up, and took it back to Advanced. I explained to the guy what happened and he wrote it up as defective and ordered me another one. Hopefully that comes in on Monday.
Lessons learned on this:
1. New rubber bushings don't come out as easily as old, whopped out bushings.
2. Pay better attention to which way you are pressing bushings out - especially if the sleeve is important.
3. Have a good report with the people at the parts store.
So I ended up doing the tension rods when I got back home. Since I didn't have the exact size needed to use the ball joint press on these, I decided to drill and torch them out. I couldn't drill them all the way out and I didn't end up firing up my propane torch at all. These bushings are a little bit different. There is a metal a support for the middle section of the bushing - kind of like a washer that the sleeve goes through. There are four small places on the edge you might be able to drill through if you got it just right. Fortunately for this process, my bushings were shot and I pretty much just pried them out after drilling around the edges on both sides. Then I cut the sleeve out and inserted the new polyurethane. They were actually one of the smoother pieces in this whole suspension ordeal.
I'll post more later - I'm falling asleep on the couch...
So let me start with my latest list of parts acquisitions since the previous update. I picked up an Eastwood fender roller, ordered another pair of Sentra ball joints to put in the rear from Advanced, three new front LCA's from Advanced (more on this later), a pair of 15mm hubcentric spacers from Ebay, and a 93 Q45 FSM (kind of not related
Two weeks ago, my wife and I went on vacation. It sucked because Irene ruined our plans - long story. Anyways, we got home Wednesday and I don't have to be back until this Tuesday. On the 17th of September I'm going to Street Life Tour in Xenia, Ohio, with my car club. Once I go back to work, I've only got two days I can work on the car before the event, so I wanted to use some of this time off to get some things ironed out.
I figured I'd start with the FLCA's. I originally ordered two entire control arms with ball joints because I couldn't find a decent price on ball joints. So I bought them online and got 20% off or something with an online promo Advanced was running. I ended up paying $130 for both the FLCA's and the rear ball joints.
I figured that since I had this whole polyurethane bushing kit I might as well get rid of those brand new, perfectly fine rubber bushings. I attempted to push out the bushing on the left control arm first. Again, using the ball joint press, I started pushing it out. I wasn't really paying attention to which way I was pressing and I probably should have. The next thing I know, the entire sleeve popped out of the control arm and jammed itself into the receiver on the press. Apparently the receiver was just a little too large. The flange of the sleeve was mangled too badly for me to want to try that again. So I put it back together, packaged it back up, and took it back to Advanced. I explained to the guy what happened and he wrote it up as defective and ordered me another one. Hopefully that comes in on Monday.
Lessons learned on this:
1. New rubber bushings don't come out as easily as old, whopped out bushings.
2. Pay better attention to which way you are pressing bushings out - especially if the sleeve is important.
3. Have a good report with the people at the parts store.
So I ended up doing the tension rods when I got back home. Since I didn't have the exact size needed to use the ball joint press on these, I decided to drill and torch them out. I couldn't drill them all the way out and I didn't end up firing up my propane torch at all. These bushings are a little bit different. There is a metal a support for the middle section of the bushing - kind of like a washer that the sleeve goes through. There are four small places on the edge you might be able to drill through if you got it just right. Fortunately for this process, my bushings were shot and I pretty much just pried them out after drilling around the edges on both sides. Then I cut the sleeve out and inserted the new polyurethane. They were actually one of the smoother pieces in this whole suspension ordeal.
I'll post more later - I'm falling asleep on the couch...
-
DeXteR
- Posts: 2702
- Joined: Sun Sep 25, 2005 9:01 pm
- Car: 14 Titan Pro4X
05 Xterra OR
92 300ZX Slicktop
94 Sentra RS Rally Car - Location: Beulah, MI
- Contact:
Re: evolution of the vert
I didn't end up working on the car at all on Friday because of gardening stuff by day and car club stuff by night. I spent all day Saturday in the lab though.
I figured I would start by rolling the rear fenders. For the record, the Eastwood fender roller will not clear Z brakes in the rear. Fortunately for me, I have all these extra spacers laying around. So I was able to put on 15mm worth of spacers to get it to clear the rear caliper. Then the sweat began to pour. I've got some pretty big flairs now. I also discovered some more shoddy body work around the left fender. I had to hammer out a couple spots to get rid of some kinks from where it looks like some welding might have been done. Overfenders will definitely be in this cars future...
Changed out the ball joints, put the spacers and wheels on, and buttoned everything back up. I was going to do some more fine tuning with the alignment, but decided that I didn't want to mess with it. I'm just going to take it in when everything is done and have them do it. Maybe a lifetime alignment special... So anytime I mess with stuff I can take it back in and have to re-aligned.
After that was completed, I went up front to remove my fenders. I was missing a few of the bolts near the door and figured I had better get those attached fully before trying to roll the front fenders. Otherwise I think I'd get some pretty crappy results or no results because there's too much give. I got as far as the passenger side fender removed, all nuts, bolts, studs, and holes tapped and chased and put the fender back on. Once I get it snugged up, I'll roll it out and see what happens.
That's all the further I've gotten so far. Hopefully tomorrow morning my other control arm will arrive and I can spend the day getting the front end sorted out. I'll try to get some pictures uploaded this week and have another update soon.
-
-RJ-
- Posts: 2469
- Joined: Wed Aug 09, 2006 4:26 am
- Car: S13 Convertible, 99 Frontier, 03 Sportage, 96 Protege
- Location: Virginia Beach
Re: evolution of the vert
I hope you have pics of those tension rods, I'm about to do mine tuesday
-
DeXteR
- Posts: 2702
- Joined: Sun Sep 25, 2005 9:01 pm
- Car: 14 Titan Pro4X
05 Xterra OR
92 300ZX Slicktop
94 Sentra RS Rally Car - Location: Beulah, MI
- Contact:
Re: evolution of the vert
Would you like something in particular? They're not bolted in yet.
Find Your Forum!